設定
[設定]メニューには、[ワークスペース]と[インタラクション]の2つのタブがあり、それぞれの項目を設定することができます。
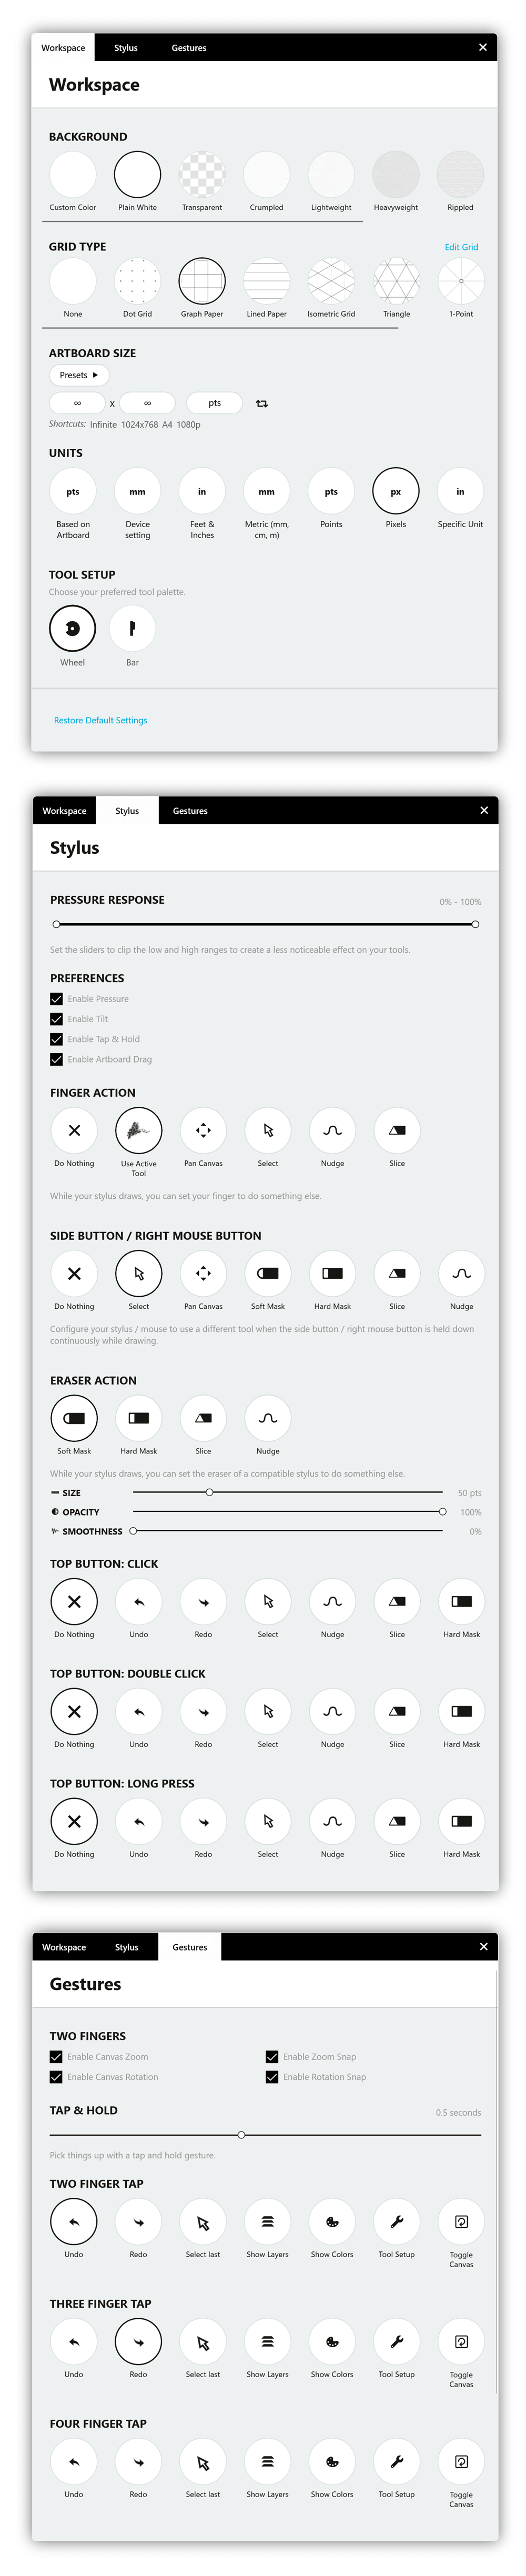
ワークスペース
「ワーススペース」のタブでは、キャンバスの作業環境を設定できます。
背景
このメニューの最初のオプションは、「背景」です。コンセプトでは9種類の背景を提供しており、繊細なテクスチャや透明感のある標準的な用紙タイプのほか、ブループリントやダークプリントなどから選べます。またカスタム色でバックグラウンドを作成するオプションも用意しています。
グリッドタイプ
メニューの2つ目の機能はグリッドタイプです。選択できる基本のグリッドタイプは、ドット、方眼紙、罫線用紙、当尺、三角方眼紙 の5種類に加え、遠近グリッドも利用できます。詳細はグリッドをご覧ください。
アートボードサイズ
次にアートボードサイズです。特定のサイズでデッサンを作成したい場合は、ここで範囲を設定できます。コンセプトが用意しているプリセットを使用することも、自分でカスタムサイズのアートボードを作成することも可能です。サイズを長押しすると、数値を直接入力できます。よく使われるサイズにはショートカットを用意していますが、「プリセット」をタップすると、さらに多くのサイズが選択できます。一般的な用紙サイズ、画面サイズ、さらには名刺サイズもあります。
プロのヒント:キャンバス上でアートボードの角を長押しすると位置を動かすことができます。デッサンをきれいにフレーミングしたり、画像を正確なサイズにトリミングしたり、実際のスケールに基づいてデッサンのおおよその大きさを確認したりするのに便利です。エクスポート時に、アートボードのサイズに合わせて画像を出力できます。
デッサンスケール
メニューの4つ目では「デッサンスケール」を設定できます。ショートカットから選択するか、数値欄を長押しして他のプリセットを選ぶか、カスタム値を入力できます。単位を変更する場合も、同様に長押ししてください。
単位
ワークスペース全体で使用する単位を選択できます。計測値は、メートル法・インペリアル法・デジタル の各単位系に基づいて設定でき、オートスケールまたは特定の単位を指定することが可能です。さらに、表示形式と精度セクションでは、計測値の表示形式や精度レベルを調整できます。
最後に、最初のチェックボックスをオンにすると、デッサンの右側にストロークの長さを表示できます(左利きのユーザーに特に便利です)。また、最後のチェックボックスをオンにすると、ステータスバーに「計測値」ではなく「スケール」を表示できます。
ツール設定
ツールホイールとツールバーのどちらかを選択できます。キャンバス上でのツールの配置方法を選択できます
インタラクション
インタラクションタブでは、ジェスチャーやスタイラスペンを使ってコンセプトを操作する際の設定を決めることができます。
キーボード&マウス
「キーボード&マウス」セクションでは、キーボードショートカットの有効化や無効化ができます。「ショートカットを編集」をタップすると、対応しているすべてのキーボードショートカットの一覧が表示され、お好みに合わせてカスタマイズできます。
キーボードショートカット
コンセプトには便利なショートカットが多数用意されています。「設定」の「インタラクション」セクションよりキーボードショートカットを見ることができます。
タッチ操作対応デバイスをお持ちでないユーザー向けに、パン、ズーム、回転モードへ簡単にアクセスできるキーボードショートカットがあります。パン・回転・ズームモードについて詳しくは、こちらをご覧ください。
「キーボードショートカットを編集」をタップすると、ショートカットの一覧が表示されます。ショートカットを変更するには入力欄をタップしてください。修飾キー(Ctrl、Alt、Shift)と英数字キーを組み合わせて独自のショートカットを作成できます。ショートカットを初期設定に戻したい場合は、そのショートカットの入力欄を有効化し、横にある矢印をタップしてください。すべてのキーボードショートカットを初期設定に戻す場合は、画面をスクロールして「ショートカットをリセット」をクリックします。
タッチ入力
タッチ入力セクションでは、アプリの操作方法を好みに応じて選択できます。まず、一本指また二本指で行う操作方法についてご覧ください。
2本指操作のデフォルト設定は、キャンバスの回転とズームです。常にキャンバスの角度とズームを固定しておきたい場合は、チェックボックスを外して回転とズームを無効にできます。たまに回転させたいけれど、そのたびにメニューを開くのは面倒だと感じる場合は、ステータスバー右上にある角度またはズームの数値を長押しして、キーボードから回転を入力できます。
長押し動作と反応速度は好みに合わせて調整できます。反応を速くしたいときはハンドルを左にドラッグして速度を短くし、速すぎると感じる場合は右にドラッグして速度を長くしてください。
2本指タップ、3本指タップ、4本指タップは、作業効率を高めるのにとても便利です。それぞれのジェスチャーには10種類の動作を割り当てられます:元に戻す、やり直す、最後のアイテムを選択、レイヤーを表示、カラーホイールを表示、ツール設定、キャンバス回転を切り替え、キャンバスズームを切り替え、すべて選択、何もしない。これらのオプションを試して、自分にとって最も便利な設定を見つけてください。
スタイラスペン
対応スタイラスペンを使用している場合、筆圧感度の有効化また調整、そして傾きも有効化できます。また、スタイラスペンとは独立して機能するフィンガーアクションも選択できます:何もしない、選択中のツールを使う、キャンバスをパン、選択、ナッジ、スライス、ズーム、回転。たとえば「選択」を指定すると、指でデッサン内をすばやく選択し、スタイラスペンで引き続き描画できます。
対応スタイラスペンのショートカットボタン、または右クリックボタンも設定できます。ボタンには以下の動作を割り当て可能です:何もしない、選択、キャンバスをパン、ソフトマスク、ハードマスク、スライス、ナッジ、ズーム、回転。
消しゴム機能付きのスタイラスペンを使用する場合は、消しゴム動作も設定できます。選択した設定は、キーボードショートカット「E」の消しゴム操作にも適用されます。