精密ツール
精密ツール機能がWindowsにも登場予定です。これらのツールのリリース予定は、ロードマップでご確認いただけます。
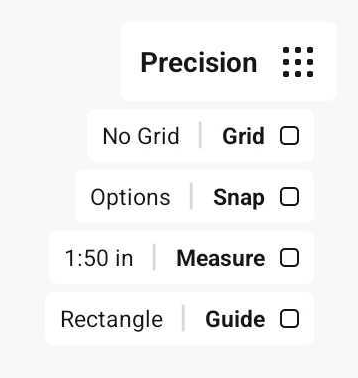
キャンバス上の「精密」ボタンをタップすると、「グリッド」と「スナップ」のオプションがメニューの下に表示されます。
グリッド
グリッドは便利な下敷きのようなもので、視覚的なガイドになるだけでなく、グリッド描画ガイドの「スナップ」や「位置揃え」と組み合わせてインタラクティブに使うこともできます。グリッドのオン/オフを切り替えるには、「精密」の下にある「グリッド」をタップします。グリッドボタンの隣にあるグリッド名が表示されたラベルをタッチすると、「ワークスペース」メニューが開いて新しいグリッドを選択できます。
グリッドタイプ
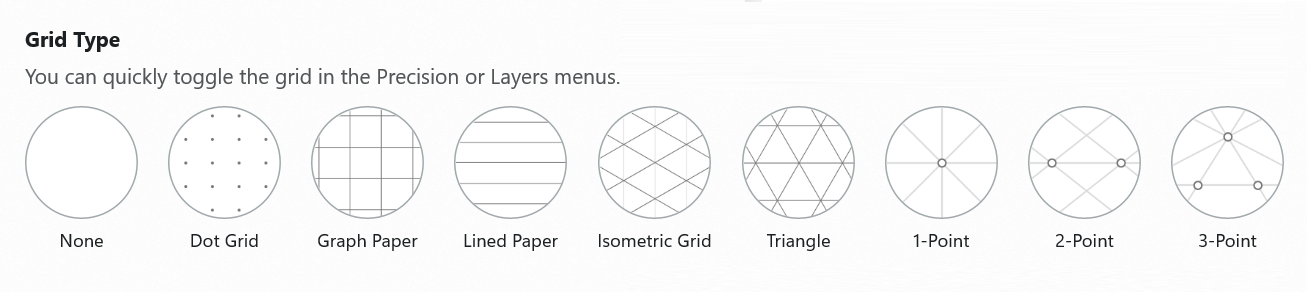
コンセプトには、5種類の基本グリッドと3種類の透視グリッドがあります:ドットグリッド、方眼紙、横罫紙、アイソメトリックグリッド、三角グリッド、 1点透視、 2点透視、 3点透視。ワークスペースメニューのリストから、使用したいグリッドを選択してください。リストを横にスクロールすると、すべてのオプションを見ることができます。現在使用中のグリッドをタップするか、「グリッドを編集」ボタンをタップすると、グリッドの詳細設定やあらかじめ用意されたプリセットを選択できます。
5種類の基本グリッドには以下の編集オプションがあります。
- プリセット – あらかじめ用意されたさまざまなグリッドが選べます。
- 間隔 – 主線/点の距離を調整します。
- 分割数 – 主線の間のマス目の数を設定します。「1」に設定すると、主線のみが表示されます。方眼紙と罫線用紙グリッドで設定可能です。
- 線幅 - グリッド線の太さを設定します。
- カラー – キャンバスに合わせた自動カラーを選択するか、カスタムカラーを選択します。
- 不透明度 - グリッドの不透明度を設定します。このオプションは、カスタム色の使用時に選択可能です。
- 方向 – グリッドの向きを横長/縦長に設定します。罫線用紙を縦書きにしたい時などに便利です。罫線用紙、等尺、三角方眼紙グリッドで設定可能です。
- アートボードに限定 – 選択すると、グリッドがアートボード内のみに表示されます。キャンバスにアートボードを設定している場合のみ設定可能です。
グリッドの単位は「ワークスペース」メニューで選択した単位に合わせて表示されます。
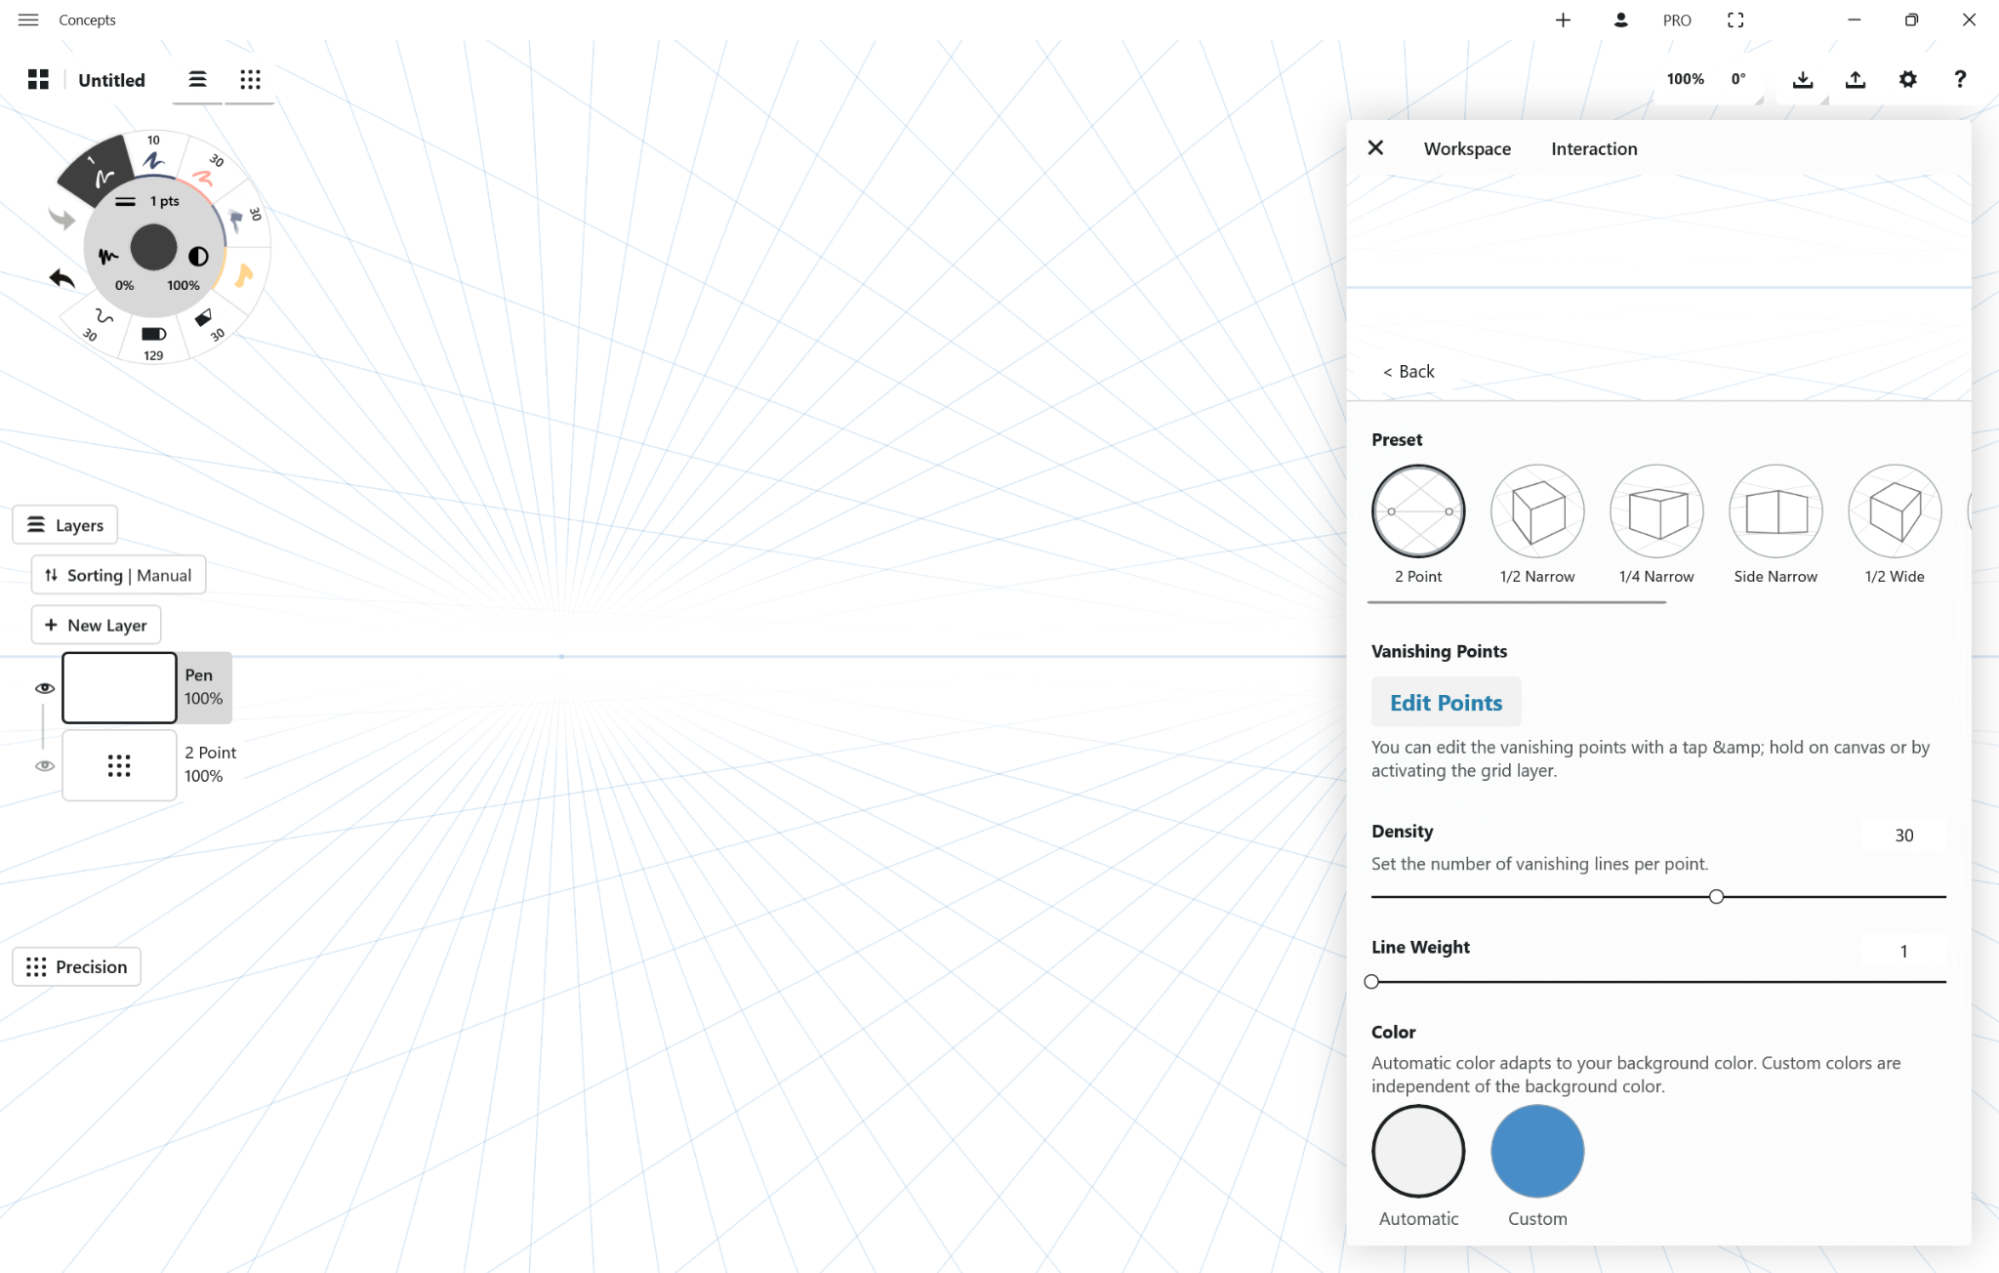
遠近グリッドの編集オプションは多少異なります。
- プリセット - あらかじめ用意された複数の透視図法から選択できます。プリセットをタップすると有効になります。
- 消失点 – このボタンをタップするとキャンバスに移動し、消失点を動かしてグリッドを好みに合わせて調整できます。キャンバス上で消失点を長押しするか、グリッドレイヤーを有効にすれば、いつでもグリッドを編集できます。
- 密度 - グリッドに表示される消失線の数を選択します。
- 線幅 - グリッド線の太さを設定します。
- カラー – キャンバスに合わせて自動的に調整される色を選ぶか、カスタムカラーを指定できます。カスタムカラーを選択すると現在の色が適用され、再度タップするとカラーホイールが表示され、新しい色を選択できます。
- 不透明度 - グリッドの不透明度を設定します。このオプションは、カスタム色の使用時に選択可能です。
- 向き - グリッドの向きを画面の向きに合わせる設定です。デフォルトでは、デッサンを作成したときのデバイスの向きでグリッドが生成されます。
- アートボードに制限 – チェックを入れると、アートボードがキャンバスに設定されている場合、その内側にのみグリッド線を表示します。この設定はすべてのグリッドタイプに共通して適用されます。
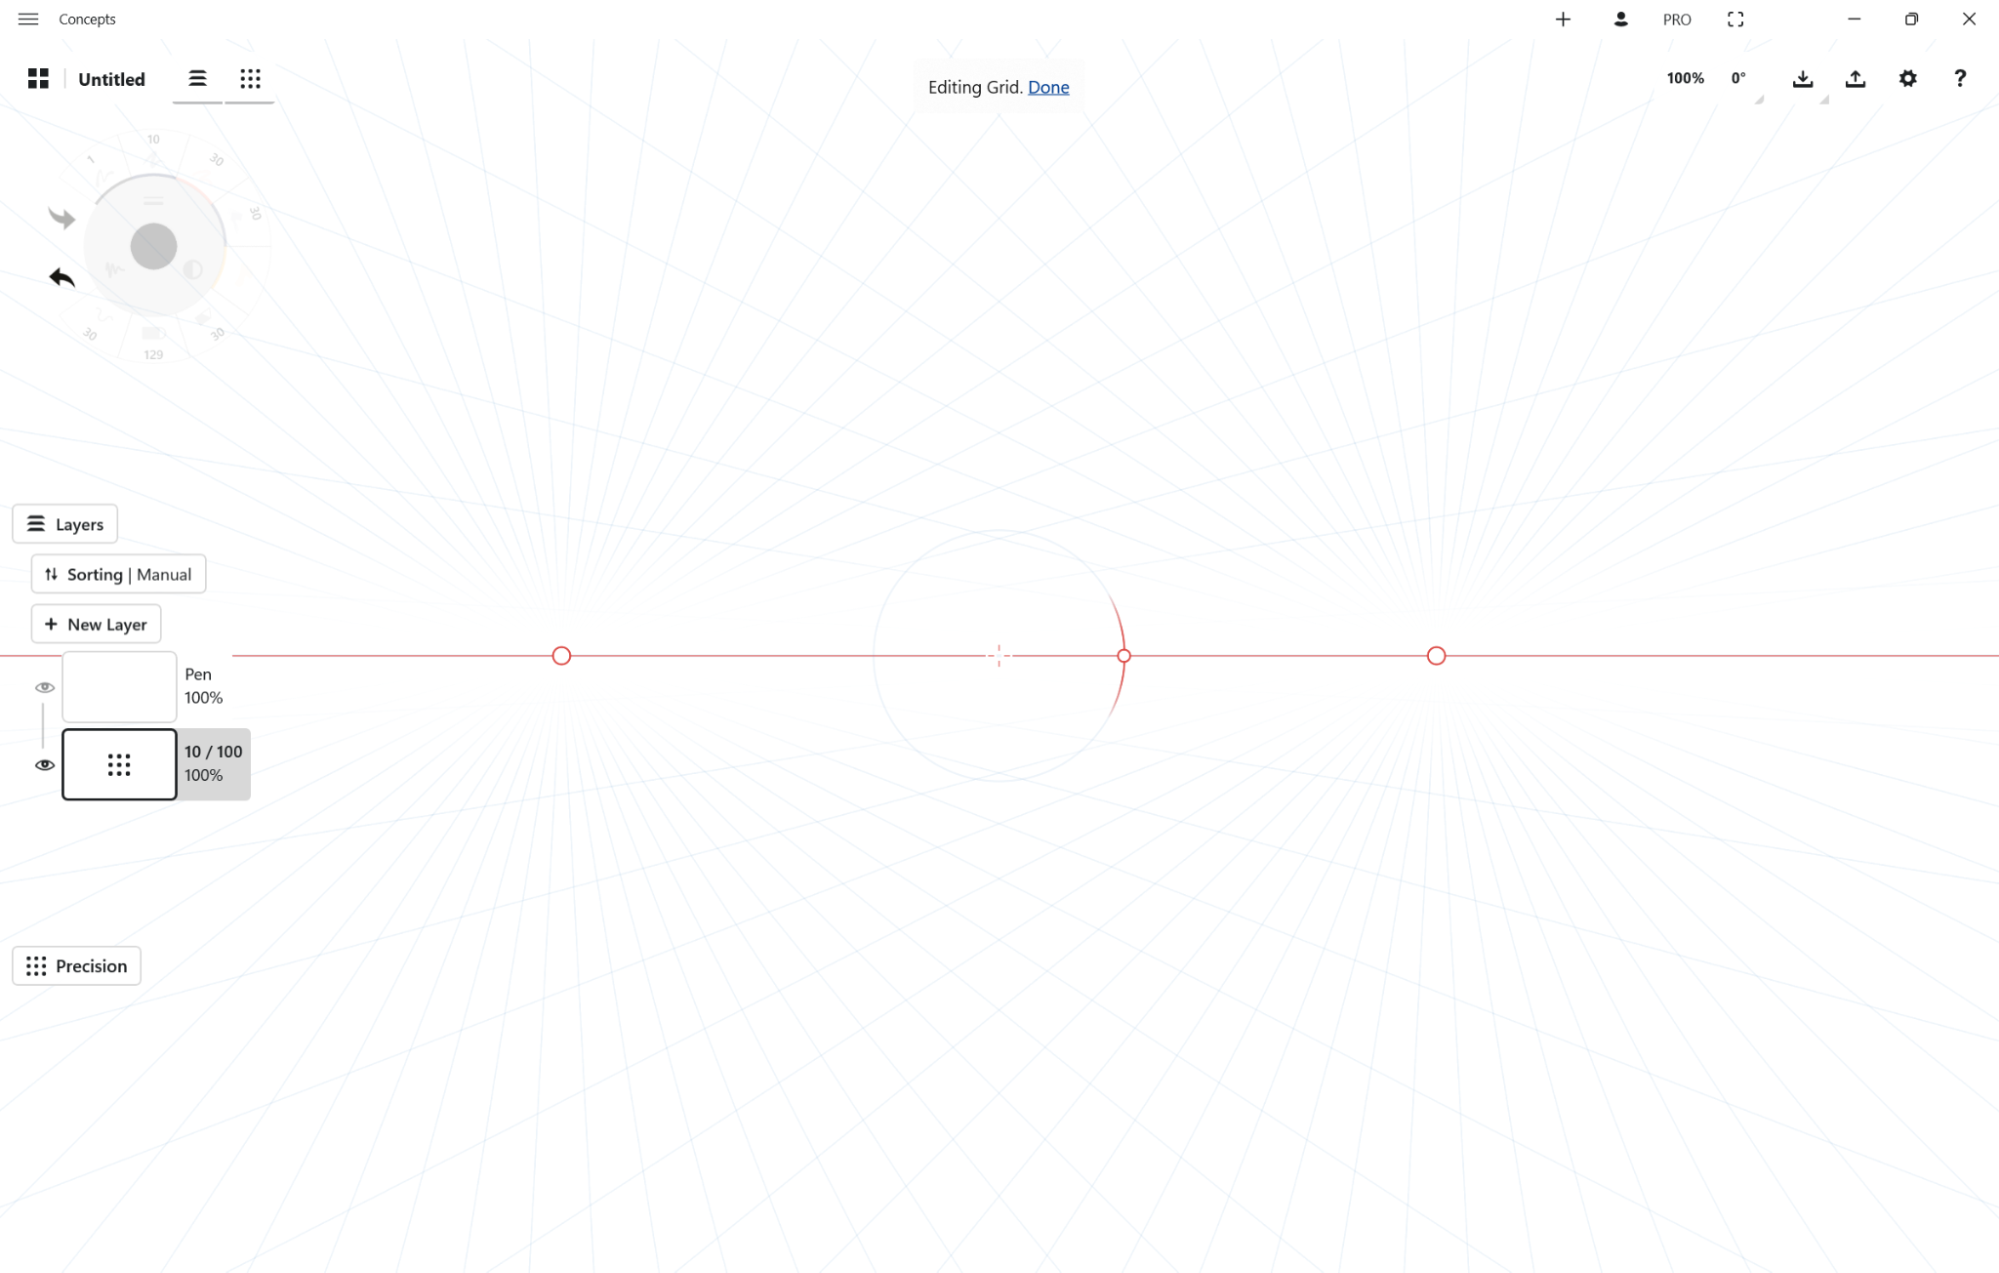
キャンバス上でのグリッド編集
グリッドは、キャンバス上で編集することもできます。グリッド編集モードに入るには、「レイヤー」メニューでグリッドレイヤーを有効にします。遠近グリッドでは、消失点を長押しすることで、グリッド編集を有効にすることもできます。グリッドレイヤーが有効になっている間は、キャンバスのズームやパンは通常通り動作しますが、グリッドの編集も可能になります。

すべてのグリッドには回転ハンドルがあり、グリッドを特定の角度に設定することができます。ハンドルをドラッグすると、スナップのターゲットラインが45度ごとに表示されます。スナップのターゲットラインが表示されている間にハンドルを離すと、その角度にスナップします。ターゲットラインが消えるまでハンドルを動かさずにしておくと、スナップターゲットに近い指定角度を設定することができます。グリッドを回転すると、ステータスバーに回転角度が表示されます。数値を長押しすると、直接編集することができます。
グリッドを移動するには、地平線の中心にある十字線からグリッドをドラッグするか、地平線を直接ドラッグします。
遠近グリッドでは、すべての消失点をドラッグして移動することができます。消失点はタップすると有効になり、複数の消失点を同時に有効にすることができます。消失点を有効にすると、選択対象を調整するのと同じように、1本指でパンしたり2本指で移動することができます。グリッドを拡大・縮小するには、すべての消失点を選択肢してから、2本指で拡大・縮小します。
編集モードを終了するには、キャンバス上で編集操作以外の場所をタップするか、別のレイヤーを有効にするか、「完了」をタップします。
スナップ
コンセプトには、スナップを使う方法が2通りあります。1つは描画中のライブスナップ、もう1つは編集中のスナップです。これらのオプションは「精密」メニューでカスタマイズできます。「スナップ」をタップするとオン/オフを切り替えられ、「オプション」をタップするとスナップ設定を変更できます。
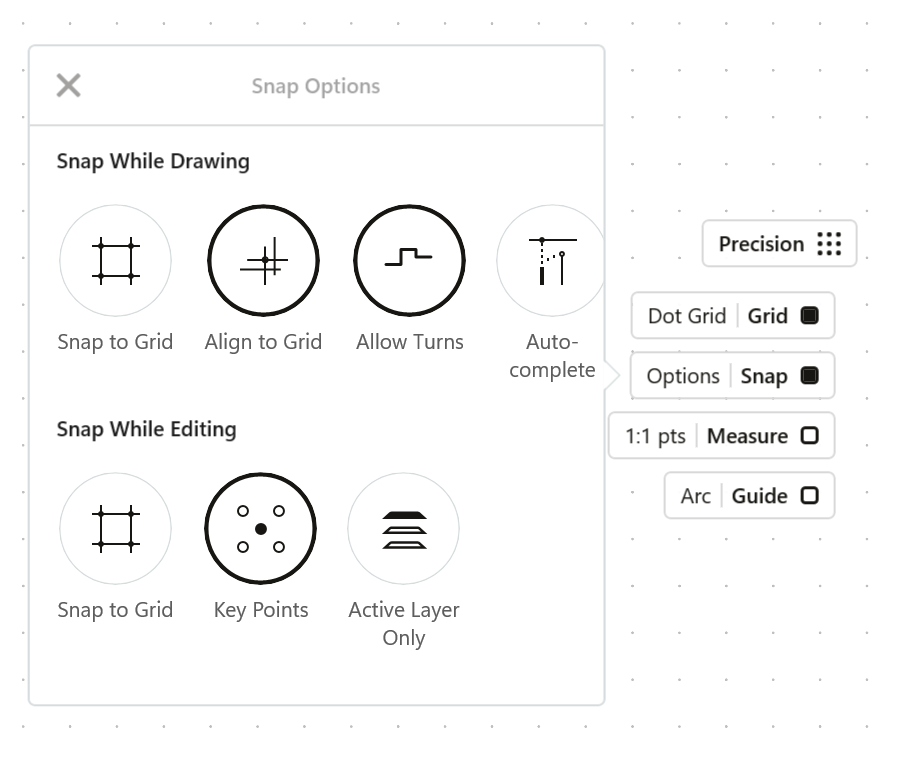
描画中にスナップ
スナップガイドには、描画用に3つのタイプがあります:「グリッドにスナップ」「グリッドに整列」「自動補完」です。さらに、「アクティブレイヤーのみ」というオプションも用意されています。これらのスナップガイドを活用すると、グリッドの方向に沿った直線の描画や、精密な間取り図の作成、スタイルパターンの設計などがスムーズに行えます。
グリッドにスナップ
このオプションを有効にすると、すべてのストロークが最も近いグリッド線上に描かれます。ブラシはそれぞれの動的特性を維持するため、傾き・速度・筆圧に応じてストロークに変化を加えることもできます。間違えた場合でも、いつでも描き直して修正可能です。
ワイヤーブラシと固定幅ブラシは、少ない制御点でクリーンな線を引くことができます。SVG や DXF ファイルをきれいに書き出したいときには、ぜひこれらのツールをお試しください。
グリッドに位置揃え
このオプションでは、ストロークはグリッド線の方向に沿って配置されますが、グリッド線上に沿ってしか線が引けないわけではありません。グリッドの方向制約を活用して、素早く正確にスケッチするのに役立ちます。間違えた場合は、いつでも描き直すことができます。
回転を許可
このオプションを有効にすると、「グリッドにスナップ」や「グリッドに位置揃え」を使って描画しながら回転することができるようになります。スタイラスペンを持ち上げずに直線を描く方が簡単な場合がありますが、このオプションならそれが可能になります。「回転を許可」が有効の場合でも、同じ線を行ったり来たりすることは可能です。
オートコンプリート
ストロークの始点と終点を自動的に接続します。接続可能なポイントがあると、小さな丸印が表示されます。接続したい場合はタップし、不要であれば無視してください。オートコンプリートは、「グリッドにスナップ」や「グリッドに位置揃え」と併用可能です。併用することで、ストロークの軌道と交差する他のストロークにスナップさせることができます。
使用中のレイヤーのみ
このオプションは「オートコンプリート」専用です。有効にすると、アクティブレイヤー上の線のみにスナップするようになります。
編集中にスナップ
すでに描いたストロークを選択すると、スナップを使って調整できます。スナップの対象となるポイントは以下の通りです:
- 1本のストロークを選択した場合、スナップの対象となるポイントは、ストロークの始点・終点、および四隅と中心点です。
- ストロークが「グリッドにスナップ」を使って描かれている場合、頂点もスナップの対象になります。
- 複数のストロークを選択した場合、スナップは四隅と中点に適用されます。
- 図形定規を使用している場合、ハンドルと中心点にスナップします。
「グリッドにスナップ」のオプションを選択した場合、選択対象のキーポイントをグリッドにスナップすることもできます。「使用中のレイヤーのみ」を有効にすると、使用中のレイヤー上のストロークのみにスナップすることができます。
スナップとグリッドを使って描画する
スナップを使って描画する場合、グリッドごとに決められた方向にのみ描画することができます。
ドットグリッド - スナップ: 水平方向と垂直方向の線のみ。位置揃え: 水平方向、垂直方向、45度の斜線。
方眼紙 - スナップ: 水平方向と垂直方向の線のみ。位置揃え: 水平方向と垂直方向の線および45度の斜線。
罫線用紙 - スナップ: 水平方向と垂直方向の線のみ。位置揃え: 水平方向と垂直方向の線および45度の斜線。
等尺グリッド - スナップ・位置揃え: 60度の斜線のみ。
三角方眼紙 - スナップ・位置揃え: 60度の斜線のみ。
1点透視 - 位置揃え: 水平方向と垂直方向の線、および地平線上の1つの消失点に向かうパース線。
2点透視 - 位置揃え: 垂直方向の線、および地平線上の2つの消失点それぞれに向かうパース線。
3点透視 - 位置揃え: キャンバス上の3つの消失点に向かうパース線のみ。
計測
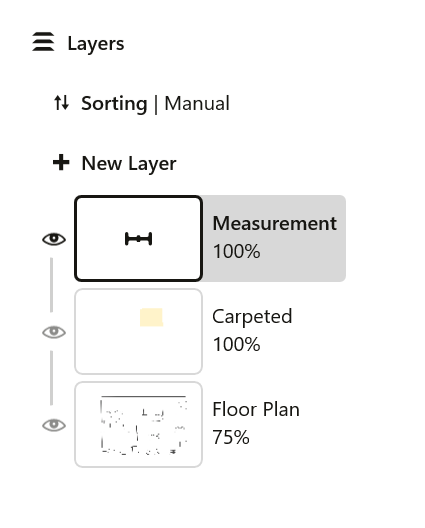
コンセプトでは、すべてのストローク、選択範囲、インポートしたアイテムに計測値が付随しています。。これらの計測値はデフォルトではキャンバス上に表示されませんが、[精度]メニューで 「計測」 オプションを有効にすると表示できます。計測を有効にすると、レイヤーリストに「計測レイヤー」が追加されます。デッサンで使用される単位やスケールは、現在のアプリの[設定]に基づいています。メートル法、ヤード・ポンド法、デジタル単位系から、好みに応じて選択することができます。
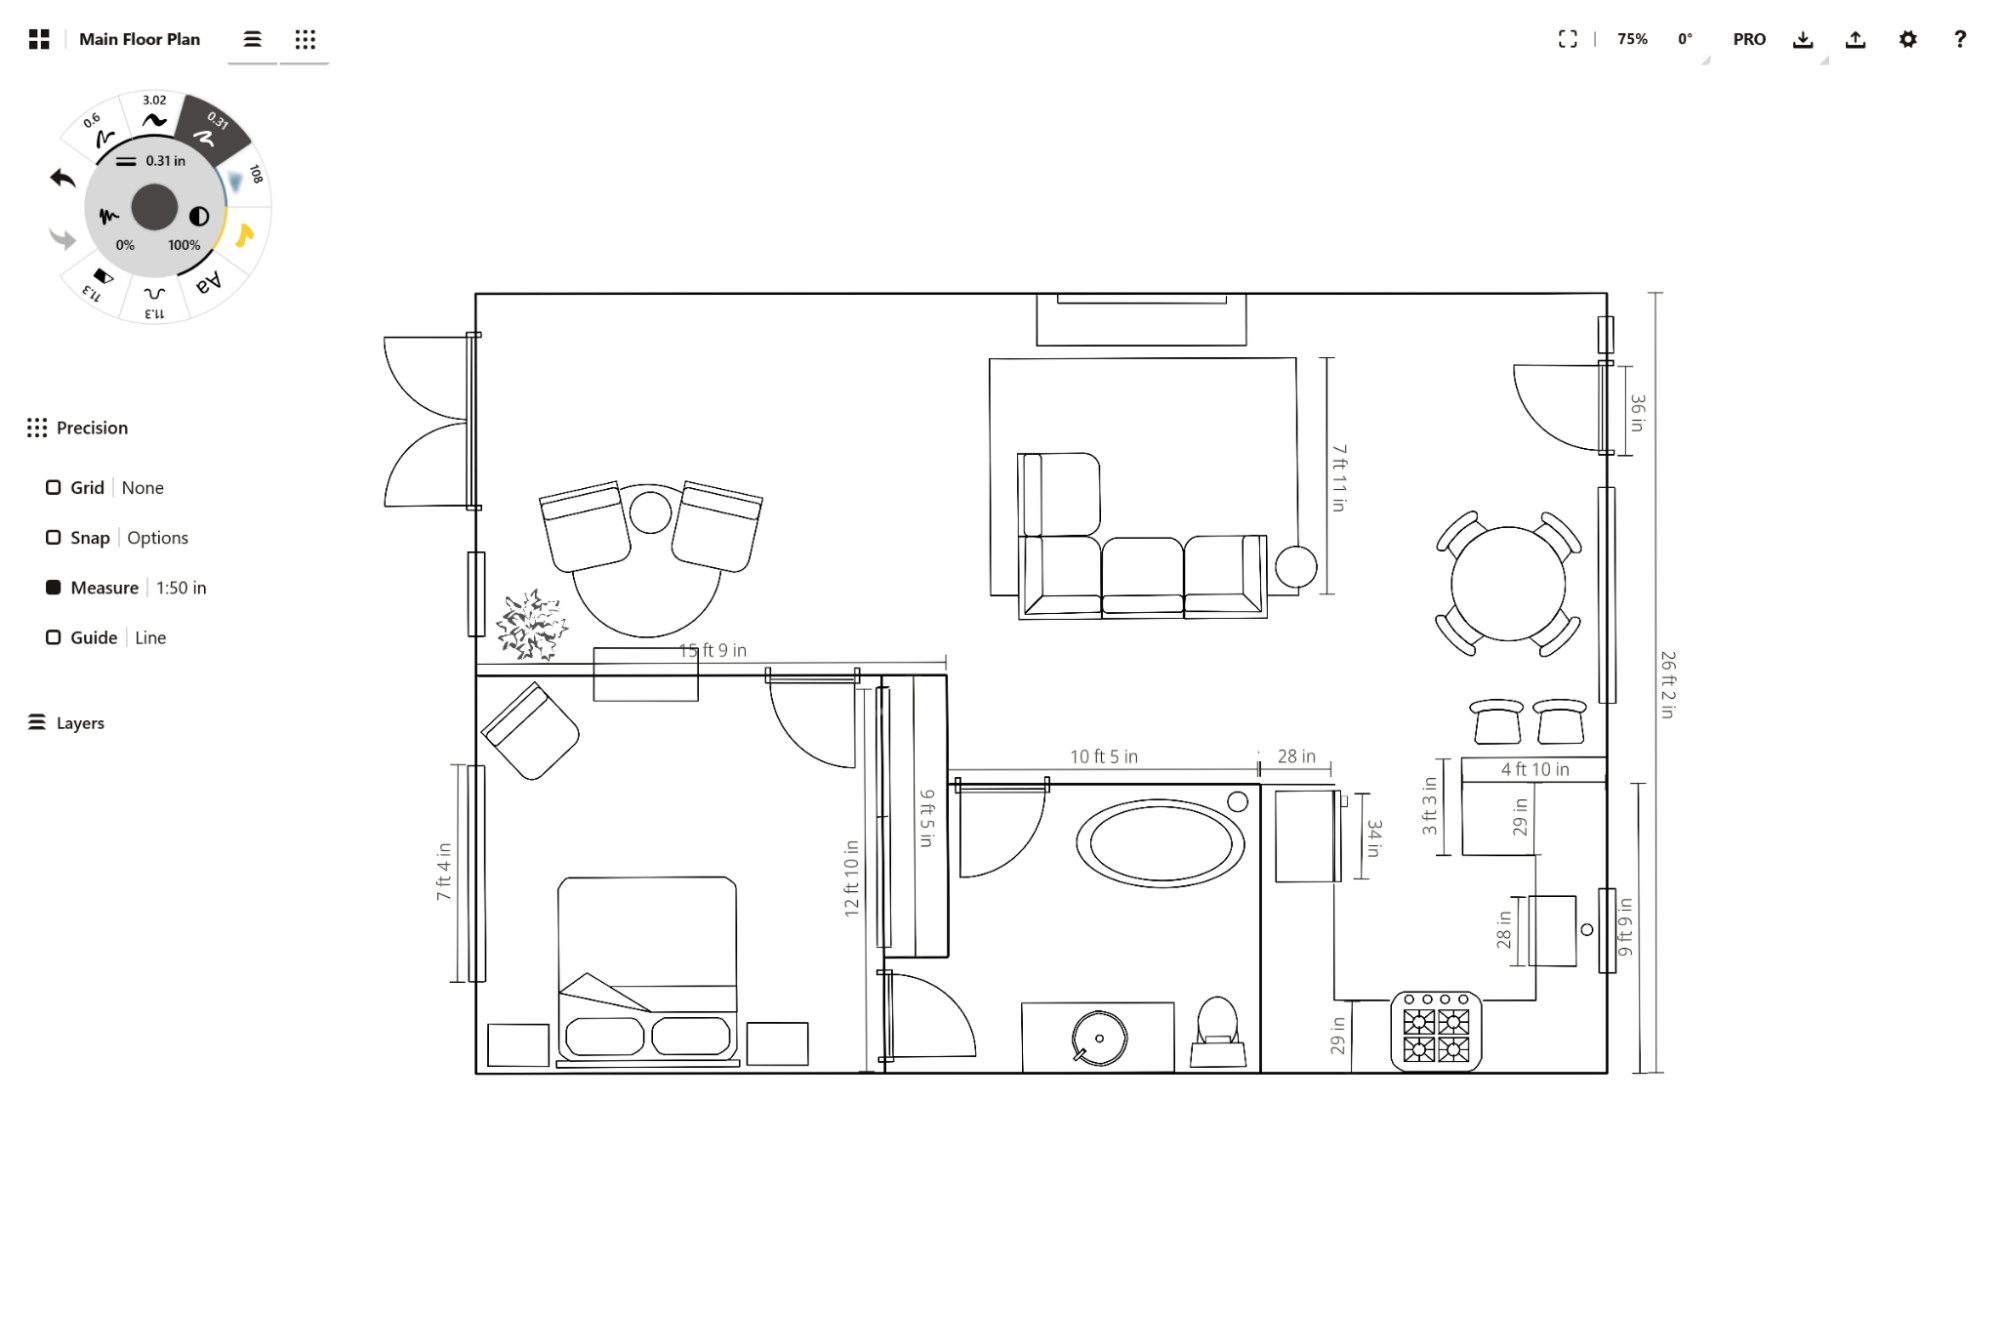
寸法ラベルを使った間取り図の例
計測を有効にした状態でストロークを描くと、そのストロークにライブの計測値が表示され、長さや面積を正確に確認できます。計測値を画面上に残したい場合は、計測ラベルをタップしてキャンバスに「固定」してください。計測ラベルはアイテムピッカーや投げ縄ツールで選択でき、反転・ミラーなど、キャンバス上で位置を調整できます。
左利きの場合は、[設定]でラベルが表示される位置を切り替えることができます。なお、ラベルは計測が有効になっている間のみ表示され、デッサンとともに書き出されます。
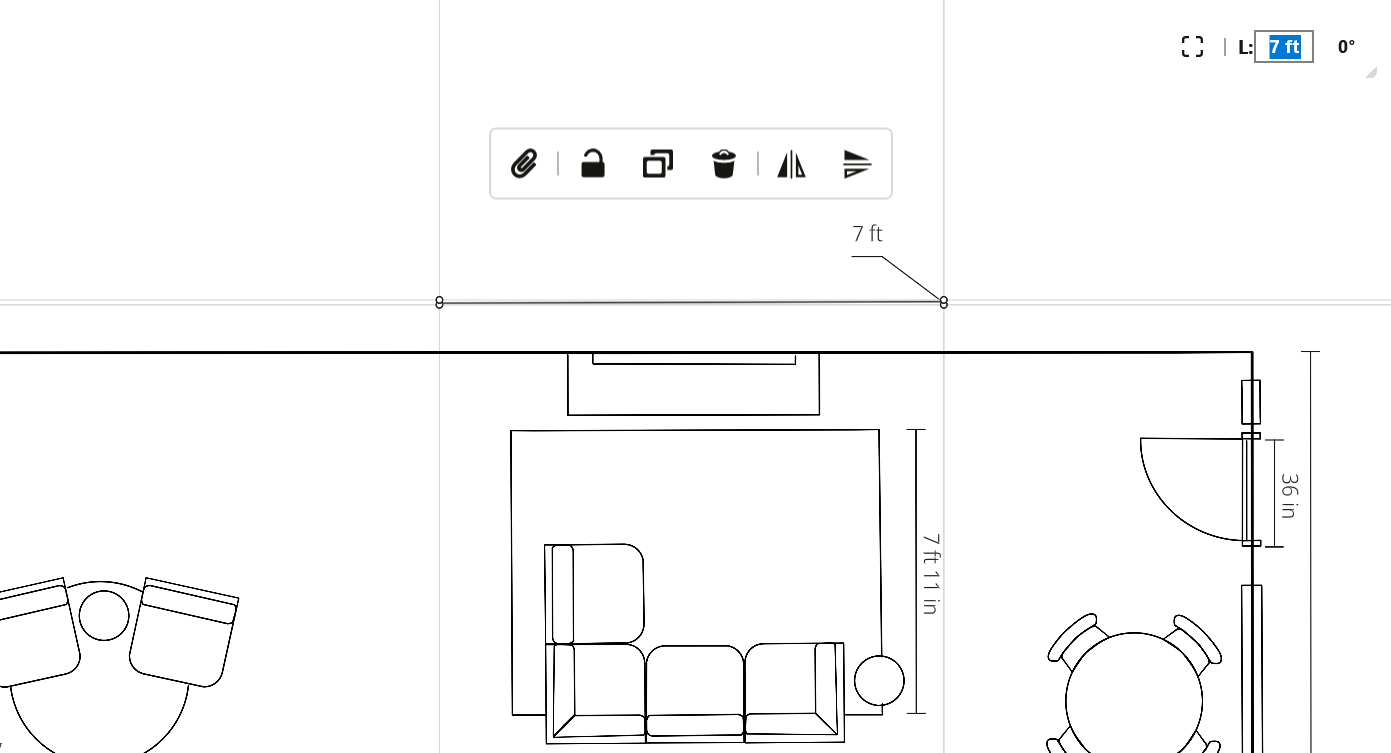
ストロークを選択し、計測値ラベルを長押しすると、任意の長さを入力できます。入力した値に応じて、線の長さが変更されます。ステータスバー上の長さインジケーターを長押しすることでも、選択範囲の長さを変更できます。
計測ラベルを長押ししてドラッグすると、描いた線に沿って位置を調整できます。
選択したストロークに対して任意の計測値を入力する
計測は、図形定規を使って正確な寸法を維持したまま設計を進める際にも役立ちます。計測値ラベルを長押しして任意の値を入力すると、ガイド全体がその値に合わせて調整されます。四角形の辺の長さを指定すれば、その長さに応じて四角形が調整されます。円の半径を長押しして値を入力すれば、その値に応じて円も調整されます。角度を含むあらゆる図形定規の値にも同じことが当てはまります。
また、固定ラベル(つまり、デッサン内のストロークに付随しない計測値)を作成することもできます。詳しくは「図形定規」のセクションをご覧ください。
面積測定
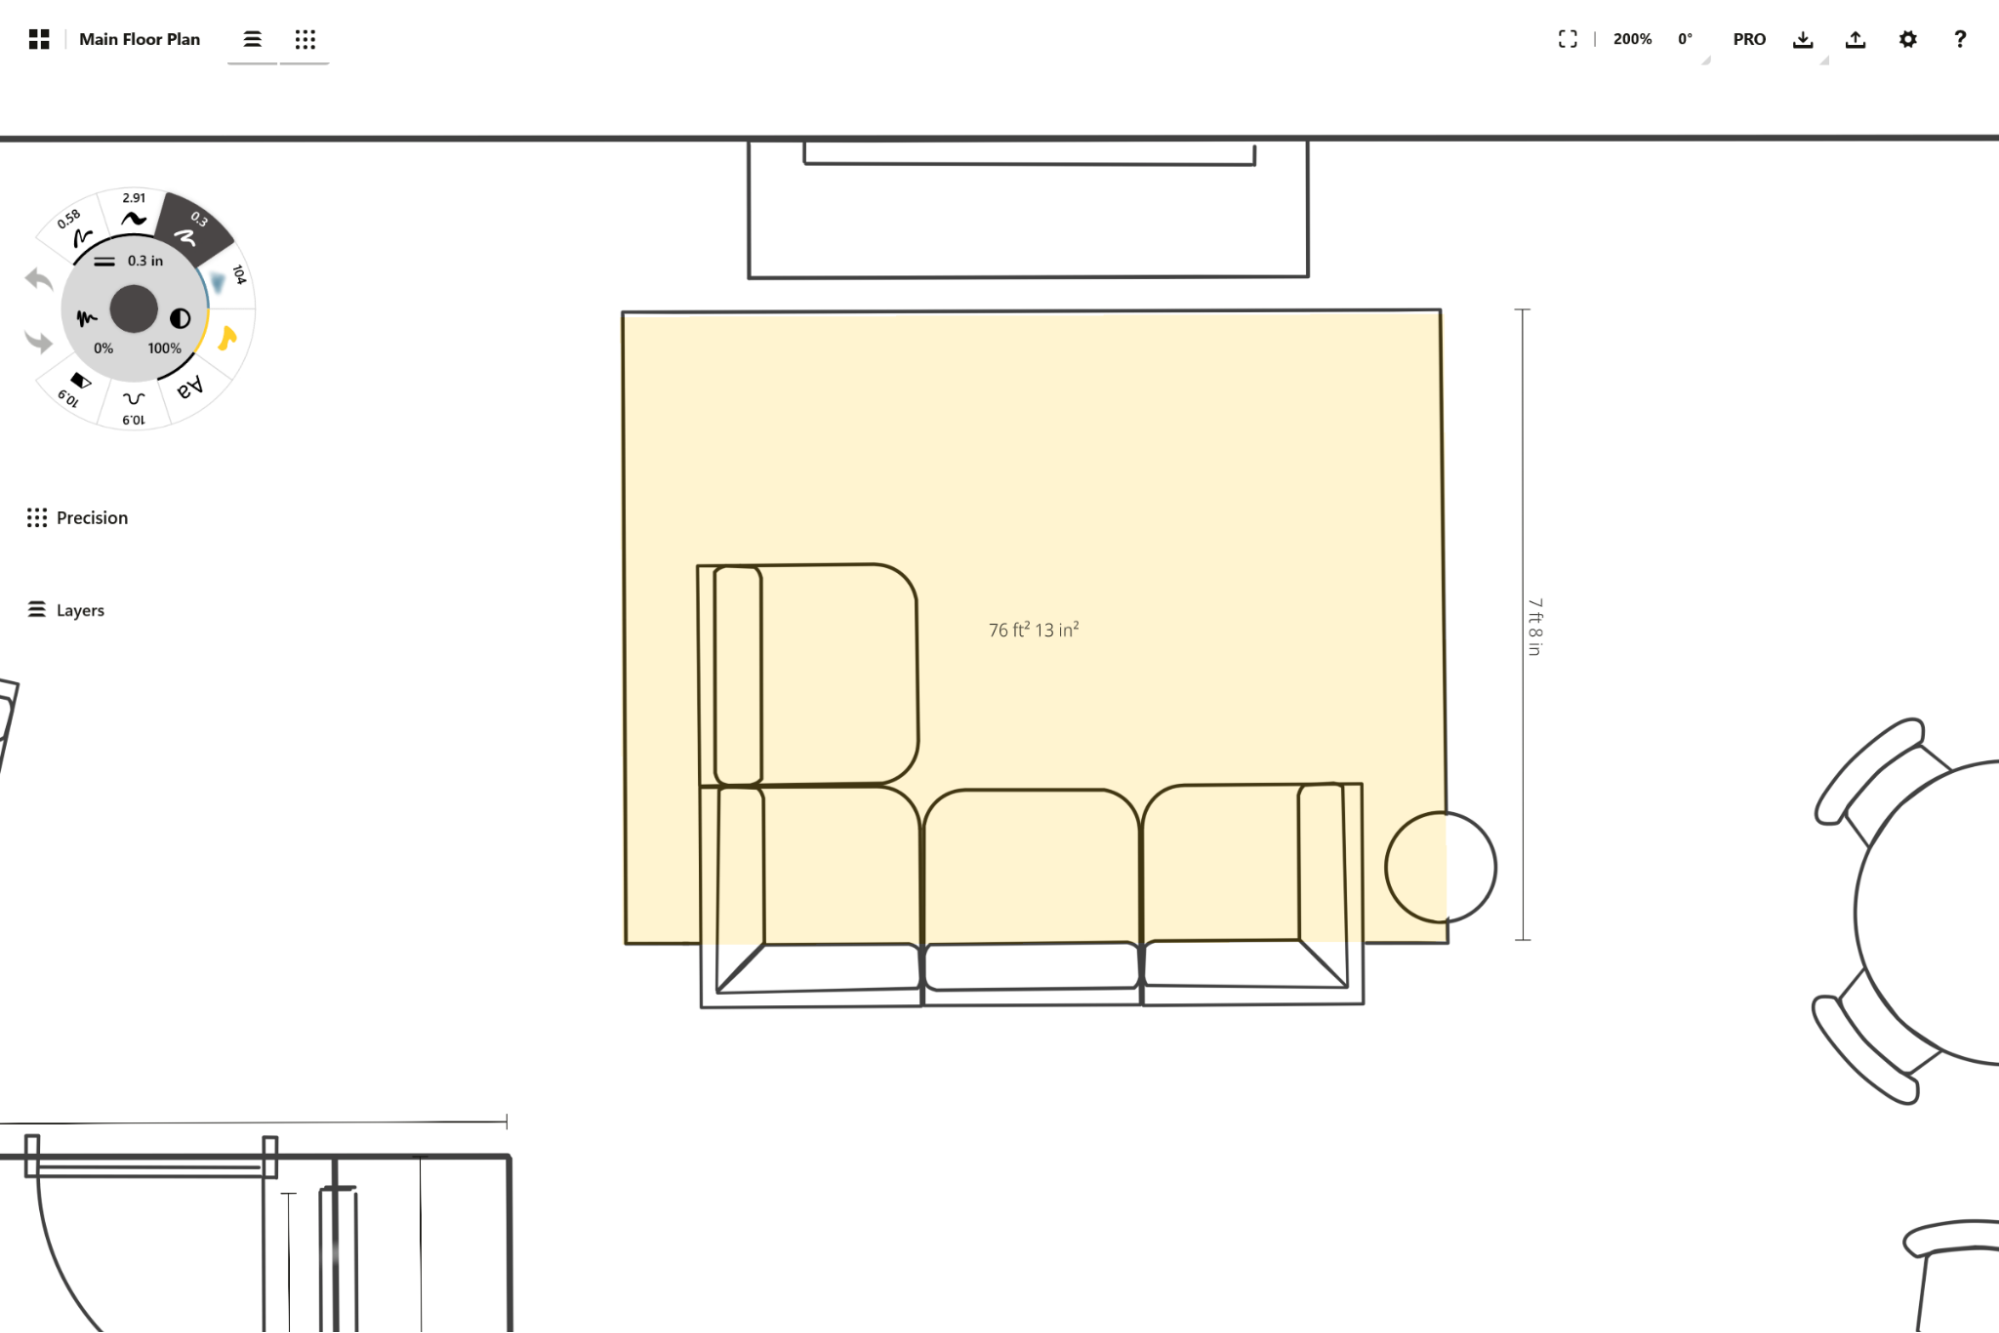
「塗りつぶし」ツールは、計測の表示方法が他のブラシと異なります。通常のストロークが長さを表示するのに対し、「塗りつぶし」ツールでは面積も表示されます。リフォームの計画で材料の使用量を見積もったり、ガーデンプランのエリアサイズを素早く確認したいときに活用できます。描画中は、塗りつぶしの中心に面積の計測値が表示されます。描き終えた後は、その計測ラベルをタップすることでキャンバス上に固定できます。
計測値のポップアップ
ステータスバーには、現在のズーム率や回転、選択対象のステータスが表示されます。このフィールドをタップすると、計測ポップアップが開きます。ここから、キャンバスまたは選択対象に対するズーム・回転のプリセットにすばやくアクセスしたり、キャンバスのズームと回転のロックや解除を行ったり、選択対象の寸法を直接入力して調整したりできます。
単一のストロークを選択すると、その長さ、幅、高さ、回転が表示されます。複数のストロークや画像を選択すると、幅、高さ、回転が表示されます。「塗りつぶし」ストロークを選択した場合は、幅、高さ、長さ、面積、回転が表示されます。また、数値を調整する際に幅と高さの比率をロック、または解除することもできます。ロックアイコンをタップして切り替えてください。
ポップアップ内の値はタップで直接編集できます。任意の単位で計測値を入力すると、ワークスペース設定で選択しているドキュメント単位に自動変換されます。パーセンテージを入力すれば、アプリが対応する値を自動計算してくれます。選択範囲は計測値や回転セクション内のプリセットをタップして拡大・縮小や回転が可能です。さらに、プリセットを長押しすると、お好みの設定にカスタマイズすることもできます。
計測レイヤー
さまざまな計測ステータスを確認できます。計測ポップアップでは、現在のキャンバスや選択対象に応じた、ズーム、回転、長さ/幅/高さなどの計測ワークフローへすばやくアクセスできます。
「計測」を有効にすると、ストロークの横に実寸の計測値が表示され、レイヤーリストに「計測レイヤー」が追加されます。このレイヤーは他のレイヤーと同様にリスト内で上下に移動させて表示順を切り替えることができます。計測レイヤーでは、固定計測値(つまり、特定のストロークに関連付けられていない計測値)を独自のレイヤーとして管理することができます。
スケール
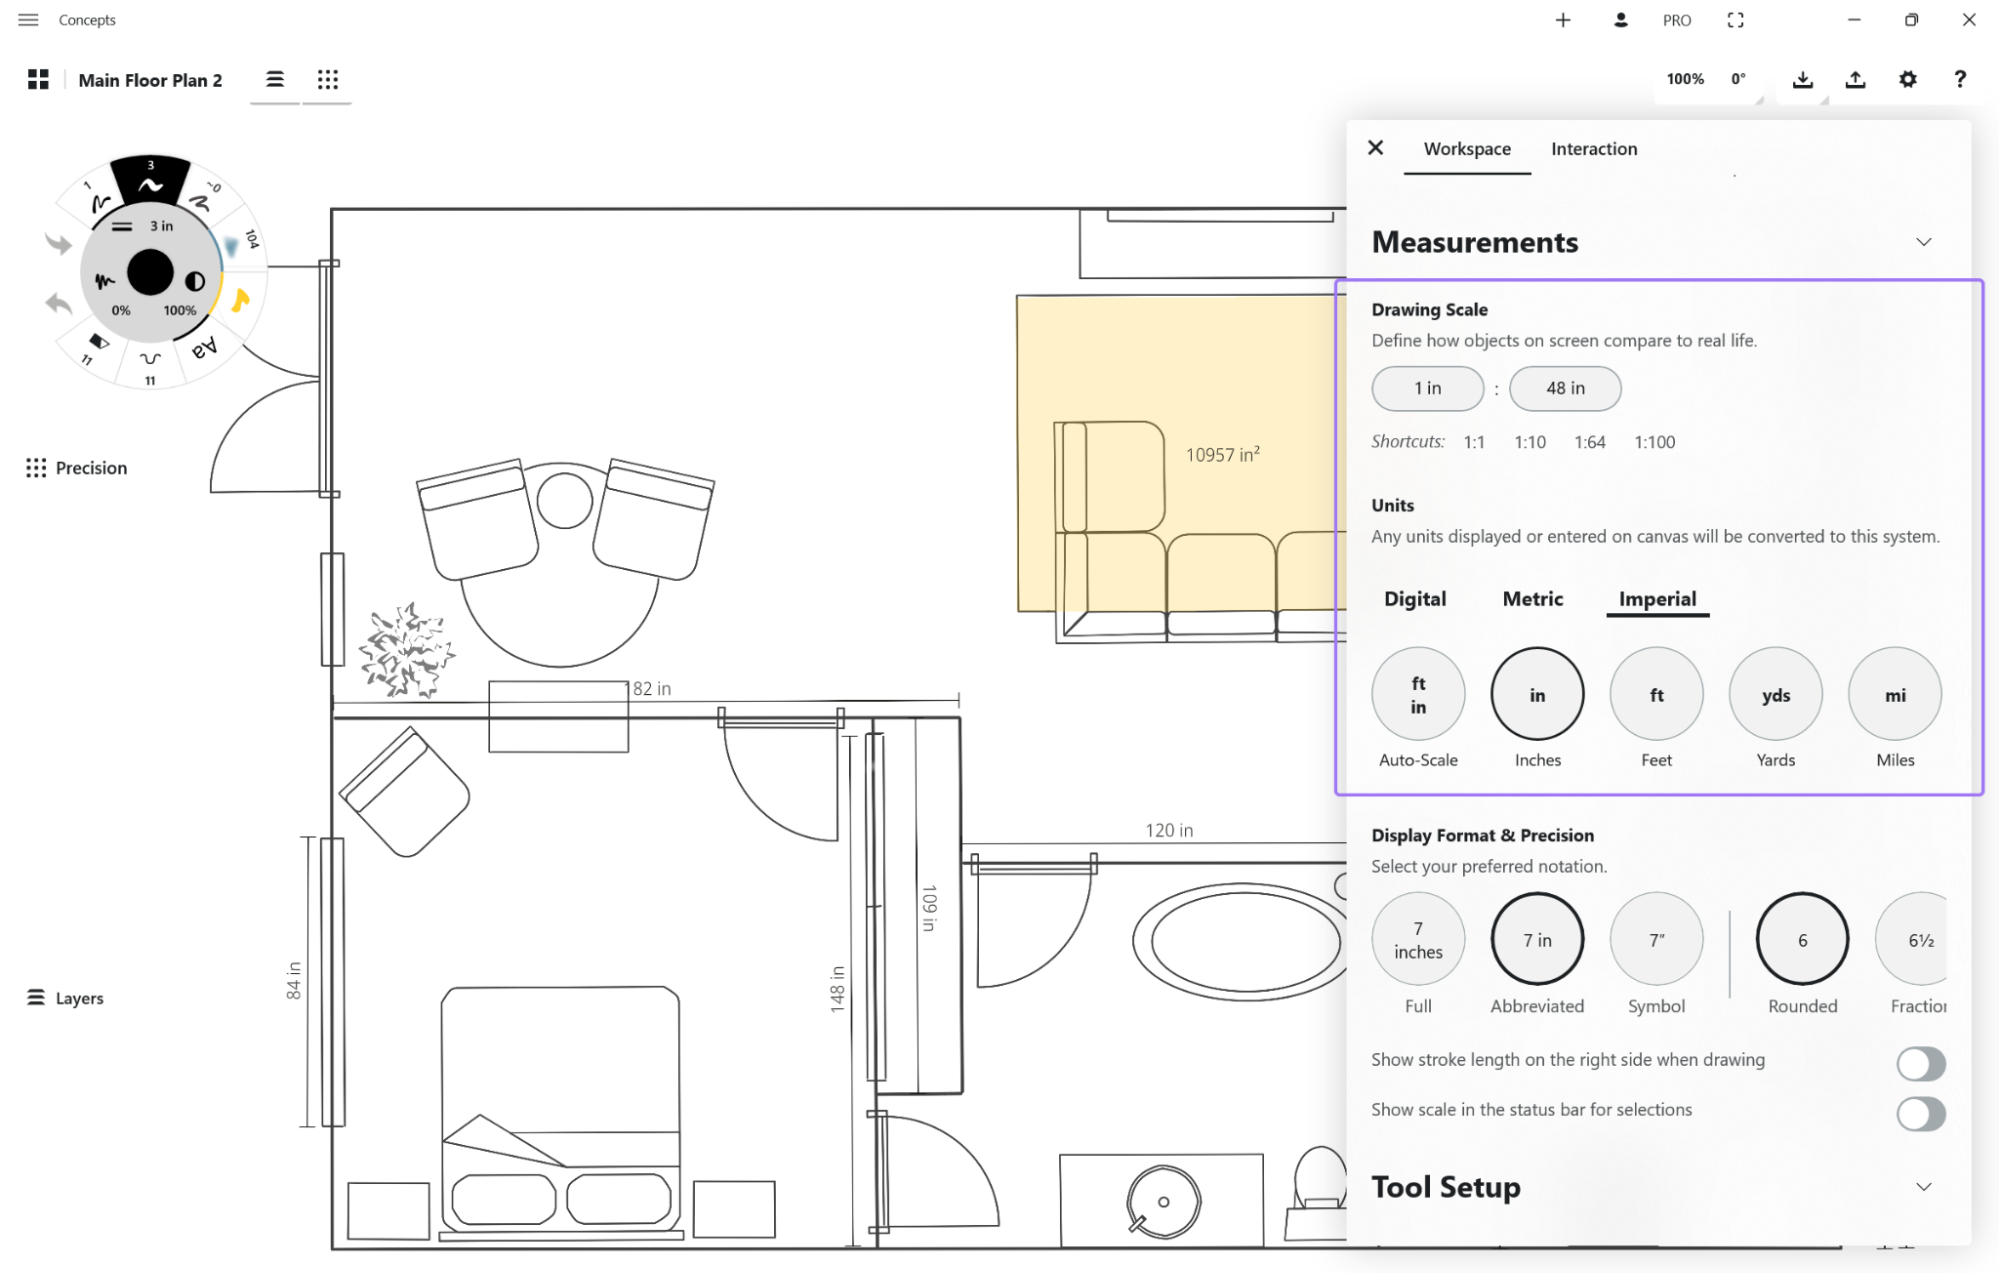
設定メニュー内のワークスペースタブが表示されます。そこでデッサンのスケールを見つけ、よく使われるスケールのショートカットから選ぶか、任意のスケールを入力してください。すぐ下にある表示単位も忘れずに設定しましょう。設定しない場合は、既定の表示単位に戻ってしまいます。
このスケールを設定すると、それ以降、すべてのツールや計測値はこのスケールに基づいて表示されます。そのため、たとえば 2 ポイントに設定したペンが 0.015インチと表示されることがあってもご心配なく。ツールプリセット自体はこれまで通り変わりませんが、表示単位は自動的に変換されて表示されます。
インポートした図面や写真にスケールを設定する方法
- プロジェクトでスケールを設定するには、実際の空間の正確な寸法がひとつ必要です。メジャーや定規を使って、図面上に描かれている壁や区画の実際の長さをひとつ測定してください。どの部分でも構いませんが、画面上で明確に確認でき、マーキングしやすい部分を選ぶと良いでしょう。
- 写真や図面をキャンバスにインポートします。(便利な手順として、画像の不透明度を下げる([レイヤー]を参照)と、ツールやデッサンが見やすくなります。)
- 精密をオンにして、「計測」を有効にします。
- 次に「直線定規」を有効にし、実際に測った壁や対象物と同じ部分にハンドルを合わせます。描画時に直線の長さを正確に制限したい場合は、直線定規の中央にある十字線をダブルタップすると便利です。
- [計測]の横にある「 1:1 」の比率をタップします。すると、現在の単位・スケール・ズームレベルに基づいた直線定規の長さが、自動的に[デッサンスケール]に入力されます。
- 2つ目のフィールドに実際の測定値を入力し、メニュー外をタップして閉じます。これでキャンバス上の[計測]ボタンの横には、新しい比率
1:入力した値
が表示されます。この比率は、ズームレベルや直線定規を拡大・縮小しても変わりません。
For a fully illustrated tutorial on setting scale, check out Scale and Measurement in Concepts.
図形定規
図形定規は、デザインスケッチの強い味方です。図形定規では描くエッジや半径を高い精度でコントロールできます。図形の一部や完全な形をスケッチするのに活用でき、サイズ・形・角度を自在に調整できます。
図形定規を有効にすると、さまざまな機能が表示されます。
- 定規自体の図形: グレーの境界線は使用中のブラシの太さをを反映し、また図形をトレースすることで塗りつぶされる領域を示します。任意の画面上でトレースすると図形を描きます。
- 定規のサークルまたはつまみ: つまみをタッチして左右に引くと、動きに合わせて図形が伸び縮みします。
- 十字線:定規の中心にあり、タップ+ドラッグで定規を変形させずにそのまま移動できます。ダブルタップすると、定規ごとに特定の機能が実行されます:
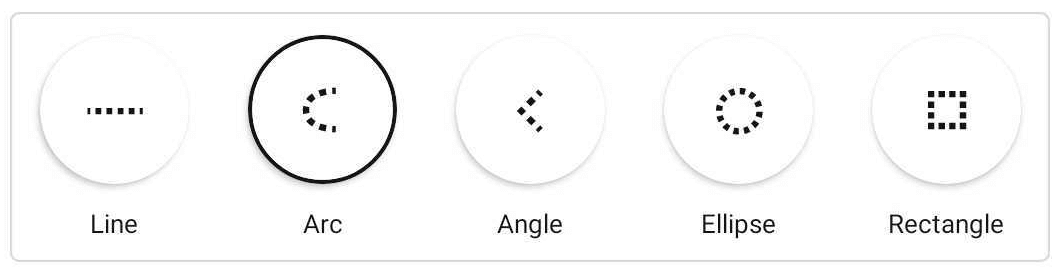
- 直線定規は,、引いたストロークをつまみの間に収めます。
- 円弧ツールは、完全な半円を描きます。
- 角度ツールは、90度にスナップします。
- 円形ツールは、完全な正円を描きます。
- 長方形ツールは、完全な正方形を描きます。
図形定規は「計測」と併用することで、本領を発揮します。両方を有効にすると、直線や図形を正確な寸法と角度で描くことができます。定規上には計測ラベルが表示され、タップすると図面に固定できます。(「計測」が有効になっていれば、図面と一緒に書き出すことも可能です。)ラベルを長押しすると、キーボードで数値を編集できます。
図形定規は、ストロークやグループに紐づいていない計測ラベルを作成することにも使えます。たとえば、図面にスケールの目安を表示したいときなど、より汎用的に活用できます。その場合は、「計測」をタップするだけで、ラベルがキャンバス上に固定されます。ラベルは選択して移動させたり、他のストロークと同様に拡大縮小することもできます。
図形定規や選択対象を回転させるには、キャンバス上部のステータスバーにある角度表示をタップします。キーボードが表示されるので、任意の数値を入力して確定してください。選択対象は時計回りに回転します。