Precision Tools

Our Precision Tools are coming to Android. We have a roadmap of our expected release dates for these tools here.
If you tap the Precision button on the canvas, you’ll see a couple of options expand beneath the menu - Grid, Snap and Guide.
Grids
The grid is a smart underlayment to your canvas that allows you to not only visually reference the grid, but interact with it via Snap and Align, our grid drawing guides. Tap Grid under Precision to turn the grid on or off. Touch the label with the grid name next to the Grid button to bring up the Workspace menu and select a new grid.
Grid Types

Concepts has five regular grids and three perspective grids: Dot Grid, Graph Paper, Lined Paper, Isometric Grid, Triangle Grid, and 1, 2 and 3 Point Perspectives. Select the grid from the list in the Workspace menu. Scroll the list sideways to access all the options. To edit the grid or choose from pre-made grid presets, tap on the active grid or tap the “Edit Grid” button.
Select a grid from the list in the Workspace menu. To edit the grid or choose from pre-made grid presets, tap on the active grid or tap the “Edit Grid” button.
With the five regular grids, you can edit:
- Preset – Choose from a variety of pre-made grids.
- Spacing – The distance between the main lines/dots.
- Divisions – Determine how many subdivisions there are between the major lines. Set value to 1 to only show the main lines. Available for Graph Paper and Lined Paper grids.
- Line Weight – The thickness of the grid lines.
- Color – Select the automatic color that adapts to your canvas or choose a custom color.
- Opacity – Set the opacity of the grid. This option is available when using a custom color.
- Orientation – Set the orientation of the grid to landscape or portrait. This is useful if, for example, you want to use vertical lines for lined paper. Available for Lined Paper, Isometric Grid and Triangle Grid.
- Confine to Artboard – Check the box to only show grid lines within an artboard. This only applies if there is an artboard on canvas.
Note that the grid units are determined by the drawing units you've selected in the Workspace menu.
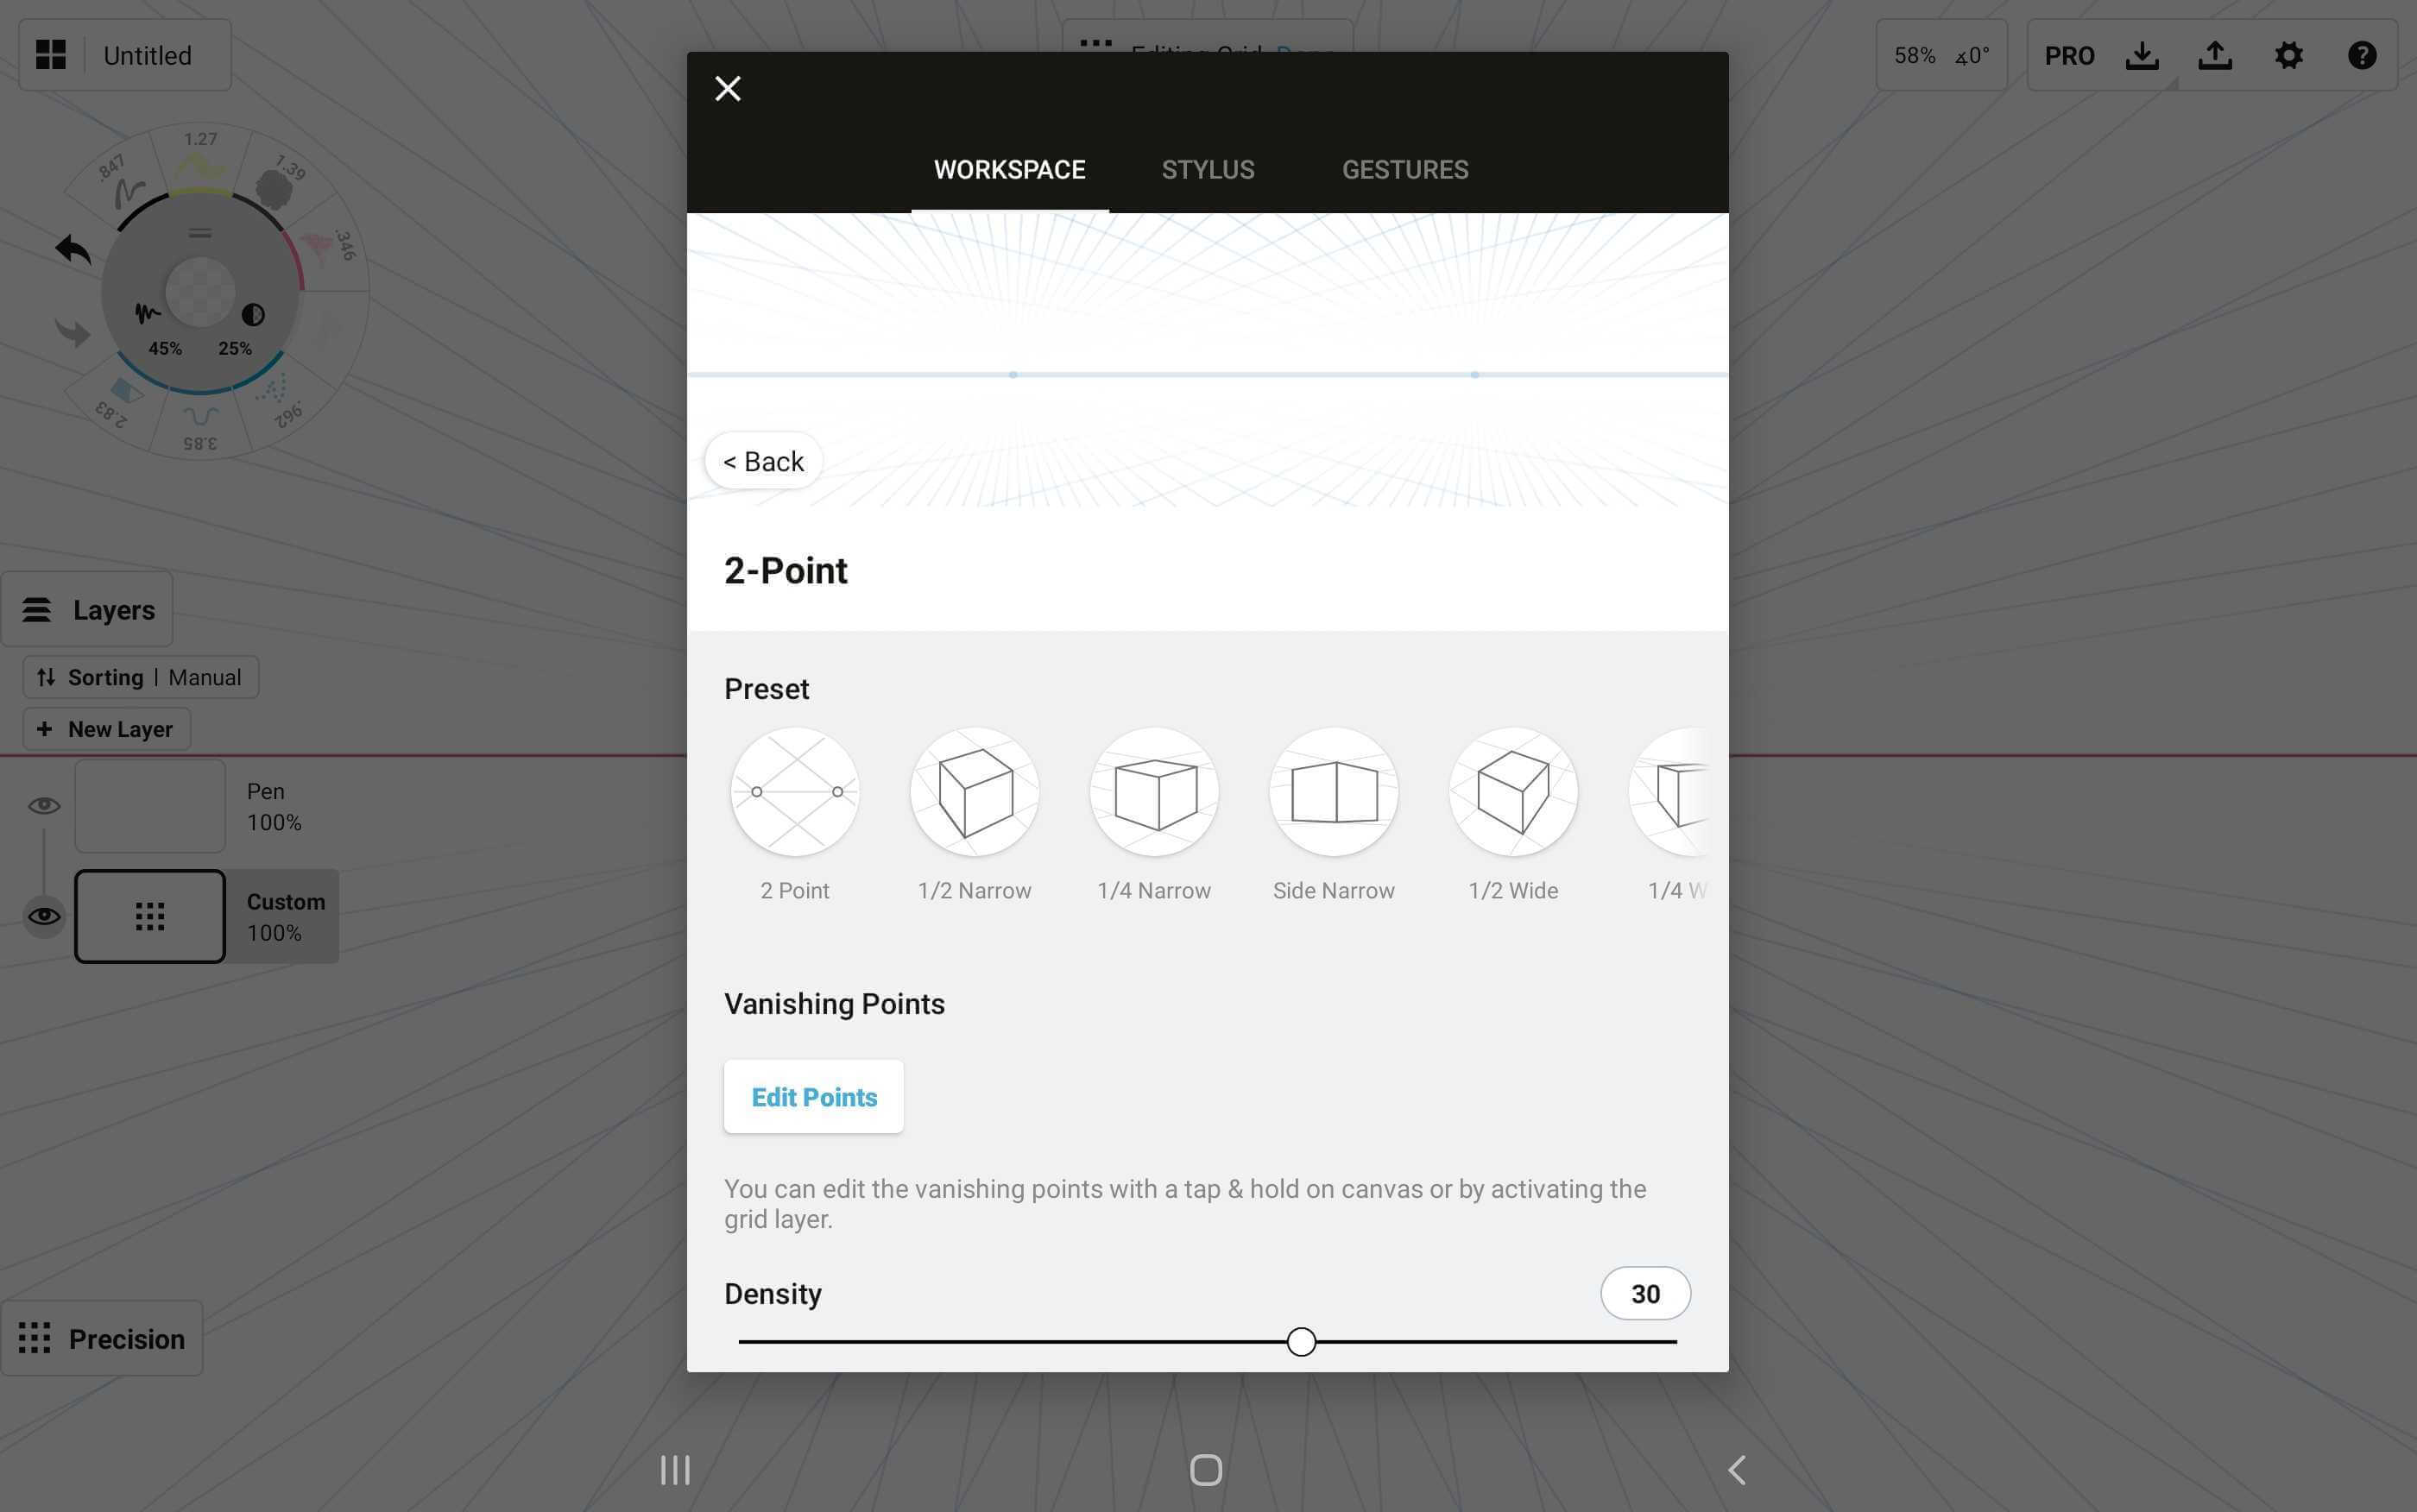
The settings are slightly different for the perspective grids:
- Presets - Choose from a variety of pre-made perspectives. Tap on a preset to activate it.
- Vanishing Points - Tapping this button takes you to the canvas, where you can move the vanishing points and adjust the grid to your liking. You can also edit the grid on canvas at any time by tap+holding on the vanishing points or by activating the grid layer.
- Density - Choose the number of vanishing lines that appear in the grid.
- Line Weight - Set the thickness of the grid lines.
- Color - Select the automatic color that adapts to your canvas, or choose a custom color. Tapping on the Custom color option selects the current color, tap it again to bring up the color wheel and choose a new color.
- Opacity - Set the opacity of the grid. This option is available when using a custom color.
- Orientation - Use this setting to match the orientation of the grid to the screen. By default, the grid is created in the same orientation the device was in when the drawing was created.
- Confine to Artboard - Check the box to only show grid lines inside the artboard if there is one configured on canvas. This is a universal setting that applies across all grid types.
Editing Grids on Canvas
The grids can be also edited on canvas. To enter the grid edit mode, activate the grid layer in the Layers menu. With perspective grids, tap+holding on a vanishing point also activates grid editing. While the grid layer is active, zooming and panning the canvas works normally, but it is also possible to edit the grid.

All grids have a rotation handle that can be used to set the grid to a specific angle. When dragging the handle, a snap target line is shown every 45°. Let go of the handle while the snap target line is showing to snap to that angle, or keep the handle still and wait for the snap target line to disappear to set a specific angle close to the snap targets. When rotating the grid, the angle is shown in the status bar. Tap+hold on the value to edit it directly.
To move the grid, drag the grid from the crosshairs at the centre of the horizon line, or drag the line itself.
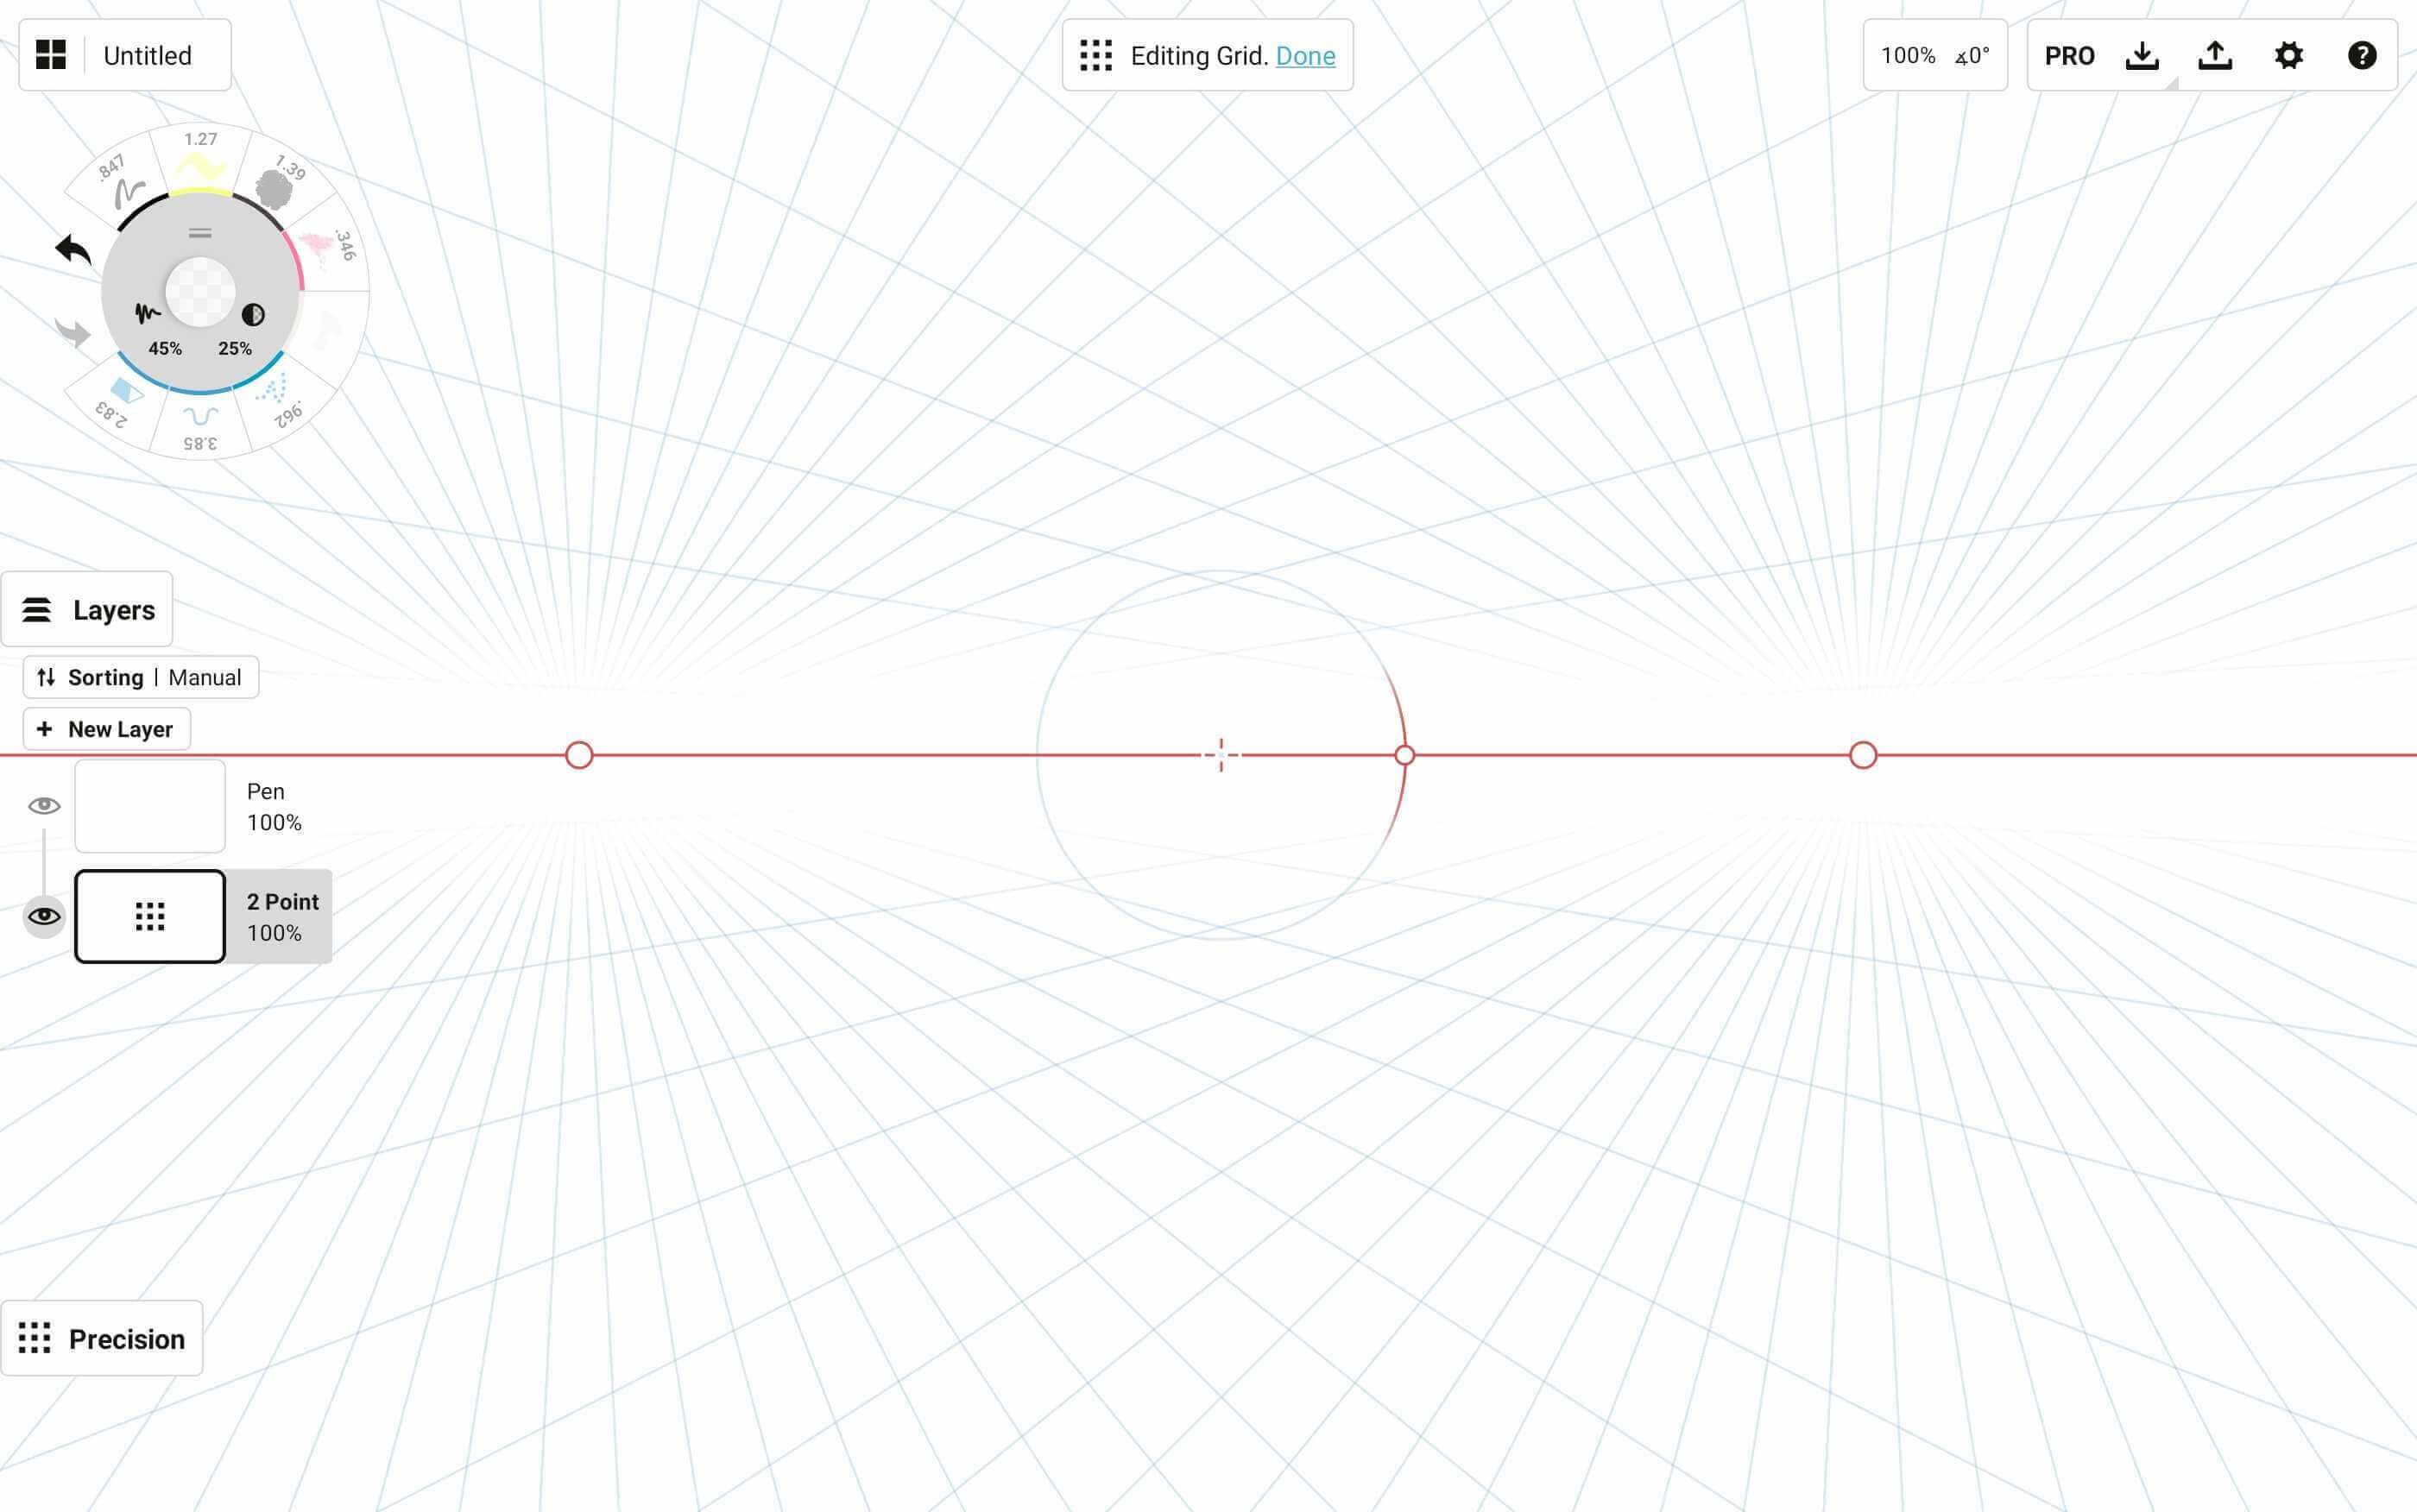
With the perspective grids, all of the vanishing points can be moved by dragging them. The vanishing points can also be activated by tapping on them. It is possible to activate more than one point at a time. When the points are active, you can pan them with one finger or move them around with two fingers just like when adjusting a selection. To scale the grid, select all vanishing points and use two fingers to scale.
To exit the grid editing mode, tap anywhere away from the editing controls on canvas, activate another layer, or tap “Done” in the notification.
點連
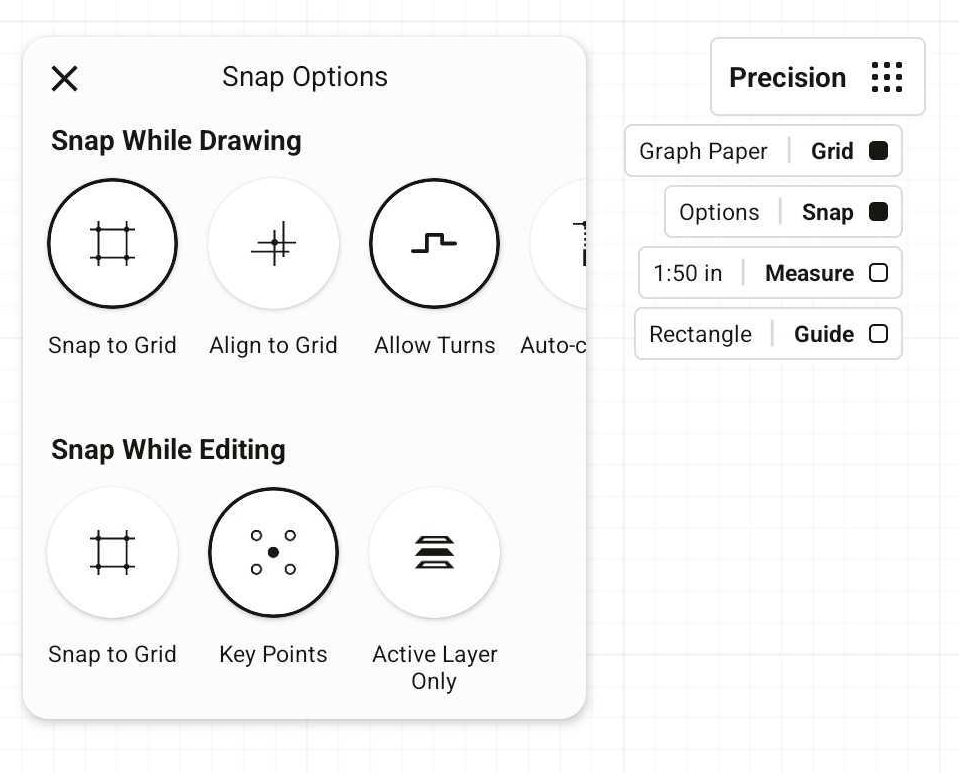
There are two ways to use Snap in Concepts: live snapping while drawing, and snapping while editing. You can customize these options in the Precision menu - tap Snap to turn it on/off, tap Options to change the snap settings.
Snap While Drawing
There are three types of Snap guides for drawing: Snap to Grid, Align to Grid and Autocomplete. There is also an Active Layer Only option. These Snap guides can help you to draw straight lines according to a grid's directional set, create precise floor plans or style patterns.
Snap to Grid
With this option enabled, all strokes are drawn on top of the closest grid line available. All of the brushes will maintain their dynamics, so you can use tilt, velocity and pressure to add variance to your strokes.
The Wire and Fixed Width brushes can be used to draw clean strokes with fewer points. Try these tools if you want to export clean SVG or DXF.
Align to Grid
This option aligns strokes directionally with the grid lines, yet does not snap them to the grid. Use this for quick, accurate sketching guided by the grid's directional constraints.
Allow Turns
Enable this option to allow making turns when drawing with Snap to Grid or Align to Grid. Sometimes it’s easier to just draw with straight lines without lifting your stylus, and this option makes this possible. When Allow Turns is on, it is still possible to go back and forth on the same line.
Autocomplete
Connects start and end points of your strokes. You may see small circles appear showing you possible points to connect to - tap one if it’s useful, or ignore them if not. Autocomplete can be used together with Snap to Grid and Align to Grid. In that case the strokes can snap to any strokes intersecting with the trajectory of the stroke.
Active Layer Only
This option only applies to autocomplete. Activate this option to only snap to lines on the currently active layer.
Snap While Editing
When you Select a previously drawn stroke, you can adjust it using Snap. The Snap points are:
- With single-stroke selections, Snap points are the beginning and end points of any given line and to the four corners and the center point.
- If the stroke is drawn with Snap to Grid, the apexes work as Snap targets as well.
- With multi-stroke selections, Snap applies to the four corners and the center point.
- When used with Shape Guides, Snap applies to the handles and the center point.
If you select the Snap to Grid option, you can also snap the key points of your selection to the grid. Active Layer Only allows you to snap to strokes on the current layer only.
Drawing with Snap + Grids
When drawing with Snap, each grid has its own guide settings that correspond with the grid's directional constraints.
Dot Grid - Snap: draw horizontal and vertical lines only. Align: draw horizontal, vertical and 45° diagonal lines.
Graph Paper - Snap: draw horizontal and vertical lines only. Align: draw horizontal, vertical and 45° diagonal lines.
Lined Paper - Snap: draw horizontal and vertical lines only. Align: draw horizontal, vertical and 45° diagonal lines.
Isometric Grid - Snap + Align: draw 60° diagonal lines only.
Triangle Grid - Snap + Align: draw 60° diagonal lines only.
1 Point Perspective - Align: draw horizontal and vertical lines, and perspective lines directing toward the single vanishing point on the horizon line.
2 Point Perspective - Align: draw vertical lines, and perspective lines directing to each of the two vanishing points on the horizon line.
3 Point Perspectice - Align: draw perspective lines only that direct toward any of the three vanishing points on the canvas.
圖形指引
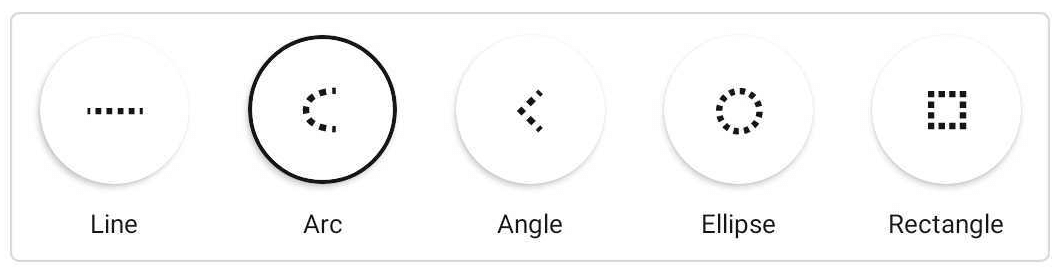
The Shape Guides are your design-sketching friend. The Shape Guides give you precision control over every edge and radius you draw. Use them to sketch partial or complete perfect shapes, and adjust them to any size, shape or angle.
When you activate a Shape Guide, you’ll see a number of features appear.
- The shape of the guide itself. The gray boundary is a reflection of the brush you’re using - narrow or fat - and is the area that will fill when you trace the shape. Trace anywhere on screen to draw the shape.
- The circles or handles of the guide. Touch a handle and pull it, and watch the shape stretch or shrink accordingly.
- The crosshairs. Located at the center of the guide, tap+drag the crosshairs to move the entire guide without altering it. If you double-tap the crosshairs, each guide will respond with a special function:
- The Line guide will limit your drawn stroke to between the handles.
- 弧形工具可繪畫完美的半圓形。
- 角度工具可折至 90度。
- 橢圓形工具能繪畫出完美圓形。
- 四邊形工具能繪畫出完美正方形。
To rotate a shape guide or any selection to an angle, tap the angle field in the status bar at the top of the canvas and a keyboard will appear. Type in a custom value and confirm your choice. The selection will rotate in a clock-wise direction.
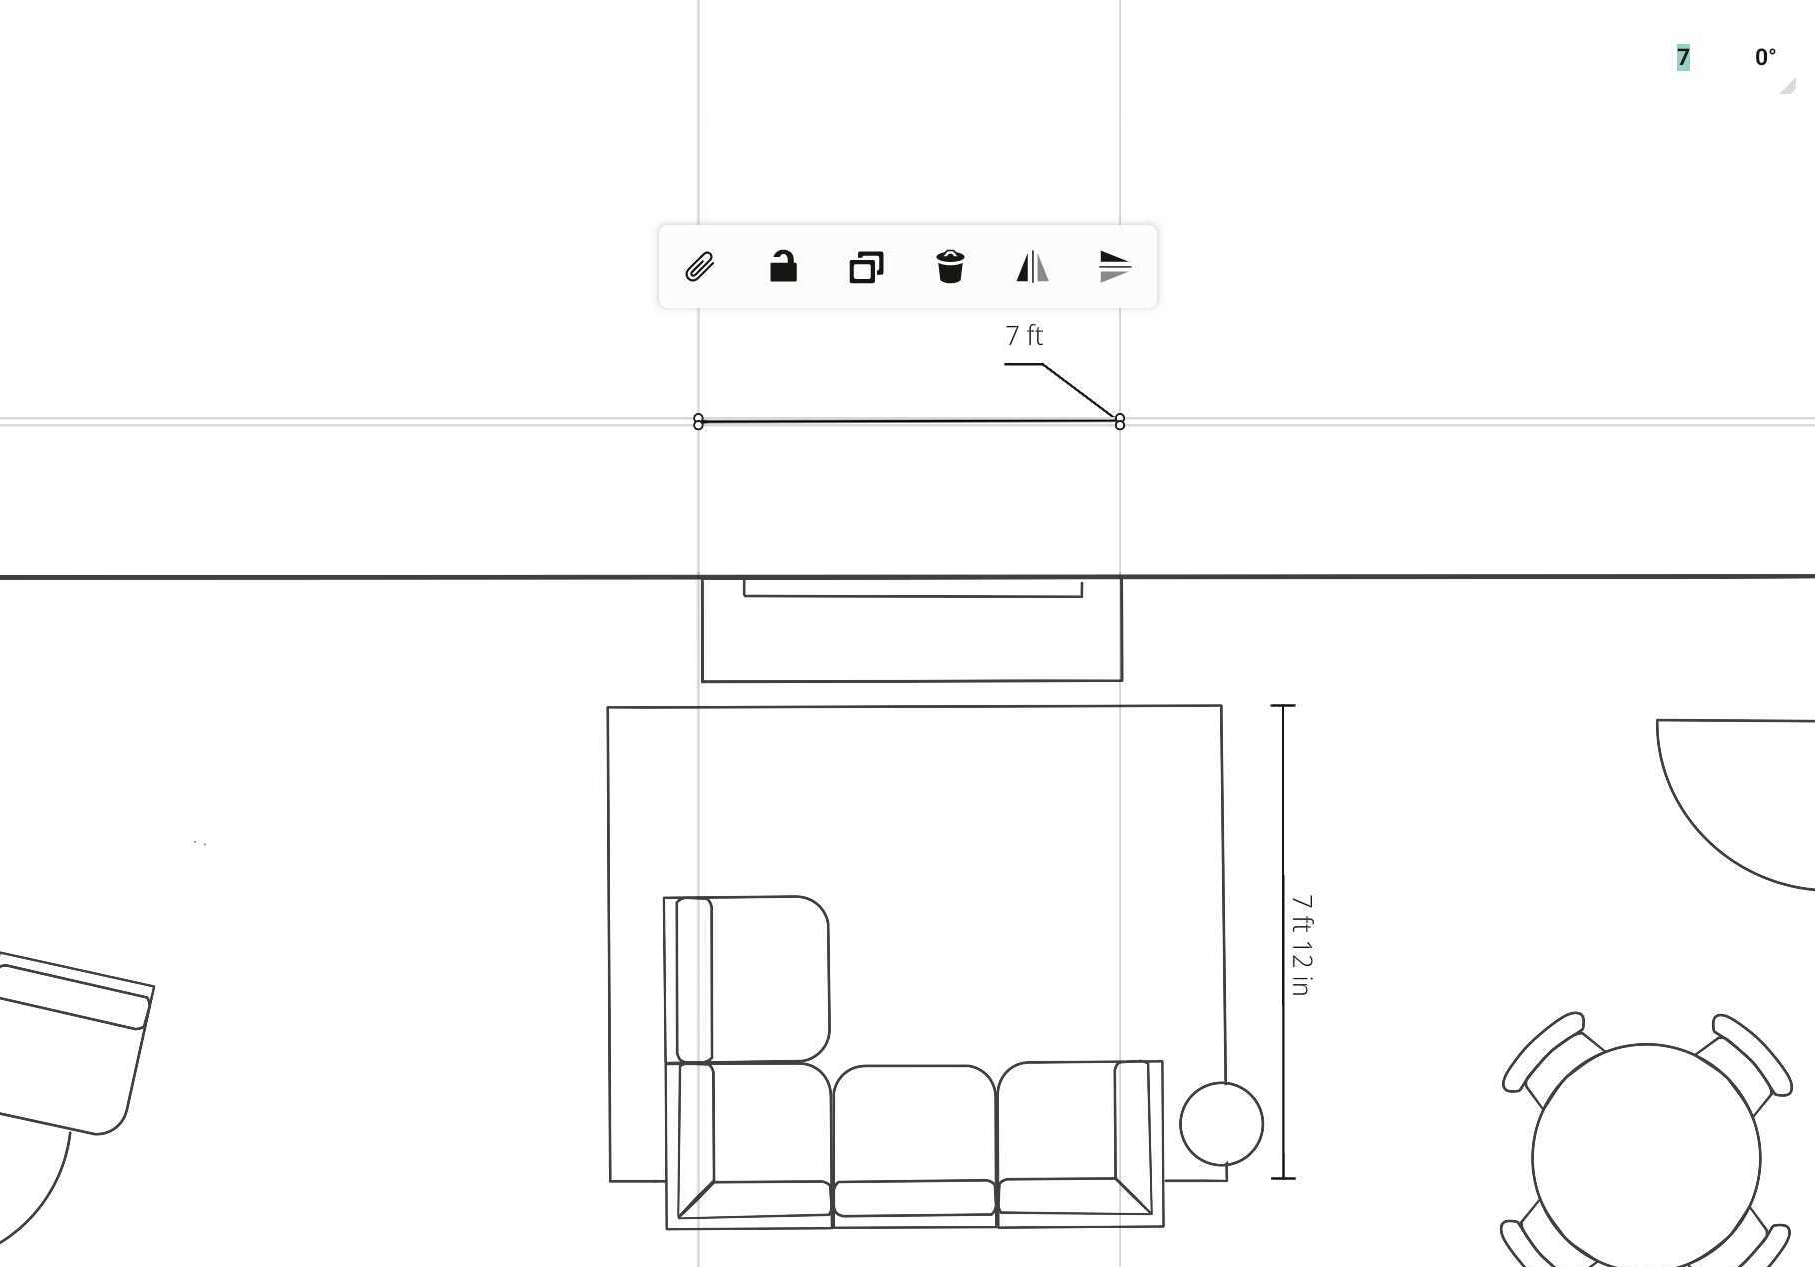
The Shape Guides are really powerful when combined with Measure. If you have both enabled, you can draw lines and other shapes with precise measures and angles. You can see the Measure labels on your guide and tap them to stick them to your plan. (As long as Measure is active, they’ll export with your plan, too.) Tap+hold them to edit the values via keyboard.
You can also use Shape Guides to create measurements labels that aren't attached to a stroke or group for more general use, like adding a scale indicator on the drawing. To do this, just tap the measurement and it will stay on your canvas. You can Select the label and move it around, and scale it like any other stroke.
測量
In Concepts, all the strokes, selections and imported items have measurements attached to them. These measurements are not visible on canvas by default, but they can be exposed by enabling the Measure option in the Precision menu. When measurement is enabled, a Measurement-layer will appear in the layer list.The units and Scale used in the drawing are based on your current app Settings. You can choose between Metric, Imperial and Digital unit systems depending on what you prefer.

An example of measurements labeling an interior layout.
When you draw a stroke with the Measure enabled, you can see a live measurement attached to it and showing the exact length or area of the stroke. To keep those measurements on screen, tap the measurement label to "stick" it to the canvas. You can Select a measurement label with Item Picker or Lasso to flip, mirror or otherwise adjust its positioning on the canvas. If you’re a leftie, you can change the side which the labels appear, in the settings. Note that labels will only appear and Export with your drawing while Measure is active.
Select a stroke and then tap+hold a measurement label to enter a custom length. It will change the length of your line to be the value you entered. You can also change the length of the selection by tap+holding the length indicator up in the status bar.
Tap+hold+drag a measurement label to reposition it along your drawn line.
Entering a custom measurement value for a selected stroke.
Measure is also useful when working with the Shape Guides to help your design plans retain exact dimensions. Enter a custom value with a tap+hold on the measurement label , and the entire guide will adjust to your value. Specify the length of the side of a rectangle, and the rectangle will adjust accordingly. Tap+hold the radius of your circle and enter a value, and the circle will adjust likewise. The same applies to any value of any shape guide, including angles.
You can also create static labels (i.e measurements that aren’t attached to any stroke in your drawing). Read more in the Shape Guides section.
Area Measurement
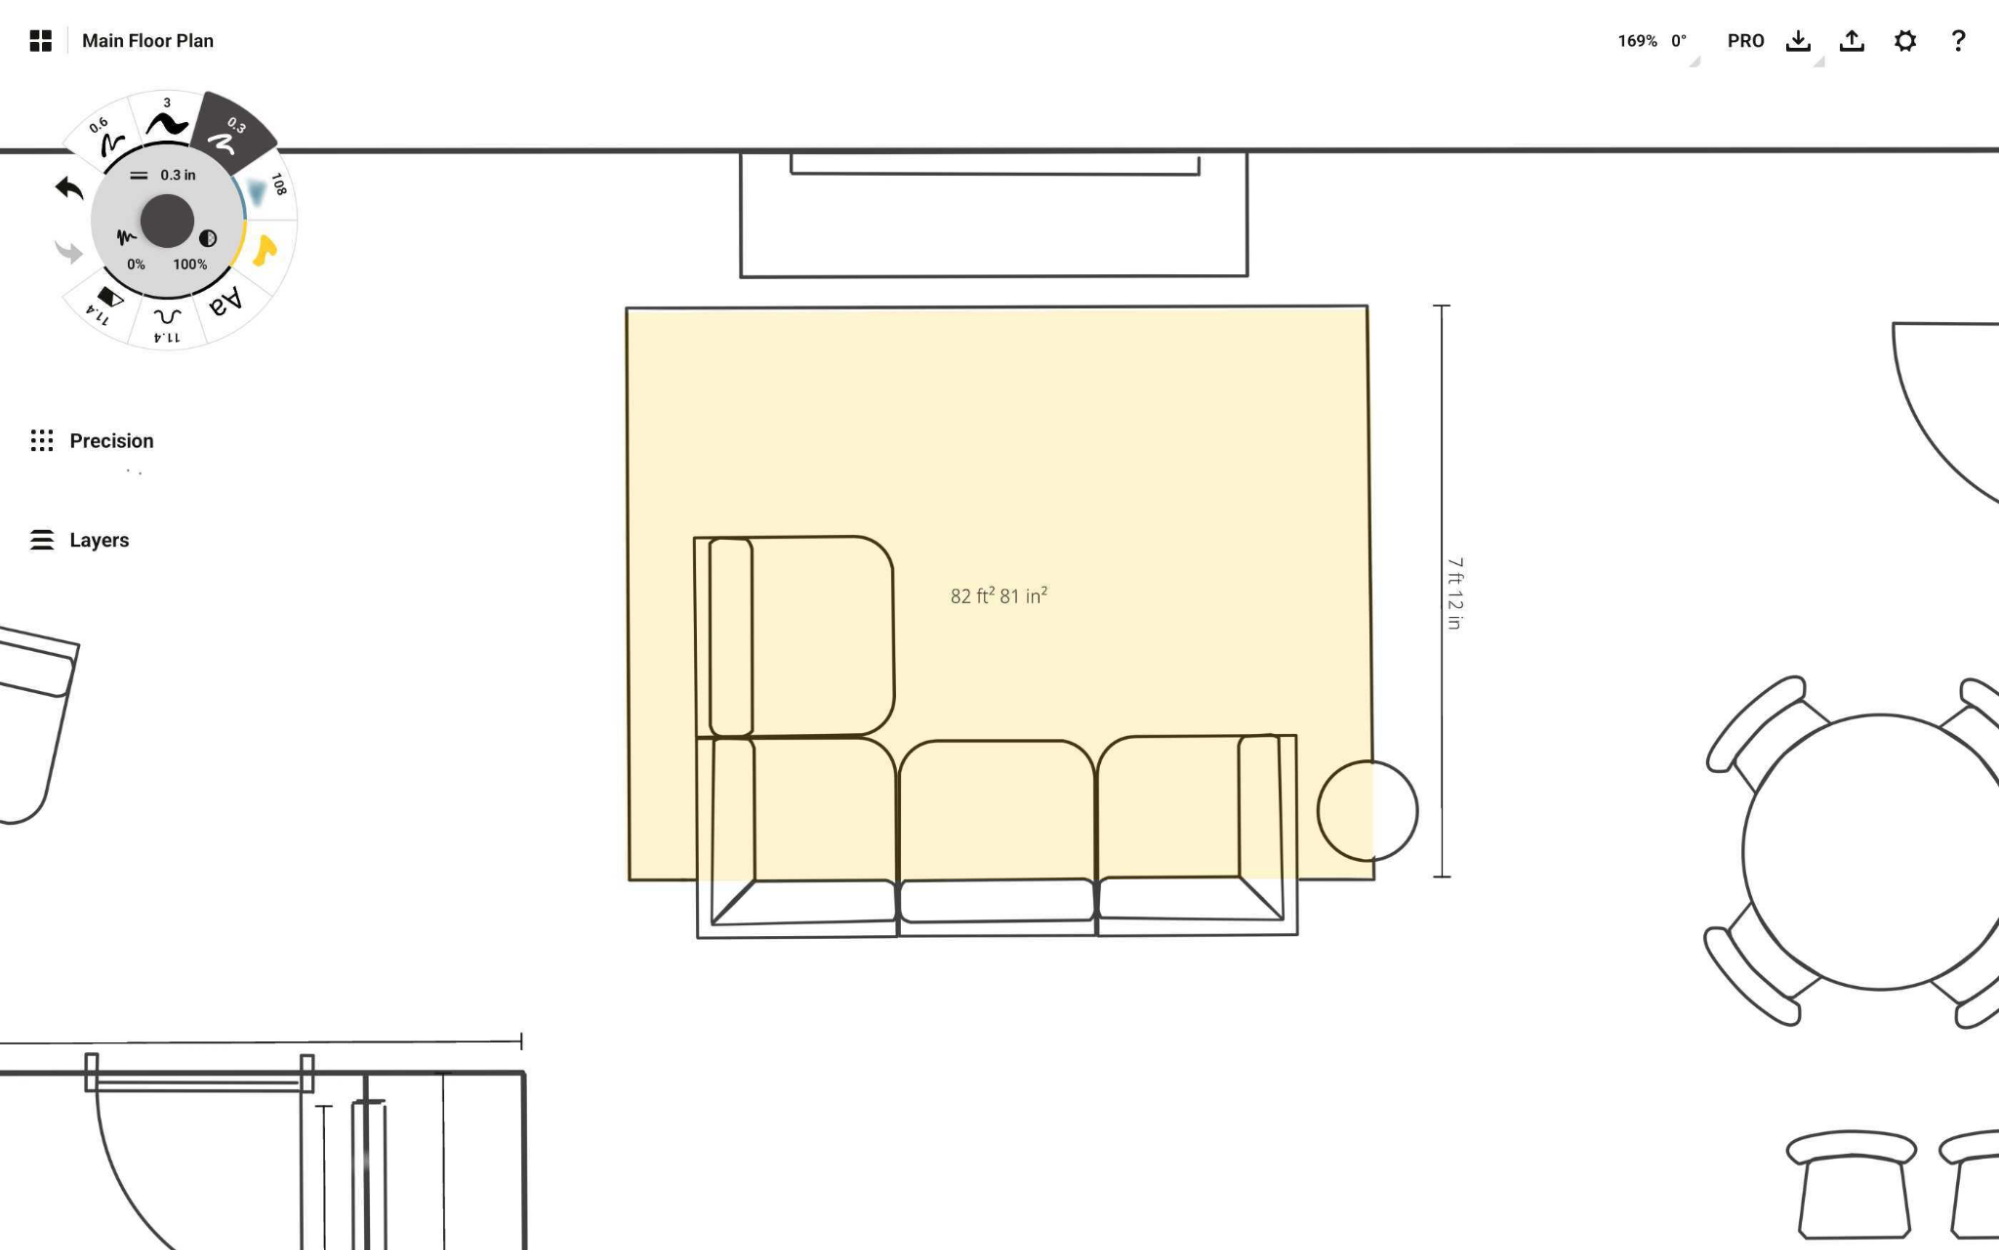
The Fill tool is different from all the other brushes in terms of the measurements shown. While other strokes show you the length, the Fill tool shows you the area as well. Use this to estimate material consumption in your renovation plans or quickly check the size of a certain area in your garden plan. When drawing, the area measurement appears in the center of the fill. Once the fill is finished, tap on the measurement to save it on canvas.
Measurement Popup
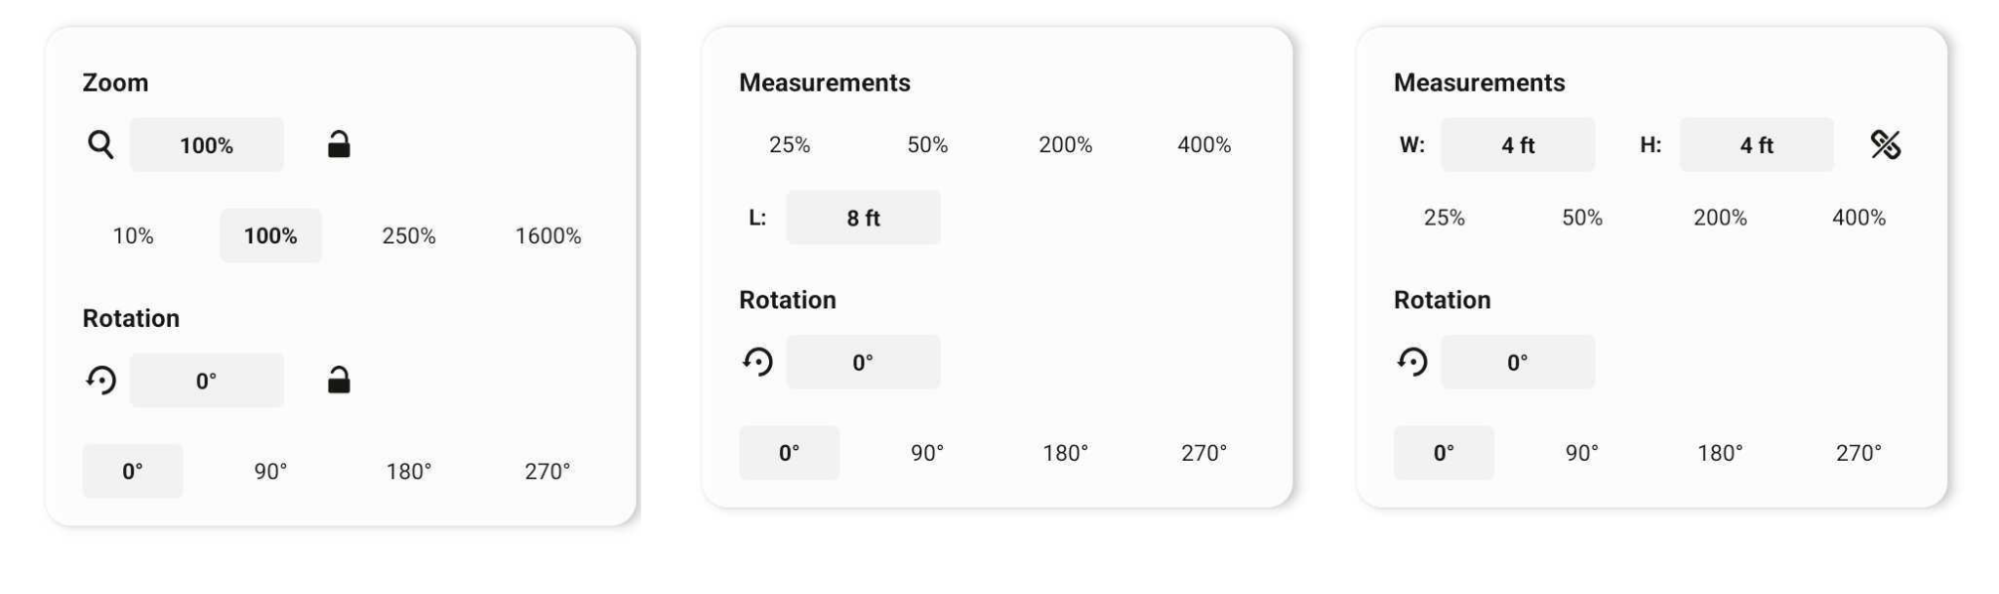
Various relevant measurement statuses. The Measurement Popup gives you quick access to relevant, available measurement workflows. This includes zoom, rotation, and length / width / height values as applicable to your canvas or selections.
On the Status Bar, you'll see a field stating your current relevant zoom, rotation and selection status. Tap on this field to open the Measurement Popup. Here you can quickly access zoom and rotation presets for your canvas or selection, lock and unlock canvas zoom and rotations, and use the fields to control a selection's dimensions.
With a single stroke selected, you’ll see the length, width, height and rotation of the stroke. With multiple strokes or an image selected, you’ll see the width, height and rotation of the selection. With a fill stroke selected, you’ll see the width, height, length, area and rotation of the selection. You can also choose to lock/unlock the relation of width and height when adjusting the values - tap the lock to toggle.
The values in the popup can be inline edited with a tap. Enter measurements in any units and they will be automatically converted to match the document units you have selected in the Workspace Settings. You can also enter percentages and the app will calculate the matching values for you. The selections can be scaled or rotated by tapping the presets on the measurement and rotation sections; additionally, you can customize the presets to your preferred choices by tap+holding a preset.
Measurement Layer
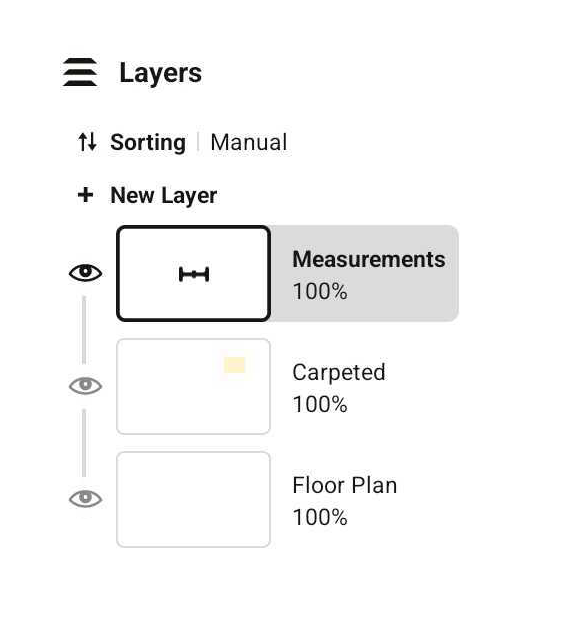
When Measure is activated, you’ll see real-world measurements appear beside your strokes and a Measurement layer in your layer list. You can move this layer up and down, as with any other layer to change its visibility. The measurement layer allows static measurement (i.e. measurements that are not associated to any strokes) to live in its own layer.
比例拉伸
Scale is a multiplier that defines how big an object is in real life as compared to its size on screen. Popular scales for model airplanes, for example, are 1:24 or 1:72 which indicates that the drawing is 1/72nd of the real size.
A giant part of the app's Precision toolset that affects every tool and guide in the app, you can set your Drawing Scale and Units by touching the ratio / units button to the side of Measure. You can also access it from the Settings gear on the status bar.
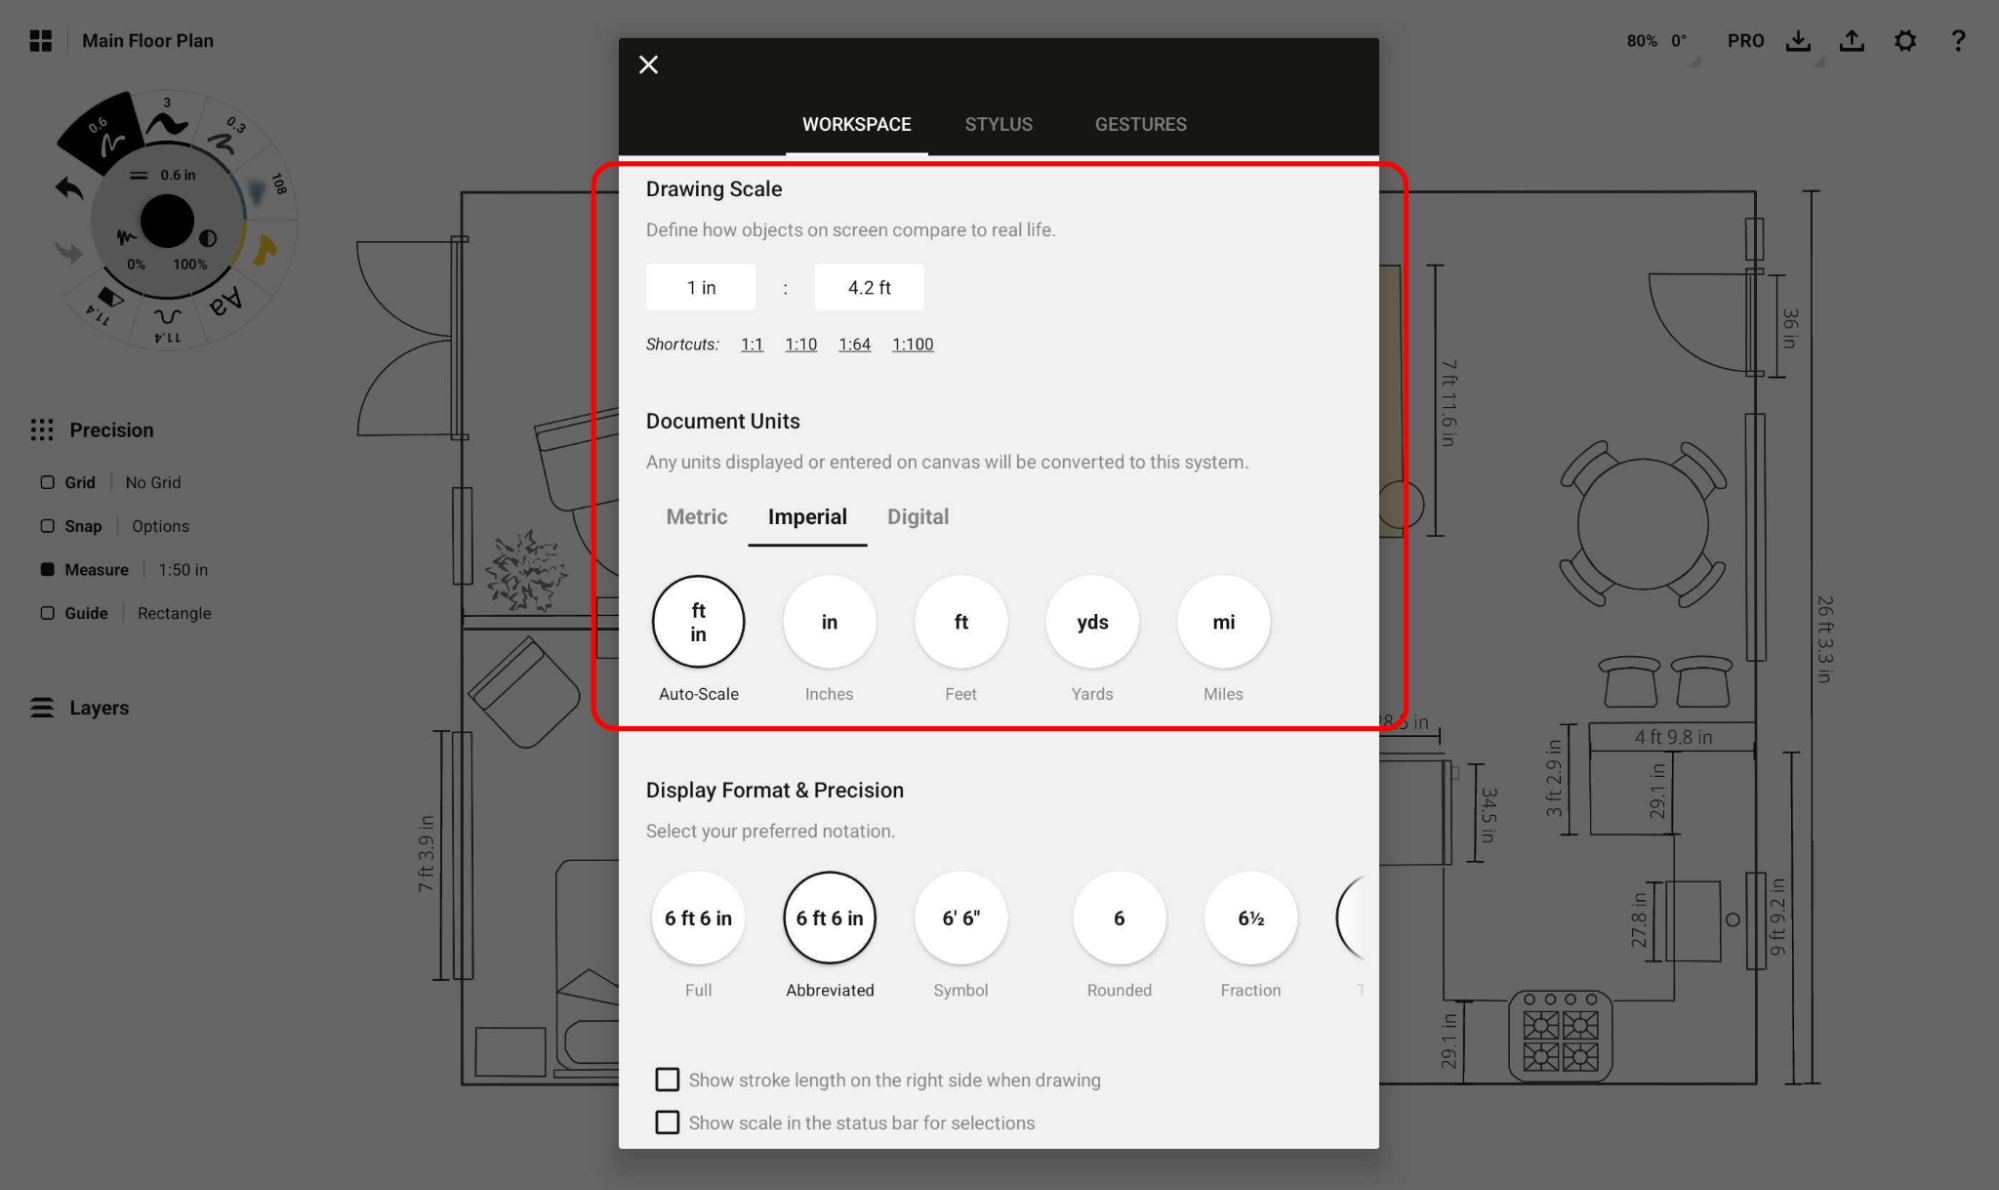
The Workspace tab of the Settings menu will appear - find Drawing Scale and tap one of the popular scale shortcuts or enter your own scale. Be sure to set your Units at the same time, just below Drawing Scale, or it will revert to your Units set.
From this point onward, all tool and measurement values will appear according to this scale, so don’t be surprised when a pen set to 2 points is suddenly .015 inches. Your tool presets will be the same as you’ve set, but the units will display as converted.
How to Set Scale with an Imported Plan or Photo
- To set scale in a project, you need one accurate measurement of your real space. Take out your tape measure or ruler, and measure one actual length of a wall or section represented on your plan. It doesn’t matter which one it is, so long as it’s clear and easy to mark on your screen.
- Import your photo or plan onto your canvas. (A helpful, in-between step is to lower the opacity of your image (see Layers) so you can see your tools and drawing easily.)
- Turn on Precision, and activate Measure.
- Activate the Line guide, and align the handles on your plan to the same segment of wall or other item that you measured in real life. It helps to double-tap the crosshairs at the center of the Line guide, to contain the boundaries of the line to your measurement when you draw.
- Tap the 1:1 ratio beside Measure. You’ll notice the values under Drawing Scale have been filled in with the current length of the Line guide according to your current units, scale and zoom level.
- Enter your real-life measurement in the second field, and tap anywhere to dismiss the menu. Now when you look at the ratio beside the Measure button on canvas, you’ll see a new ratio - 1:your-new-calculated-value. This will remain the same regardless of zoom level, and regardless of how much you shrink or expand your Line guide.
For a fully illustrated tutorial on setting scale, check out Scale and Measurement in Concepts.