Your Workspace
QUICK SUMMARY
- Set up your favourite tools in the Tool Wheel.
- Customize your canvas by rearranging the Canvas Elements to your liking.
- You can always get back to the Gallery by tapping the gallery icon in the top left of the Status Bar.
Interface

- The Status Bar. From left to right: Gallery, Drawing Name, Menu Toggles (tap to add or remove menus from the canvas), Measurements (Zoom & Angle), Pro Store, Import, Export, Settings, Help. On Windows there are a few additional items: a Drop-down menu, Account Icon, Full-Screen toggle and minimize, Windows and close buttons.
- The Tool Wheel. Eight configurable tools, along with undo and redo. You can drag & drop it on the side (iOS) or in the middle (Windows & Android) of the canvas to change it into a Tool Bar. You can also change between the Wheel and Bar in the Settings.
- Color Palette & Mixer (iOS Only). A configurable on-canvas palette. Swipe to scroll through your active palettes (set these up in the Colors Menu). Tap+hold to mix the palette colors into a gradient selection. Read more about Colors.
- Layers. Layers help organize your drawing. For example, you can organize by tool, iteration, or background/outline. Toggle between Automatic (tool-based) or Manual (custom) modes. Read more about Layers.
- Precision Tools. Activate Grids, Snap, Measure, and Shape Guides in this menu to help you draw precisely. Read more about Precision Tools.
- Objects. Tap to open the Object Library. Choose objects from the Object Market or My Object libraries. Read more about Objects.
The Title Bar (Windows Only)
The Title Bar is unique to Concepts for Windows. The Title Bar has several familiar buttons from the Windows operating system as well as some unique to Concepts.

- Drop-down Menu. From here, you can save your work and open a new drawing, open an existing drawing, save your work, export a drawing, manage your settings, learn about Concepts, purchase in-app features, find 24-hour Ask Us Anything support and exit the app.
- Start a New Drawing tap +. Save your current drawing and start a new drawing by tapping or clicking on the +.
- Account. Sign up or sign in to your free Concepts account.
- Pro Store.
- Full Screen. Enter full screen for fewer distractions. Full-screen mode will hide the title bar as well as the Windows Taskbar at the bottom.
- Minimize the app to wait in your Windows Taskbar.
- Full Screen vs. Window Mode. Shrink your canvas and show your workspace, or expand to a full display.
- Quit. Tap X to quit Concepts.
The Status Bar

At the top of the screen, you'll find your Status Bar. Here, you'll find many of the important tools to get the most out of Concepts.

- The Gallery. Tap to return to the Gallery.
- Drawing Name. This displays the name of your current drawing. Tap the name to rename the drawing.
- Precision Toggle. This button toggles the Precision menu on the canvas. You can make it visible or hide it, depending on your needs.
- Layers Toggle. This button toggles the Layers on the canvas. You can make layers visible or hide them, depending on your needs.
- Objects Toggle. This button toggles the Objects menu on canvas.
- Canvas Status and Measurements. This shows the current canvas zoom and rotation; if there's an active selection, its measurements will appear here. Tap the values to open a measurement popup with more controls, or tap+hold the values to inline edit them.
- Pro Store. Tap here to open the store. The button represents the status of your purchases: PRO when you have purchased either an Everything subscription or Essentials, and will say Go PRO when you haven't made a purchase. You can also restore purchases here. On Windows, you can get to the Pro Store from the Title Bar.
- Import. Tap this button to access Import options.
- Export. Tap this button to open the Export menu.
- Settings. The Workspace tab offers drawing-specific settings like Background Type, Artboard Size, Units and Scale. Tap the Interaction tab to configure your gesture and styli preferences.
- Help. Access our in-app support via Ask Us Anything, and find links to our latest stories, video tutorials, FAQ, and more.
The Tool Wheel / Bar


Below the Status Bar is the Tool Wheel. This is where you access your tools, configure their properties and choose your colors.

Tools

The outer ring has up to eight configurable tool slots. Tap a tool to activate it and start drawing. Tap again (or double-tap an inactive tool) to enter the Brush menu, where you can choose from many different tools and set your tool's presets.
Brush Preferences


On the inner ring of the Tool Wheel are three settings you can use to configure your brush preferences: size, opacity and smoothing.
- Size. Use the size slider to determine the size of your brush. Choose one of the four presets at the top, and set those for fast toggling between favorite brush sizes.
- Opacity. Use the opacity slider and presets to set the opacity of your brush. 100% is fully opaque, 0% is fully transparent.
- Smoothing. Use the smoothing slider and presets to set how much smoothing you'd like your line to have. 0% smoothing gives you the raw stroke straight from your hand input, 50% smoothing removes many of the bumps for a more polished stroke, and 100% smooths the stroke into a perfectly straight line between start and end points, no matter how wriggly it started.
Setting the Presets
Tap one of the preferences to bring up a slider and find your tool's presets. Select a preset by tapping on it, then drag your finger along the slider to set its value, or tap+hold the preset value to manually enter a new value. Tap again to dismiss the menu.
If you want to adjust any of the values quickly in flow, just tap+hold+slide on any of the shortcut buttons to adjust immediately. The slider will open as you slide it and close as soon as you lift your finger from the screen.
Color
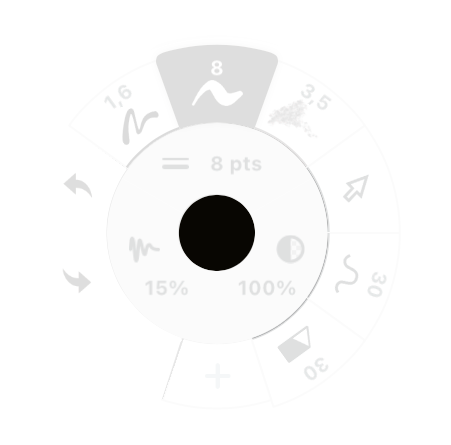
At the center of the tool wheel, you'll see the current color and opacity of your brush. Tap the circle to bring up the Color Wheel and find the color picker. Tap+hold the circle to bring up your Colors menu (Color menu, palettes and mixing are currently only on iOS).
Undo / Redo

At the side of your Tool Wheel, you will find the undo and redo buttons. Tap the arrow pointing to the left if you want to undo a stroke. Tap the arrow pointing to the right to redo a stroke. You can also use the two-finger tap gesture to undo and three-finger tap to redo. Concepts also has keyboard shortcuts: Ctrl+Z to undo, Ctrl+Shift+Z to redo.
Because Concepts is vector-based, you can always edit your lines instead of undoing them. You can Select and adjust any line, Nudge it, Slice (erase) it, or delete it entirely whenever you want.
The Color Palette (Only on iOS)
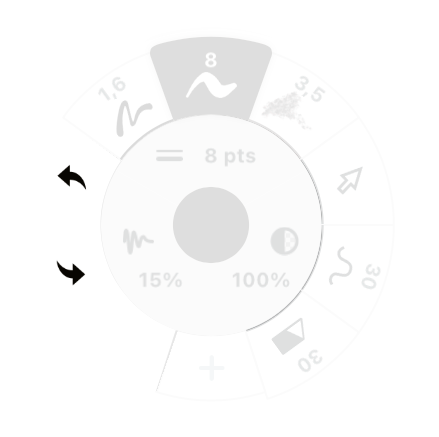
Below the tool wheel is the Color Palette. You can customize and add palettes in the Colors menu. Any palette you activate in the Colors menu will appear on screen. You can swipe between the different color palettes.


- Tap a color to set it for your tool.
- Tap+hold+drag to activate the color mixer mode, where the colors in your palette will blend into a seamless gradient.

- Swipe between the different palettes. Access the colors menu, by tap+holding the color dot in the middle of your tool wheel.
Switching to A Tool Bar
By default, your tools are arranged in the Tool Wheel. Concepts also offers a Tool Bar option, providing the same tools and options as the Tool Wheel.
You can switch to the Tool Bar in a few ways:

- Start moving the Tool Wheel with tap+hold+drag.

- On iOS, drag the Tool Wheel on either edge of the screen. The canvas layout manager will highlight, and the Tool Wheel will change into the Tool Bar.
- On Windows and Android, drag the Tool Wheel onto the canvas layout manager in the middle of the screen and it will turn into the Tool Bar. You can then drag the Tool Bar to your preferred location.

- You can also change between the Tool Wheel and Tool Bar in the Settings. Navigate to Settings → Workspace → Tool Setup.
If you do not see the size, opacity, and smoothness or the color options in your Tool Bar, you are likely in compact mode. Swipe the Precision or Layers labels towards the center of the screen to return to normal mode.
Customizable UI

Everyone works differently, which is why we have made the workspace in Concepts fully customizable. Every menu on the screen can be moved to maximize your Canvas space and tool usability.
Scaling the Tool Wheel and Moving the UI Elements

You can scale the Tool Wheel by pinching or expanding your fingers on it. Find the size that is most comfortable for you. If you are using Concepts on a desktop device, hover your mouse over the Tool Wheel and scroll up or down.

The Tool Wheel, Precision menu, Layers menu, and Object Library are movable canvas elements. You can customize the Canvas to make it more suitable for your workflow. Relocate the canvas elements by tap+hold+drag them, then dropping them on the Canvas.
Minimizing the UI
You can set your workspace into three different modes: normal, compact and hidden modes.

- In normal mode, all menus are visible and the Tool Wheel is completely on canvas.

- Swipe outwards on the Layers or Precision menus, or corner the Tool Wheel to enter compact mode.

- In compact mode, the labels are minimized into simple icons, and the Tool Wheel is docked. The size, opacity and smoothing sliders are hidden from the Tool Bar. To return to normal mode, drag the Tool Wheel from the corner, or swipe inwards on the Layers or Precision menus.
- Once in the compact mode, swipe outward again on the Layers or Precision menu buttons to enter hidden mode. Hidden mode hides all of your menus to maximize your workspace.
- When in hidden mode, tap the Concepts icon on the canvas to bring the menus back. You can also configure one of your gesture shortcuts to toggle hidden mode; see Interactions to learn more.
Hiding Canvas Elements
You can hide the Precision, Layers and Objects menus from your Canvas if you don't need them.

Tap on the Canvas menu toggles in the Status Bar to choose whether to show or hide them. Items currently on Canvas show a line under their icon.
Left-Handed Support

Concepts works great for both left-handed and right-handed people. While the app provides some default options when you first launch it, these are just suggestions. Try moving the Tool Wheel to the opposite side of the screen and watch the menus switch orientation. Move your menus so they will not be in the way.
For a step-by-step walkthrough on setting up your workspace comfortably for you, read Setting Up Your Menus, Brushes and Presets.