筆刷和工具
筆刷手勢
To use a tool, just tap on it and start sketching. Tilt and pressure are supported with some styli (like Apple Pencil) and with some tools (each tool is a bit different), and will happen naturally as you tilt or press on the screen. Try them out and see which you like best.
As mentioned in the Tool Wheel section, the middle ring allows you to adjust the active brush’s size (how big it is), opacity (how transparent it is), and smoothing (how bumpy or smooth you want your line to appear once it’s drawn. 0% is no smoothing, 100% gives you a perfectly straight line between your starting and ending points no matter how wriggly you get). Tap on one of these options to bring up your presets, or for a shortcut, just drag across it with your finger to adjust.
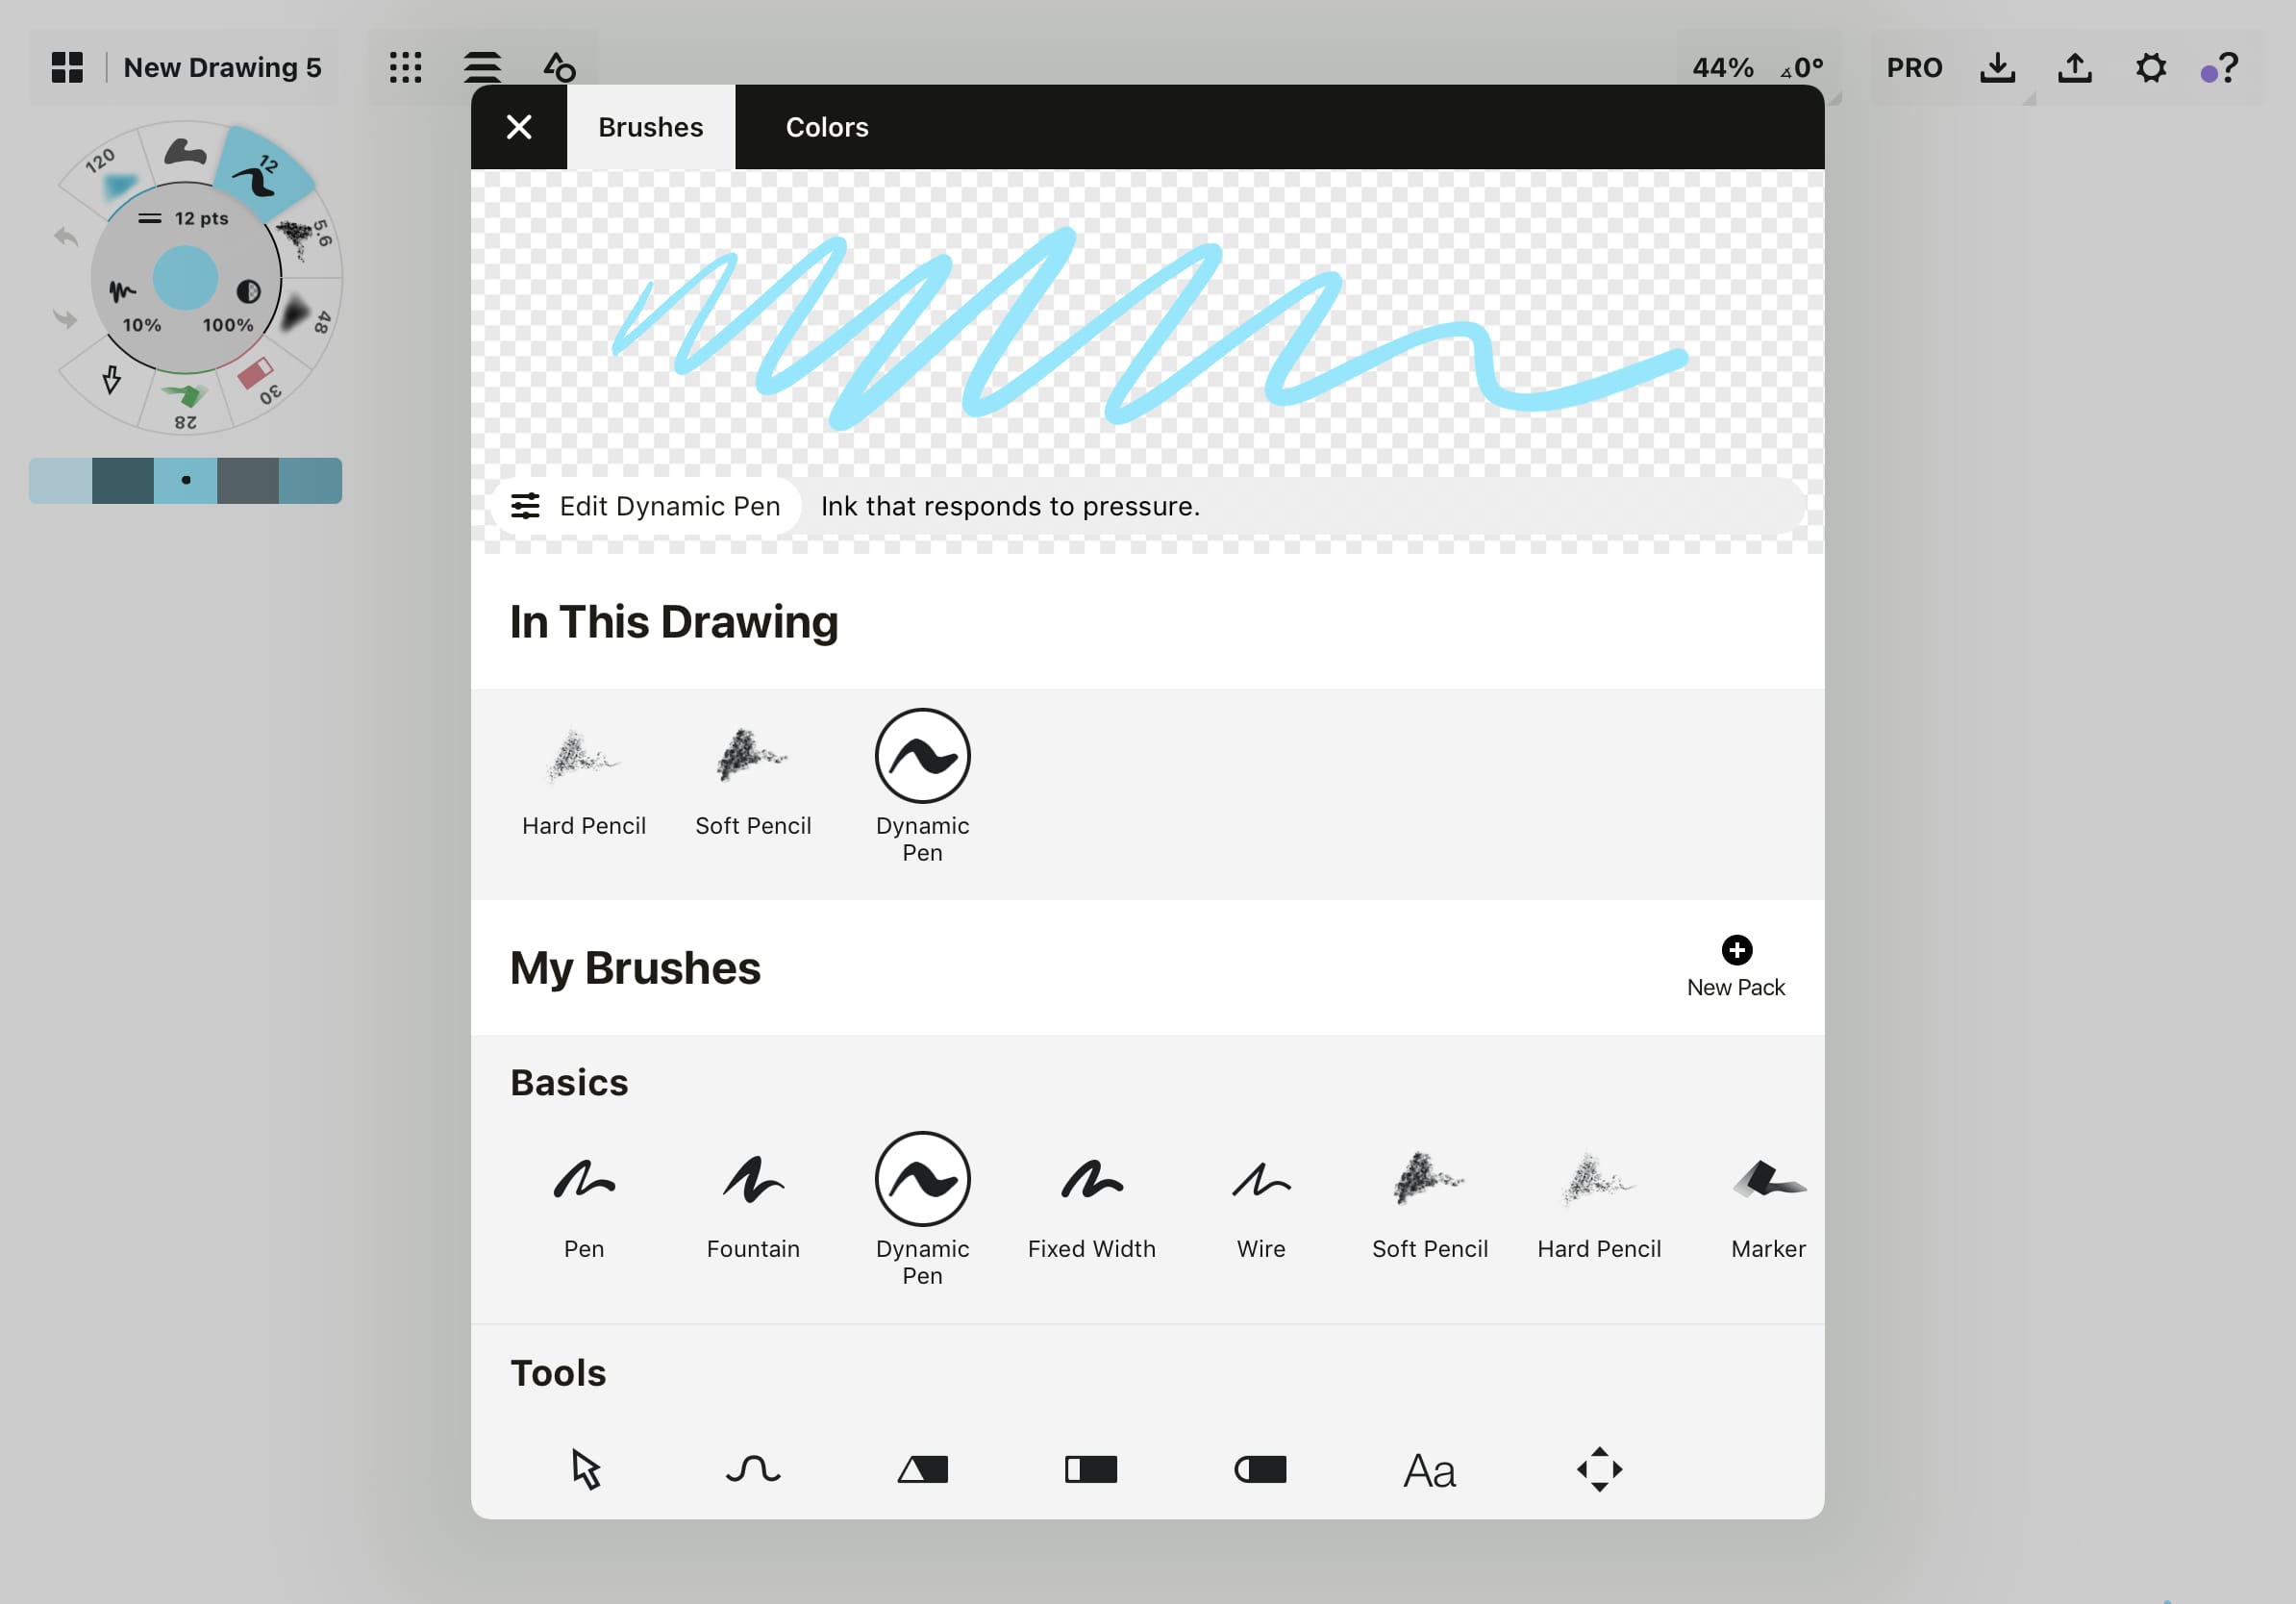
To access the Brushes menu, tap again on the active tool, or double-tap on an inactive tool.
基本筆刷和工具

鋼筆類
Pens are most widely used in sketching when you want to make a statement or reflect permanence. Our Pen and Fountain Pen tools react to velocity to vary their line width - draw fast to get a thicker stroke. Our Dynamic Pen reacts to pressure. The Fixed Width Pen does what it says on the tin - it maintains a constant width from cap to cap.
Wire
This tool behaves like a traditional CAD or vector tool would - the line width is maintained at any zoom level, making it perfect for wireframes, light CAD drawings, perspective layouts, and more. Export an SVG file using Wire into another vector program and find the same clean line.
硬角 & 柔角橡皮擦
Slightly different in texture and feel, these traditional sketching tools are modeled on real pencils. They react naturally to tilt, pressure and velocity with a supported active stylus like Apple Pencil. For great shading, tilt your stylus like you would a real pencil.
Marker
Have you ever used a COPIC marker? Our markers have the same texture, transparency and edge that these popular markers have, making them great for highlighting, texturing and illustration work. Give yourself a wide tip or a narrow one, or increase / decrease the opacity to your liking.
Watercolor
This artistic wet brush blends beautifully with consecutive watercolor strokes in the same layer. Within a single layer, you can interrupt the blending by using other types of strokes in between (like Pen). You can use the eraser tool (below) to mask different pieces without affecting the blending. Enjoy using this brush with infinite Layers for an organic, dry edge effect.
噴槍
The airbrush flows onto the screen with subtle texture and soft edges like the real medium. It's popular with sketchnoters and product designers for highlights, for painting, and gives your design some sheen.
填滿筆劃
Not to be confused with Bucket Fill (which we’re currently working on - lots of definitional bits to think about with the interactive parameters of vector strokes), the Filled Stroke tool is a brush unique to Concepts. It allows you to draw any type of shape - simple, wriggly, complex - with a stylus or finger, and fill the positive space inside.
“Positive space” refers to any area inside your drawn line between start and end point that is original to the stroke - as in, the area hasn’t been drawn over a second time during the same stroke. This crossing over of a filled area causes it to become “negative space” and remain empty. Of course, if you draw over the area a third time within the same stroke, it becomes positive again and is filled.
Your resulting fill is a clean finish, customizable with opacity and line smoothing. Excellent for shadows, light, and complex figures, we think you’ll appreciate the possibilities this brush offers your design + art toolkit.
Troubleshooting. Since Filled Stroke takes into account the start and end points of your line, make sure Line Smoothing is set below 100%.Otherwise your shape will disappear into a line or a point as though the rest of the stroke never happened. Also check that your transparency is above 0%, or like all strokes it may disappear, only to be found when Selecting in the area.
For a fun tutorial on the Filled Stroke tool, check out Drawing Shapes Instead of Lines: 8 Exercises for Filled Stroke.
Dotted
Great for annotations, partial boundaries or a bit of variety, the dotted line is a single stroke, not thousands of dots. Treat it as a textured stroke susceptible to color, opacity and smoothing.

Selection Tool
The Selection tool can be added to any of your tool slots and has two modes: a single-select Item Picker and a multi-select Lasso. Toggle between these two options using the popup at the bottom of your canvas, or put a second finger down anywhere to temporarily toggle the mode.
The Selection tool can also be activated via tap+hold anywhere on the canvas - helpful for when you're in sketching flow and don't want to change tools. It can also be assigned as your finger gesture in Stylus settings. To learn more about this tool, see Selection.
Nudge
The Nudge tool allows you to push and pull your lines about like a piece of string. Touch your stylus directly onto a stroke and drag it to pull it. To push a line, touch your stylus away from a line and watch the circular nib appear, then nudge at your line. You can adjust the size of the tool using the size preset in the tool wheel. Use a smaller size and zoom in to nudge tight corners, use a larger size and zoom out to nudge gentler curves.
We have an illustrated tutorial on using the Nudge tool here.
We have a great video tutorial on creating icons with Nudge here.
Slice
The Slice tool is about as close to a real eraser as you’ll get in the vector world. It’s not exactly a pixel eraser... you can’t rub away edges of strokes, but you can cut strokes into pieces - redefining them into separate, independent strokes - and erase aka destroy your vector data by sliding the puck across them.
The Slice puck is adjustable for size. Make it bigger to “erase” a scribble with a swipe, or make it smaller for more precise incisions, then select and delete the remaining line.
You can also set the size to zero and divide your strokes without chopping away at their length (handy for strokes that use exact measurements). It might not appear that anything happened when you ran your puck through the line, but try selecting one end of the stroke and you’ll see that it was cut in two.
When slicing shapes made with the Filled Stroke tool, you can cut from an outer edge into the shape and carve out full areas.
For a full tutorial on how to use Slice (and when to use it versus the Hard and Soft Erasers), check out The Slice Tool: Divide and Conquer Your Ideas.
平移
Whether you want to showcase your work to your client or just pan through your infinite canvas, you can use the Pan aka View Only tool. It allows you to pan and zoom without accidentally selecting or changing anything in your drawing.
文字
Text labels are an easy, clean way to add annotations to your drawing. You can manipulate text the same way you manipulate other strokes and images.
- Set the active tool to Text. It might already be on your toolbar, or you may need to select it from the Brushes menu.
- Tap anywhere on screen to add a new text label. The keyboard will appear; type or paste text, then dismiss the keyboard by tapping done to solidify the label.
To edit a text label, Select it, then tap the text edit icon in the popup. It will take you back to the keyboard.
You can select and modify the appearance of your text label just like you’d select any other stroke. Select the text, then change its color or opacity via the tool wheel, use the Selection popups to rotate, flip, scale, group, lock, delete it (etc), or use the control points to stretch your text into Star Wars-like perspectives and align it with your drawing.
Concepts has full support for any language your device can input, including emojis :). We are currently limited to a single font, but we plan to allow font selection in a future update.
Hard Mask & Soft Mask
In a traditional pixel-based world, erasers delete things permanently. But vectors aren’t pixels, they behave and remember data differently, and if you're comfortable with programs like Adobe Photoshop or Autodesk Sketchbook Pro, the mask tools will function similarly to masking tools in aforementioned software. They visually remove anything underneath them, but the data isn't actually gone. You can still retrieve old strokes later, or adjust your mask as your drawings progress.
If you want to remove strokes completely, try selecting them with a tap+hold and then use Delete, or use the Slice tool to incise and delete sections or destroy them from the canvas.

Double-tap the mask button to open a Quick Clear menu. Here you can choose to delete everything on the current layer, or clear everything in the drawing.
The mask stays the same size regardless of your zoom level. This means the further you zoom inward, the smaller its effects will be - very useful for working with the details. You can also change the size of the mask using the Size slider, and its effects will scale the same way.

The Hard Mask gives you crisp, clean edges; the Soft Mask works beautifully with the pencils (and any other tool) to soften edges in a true-to-life, artistic manner.
Brush Market Brushes
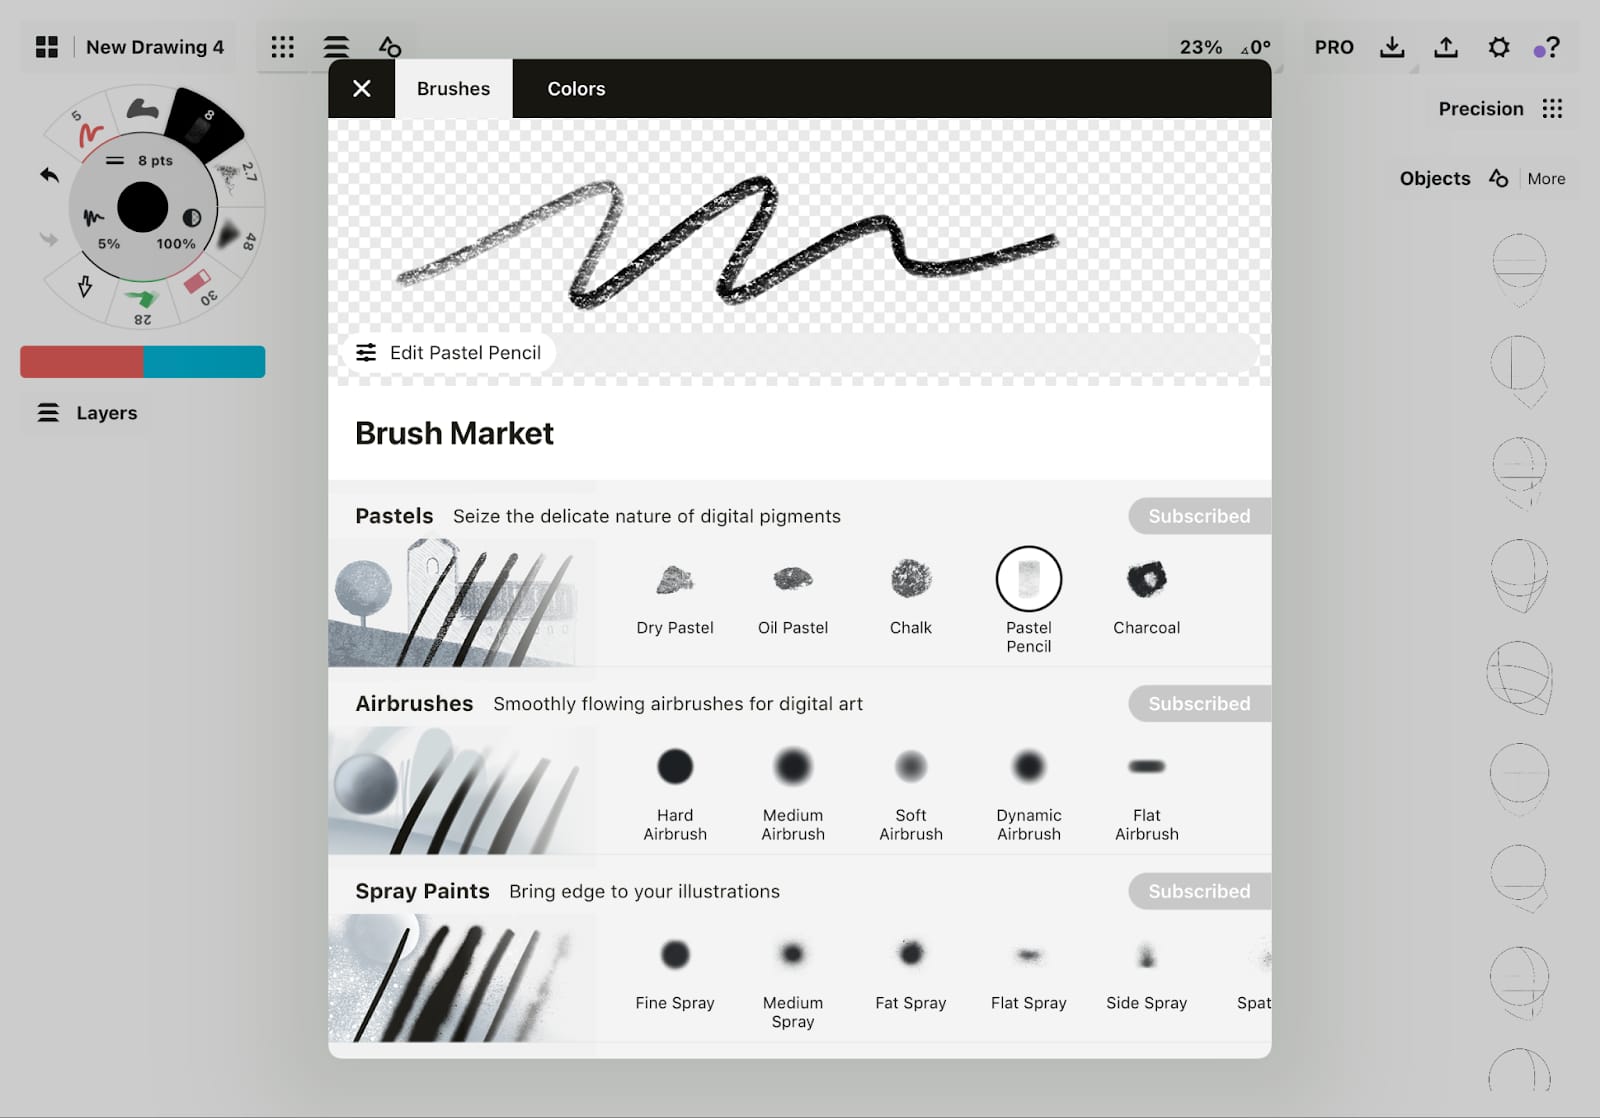
The brushes in our Brush Market are specialty brushes that add artistic texture to your drawings. These brushes are designed to work with our brush editor and use stamps and grains as their base. They are fully adjustable like all of our vector tools, but they differ from the basic brushes in that they’re created using pixel-based images or “stamps”.
The only place this might get in your way is if you are creating giant-sized posters where resolution matters. When you zoom in far enough, you start to see the pixels the stamps were created from. If this is an issue for you, stick with the Basic Brushes up top, and also avoid the Dynamic Pen, it’s also stamp-based. We hope to update this pen to act resolution-independent soon.
Any brush in the Brush Market can be edited. Tap “Edit” in the preview window at the top of the menu to bring up the brush editor. We recommend you duplicate the brush first and then make edits, but you can tap “Reset” at the top of the brush editor to restore the settings back to original at any time. You can alter the brush grain’s size and rotation here to match your project’s scale. Read more on editing your brushes and editor controls in Creating a Custom Brush below.
Tiling Patterns - An Interior Design library of classic and trending floor and wall patterns to add fast design elements to your floor plans. This library was created by Interior Architect Jessika Wendel (@visualisieren.koennen.alle). 25 brushes.
Crosshatching - Add instant depth perception to your drawings with these crosshatch patterns by Artist MiksKS. 14 brushes.
Ink and Blot Textures - Richly textured ink, sponge and spray brushes add real-world grit and grunge to your paintings, created by Artist MiksKS. 14 brushes.
Memphis Patterns - These brushes let you add a variety of playful patterns to your work just by coloring in. 22 brushes.
Waterful - An artistic ocean of wet watercolor styled brushes, created by artist Matthew Baldwin. 36 brushes.
Exterior Walls - Apply natural, realistic faces to your designs. Try the different types of stone, paneling, concrete, plaster and steel. 9 brushes.
Pastels - Captured from their actual physical counterparts, the dry pastel, oil pastel, chalk, pastel pencil and charcoal look and feel very much like the real thing. 5 brushes.
Pencils - These pencils complement the basic hard and soft pencils to give you a full set of traditional sketching pencils, including a 4B Solid Graphite, 2H Solid Graphite, Knife-Sharpened Pencil, Carpenter’s Pencil, round and square Graphite Sticks and a Mechanical Pencil. 7 brushes.
Pens - These pens round out your ink drawing set, including a Ballpoint Pen, a Gel Pen, firm, medium and soft Brush Pens, a Felt Tip Pen and a Felt Tip Marker. 7 brushes.
Spray Paints - Add some beautiful spatters and sprays to your art with these graphitic paint tools. They come in fine, medium, fat, flat, side and spatter sprays. 6 brushes.
Airbrushes - Our airbrushes are soft, smooth and even for coating any design. They come in hard, medium, soft, dynamic and flat brushes. 5 brushes.
Halftones - These vintage halftone brushes stem from printing techniques from the 1890s onward and add some classic style to your comics and illustrations. 14 brushes. Read more about how to use and edit these brushes here.
Creating a Custom Brush
You can create your own brushes in the Brush editor (with Subscription or Essentials). These brushes are image or “stamp” based brushes that you can apply pressure, tilt or velocity settings to, as well as spacing, scatter and rotation settings. You can create simple or deeper responsive brushes that fit your style very easily.
To create a brush, find the My Brushes section in the Brushes menu, tap + New Pack to create a new brush set, then tap the “Untitled” brush that appears in the set or tap Edit Brush up in the viewer. You’ll be brought to the Brush editor.
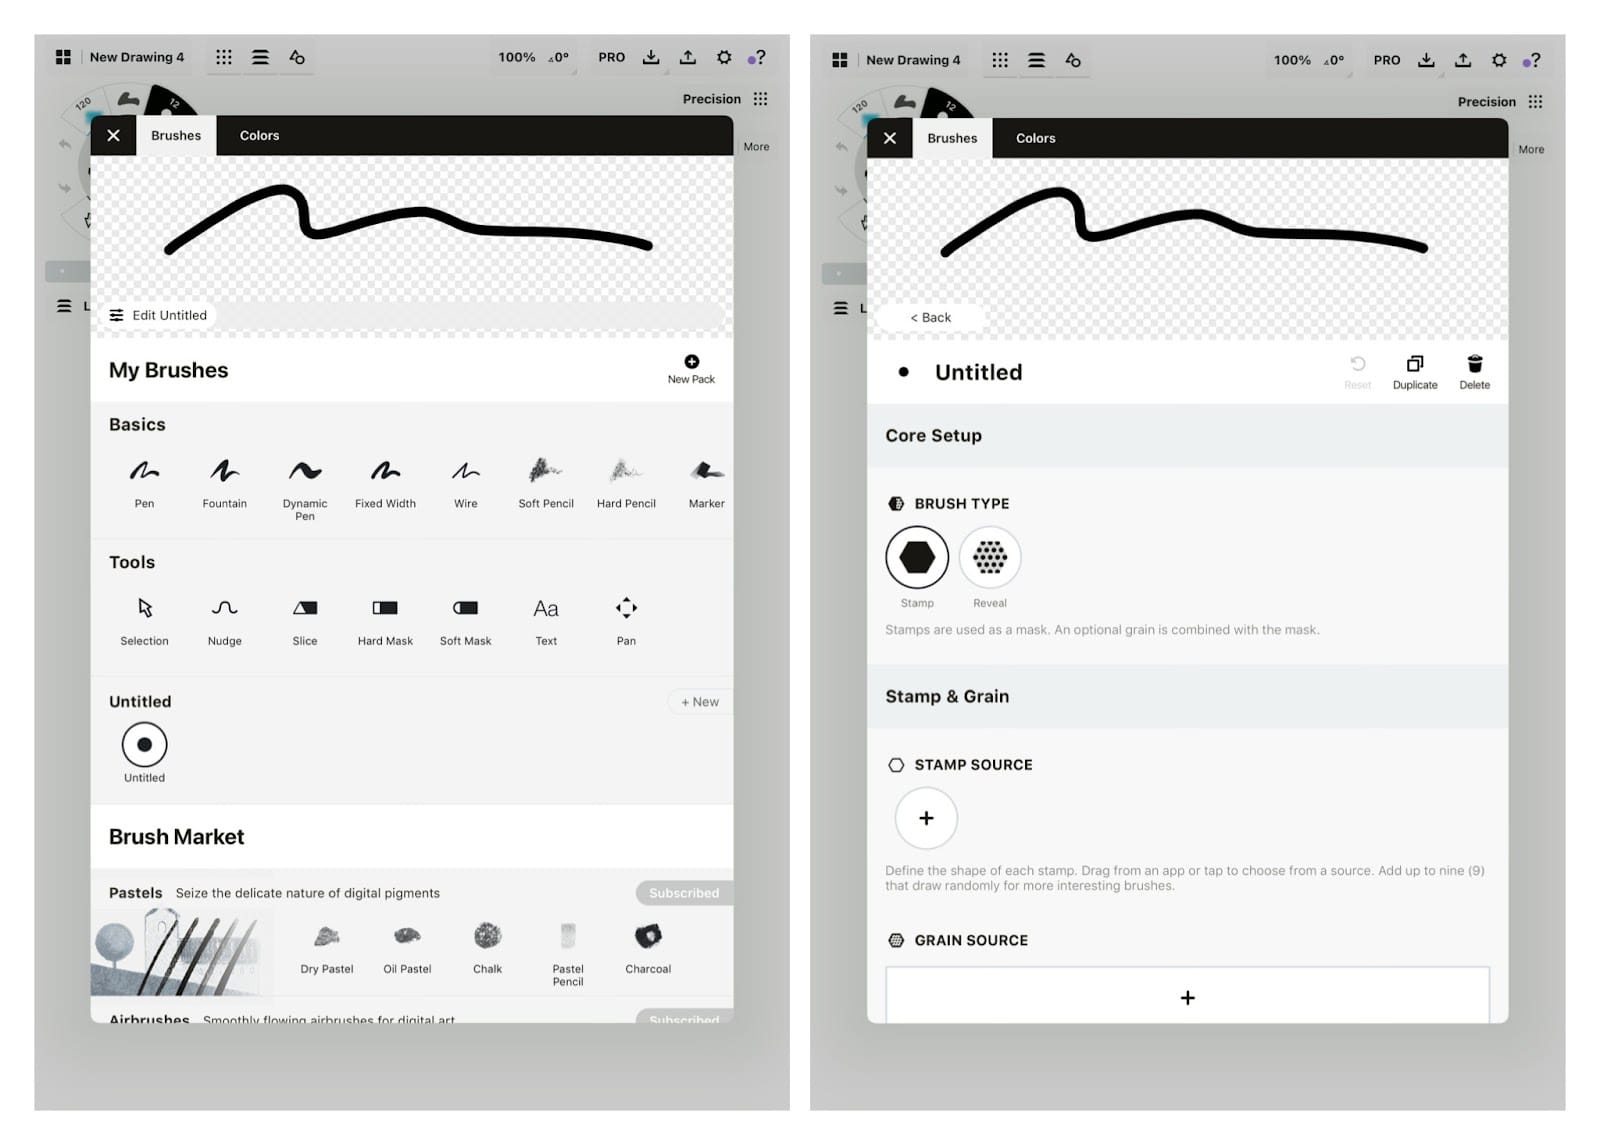
[Left: In the Brushes menu, tap the Untitled brush. Right: Enter the Brush editor.]
Here you’ll see the live viewer, then the title of your brush (tap to rename) with the abilities to reset, duplicate or delete the brush.
Core Setup
Next you’ll find the Core Setup for your brush. You have two types of brushes to choose from - a Stamp brush and a Reveal brush. These function oppositely from each other in a fundamental way.
- A Stamp brush creates a stamp using one or several images, and stacks these stamps on top of each other at intervals you set to create your brush texture. Think real-life ink stamps built on top of each other, repeating as they create a stroke.
- A Reveal brush uses its image base to unmask a grain underneath. A good metaphor for this might be watercolor paint — it seeps into the textured paper to enhance the paper with pigment and reveal the texture further. The resulting stroke of this brush type is even and consistent, there is no “overlap” when a stroke doubles back on itself.
Stamp & Grain
Choose a brush type and then move down to Stamp & Grain. Here you’ll be able to upload images (JPG or PNG) to use as an image base for your brush. “Stamp” here refers to the image, not to the brush type above. We’ve created a complete tutorial on creating stamps and grains for your brushes here.
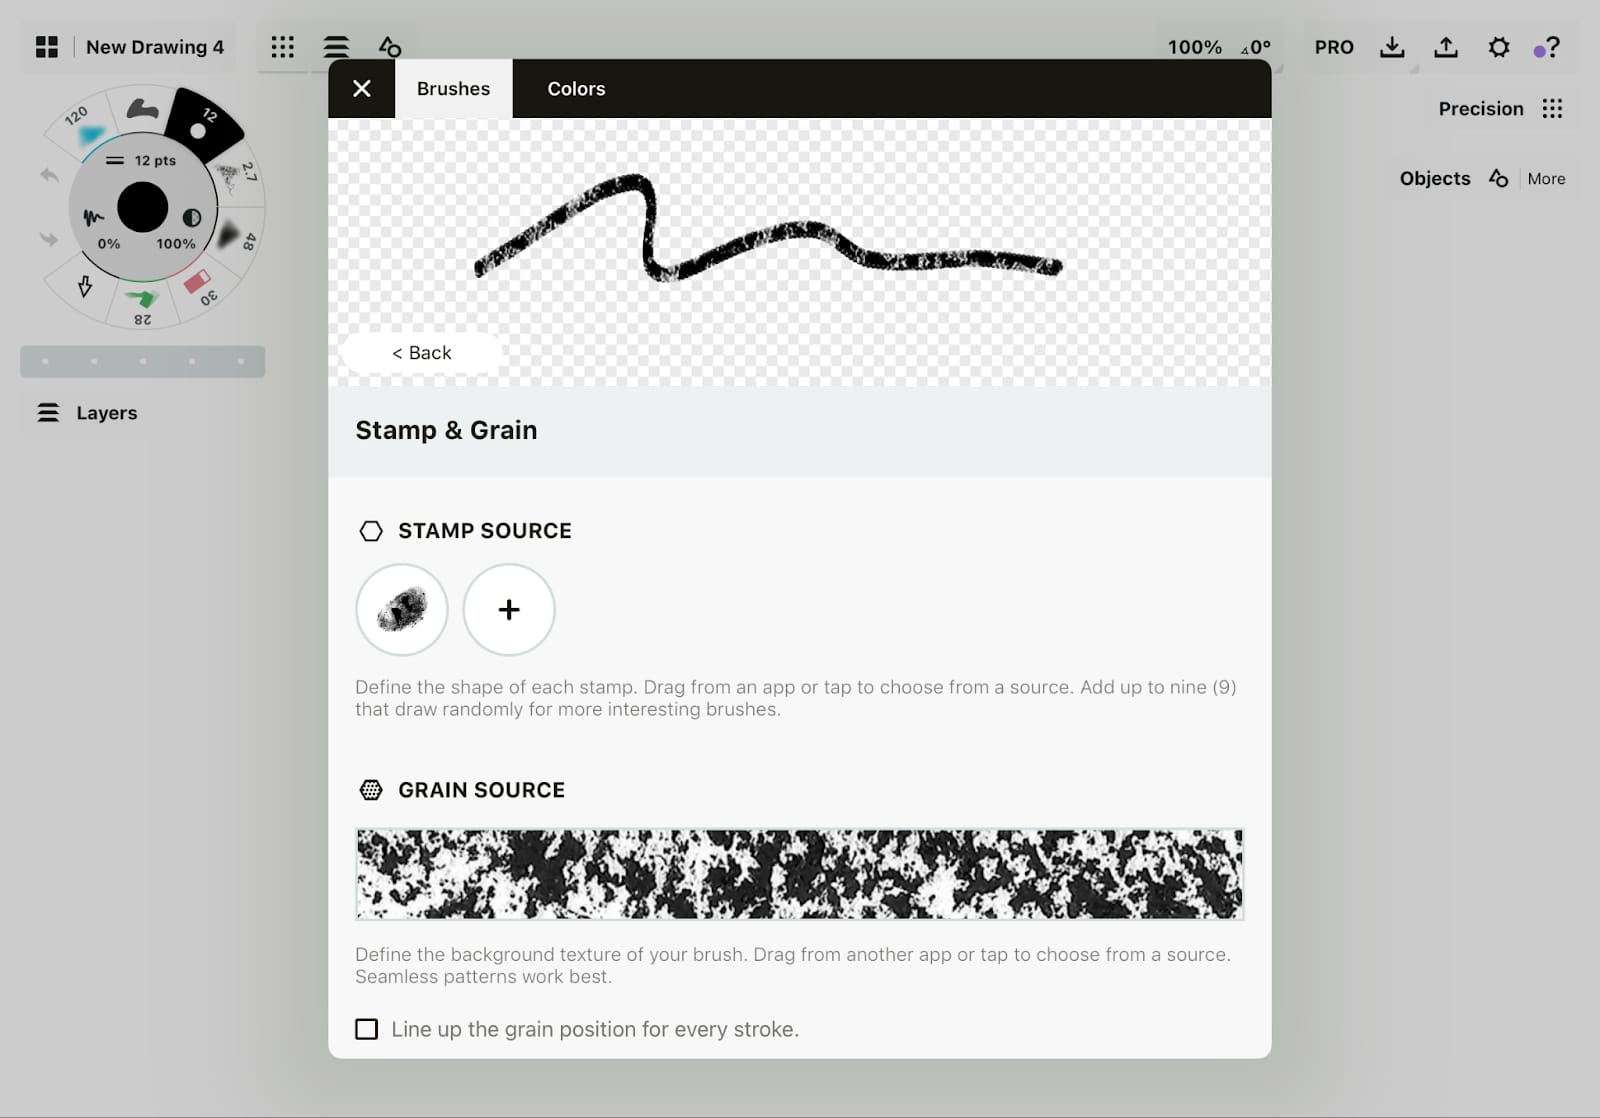
One of the hardest problems to solve with digital media is creating a truly random stroke like traditional tools can create - natural brush strokes and “happy accidents” are difficult to replicate. To help with this, we’ve given you the ability to import up to 9 stamps, more than any other professional illustration app. Stacking these stamps on top of each other can give you a wonderful level of depth, richness and randomness when combined with the other controls.
Import your stamp(s), then import your grain. The grain is a background image that adds additional texture to your brush. Grains work best when they are “seamless” - you don’t want to see the edges of the image when it repeats. Again, you can learn how to make a seamless grain here (and find an example to work with if you don’t want to create your own).
You can edit your grain’s rotation and scale using the sliders beneath the source image. If you check the box next to “Line up the grain position for every stroke”, you’ll lock in the grain so that it doesn’t overlap when you lift your stylus to color in further - it will appear as a seamless pattern on the canvas.
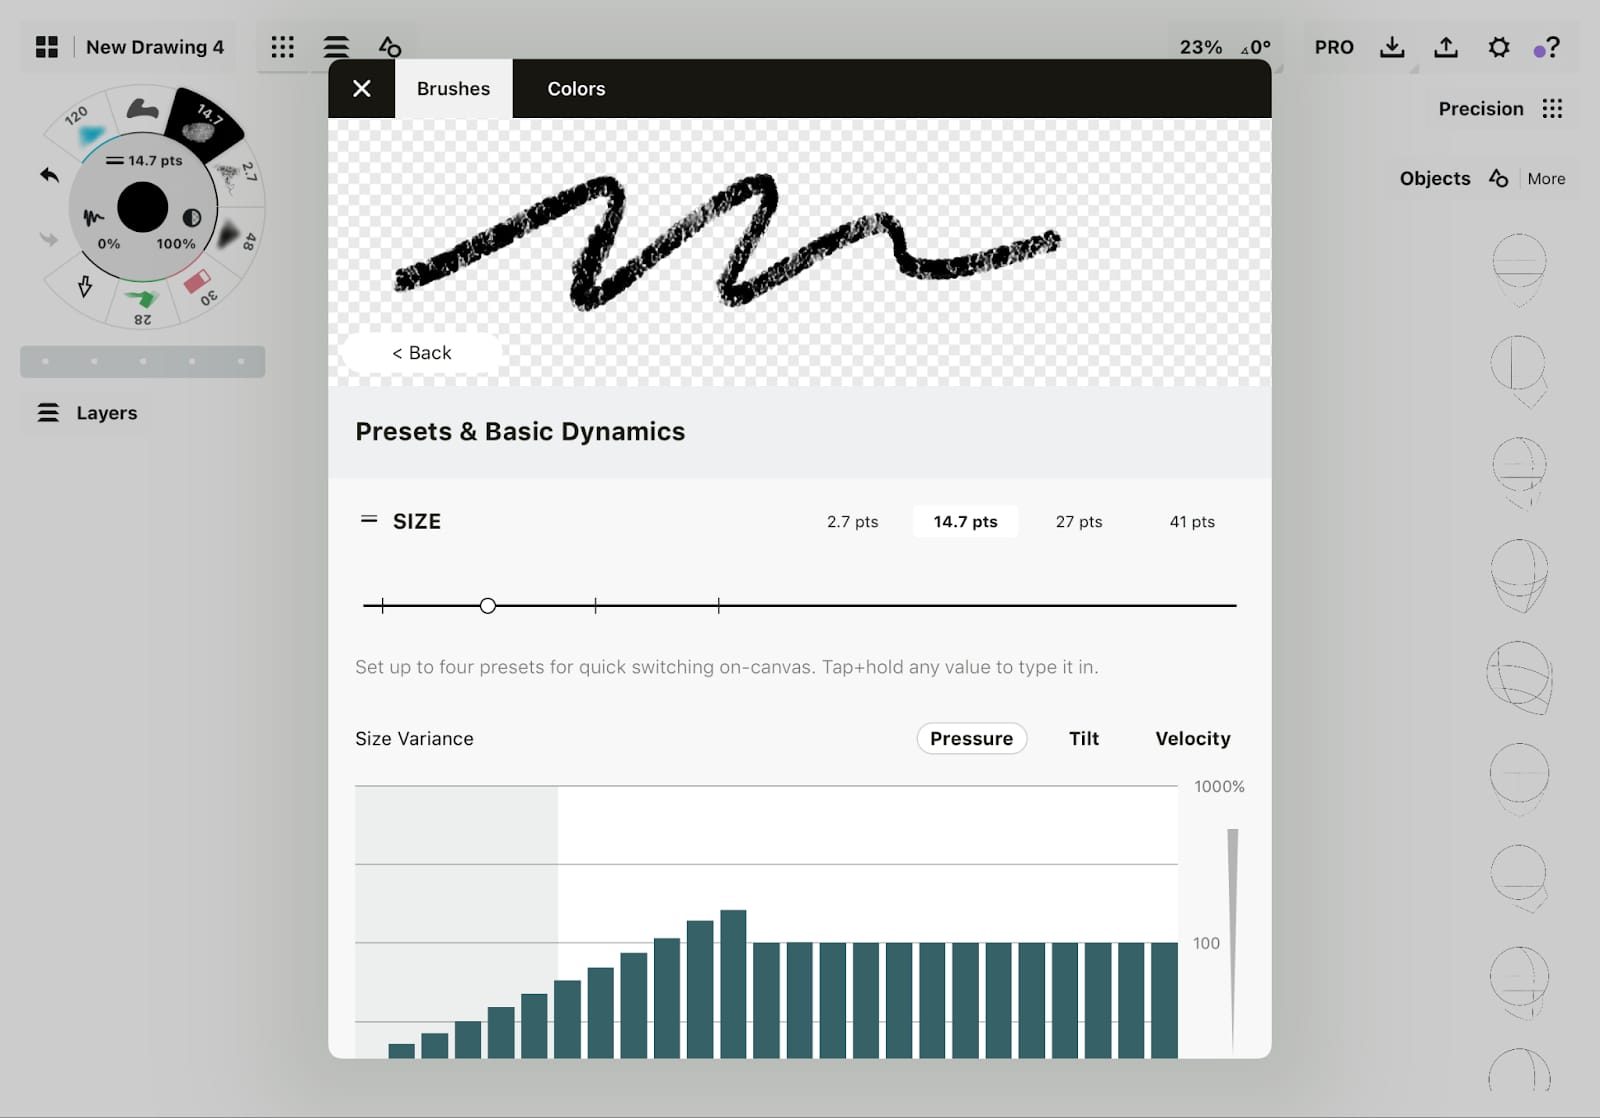
Presets & Dynamics
In Presets & Basic Dynamics, you’ll find the Size, Opacity and Smoothing presets that you’re used to from the main canvas, as well as variance graphs that help you to fine tune the brush action to your stylus’ pressure, tilt and velocity inputs.
- Size. Use the size slider or tap+hold the preset field to enter a custom value to determine your brush’s median size. This is the size that in the graph is represented at the 100% line. Depending on how you adjust the variance for pressure etc, your brush will range around this size.
- Opacity. The same principle applies to the Opacity slider and graph. Note that there isn’t a variance graph for opacity when the Reveal brush is selected, as when it draws over itself, it doesn’t build up opacity. You can still make the brush more transparent overall with the slider, but there is nothing to adjust during the stroke action itself.
- Smoothness. Smoothness is a simple percentage and doesn’t have a graph.
Working With the Variance Curves
Before adjusting one of the graphs, we recommend you draw a stroke in the live preview area.
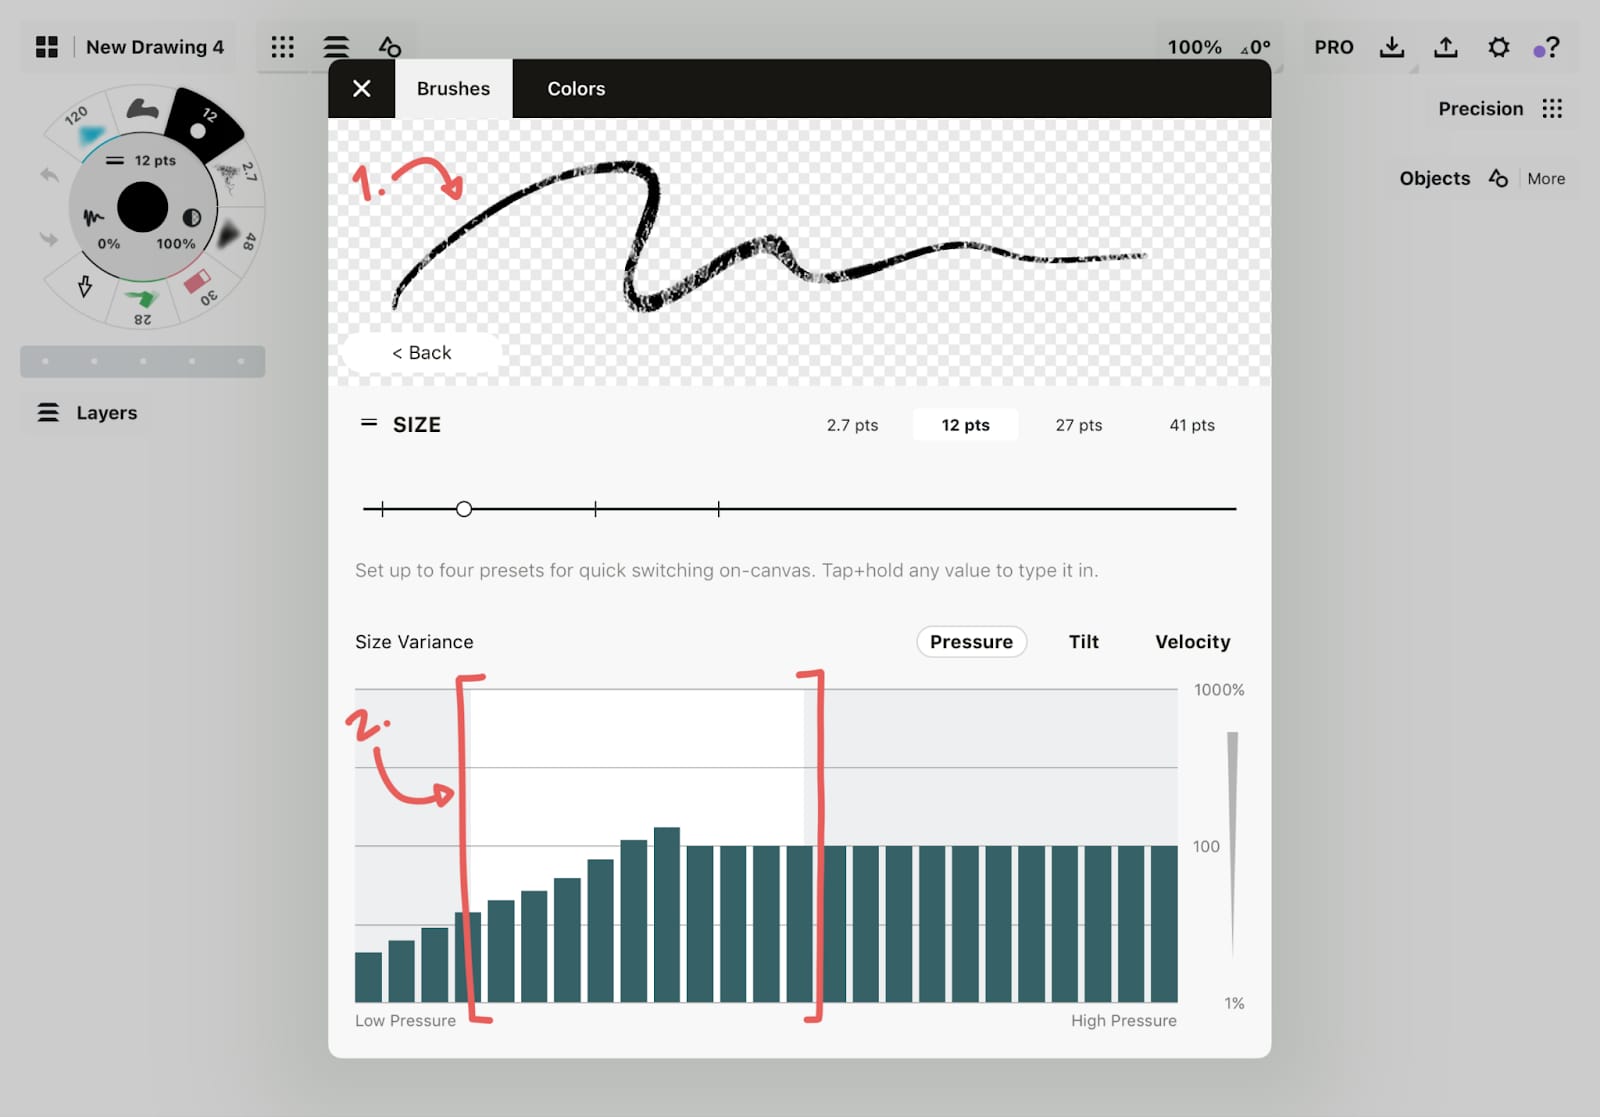
1. Draw a stroke in the viewer. 2. Notice the white range area appear behind the graph.
While you draw, take a look at a graph: you’ll see a white area appear behind the bars while drawing. This is a live match to your brush stroke on the viewer, reflecting the range of pressure, tilt or velocity (depending on your selection) you are applying as you draw. As you adjust the bars in the graph, you’ll see the effects in the viewer. Experiment with these different types of input, and see what feels natural for the brush you’d like to create.
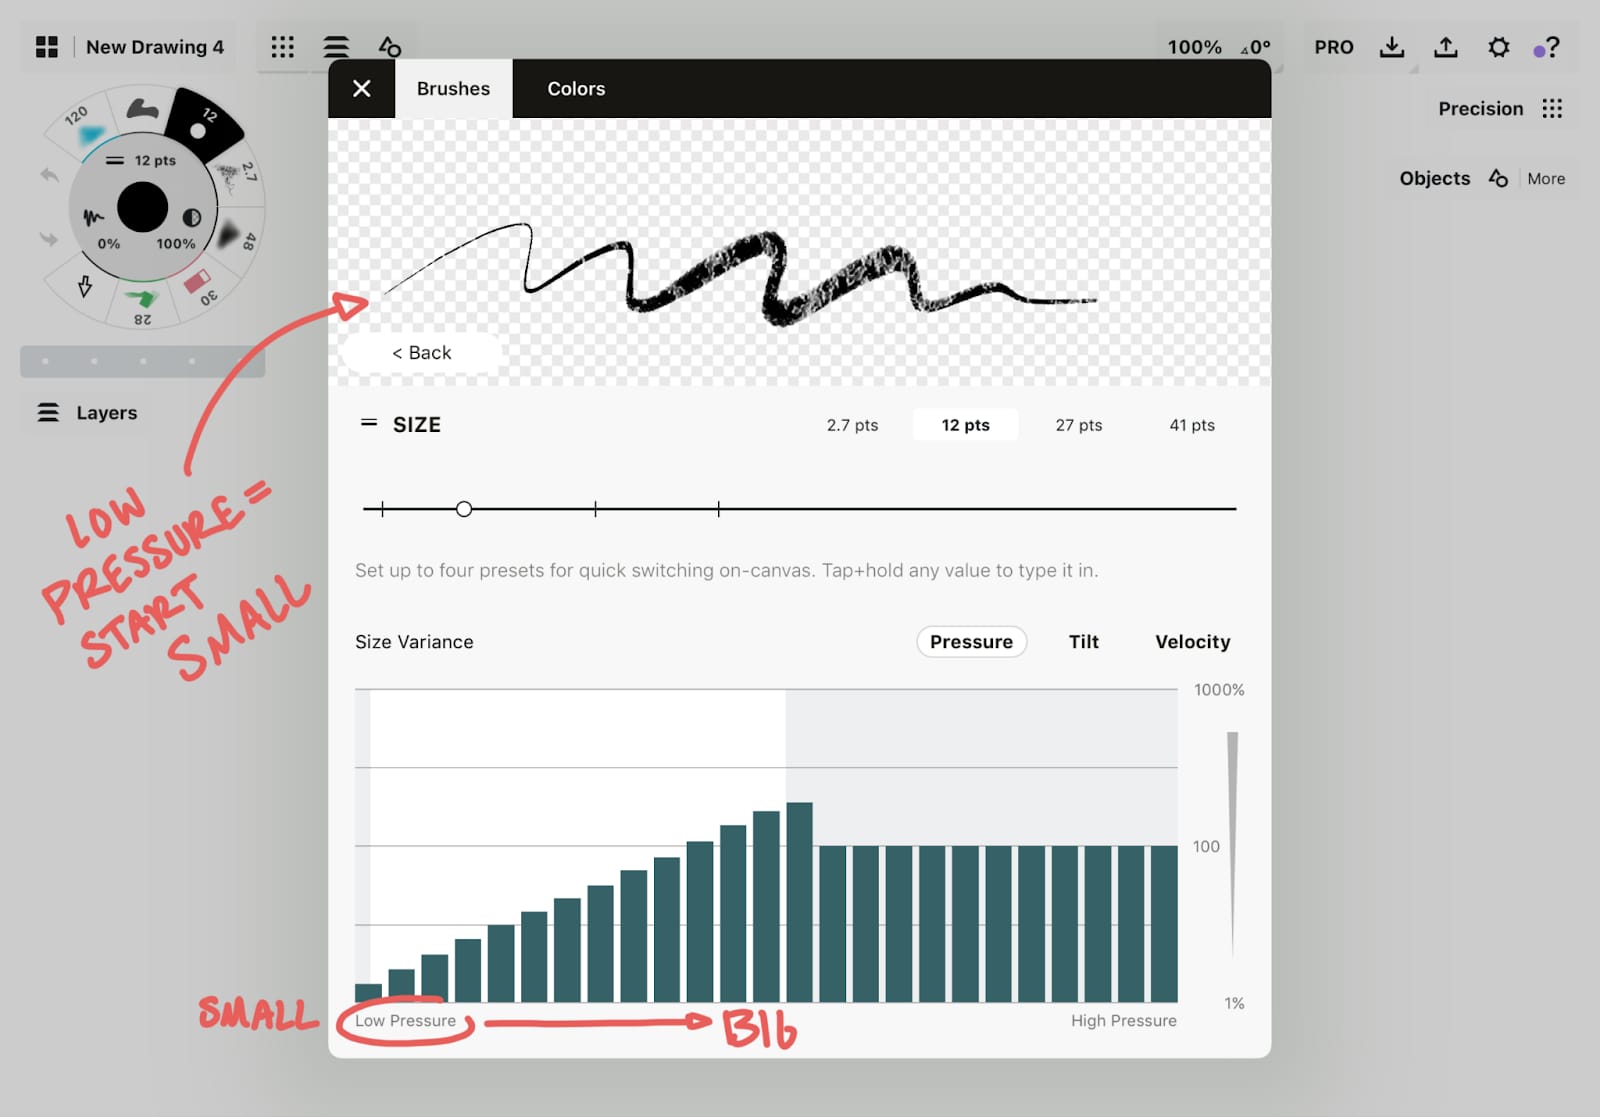
Typically, you want a nice smooth line upward or downward across the white range box. A pressure-sensitive fountain pen, for example, will start small and gradually increase in size depending on how hard you press the pen to the paper. You would use the Size preset with the Pressure dynamic for this pen, and draw a smooth line upward from the left side of the graph to the right side. It would look something like this:
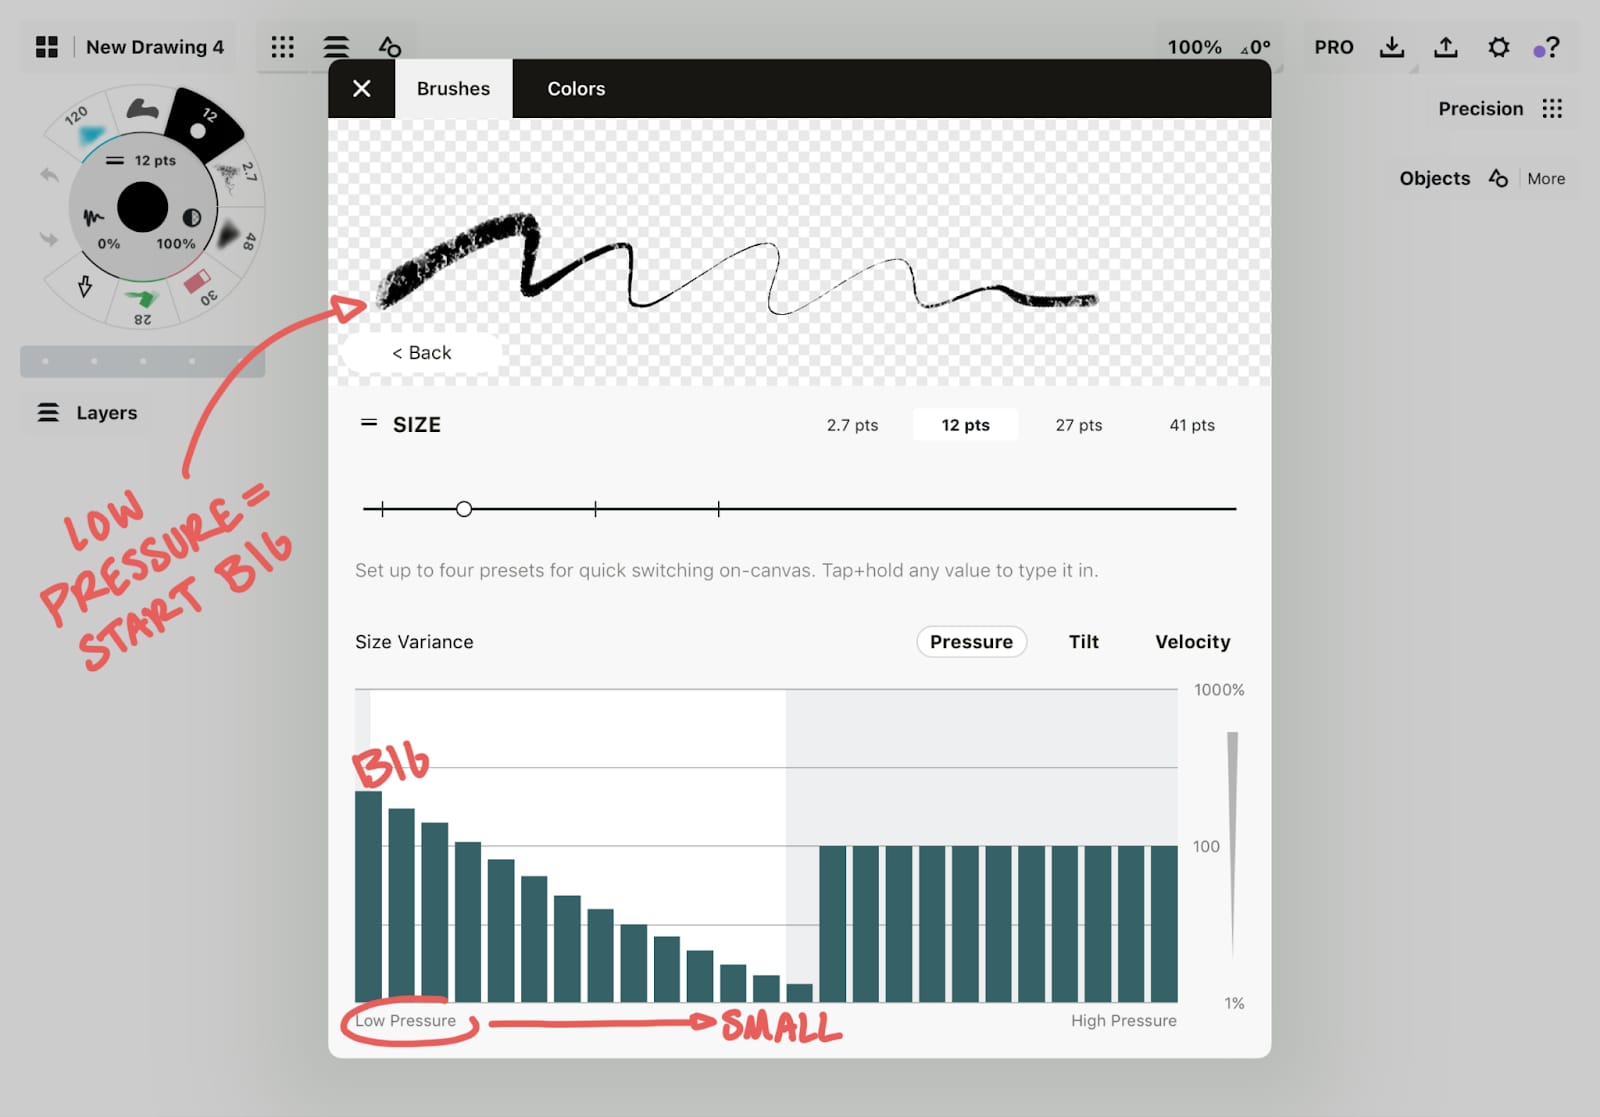
If you want the stroke to start wide and get narrower as you press or increase speed etc, you can draw the variance curve downward — bigger to smaller.
Applying extreme ups and downs to the bars in the middle of a stroke represent “accidental” or “unexpected” variations to your brush stroke. You might like these if you’re feeling artistic — try a “rough” graph and see what happens to the stroke in the viewer.
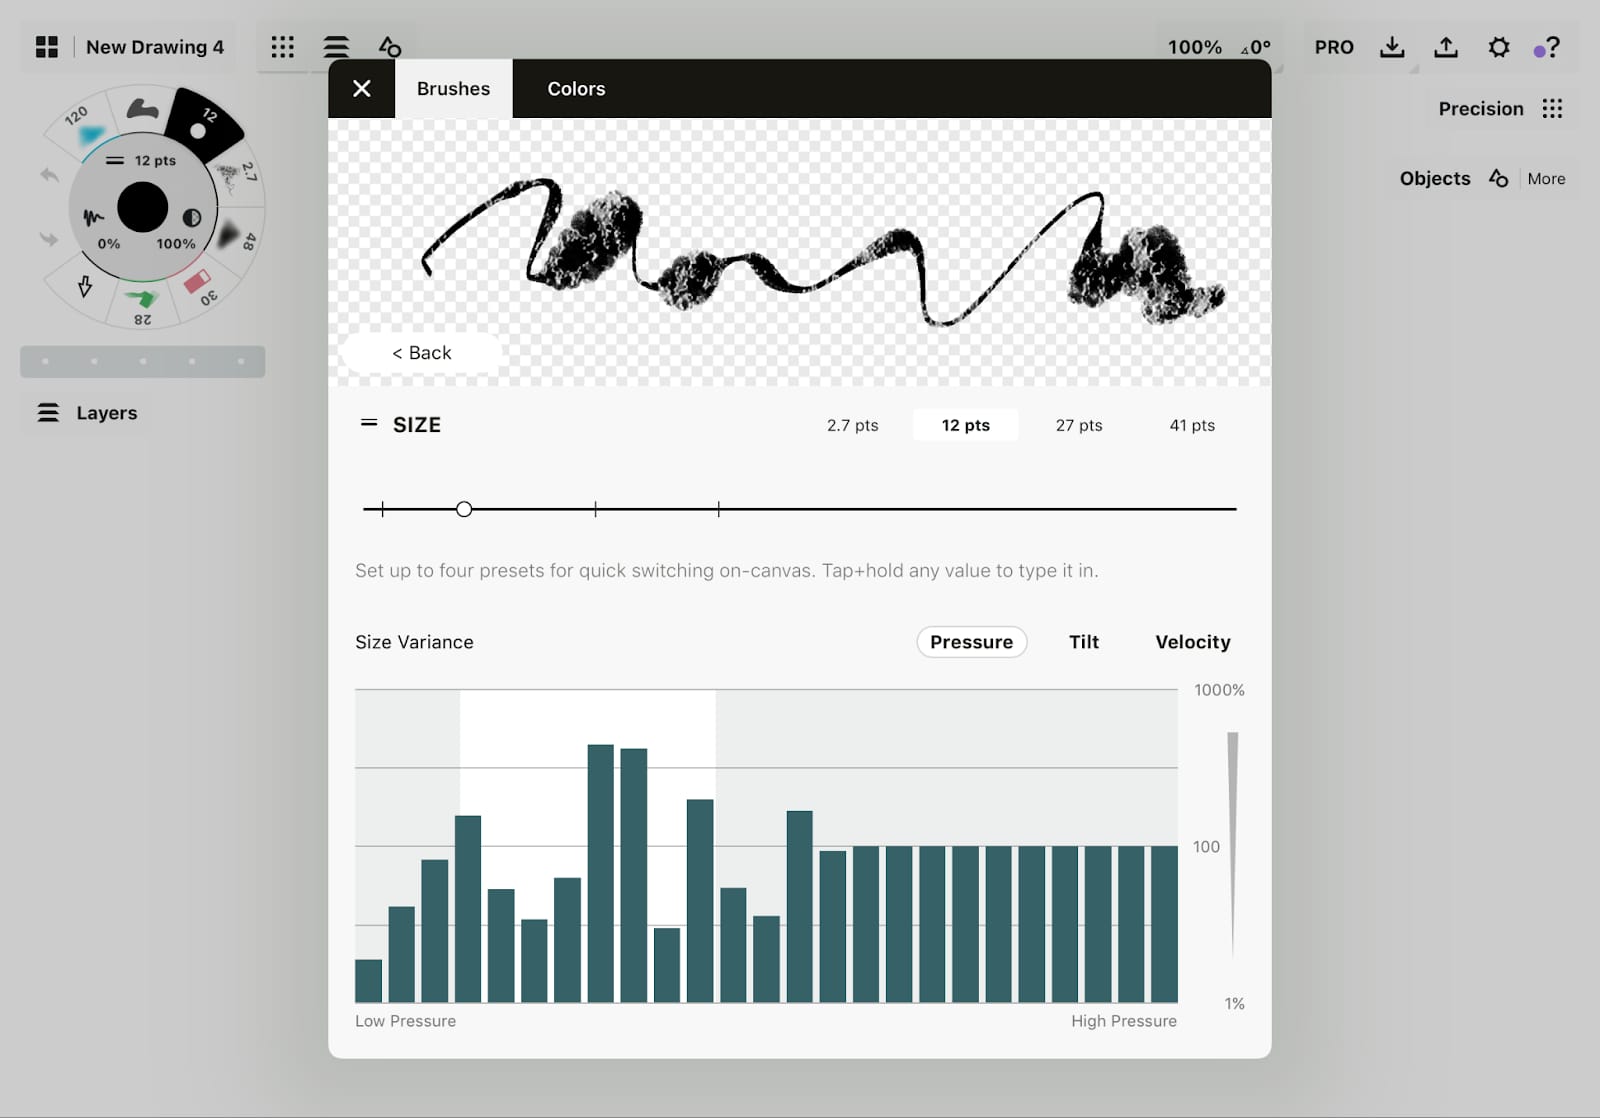
Generally, however, smooth is the norm. Just a fairly quick, simple upward or downward stroke along the graph - all the way across your white range area - will work fine.
As you apply these settings to your brush, notice how it responds in the live viewer. If at any time you don’t like what’s going on, you can reset your graph. To reset a graph, double-tap the vertical value axis (1% — 1000%) beside it.
Notice that on the value axis, the bottom half of the graph is 1 - 100% (the size or opacity value you entered), whereas the upper half is 100 - 1000% - an exponential level larger. The majority of your graph will be within the bottom half of the graph, while continuing the stroke along past the 100% mark will create larger differences in your brush stroke in the viewer.
An additional note - the range on the white box for pressure is directly related to the pressure setting for your stylus in Settings → Stylus. You can adjust this setting to between 30% and 70% for a nice clip to your brush’s action.
Shape Controls
Now continue on to the Shape Controls. In this section, you can adjust the spacing, scatter and rotation of your stamps. Pay attention to the live viewer as you play with these controls and enjoy seeing the stamps respond to your adjustments.
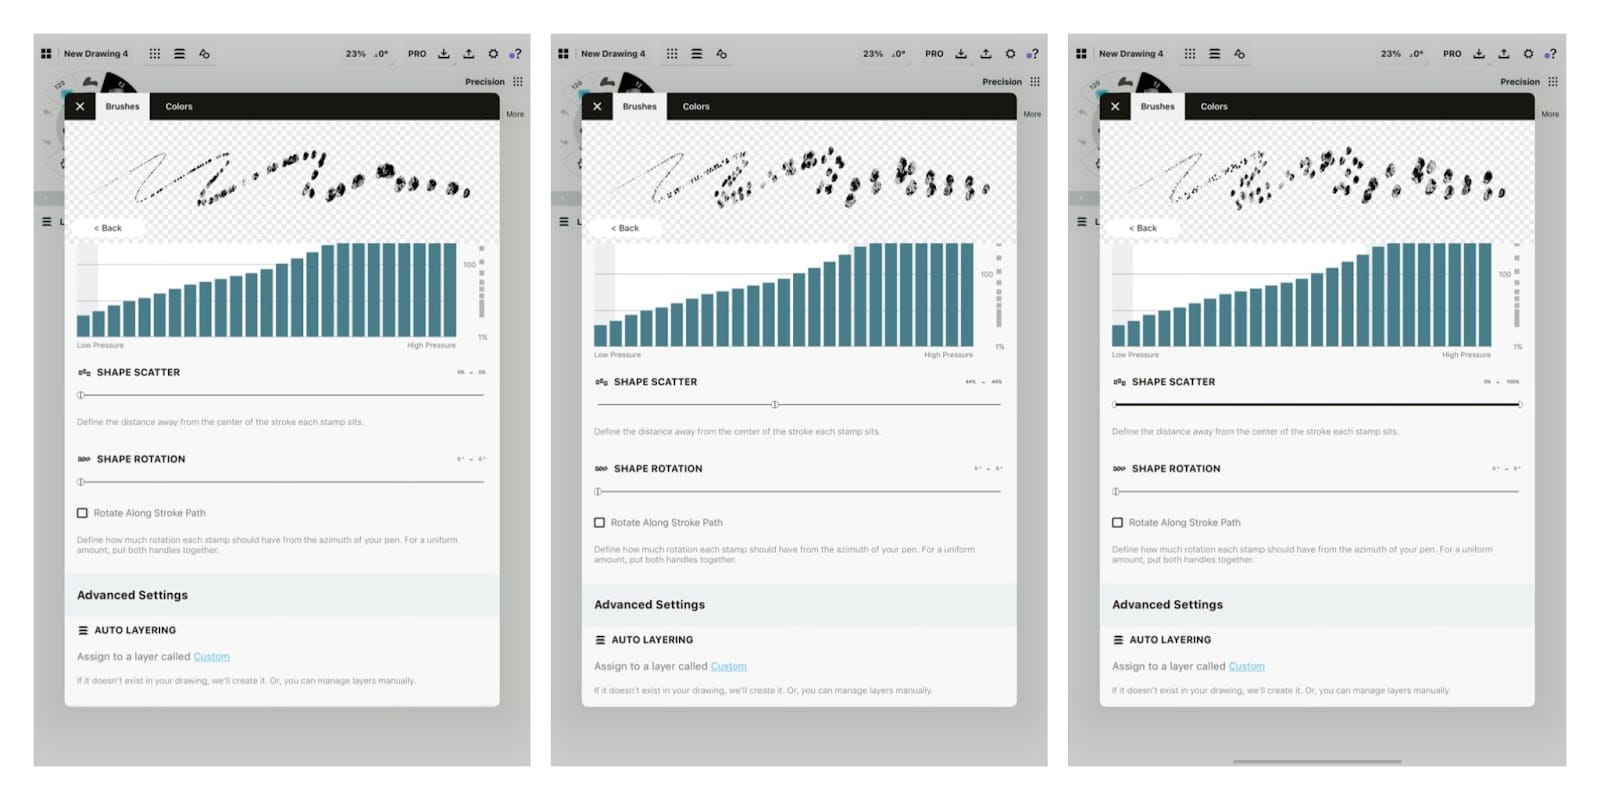
With each of these controls, you’ll notice the handle is split down the middle. This allows you to create a range of random “jitter” for your shapes to appear in. When the handles are together, there is no jitter, they will appear along the stroke path with an even spacing or rotation etc. If you pull the handles apart, you create a range of randomness that the stamps can appear in.
- Shape Spacing allows you to adjust the distance your stamps appear from each other. Separate the handles to create more random spacing.
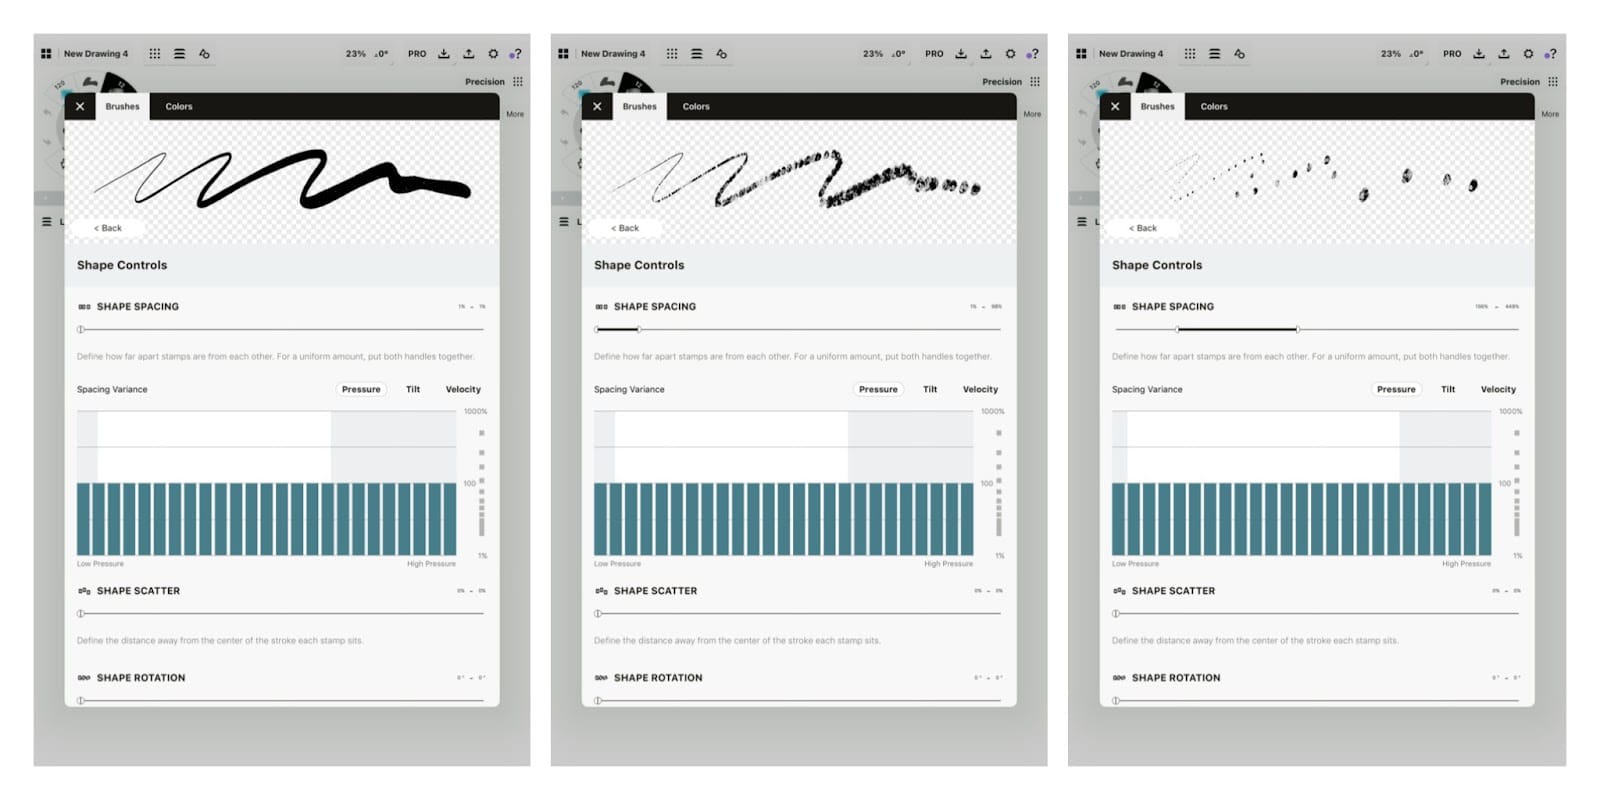
- Shape Scatter gives your stamps an additional vertical field to appear in along the stroke path. Separate the handles to create a more random scatter.
- Shape Rotation affects the rotation of the stamp along the stroke line. Separate the handles to create a more random rotational effect.
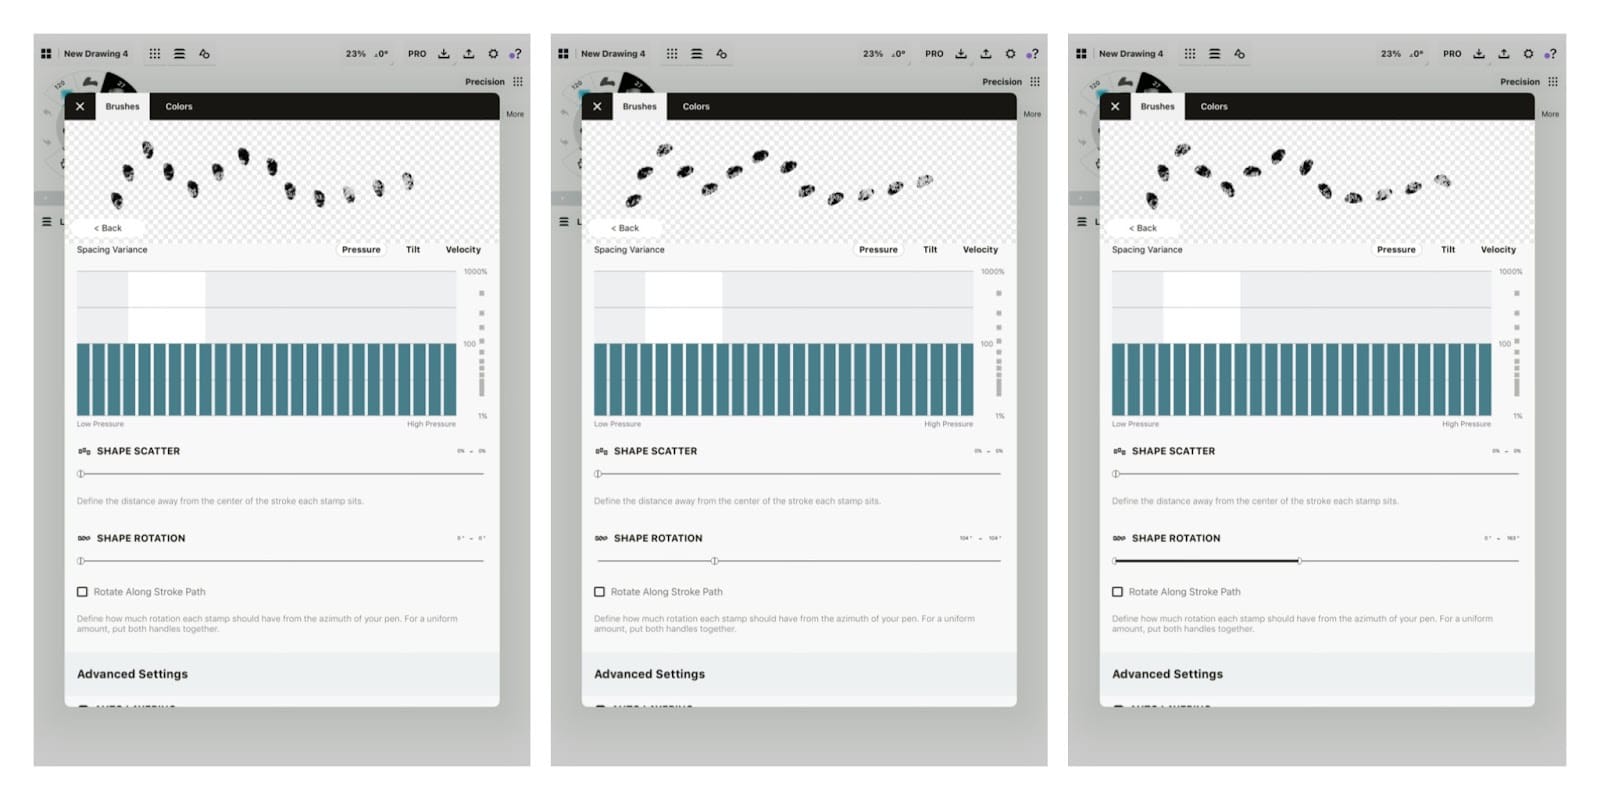
Rotate Along Stroke Path. By default, your stroke follows the azimuth of the stylus, so if you turn your stylus upward or downward, the stroke will rotate along with it. If you want to disable this rotation, you can check this box.
Advanced Settings
Finally, under Advanced Settings, you have the ability to define the layer your brush will appear in. Automatic layering separates your strokes by tool type, so defining your brush as a Pen, for example, will make the brush appear in the Pen layer along with any other Pen tool you’ve used in the drawing.
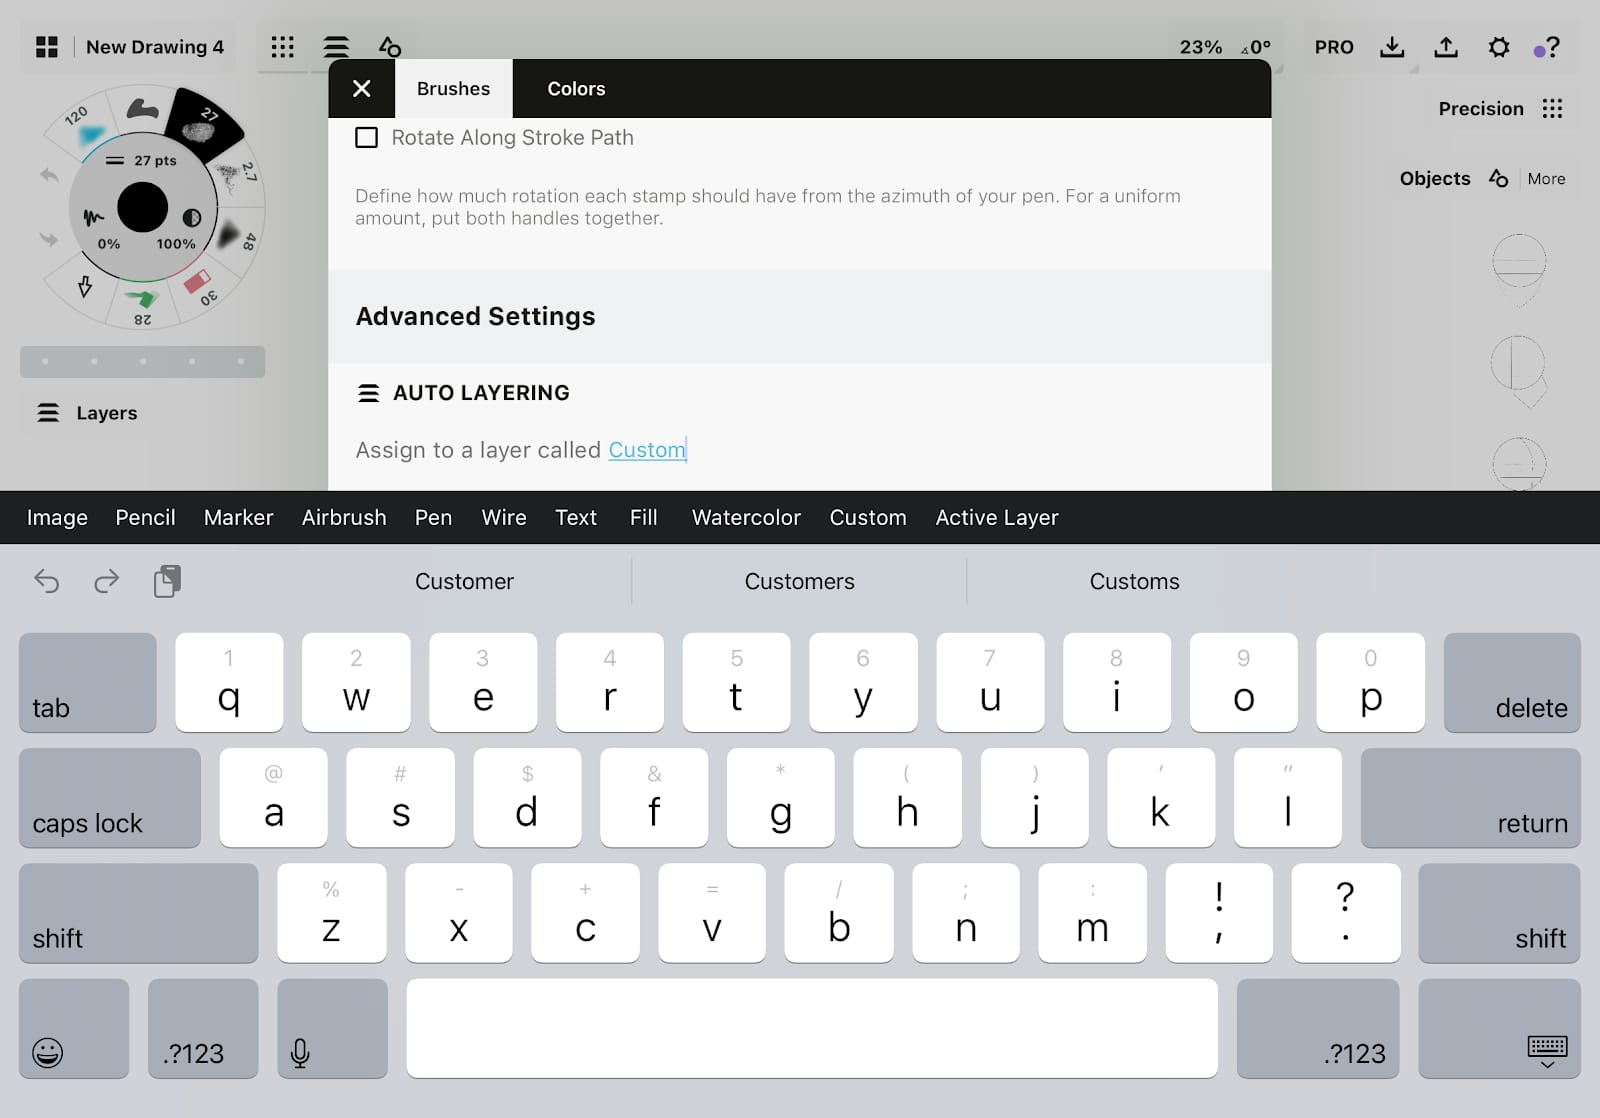
Tap on the layer label (“Custom” in the above image), and a keyboard along with several pre-set layer labels will appear. You can tap one of these options to define your brush as an Image, Pencil, Marker, Airbrush, Pen, Wire, Text, Fill, Watercolor or Custom tool type, set it to appear in your Active Layer, or enter in your own brush title.
We hope you enjoy creating your own brushes. It might appear overwhelming at first, but as you play and experiment with the editor, you’ll find it’s very simple and can give you very satisfying results.
For more practice, try our photo-based brush tutorial and create an easy brush using your own hand, face or other photograph. You can also try your hand at Creating an Acrylic-based Brush with ready-made stamps provided in the tutorial.
Brush Sharing
With the team-sharing capability that comes with a subscription, you can share your custom-made brushes with any colleague or friend who has a free Concepts account, or even sell a link to your brush library in an online store. These are read-only brushes, non-editable by anyone except for you. Any change you make to a brush will update live on the accounts you’ve shared your brushes to.
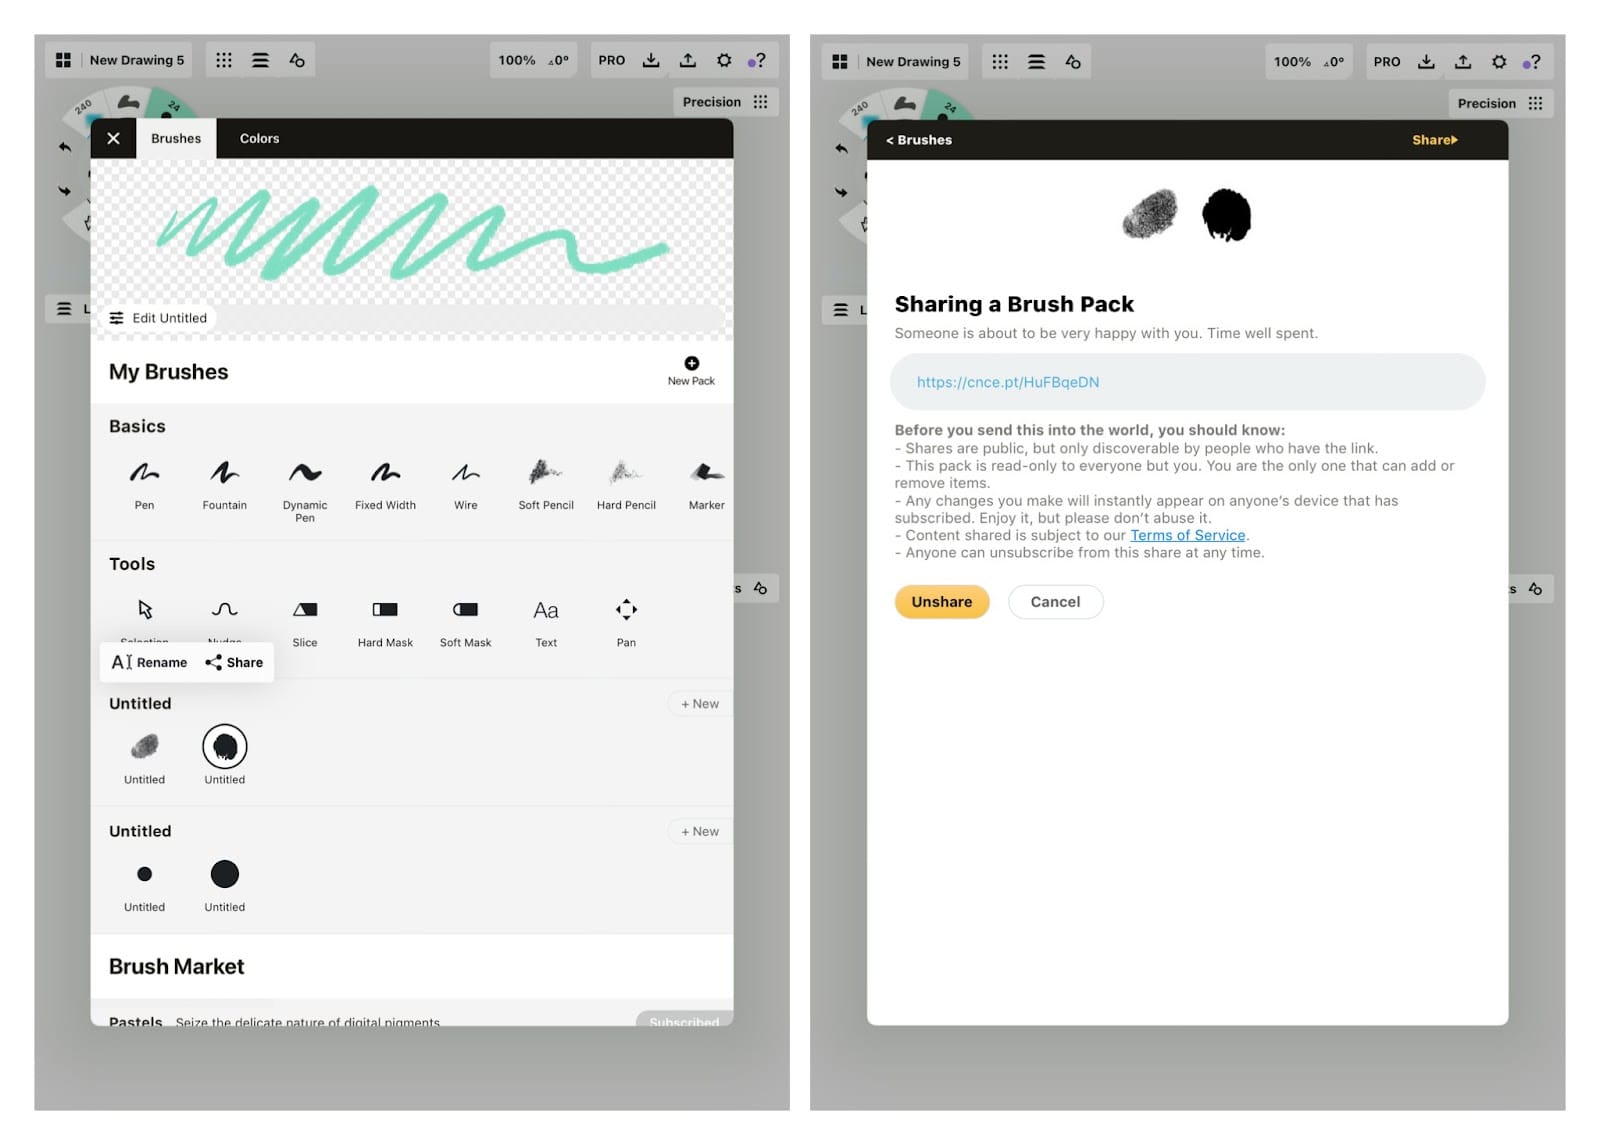
Tap+hold the title of the brush pack you wish to share, tap Share, and find a link you can text or email along, or tap Share in the upper corner of the popup and send it off. At any time, you can unshare your pack.
Exporting Brush Packs
In addition to live sharing, you can export your brush packs to share them with your colleagues and friends. This feature is only available for users who have purchased Essentials or Subscription. To export a brush pack, go to your brush library and tap+hold on the pack you want to export. This initiates drag & drop, after which you can drag the pack to Files and drop it to your desired location. Only packs made by you can be exported.
If you want to share your brushes with the world via a store of your choice, you can do that, too. Some of our users already sell Concepts brushes on Creative Market and Gumroad. If you want to learn more about this or have a chance to promote your brushes in the Brush Market, let us know. Send us a message at concepts@concepts.app and we’ll help you.
Importing Brushes
Brush pack import is available for the users who have purchased either Essentials or Subscription.
If you want to buy brushes made by our users or import brush packs made by your friends or colleagues, you can import them straight into your brush library. There are two ways of doing this: 1. Via the Import menu, and 2. Using the ‘Open In’ command in Files.
For both options, start by saving the brush pack file to Files.
To import the pack via the Import menu in Concepts:
- Tap on ‘Import’ on the status bar on your canvas.
- Choose Files.
- Select the brush pack file.
- You will get a message that the brush pack was added to your library. Tap "OK".
- Open the brush menu by tapping the active tool in the tool wheel / tool bar.
- Scroll down the menu. The brush pack has been added under "Imported".
- You’re all set up. Pick the brush you want to use and start creating!
To import the pack from Files:
- Open Files and search for the brush pack file.
- Tap on the file to open it.
- Tap on the export icon in the top right corner.
- Select 'Copy to Concepts'.
- Concepts will open and you’ll get a message that the brush pack was added to your library. Tap "OK".
- To use the brushes, open the brush menu by tapping the active tool in the tool wheel / tool bar.
- Scroll down the menu. The brush pack has been added under "Imported".
- You’re all set up. Pick the brush you want to use and start creating!
Note that the Imported brushes and Brush Market brushes behave a bit differently from the ones you have made yourself. If you have purchased Essentials or subscribed, you can duplicate and edit the brushes within the pack, but can’t move them out of that pack, to preserve the rights of the creator. If you accidentally edit the original brush, you can always reset it in the Brush editor.
