精确工具
Our Precision Tools are coming to Windows. We have a roadmap of our expected release dates for these tools here.
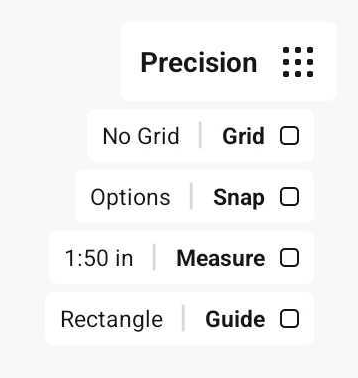
如果您点击画布上的精确按钮,将会看到菜单下面展开了一些选项:网格和吸附。
网格
网格对于您的画布来说是一张智能底层,不仅能够在视觉上将网格作为参考使用,还能通过吸附和对齐与它进行互动,我们的网格绘制辅助线。点击精确下面的网格来打开或者关闭它。点击网格按钮旁边有网格名称的标签能够打开工作空间菜单,然后选择一款新的网格。
网格类型
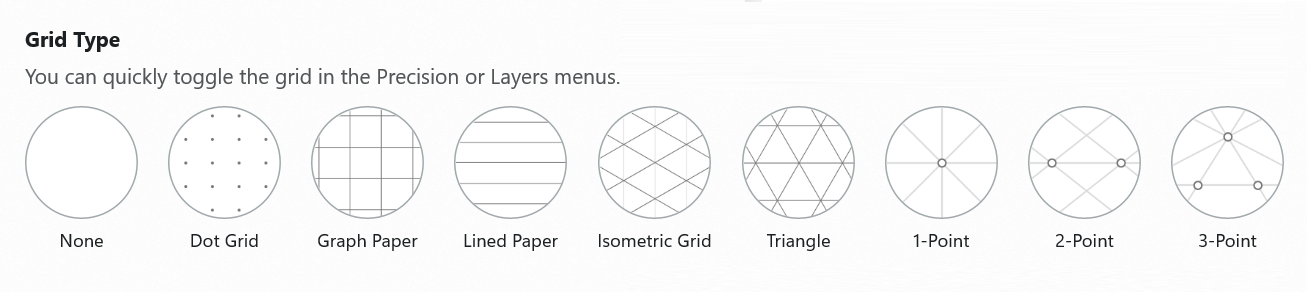
概念画板有五款常规网格和三款透视网格:点状网格、坐标纸、横格纸、等距网格、三角形网格和1点/2点/3点透视网格。从工作空间菜单中的列表中选择一款网格。横向滚动列表可以访问所有的选项。要编辑网格或者从预制的网格预设中进行选择,点击活动网格,或点击“编辑网格”按钮。
使用五款常规网格,您可以编辑:
- 预设 – 从各式各样已预制的网格中选择。
- 间距 – 主线/点之间的距离。
- 分段 – 决定网格主线间会显示多少个分段。设定为1时仅显示主线。坐标纸和横格纸可用该功能。
- 线宽 - 网格线的粗细。
- 颜色 - 选择适应您画布的自动颜色,或选择一个自定义颜色。
- 透明度 - 设置网格的透明程度。该功能在使用自定义颜色时可用。
- 方向 - 设定网格的方向为横向或纵向。举个例子,如果您想在横格纸上使用垂直线,这个功能会非常有用。横格纸、等距网格和三角形网格都可用该功能。
- 限制到画板 - 勾选该复选框来仅在画板内显示网格线。仅当画布上有画板时,该功能可用。
请注意,网格单位由您在“工作空间”菜单中选择的画作单位决定。
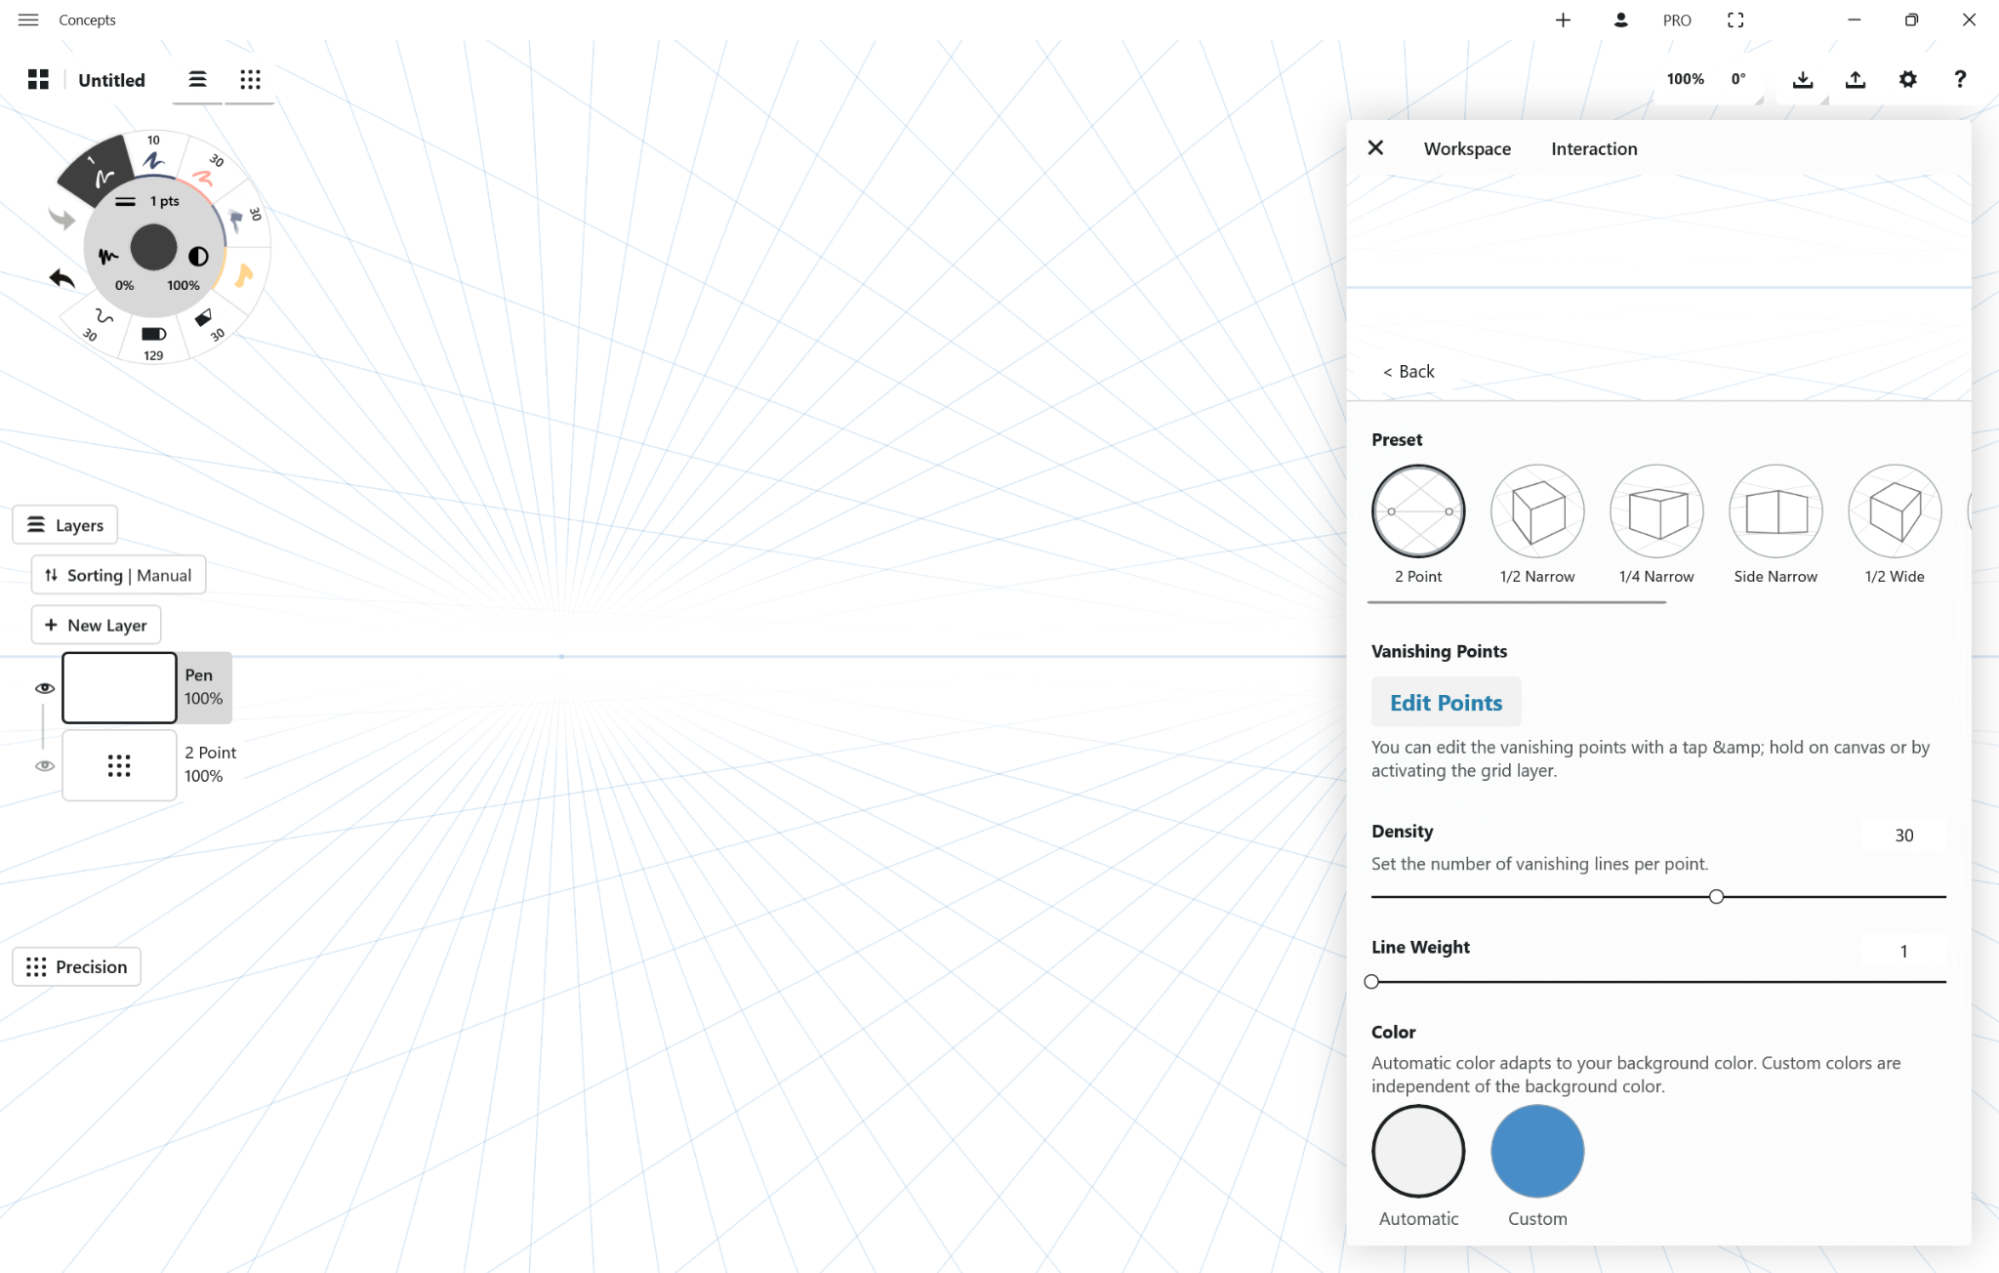
透视网格的设置略有不同:
- 预设 - 从各种预制的透视中进行选择。单击可激活该预设。
- 消失点 - 点击此按钮可进入画布,在那里您可以移动消失点,并根据喜好调整网格。您也可以随时通过长按消失点或激活网格图层来编辑画布上的网格。
- 密度 - 选择网格中出现的消失线的数量。
- 线宽 - 网格线的粗细。
- 颜色 - 选择适应您画布的自动颜色,或选择一个自定义颜色。点击“自定义”颜色选项可选择当前颜色,再次点击以弹出色轮,然后选择一个新的颜色。
- 透明度 - 设置网格的透明程度。该功能在使用自定义颜色时可用。
- 方向 - 使用此设置使网格的方向与屏幕相匹配。 默认情况下,网格的创建方向与设备在创建画作时的方向相同。
- 限制到画板 - 勾选该复选框来仅在画板内显示网格线。仅当画布上有画板时,该功能可用。这是一个适用于所有网格类型的通用设置。
在画布上编辑网格
网格也可以在画布上进行编辑。要进入网格编辑模式,请在图层菜单中激活网格图层。对于透视网格,长按消失点也能激活网格编辑功能。当网格图层处于激活状态时,不仅可以正常缩放和平移画布,也可以编辑网格。

所有的网格都有一个可用于将网格设置为特定角度的旋转手柄。当拖动手柄时,每45°就会出现一条吸附目标线。当吸附目标线显示为吸附到该角度时松手,或者保持手柄静止等待吸附目标线消失,就可以设定一个接近吸附目标的特定角度。当旋转网格时,角度会显示在状态栏中。长按该角度值可直接进行编辑。
要移动网格,从水平线的十字准心线拖动它,或者拖动线条本身。
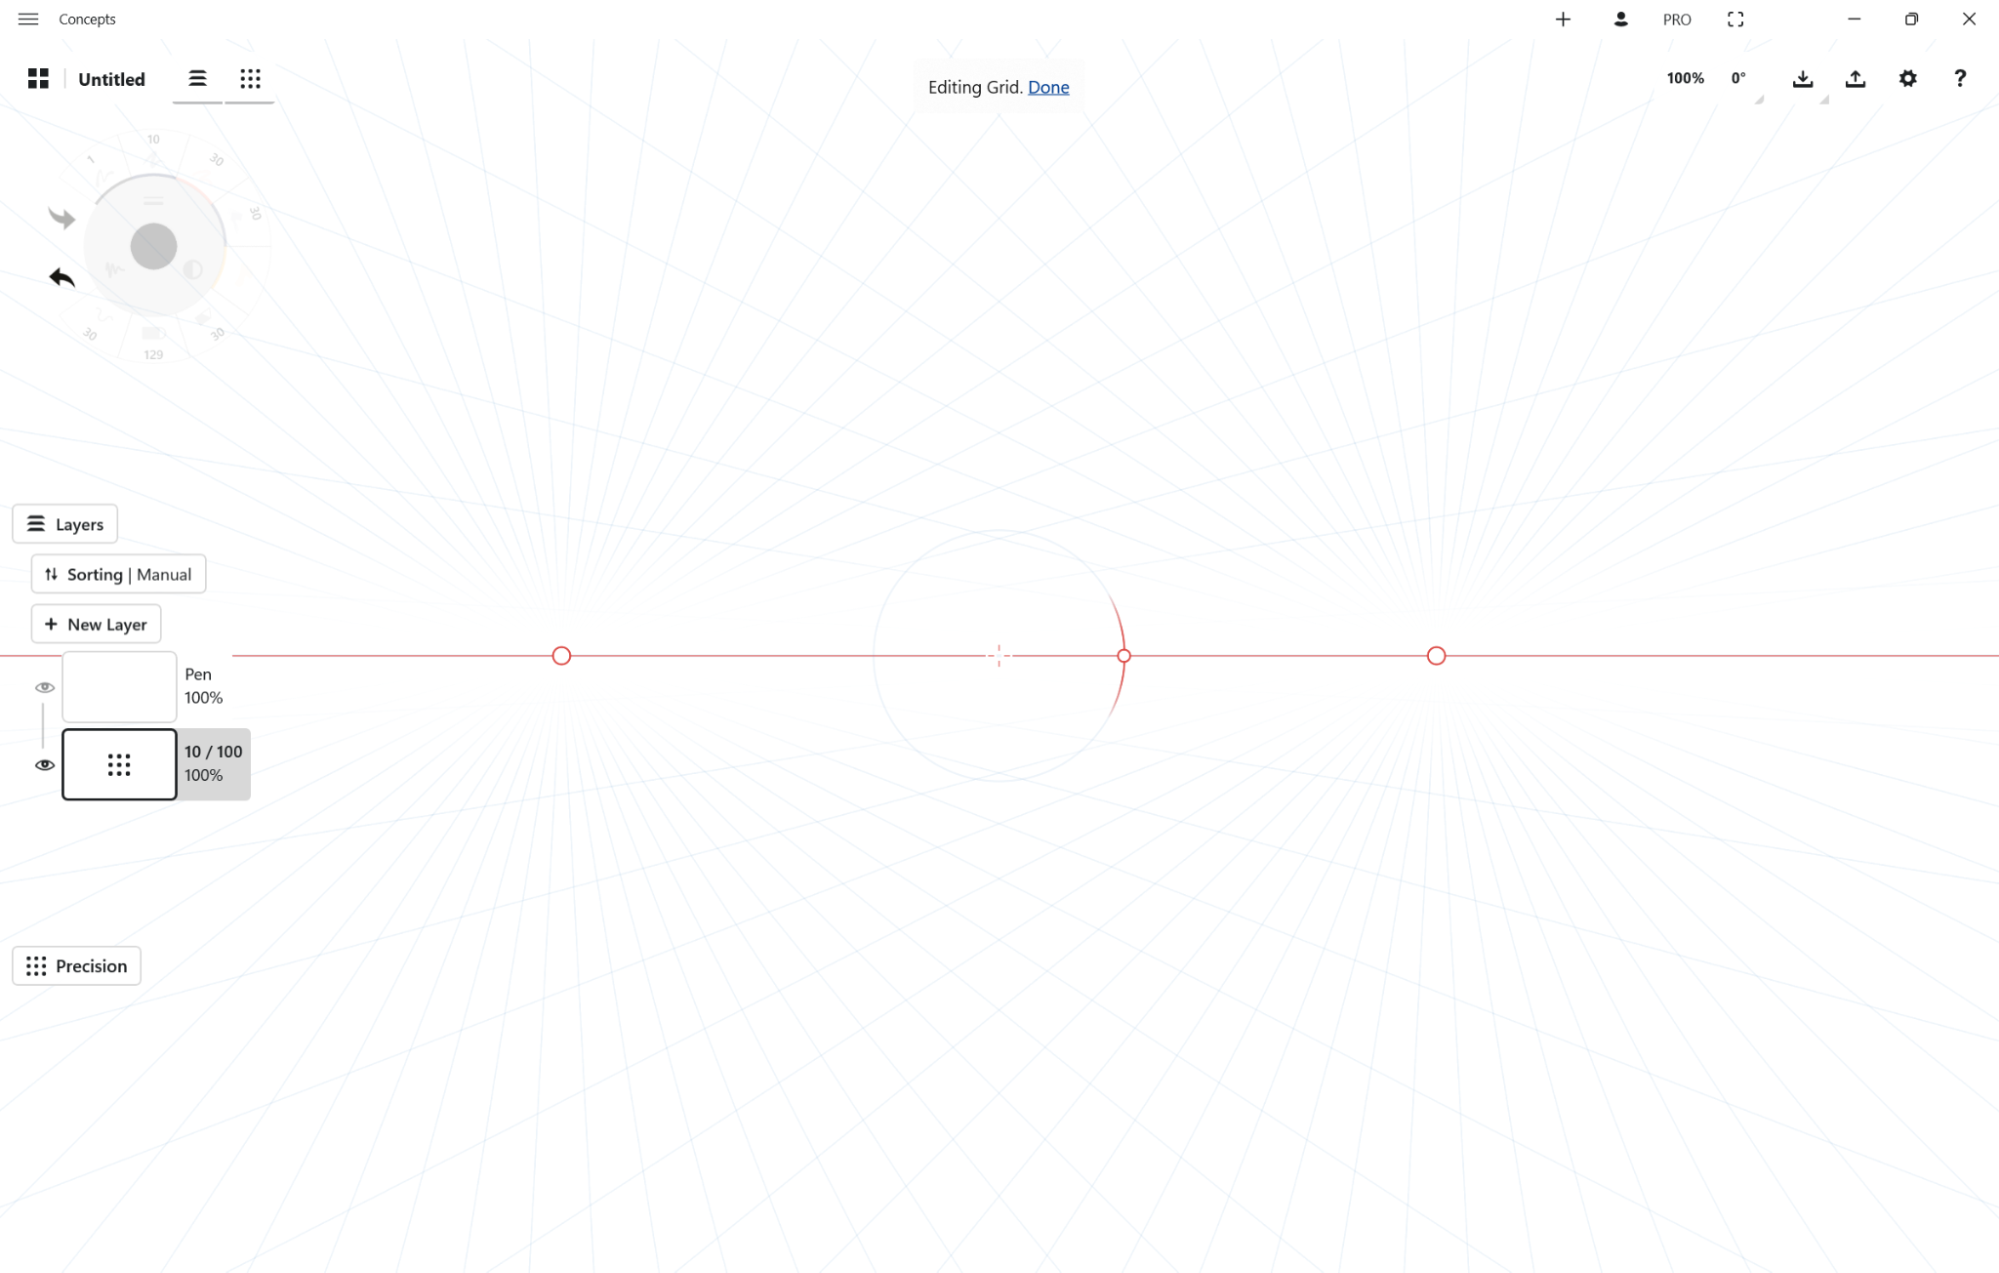
在透视网格中,所有的消失点都可通过拖动来进行移动。消失点也可以通过点击来激活。也可一次性激活多个消失点。当这些消失点被激活时,您可以使用一根手指平移它们,或者使用两根手指四处移动它们,就像调整选区一样。要缩放网格,选中所有的消失点,然后使用两根手指进行缩放。
要退出网格编辑模式,点击画布上任意远离编辑控件的位置,激活另一个图层,或点击提示通知中的“完成”。
吸附
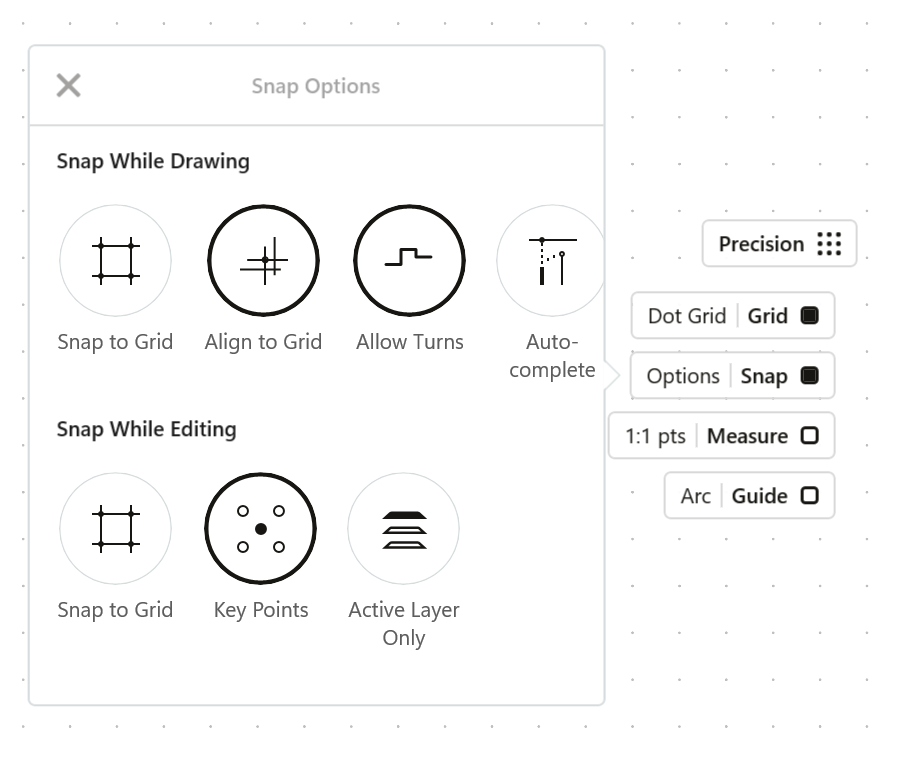
概念画板中有两种使用吸附的方法:绘制时实时吸附,和编辑时吸附。您可以在精确菜单中自定义这些选项,点击吸附可以开启或关闭它,点击选项可以修改吸附设定。
绘图时吸附
我们有三款绘图用的吸附指南类型:吸附到网格、对齐到网格和自动完成。还有一个仅活动图层选项。这些吸附指南可以帮您通过网格方向设定来绘制直线。创建精准的平面图或风格图案。
吸附到网格
With this option enabled, all strokes are drawn on top of the closest grid line available. All of the brushes will maintain their dynamics, so you can use tilt, velocity and pressure to add variance to your strokes. If you make a mistake you can always retrace your steps and redo your lines.
线条和定宽笔刷可以用来画出点数较少的干净笔画。如果您想导出干净的SVG或DXF格式,可以尝试使用这两种工具。
对齐到网格
This option aligns strokes directionally with the grid lines, yet does not snap them to the grid. Use this for quick, accurate sketching guided by the grid's directional constraints. If you make a mistake you can always retrace your steps and redo your lines.
允许转弯
启用该选项可以在“吸附到网格”或者“对齐到网格”进行绘制时转弯。有时,在不抬起压感笔的情况下仅使用直线绘制会更容易一些,该选项恰好适用。当允许转弯开启时,仍然可以在同一行上来回绘制。
自动完成
自动完成连接笔画的起点和终点。您可能看到出现的小圆圈,显示能够连接的可能点 - 如果对您有所帮助,可以点击其中一个;如果不需要,忽略即可。自动完成可以和吸附到网格与对齐到网格一起使用。这样做,笔画将吸附到与笔画轨迹相交的任何笔画。
仅活动图层
该选项仅适用自动完成。激活该选项,仅吸附到当前活动图层上的线条。
编辑时吸附
当选中一根以前绘制的笔画时,您可以使用吸附调整它。吸附点是:
- 对于单独笔画选区,吸附点是任意给定线条的起点和终点,以及四个角和中心点。
- 如果该笔画是使用吸附到网格所绘制,顶点也可作为吸附目标。
- 对于多笔画选区,吸附适用于四个角和中心点。
- 当使用图形辅助线时,吸附适用于控点和中心点。
如果您选择吸附到网格选项,还可以将选区的关键点吸附到网格上。活动图层选项仅允许您吸附到当前图层的线条上。
使用吸附 + 网格绘图
当使用吸附绘图时,每个网格都有自己专属的指引设定,与网格的方向限制相对应。
点状网格 - 吸附:仅绘制水平和垂直线。对齐:绘制水平线、垂直线和45度对角线。
坐标纸 - 吸附:仅绘制水平和垂直线。对齐:绘制水平线、垂直线和45度对角线。
横格纸 - 吸附:仅绘制水平和垂直线。对齐:绘制水平线、垂直线和45度对角线。
等距网格 - 吸附 + 对齐: 仅绘制 60°的对角线。
三角形网格 - 吸附 + 对齐: 仅绘制60°的对角线。
1点透视 - 对齐:绘制水平线和垂直线,以及指向水平线上单个消失点的透视线。
2点透视 - 对齐:绘制垂直线,以及指向水平线上两个消失点的透视线。
3点透视 - 对齐:仅绘制指向画布上三个消失点中的任何一个的透视线。
测量
In Concepts, all the strokes, selections and imported items have measurements attached to them. These measurements are not visible on canvas by default, but they can be exposed by enabling the Measure option in the Precision menu. When measurement is enabled, a Measurement-layer will appear in the layer list.The units and Scale used in the drawing are based on your current app Settings. You can choose between Metric, Imperial and Digital unit systems depending on what you prefer.
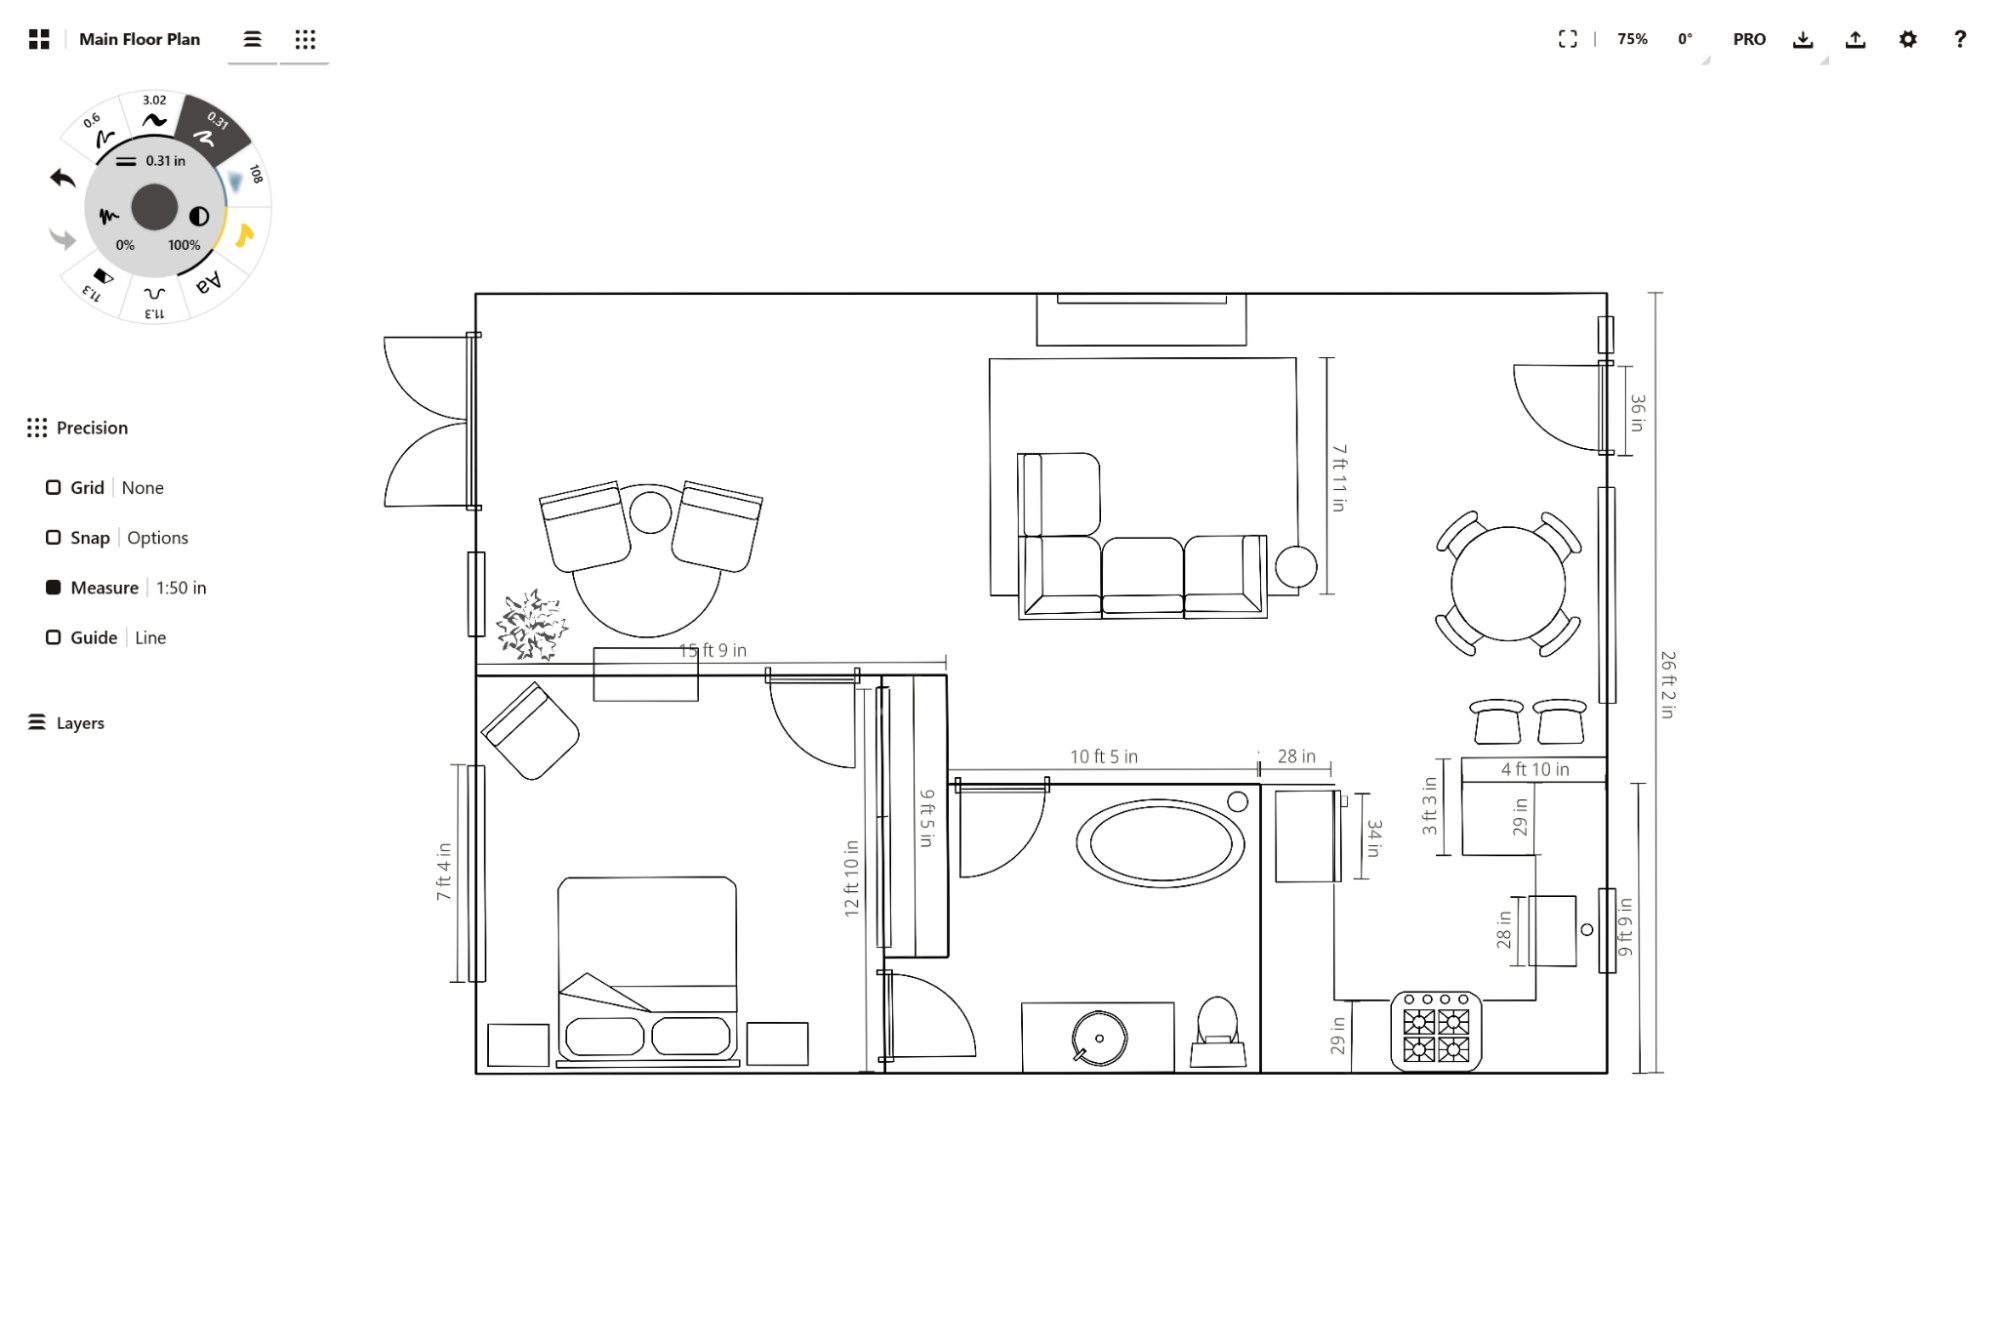
一幅标记着室内布局测量值的示例图。
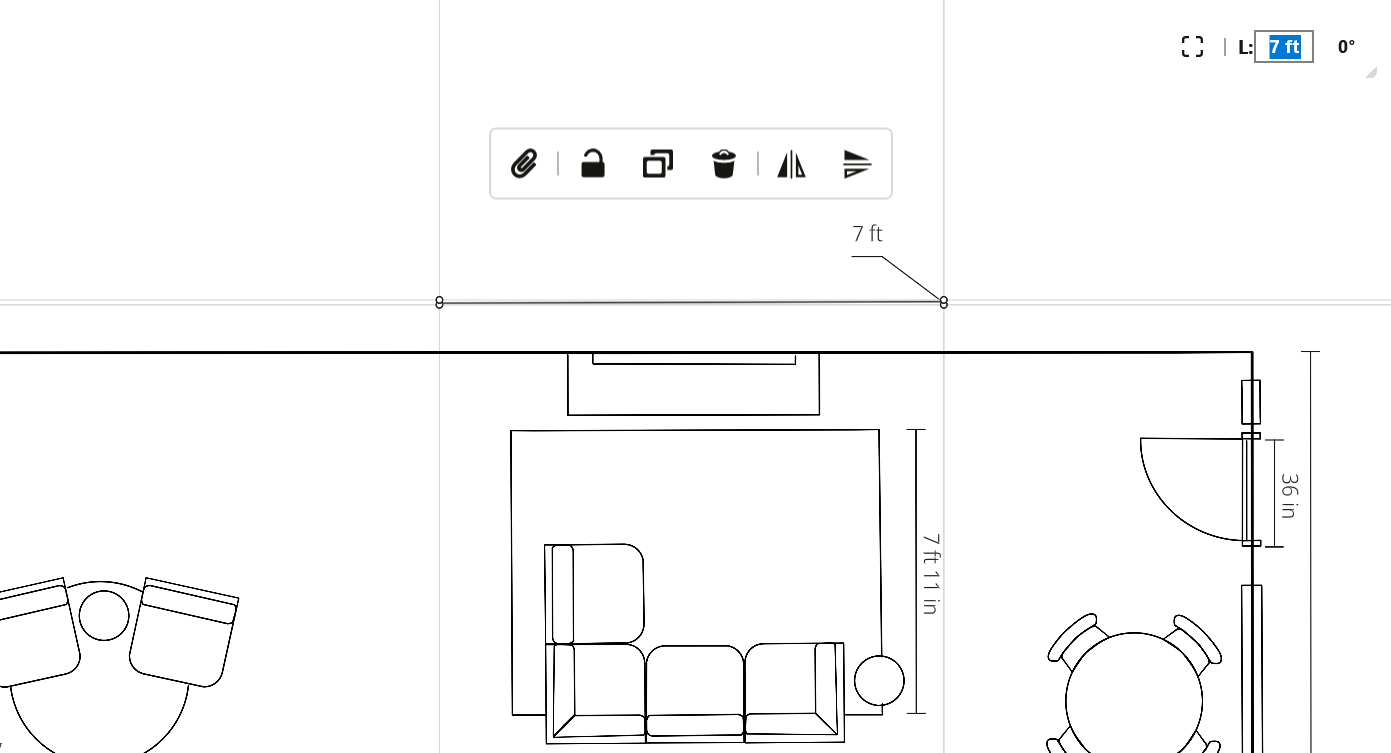
When you draw a stroke with the Measure enabled, you can see a live measurement attached to it and showing the exact length or area of the stroke. To keep those measurements on screen, tap the measurement label to "stick" it to the canvas. You can Select a measurement label with Item Picker or Lasso to flip, mirror or otherwise adjust its positioning on the canvas.
If you’re a leftie, you can change the side which the labels appear, in the settings. Note that labels will only appear and Export with your drawing while Measure is active.
Select a stroke and then tap+hold a measurement label to enter a custom length. It will change the length of your line to be the value you entered. You can also change the length of the selection by tap+holding the length indicator up in the status bar.
Tap+hold+drag a measurement label to reposition it along your drawn line.
Entering a custom measurement value for a selected stroke.
Measure is also useful when working with the Shape Guides to help your design plans retain exact dimensions. Enter a custom value with a tap+hold on the measurement label , and the entire guide will adjust to your value. Specify the length of the side of a rectangle, and the rectangle will adjust accordingly. Tap+hold the radius of your circle and enter a value, and the circle will adjust likewise. The same applies to any value of any shape guide, including angles.
You can also create static labels (i.e measurements that aren’t attached to any stroke in your drawing). Read more in the Shape Guides section.
Area measurement
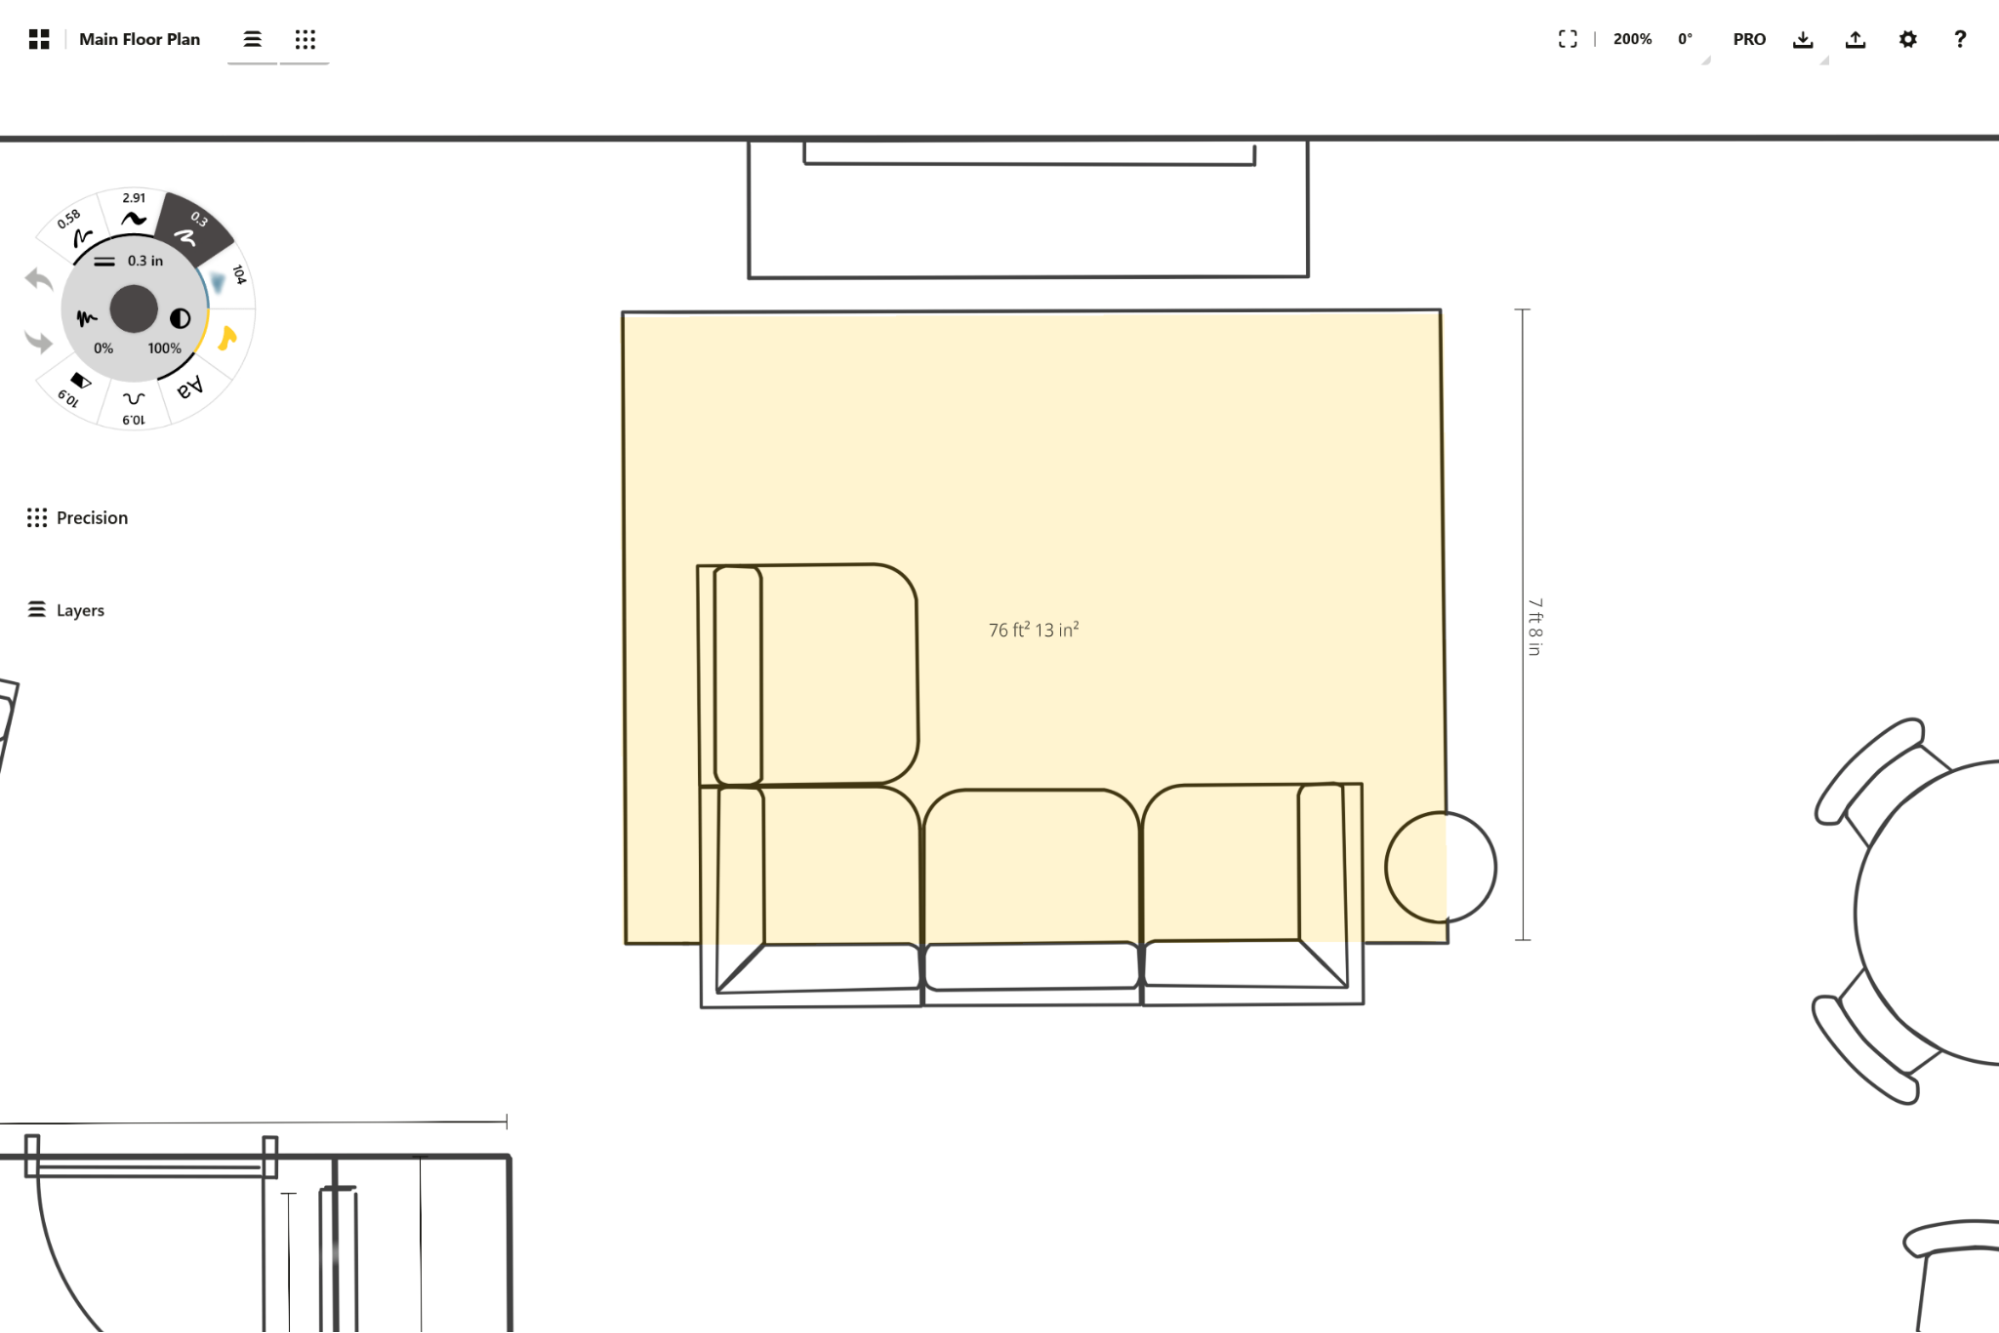
The Fill tool is different from all the other brushes in terms of the measurements shown. While other strokes show you the length, the Fill tool shows you the area as well. Use this to estimate material consumption in your renovation plans or quickly check the size of a certain area in your garden plan. When drawing, the area measurement appears in the center of the fill. Once the fill is finished, tap on the measurement to save it on canvas.
测量值弹窗
On the Status Bar, you'll see a field stating your current relevant zoom, rotation and selection status. Tap on this field to open the Measurement Popup. Here you can quickly access zoom and rotation presets for your canvas or selection, lock and unlock canvas zoom and rotations, and use the fields to control a selection's dimensions.
With a single stroke selected, you’ll see the length, width, height and rotation of the stroke. With multiple strokes or an image selected, you’ll see the width, height and rotation of the selection. With a fill stroke selected, you’ll see the width, height, length, area and rotation of the selection. You can also choose to lock/unlock the relation of width and height when adjusting the values - tap the lock to toggle.
The values in the popup can be inline edited with a tap. Enter measurements in any units and they will be automatically converted to match the document units you have selected in the Workspace Settings. You can also enter percentages and the app will calculate the matching values for you. The selections can be scaled or rotated by tapping the presets on the measurement and rotation sections; additionally, you can customize the presets to your preferred choices by tap+holding a preset.
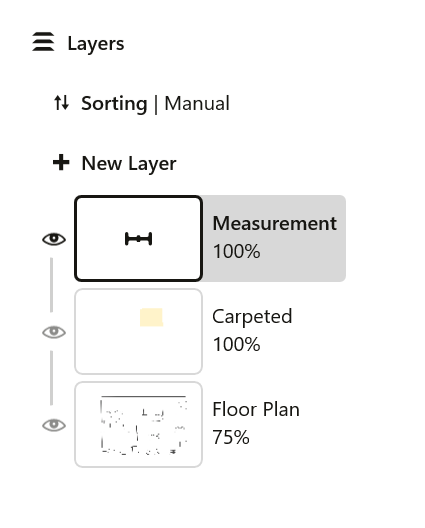
Measurement Layer
Various relevant measurement statuses. The Measurement Popup gives you quick access to relevant, available measurement workflows. This includes zoom, rotation, and length / width / height values as applicable to your canvas or selections.
When Measure is activated, you’ll see real-world measurements appear beside your strokes and a Measurement layer in your layer list. You can move this layer up and down in the layer list, as with any other layer to change its visibility. The measurement layer allows static measurement (i.e. measurements that are not associated to any strokes) to live in its own layer.
缩放
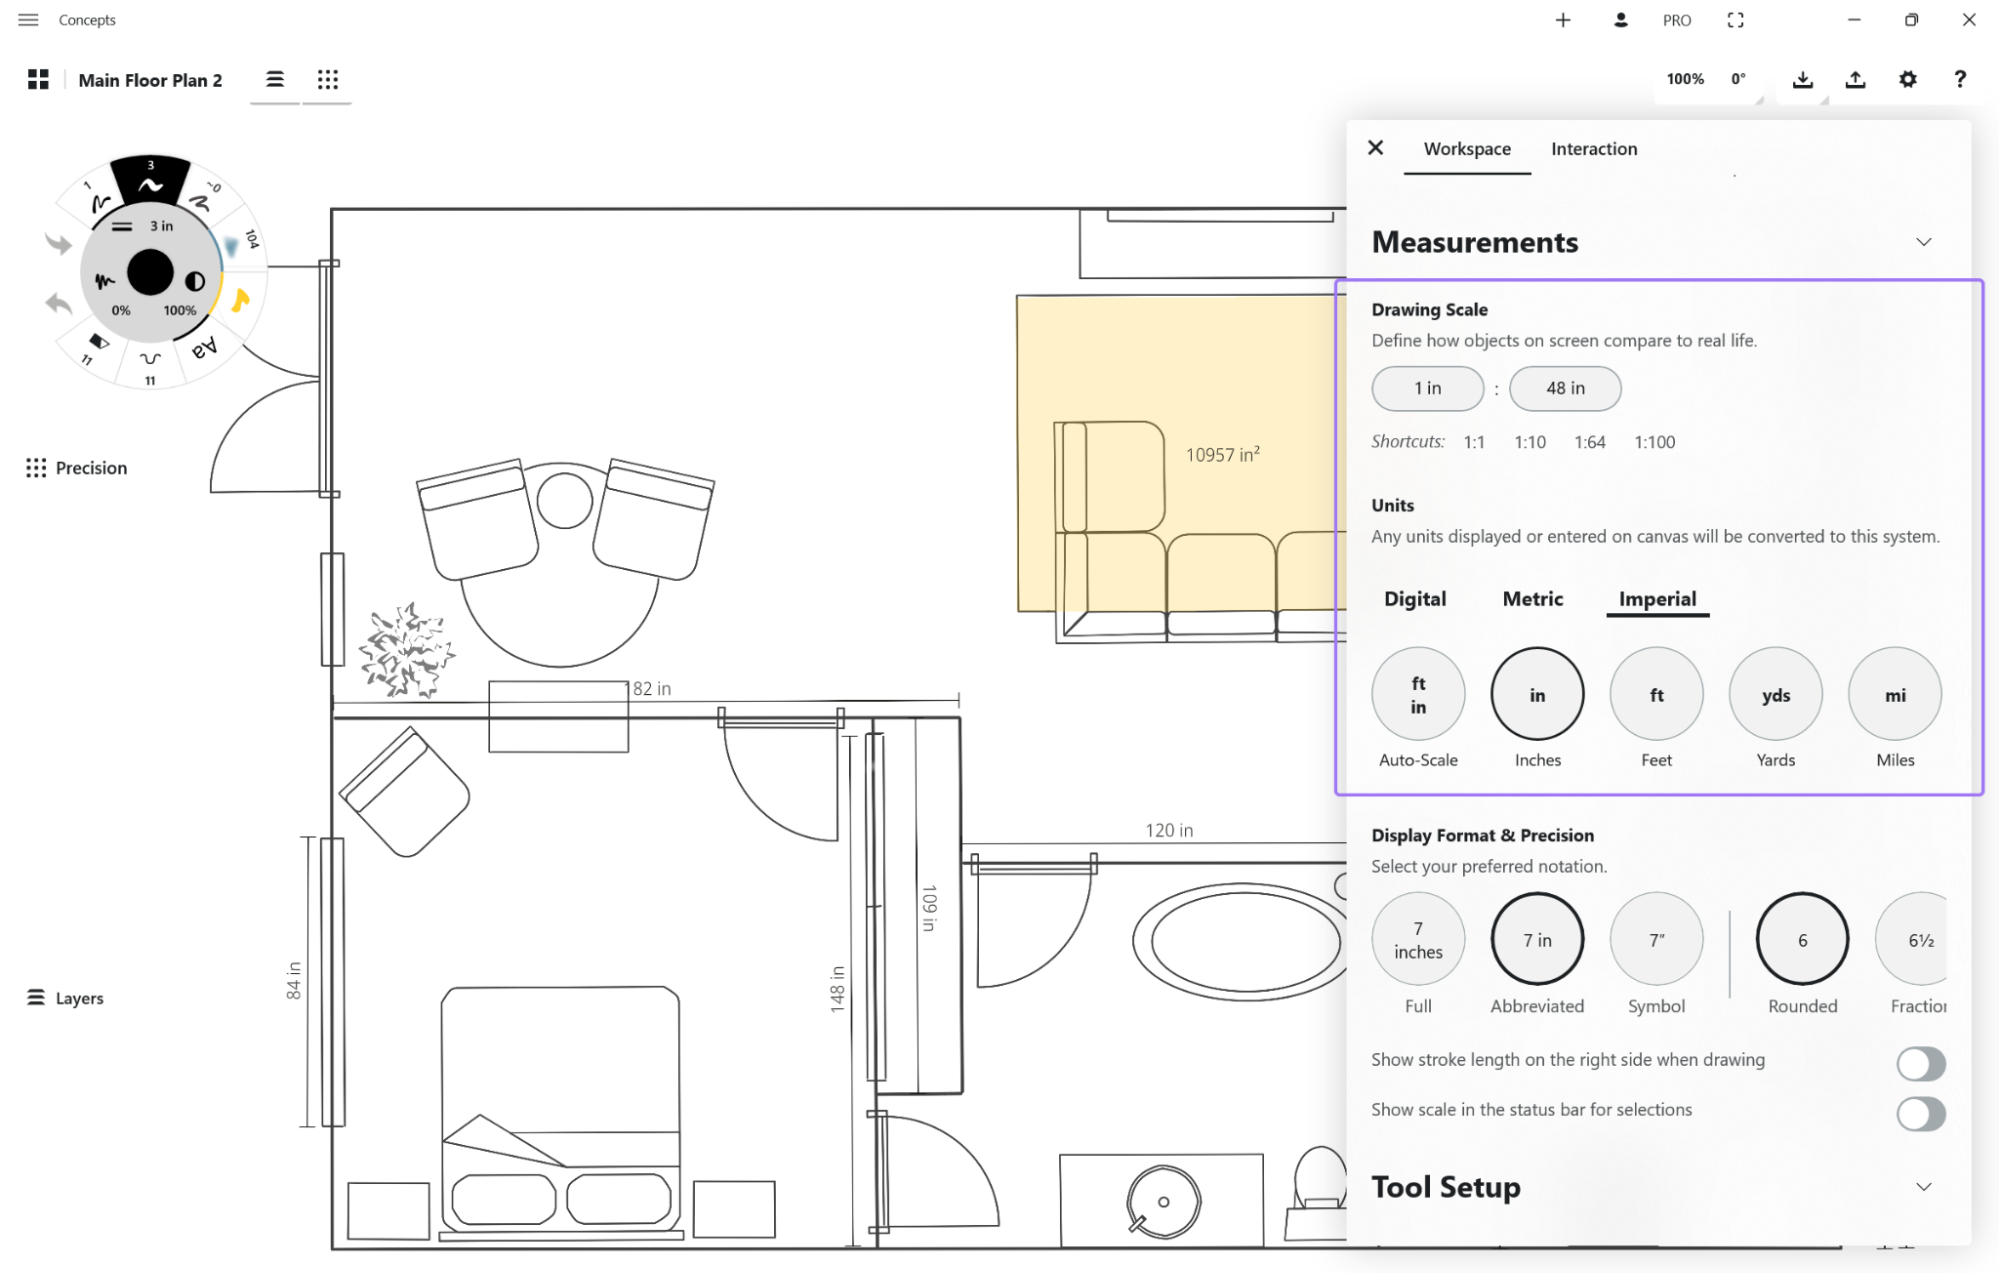
The Workspace tab of the Settings menu will appear - find Drawing Scale and tap one of the popular scale shortcuts or enter your own scale. Be sure to set your Units at the same time, just below Drawing Scale, or it will revert to your Units set.
From this point onward, all tool and measurement values will appear according to this scale, so don’t be surprised when a pen set to 2 points is suddenly .015 inches. Your tool presets will be the same as you’ve set, but the units will display as converted.
如何为导入的平面图或照片设置比例?
- To set scale in a project, you need one accurate measurement of your real space. Take out your tape measure or ruler, and measure one actual length of a wall or section represented on your plan. It doesn’t matter which one it is, so long as it’s clear and easy to mark on your screen.
- Import your photo or plan onto your canvas. (A helpful, in-between step is to lower the opacity of your image (see Layers) so you can see your tools and drawing easily.)
- Turn on Precision, and activate Measure.
- Activate the Line guide, and align the handles on your plan to the same segment of wall or other item that you measured in real life. It helps to double-tap the crosshairs at the center of the Line guide, to contain the boundaries of the line to your measurement when you draw.
- Tap the 1:1 ratio beside Measure. You’ll notice the values under Drawing Scale have been filled in with the current length of the Line guide according to your current units, scale and zoom level.
- Enter your real-life measurement in the second field, and tap anywhere to dismiss the menu. Now when you look at the ratio beside the Measure button on canvas, you’ll see a new ratio -
1:your-new-calculated-value
. This will remain the same regardless of zoom level, and regardless of how much you shrink or expand your Line guide.
For a fully illustrated tutorial on setting scale, check out Scale and Measurement in Concepts.
图形辅助线
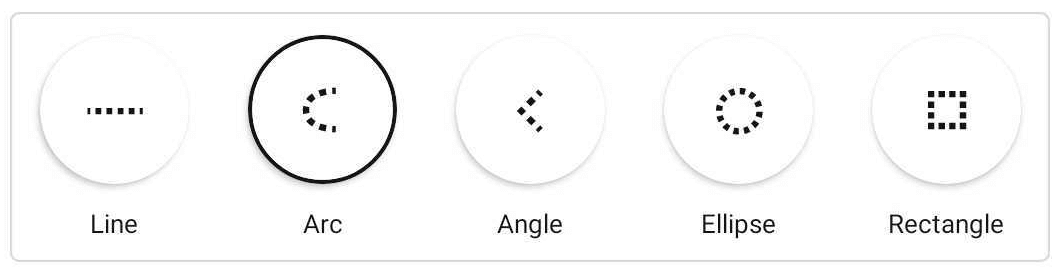
图形辅助线是您设计和绘图的好朋友。图形辅助线让您可以精准控制所画的每条边和半径。使用它们绘制部分或完整的完美形状,并将其调整为任意大小、形状或角度。
当您打开一个图形辅助线,将看到一些功能显示出来。
- 辅助线本身的形状。灰色边界是您使用的笔刷的反射 - 窄或胖 - 也是当您勾画形状时将填充的部分。在屏幕上任意位置勾画形状。
- 辅助线的圆圈或手柄。点击一个手柄然后拉动它,就可以看到形状辅助线相应的拉伸或收缩。
- 十字准线。位于辅助线的中心,点击并拖动十字准线可以在不改变辅助线的情况下移动整个辅助线。如果您双击十字准线,每个辅助线都将通过特殊功能进行响应:
- “直线辅助线”会将您已绘制的线条限制在手柄之间。
- “弧线”工具会变成标准的半圆形。
- “角度”工具会吸附到90度。
- “椭圆”工具会变为正圆形。
- “矩形”工具会变成正方形。
The Shape Guides are really powerful when combined with Measure. If you have both enabled, you can draw lines and other shapes with precise measures and angles. You can see the Measure labels on your guide and tap them to stick them to your plan. (As long as Measure is active, they’ll export with your plan, too.) Tap+hold them to edit the values via keyboard.
You can also use Shape Guides to create measurements labels that aren't attached to a stroke or group for more general use, like adding a scale indicator on the drawing. To do this, just tap the measurement and it will stay on your canvas. You can Select the label and move it around, and scale it like any other stroke.
要旋转一个图形辅助线或任意选区到一个角度,点击画布顶部状态栏内的角度区域,键盘将会显示。输入自定义数值,确认您的选择。选区将会按顺时针方向旋转。