Learn the Basics of Concepts
Welcome to Concepts! Ready to dive in? These beginner tips and tricks will help you get started fast.
What This Page Covers:
• Tool Wheel
• Selection & Nudge
• How to Erase
• Importing Photos & PDF's
• Color & Fill
• Layers
• Shape Recognition & Guides
• Exporting
• Additional Help
Get familiar with the Tool Wheel
The Tool Wheel is where all your tools, colors, and tool settings are stored in Concepts. The graphic below explains how it works.

Tools & Brushes
Tap a tool on the outer ring to select it, tap again to view all of the available tools.
Tool Settings
The middle ring contains shortcuts to your brush size, opacity, and smoothness.
Bonus! Tap two fingers anywhere on the canvas to undo!
Customization
Tap and hold the outer ring to drag the Tool Wheel around the canvas or switch to a more traditional tool bar.
Nudge and Selection
Selection
You can select any stroke or shape to move, scale, edit, or delete it. One of the powers of vector-raster hybrid is the flexibility to experiment and change your ideas at any stage.
Nudge
The nudge tool is one of the most intuitive ways to edit strokes in Concepts. It allows you to use your stylus - or finger - to push things around like a piece of string. It’s super useful for creating unique shapes and pushing things into place.
How to erase in Concepts
Because Concepts is a vector-raster hybrid, erasing may not work the way that you’re accustomed to. We’ll cover the two ways to erase in Concepts below.
Erase using Slice
The slice tool provides a traditional eraser experience. As opposed to masks, the slice tool is a destructive tool that will permanently delete the part of any vector stroke it touches. There are a few things it wont affect, like imported images.
Erase using Masks
Masks function like erasers but are non-destructive. That means they remain editable and simply cover the strokes beneath them without deleting them. You’ll be able to select and adjust the width, opacity or smoothness, or make other edits using the selection menu. Masks can be used to cover imported images and come with both hard and soft edges.
Importing Photos and PDF's
You can import images, PDFs, or .concepts files onto your canvas to mark up or use as guides for your sketches.
Access the Import Menu Easily: Tap the "+" button fromthe Gallery screen or the import icon in the status bar of your drawing to open the Import menu.
Versatile Import Options: Bring in content from your photos, files, the clipboard, or even take a new picture with your device's camera directly.
Drag-and-Drop Convenience: Quickly drag and drop images or files onto your canvas from other apps or your device's file manager.
Clipboard Integration: Paste copied images, text, or selections directly into your drawing from your device's clipboard.
Wide File Type Support: Concepts supports importing JPG, PNG, PSD, and PDF files, as well as its own .concepts files.
Note on .concepts Files: While we are working towards a unified file format, .concepts files are not yet compatible across all platforms.
PSD and AI Import: Importing PSD or AI files will bring them into your drawing as flattened PNG images.
Utilize the Objects Library: Enhance your drawings by importing and using pre-made or custom-created objects from your library.
Layers
Layers bring order and flexibility to sketching. They let you explore ideas on top of your work and add depth without needing perfect first attempts.
Open a drawing and tap the Layers icon. Tap "+ New Layer" to add a new layer, tap a layer to activate it, and tap again for options like select, lock, duplicate, delete, merge, and opacity. You can drag the layers to reorder them, tap the eye to hide them, and double-tap for Focus mode.
Concepts has Automatic and Manual layering. Automatic sorts by tool (pens in one layer, pencils in another). Manual lets you control each layer's content. Toggle between them at the top of the Layers menu.If you have broken the Automatic layering rules (e.g., multiple tool types on one layer or multiple layers for the same tool), the mode will remain in Manual.
Want to learn more about working with Layers? Read our full Layers Tutorial.
Color and Fill
Color Wheel
The color wheel is one of our favorite interface details. You can use it to choose from COPIC palettes or fine-tune your colors with RGB and HSL sliders. Tap the center of the Tool Wheel to get started!
Fill Tool
The Fill Tool creates colored surfaces instantly. It is all about the positive space left within the path you draw. As with any other brush, you can select it and turn it into a different brush and vice-versa.
Want to quickly fill a single-stroke shape? Simple select it and choose the Fill tool. Your shape will transform from a line to a filled area.
We know the way our Fill Tool works is a little non-traditional. A one-tap bucket fill in a vector app is a hard problem to solve, but we’re working on it!
Shape Recognition and Guides
Shape Recognition
Shape recognition allows you to quickly turn rough drawings into perfect shapes. Start by drawing a shape with one to four strokes. Then hold at the end of the final stroke to detect a shape. When the shape has been detected, it can be scaled and rotated by moving your stylus without lifting it from the screen.
Supported shapes include straight and curved lines, arrows, triangles, squares, rectangles, circles and ellipses.
Shape Guides
Shape Guides act like a ruler to give you precise control over your drawings.
You can use the adjustable handles for resizing and the central crosshair for moving the entire guide.
QUICK TIP: Double-tap the crosshair to return the guide back to a perfect shape (Line, Arc, Angle, Ellipse, Rectangle). The line will either expand across the full screen, or return to the length you set.
Exporting
Concepts works on an infinite canvas, so you need to define what part of your drawing you want to export. You'll typically see these options:
Entire Drawing:Exports everything you've drawn on the canvas, even if it's not currently visible in the viewport.
Artboard (if active):If you've set up an artboard with specific dimensions, you can choose to export only within those boundaries.
Selection (if you have an active selection): If you've used the Lasso or Item Picker to select a specific area, you can export just that selection.
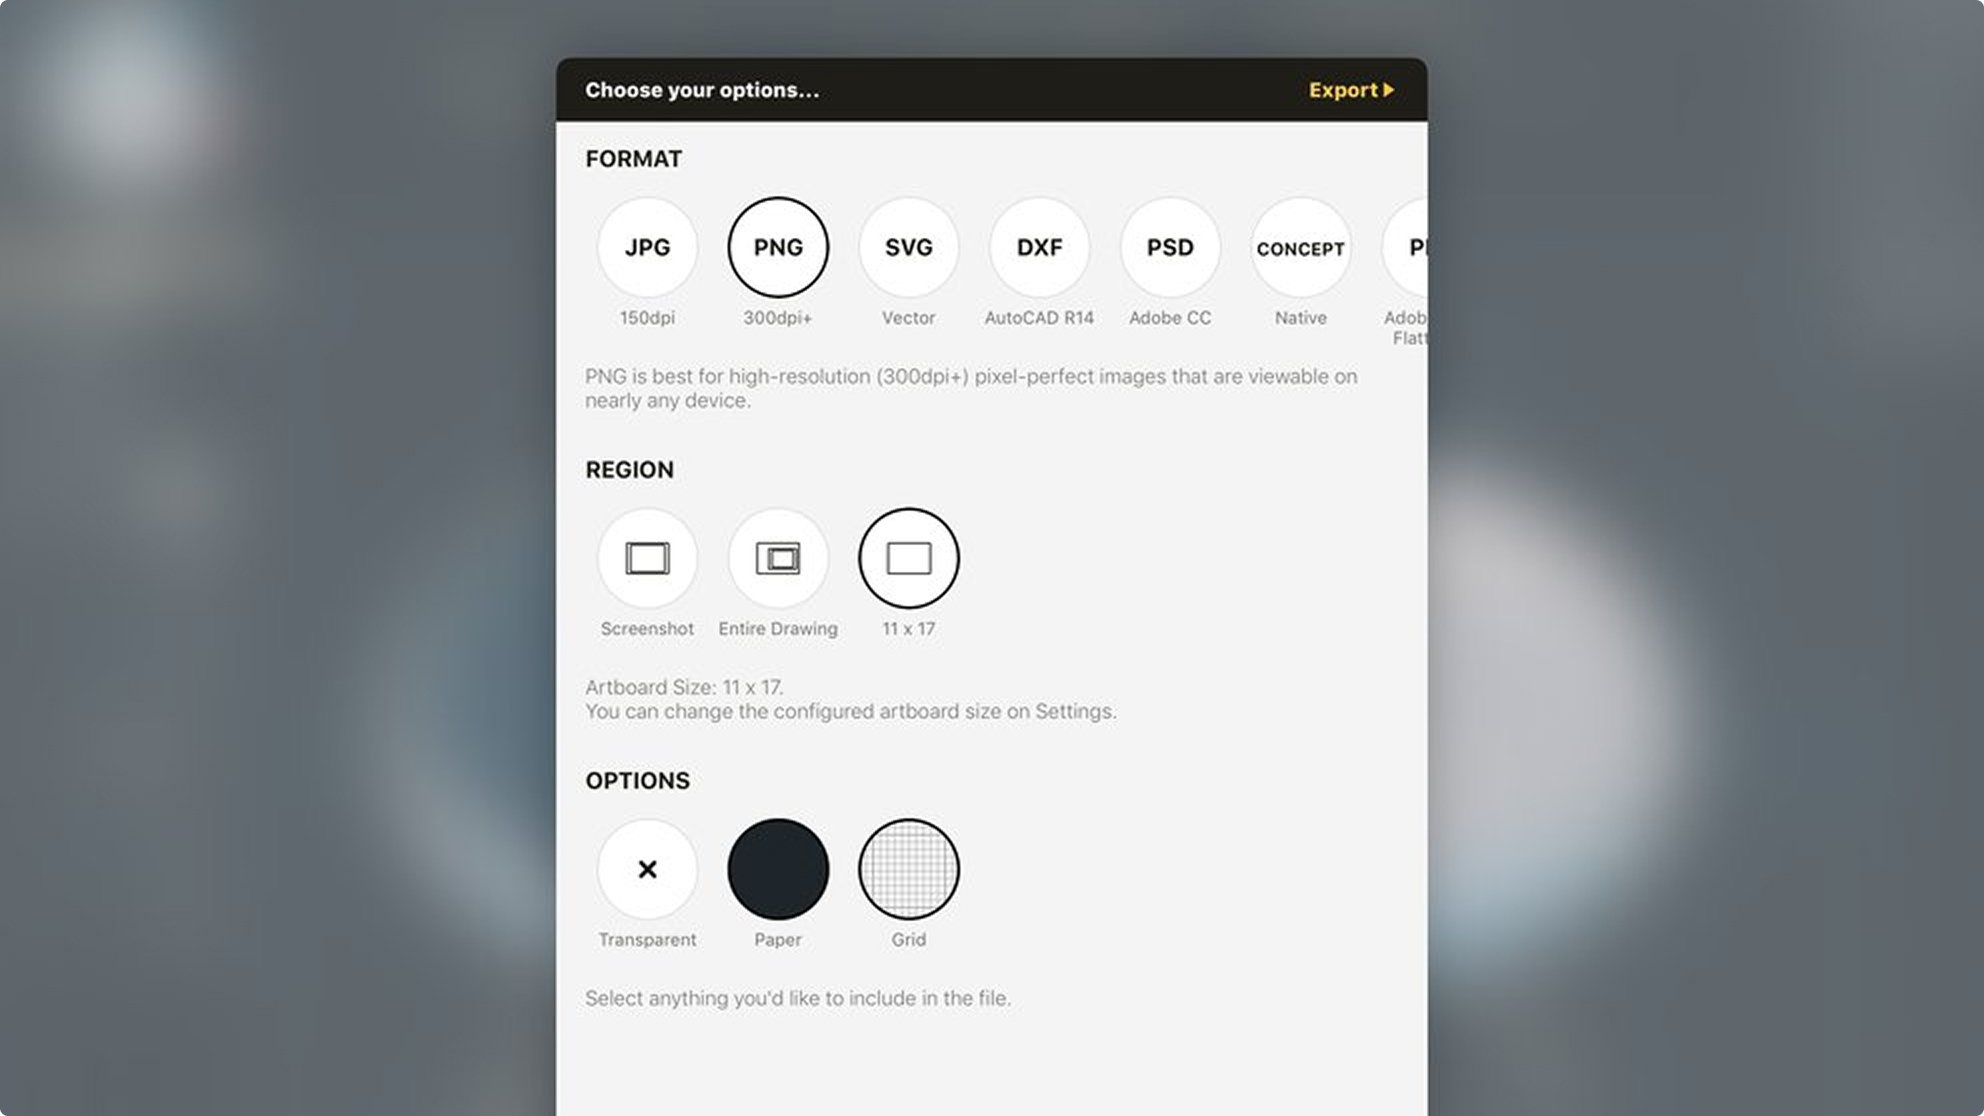
Once you’ve defined what you’d like to export, you can choose from a variety of formats and settings:
File Format: Options include JPG , PNG, SVG, DXF, PSD, PDF (raster or vector), and .concepts (Concepts file).
Set Options:These options will change based on the file format you choose but you’ll be able to set your scale and resolution, background (for PNG), paper type, etc.
Confirm Export:Tap Export and choose where to save/share.
To learn more about how to export, read our Export Tutorial.
Need more help?
You can find video tutorials, an FAQ, and our Online Manual right in the app! Simply tap the question mark in the top right to open our help menu.

Frequently Asked Questions
Do you have a User Manual?
We do! You can access it on our website here or in the app by tapping Online Manual in the Help menu under Help & Support.
Do you have more learning resources?
Whether you prefer to read or watch, we have a learning resource for you. You can watch video overviews of all our features on our YouTube Channel, check out our Online Manual, or subscribe to our Newsletter for our getting started mini-course.
In the app: Did you know you can access our full User Manual right in the app? Just open the Help menu and tap Online Manual. You can also access our FAQ for any questions.
How can I learn Concepts' Pro Subscription features?
We have a guided tutorial to walk you through each of the Pro Subscription features. Click here to read it.
Which tools are on which platforms?
For an up-to-date list of all of our features and platforms, feel free to check out our Features page.