Concepts is an infinite, flexible creative tool for all your good ideas. Available on iOS, Windows and Android.
Drawing Shapes Instead of Lines: 8 Exercises for Filled Stroke
Learn how to use Concepts' filled-stroke tool to create fluid, dynamic shapes in your drawings.

If you haven’t tried Concepts' Filled Stroke tool or aren’t sure what it’s supposed to do, these exercises will get you going. If you happen to already appreciate the Filled Stroke tool, you can use these exercises to expand your drawing toolkit, and enjoy how versatile, fun and useful the tool can be when visualizing your ideas.
As a designer, the Filled Stroke tool can give you a fast way to define shapes and spaces without extra linework.
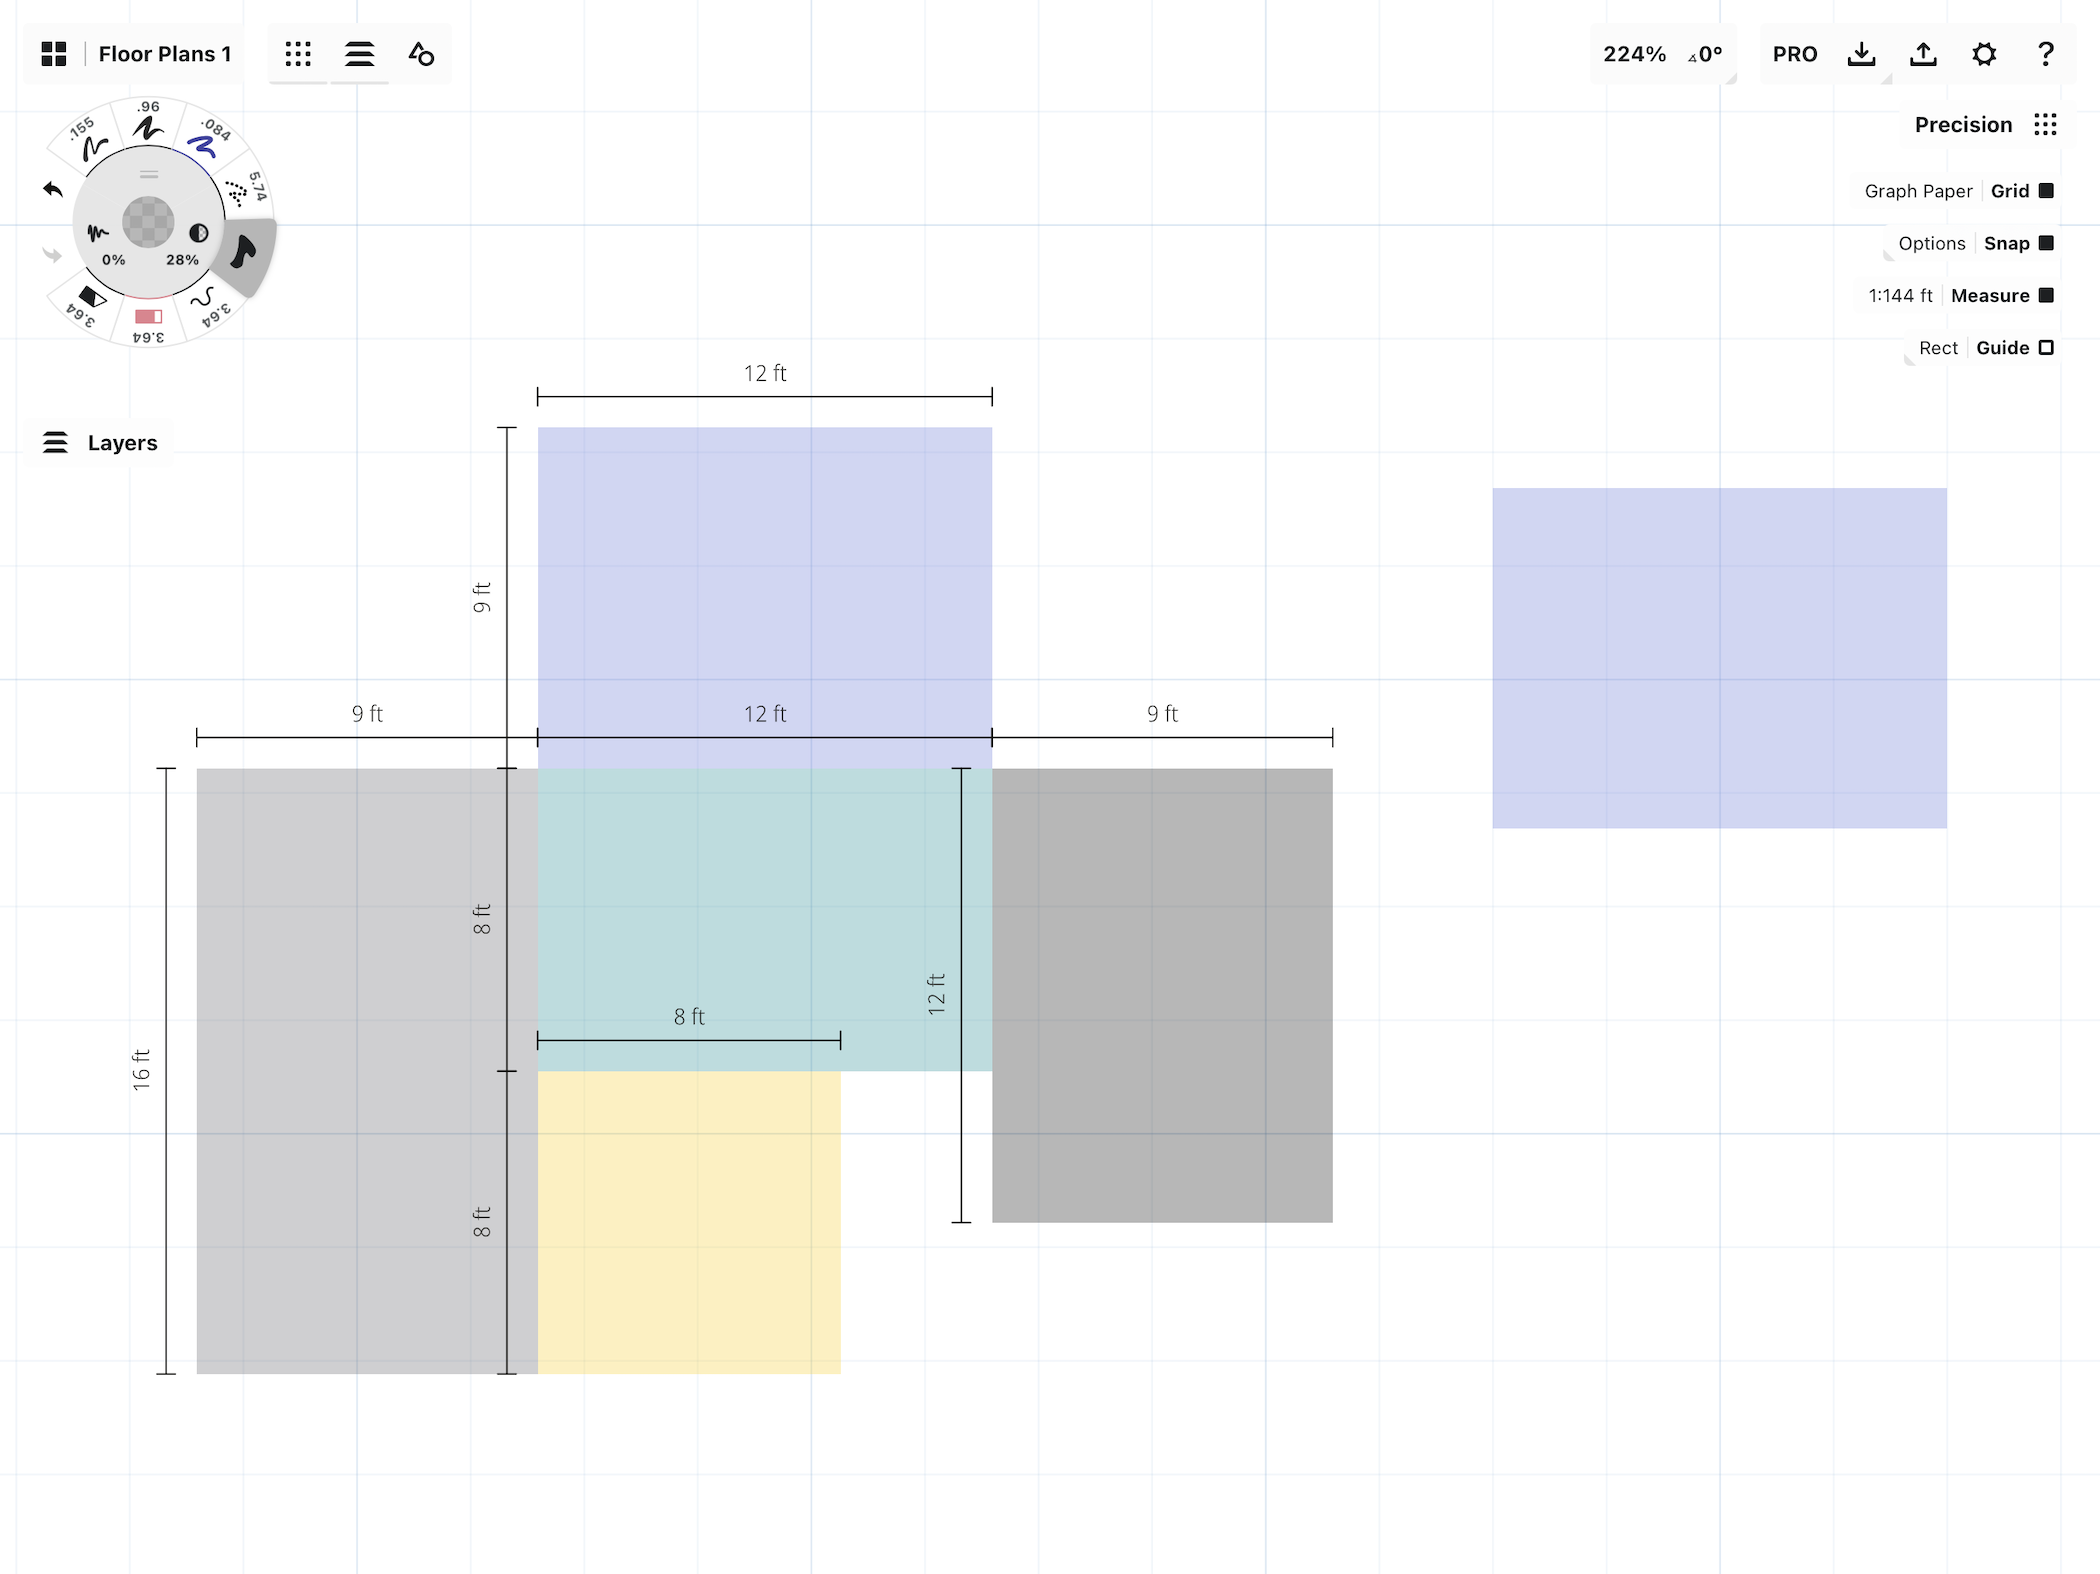
Quick floor plan layouts using Filled Stroke - draw this with Snap or Shape Guides.
As an illustrator, the “brush” has a smooth, contemporary feel while giving you complete control over the details.
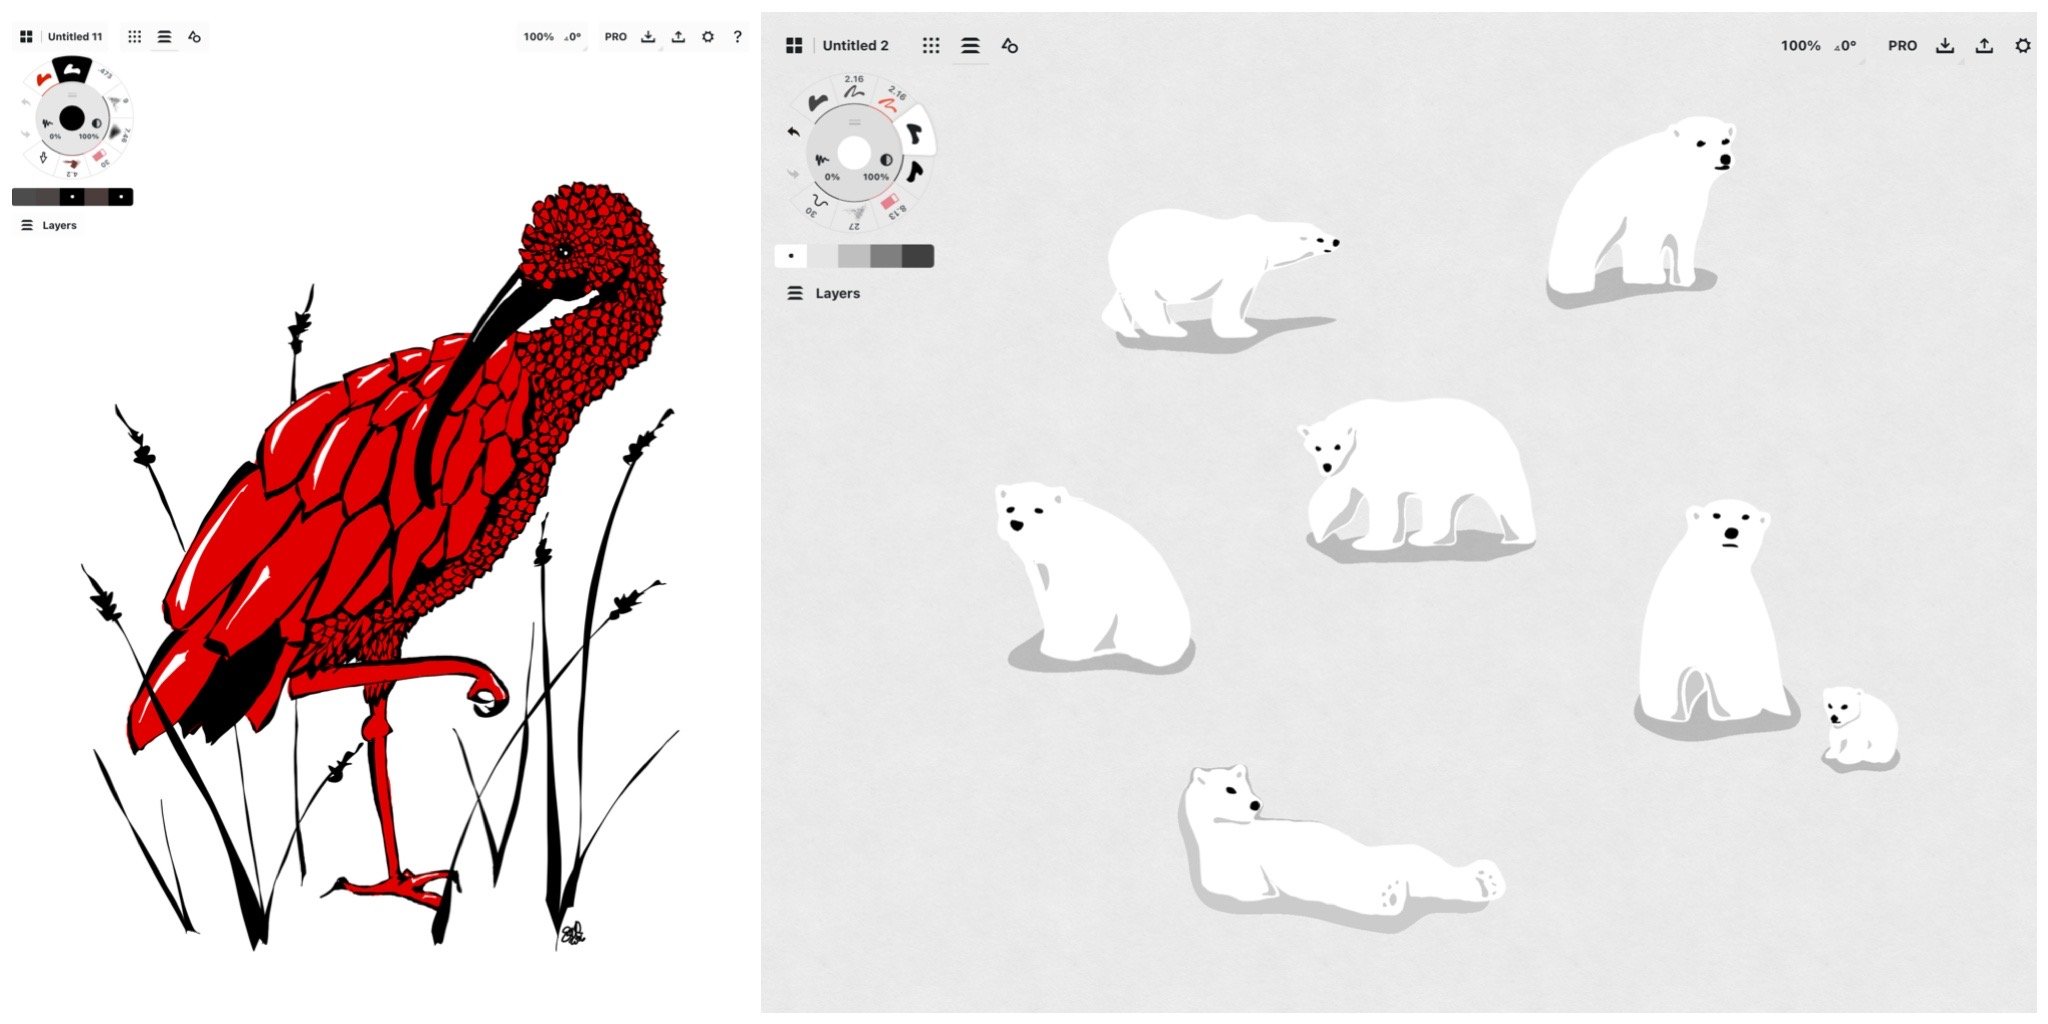
Scarlet Ibis and Polar Bear Wrap Design by Erica Christensen
How Filled Stroke Works
The Filled Stroke tool is a unique kind of brush that allows you to create any kind of filled space using your hand or stylus as the control. It’s different than a traditional bucket fill, which fills a pre-defined, closed area. The Filled Stroke tool follows your stylus’ motion on the canvas and fills any positive space inside it, from the moment you touch your stylus to the screen to the moment you take it away.
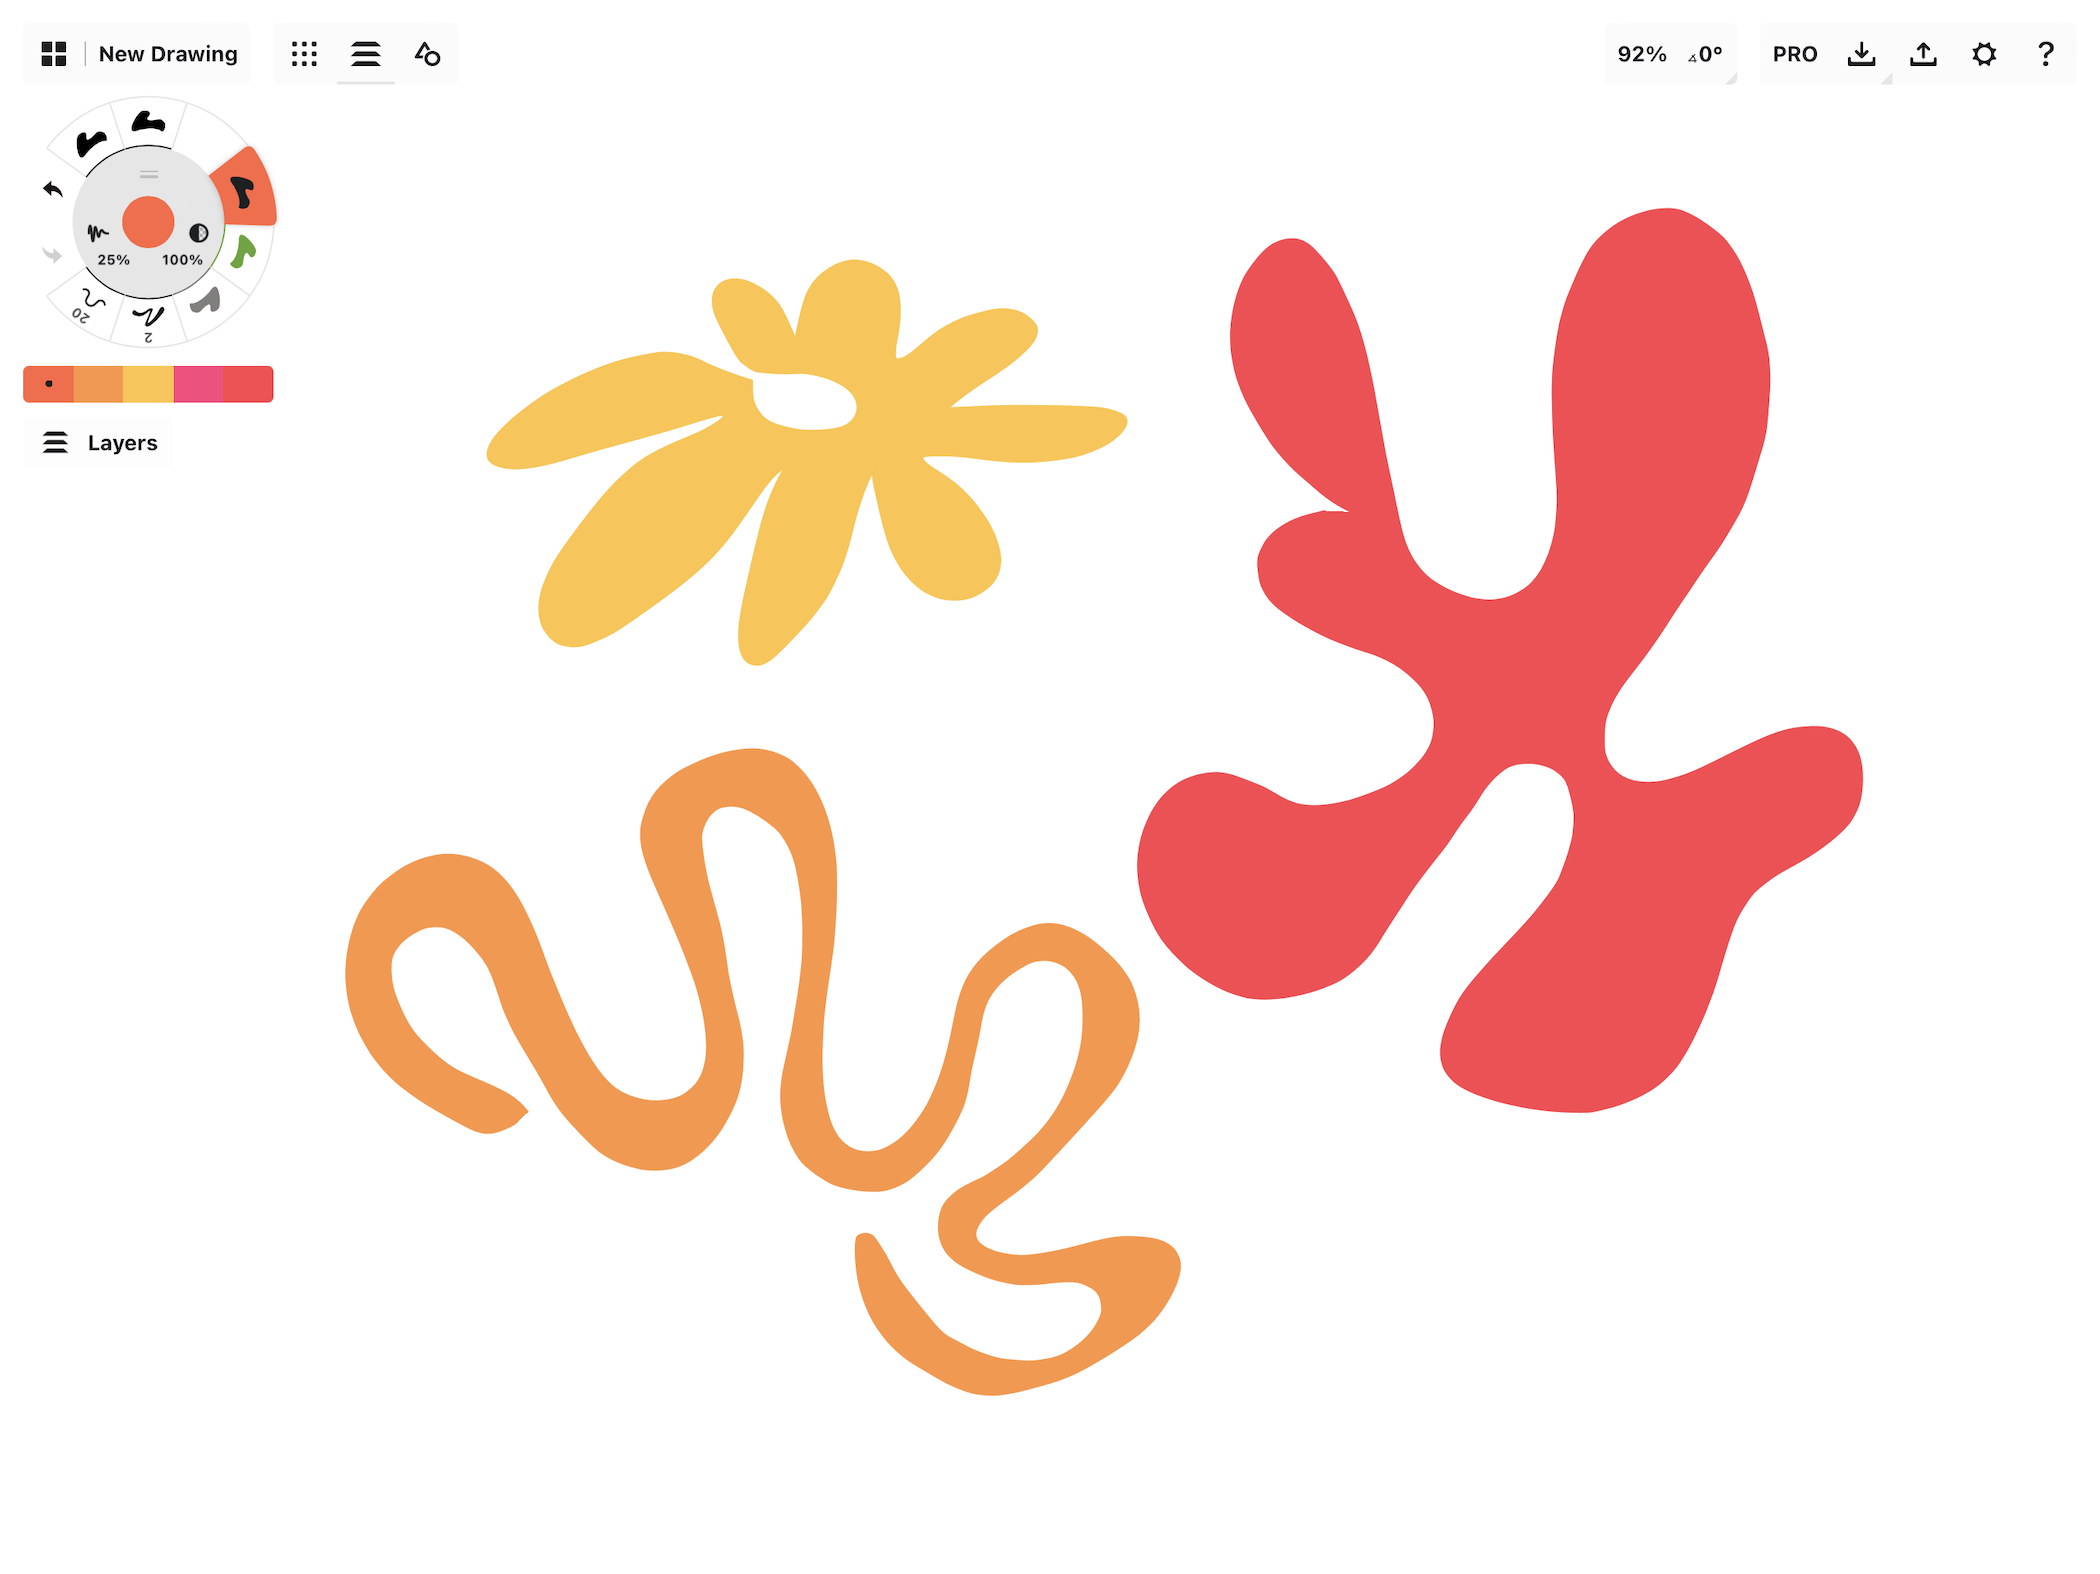
Each of these shapes are one stroke.
“Positive space” means an area filled by your motion between the start and end points that is not crossed over within the same stroke.
If the area is drawn over a second time within the original stroke, it becomes “negative space”, and is not filled.
Of course, if you cross over it a third time, it reverses again and becomes positive.
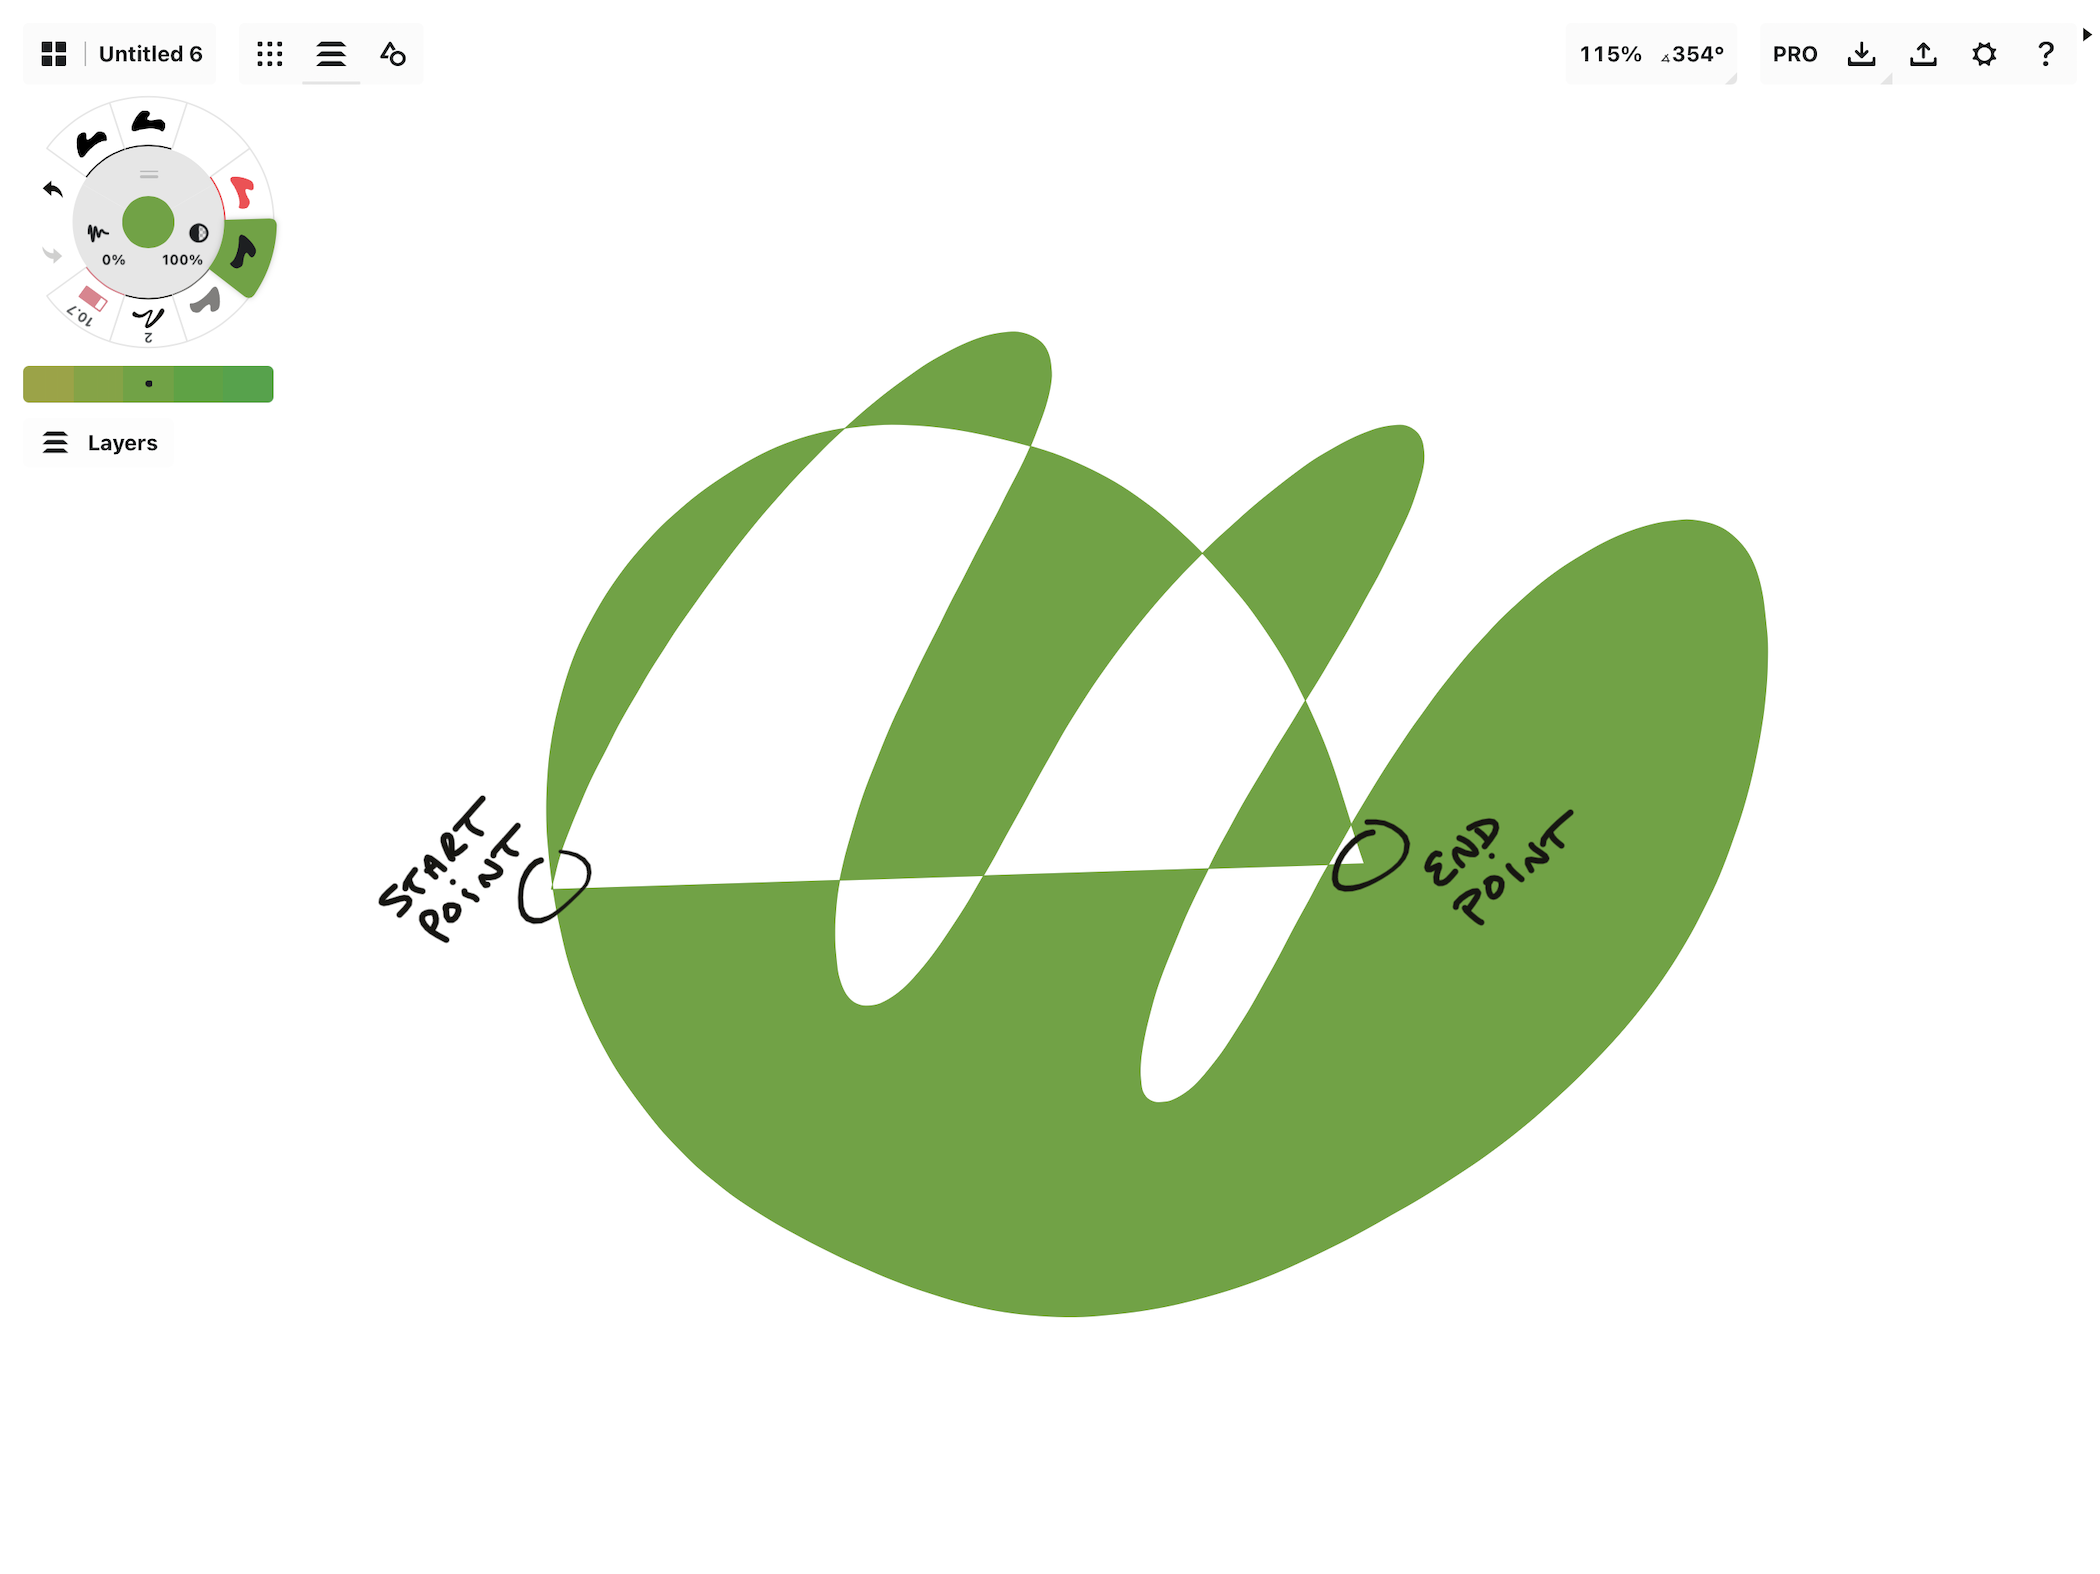
If you lift the stylus before reaching your start point, it will connect with a straight line.
If you pick up your stylus before reaching the original start point, it will connect your points for you with the shortest possible line between points: a perfectly straight line.
In tandem with Concepts' other tools, you can use the Nudge tool to push or pull your filled shapes, and the Slice tool to trim or cut through shapes (from the outside inward). Feel free to experiment with these tools, they work beautifully with Filled Stroke. The following exercises, however, are all about drawing with the tool.
Filled Stroke Exercises
As a creative tool, Filled Stroke offers a way to visualize in shapes instead of lines. The world is made of shapes, in all types and sizes, all around you. The leaf in the photo below is a simple shape, with contrasting color and textural shapes ingrained in it.
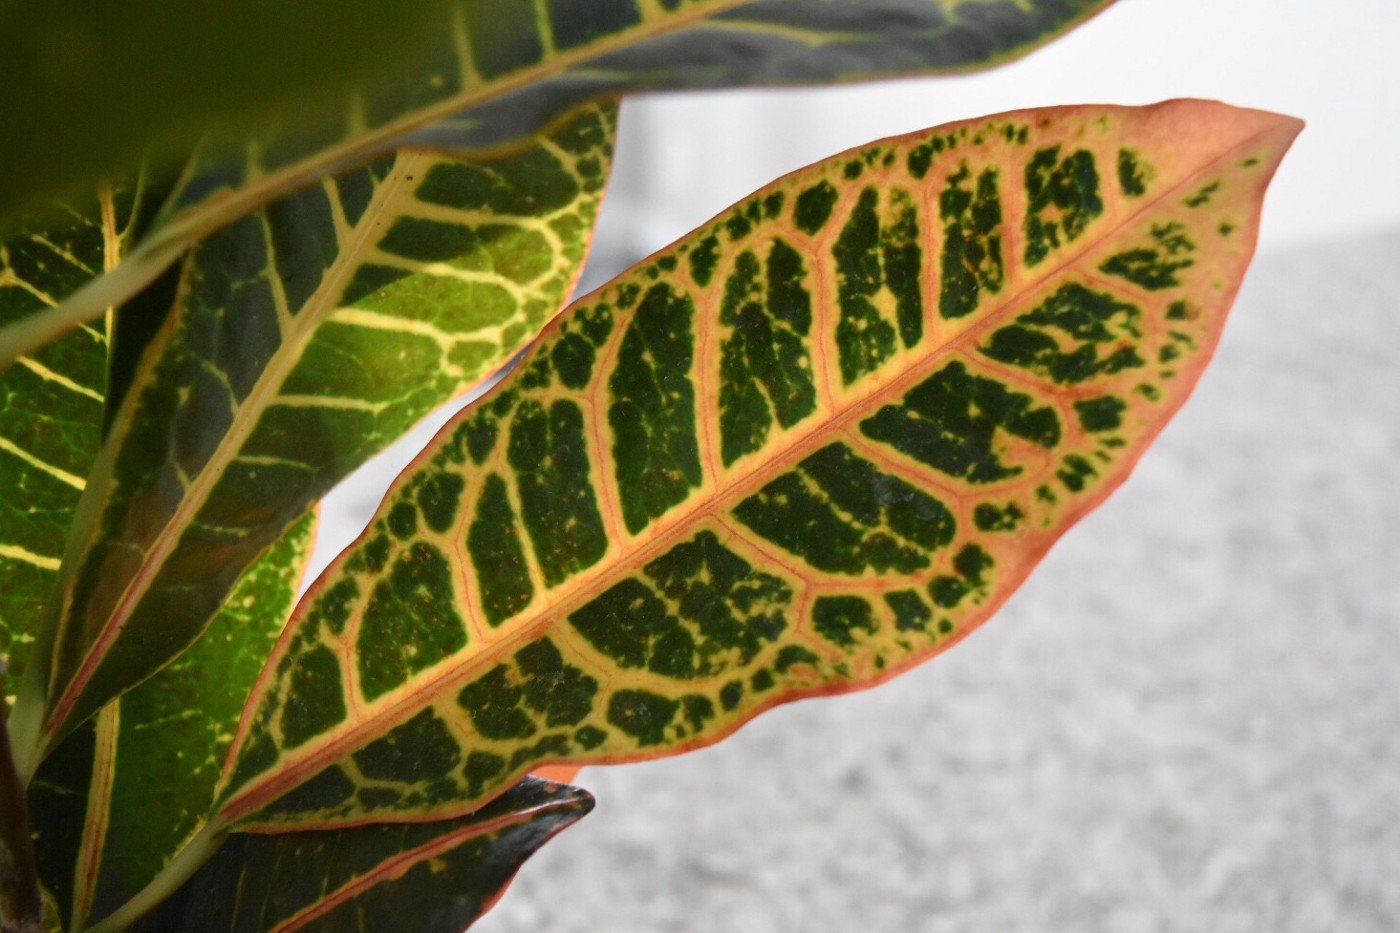
This plant is a colorful Croton.
You can recreate these shapes with the Filled Stroke tool just by outlining them with your hand. Using this photograph as inspiration, let’s get warmed up.
To start, let’s configure your Filled Stroke tool. Tap a slot on the tool wheel, and then tap again to open the Brushes menu. Find the Filled Stroke tool from among the basic tools.

On the inside ring of the tool wheel, you can see there are options for opacity and smoothness presets. Since you define the size of your stroke by drawing it, there is no size option. Choose a color and opacity.
Feel free to apply smoothing to the tool, as well. Values between 10% and 30% work well for polishing edges while you draw. A note to NOT set your Filled Stroke to 100% smoothness or you’ll never see the stroke you make. Smoothness shortens the overall distance between start and end points. As a 100% smooth line will become the shortest line possible between points, or a straight line, a 100% smooth shape will be the smallest shape possible no matter how giant your stroke appeared when you drew it. It will become a point. And it will disappear.
For a drawing using entirely fill, I prefer to set every tool on the tool wheel to Filled Stroke and give them their own colors and settings as I draw. This makes it a quick tap to toggle between fills. That said, if you like to have other tools on hand, you can also toggle fill settings using the preset values and the color picker.
Exercise 1 - Draw a Shape
Define a simple background by drawing a large, relaxed shape. No expectations.
The color you choose sets the emotional tone of your drawing. Pick something you’re in the mood for.
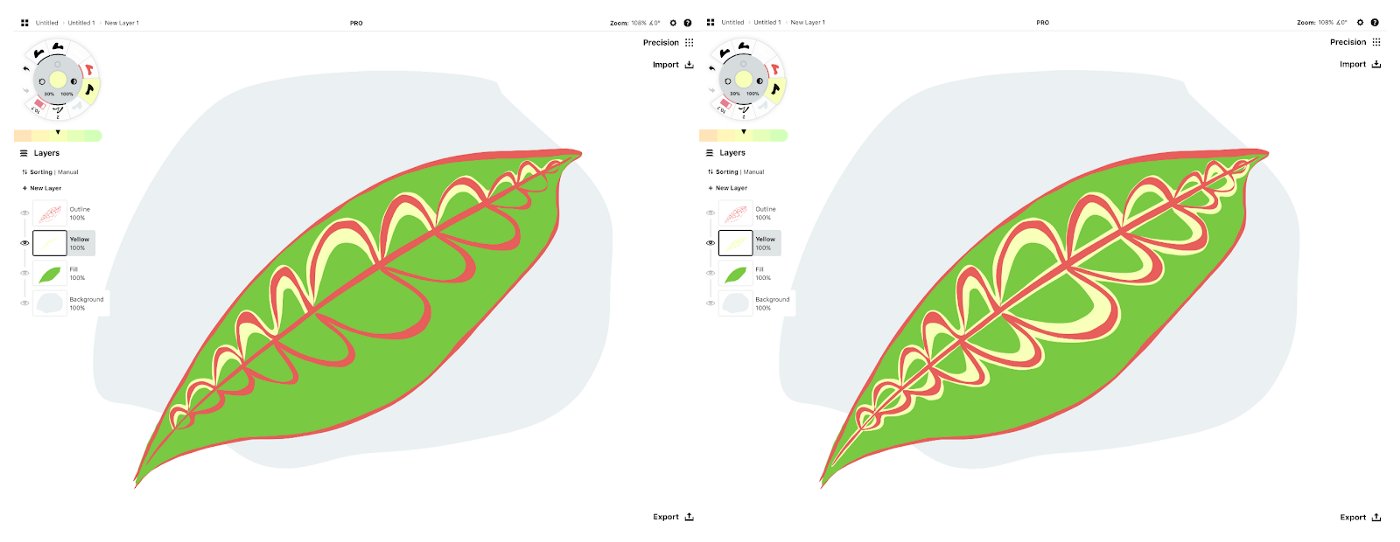
Exercise 2 - Outline a Shape
In a new layer, try drawing the outline of the leaf. Go upward from the stem and trace the general shape. Then without picking up your stylus, parallel that line and come back around.

I drew this line at 0% smoothing. You can see how rough the edges are. It isn't wrong, just an artistic mood.
Add a few more lines to define the most structural areas of the leaf.
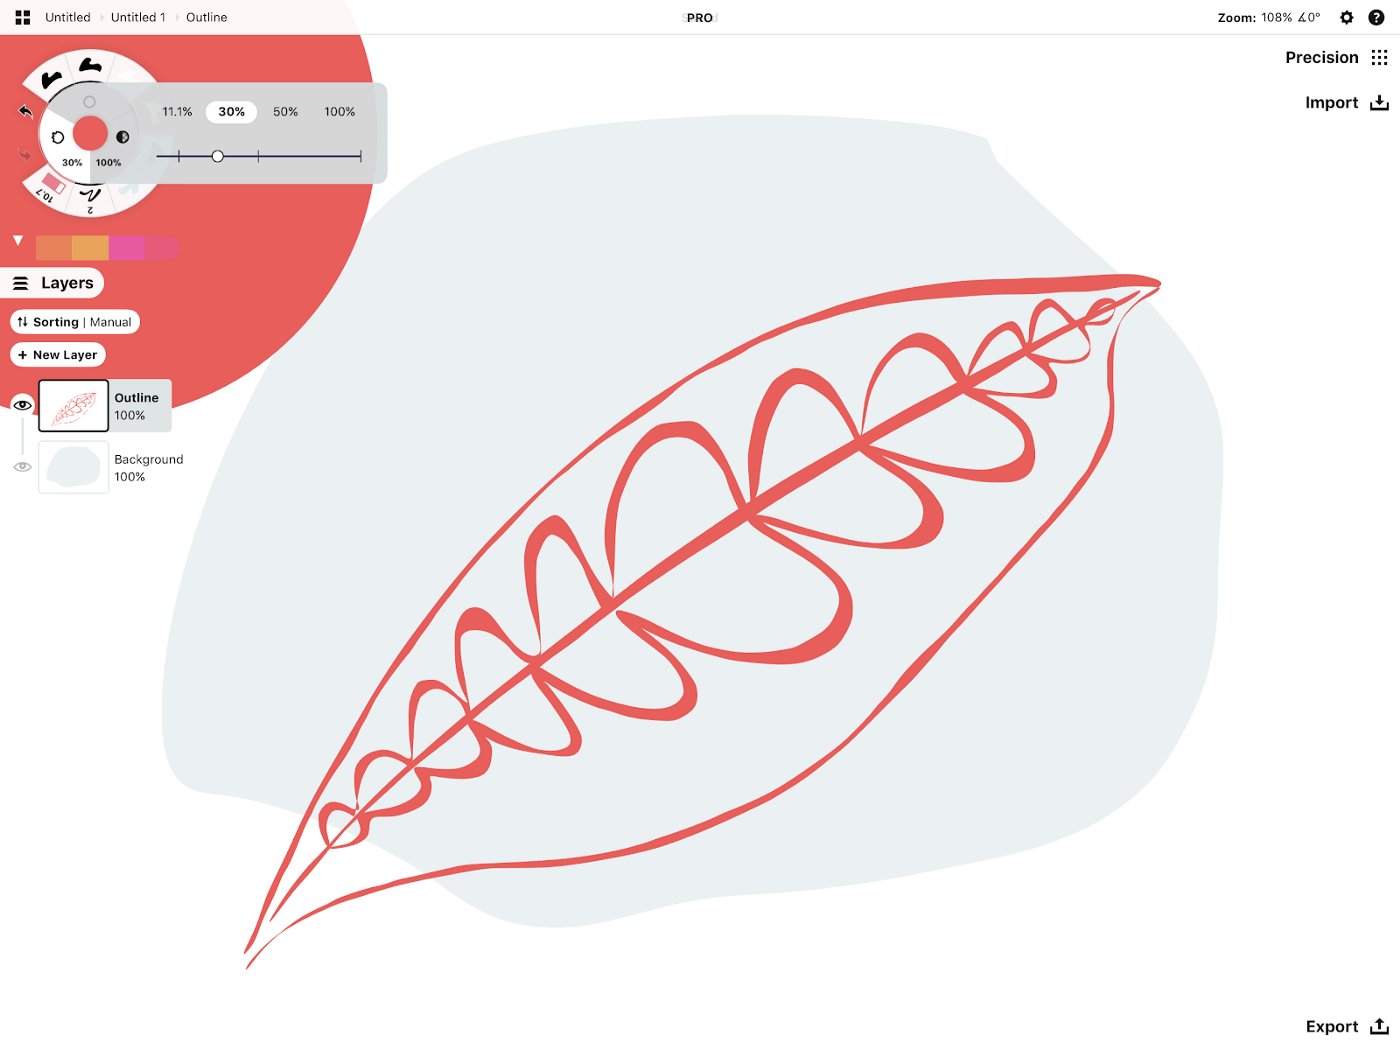
I applied 30% smoothing to my stroke to soften things up for this piece.
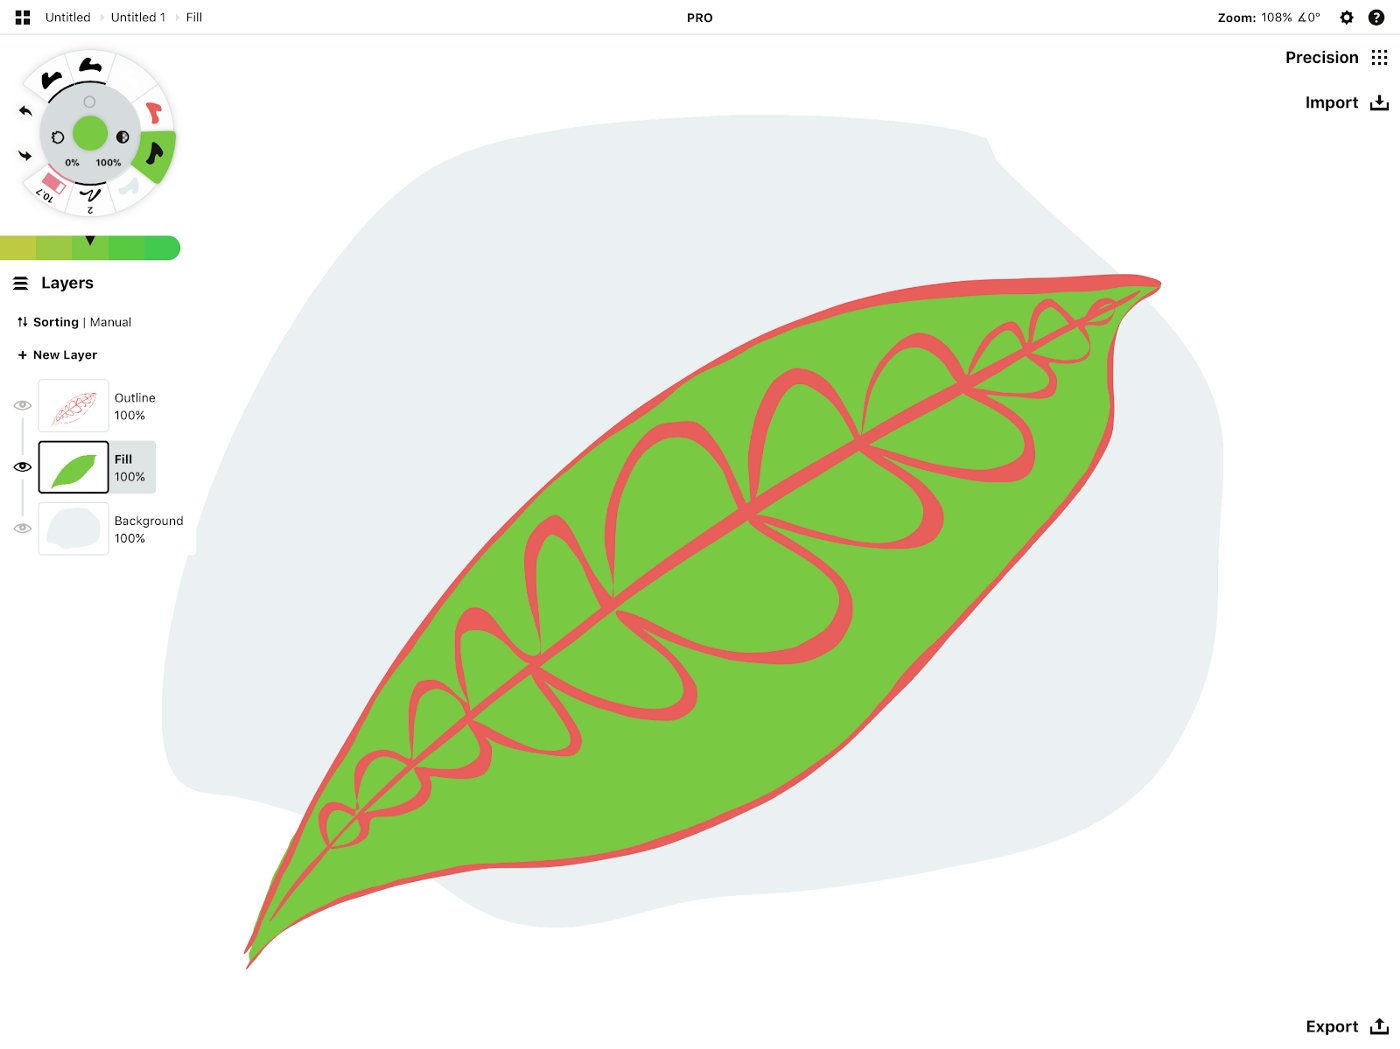
Exercise 3 - Fill an Outline
When adding structural elements to your drawing, such as backgrounds, details or highlights, it can help to use layers to organize your work. This makes it easy to change colors or edit pieces by type, instead of editing the full drawing.
Open the Layers menu, and tap + New Layer to add a layer for a background fill. Place it beneath your outline layer. Trace the outline of the shape you drew to fill it in.
Awesome. Now that you’re warmed up and have a feel for the tool, let’s go a little deeper.
Exercise 4 - Create Smaller Shapes
Let’s add some detail to the leaf using smaller, organic strokes, some layers, and different colors. Feel free to experiment with each of these elements. You don’t have to stick to the photograph unless you’d like to. Take your time and enjoy the flow as you draw the shapes.
The light yellow pops with the red tones.
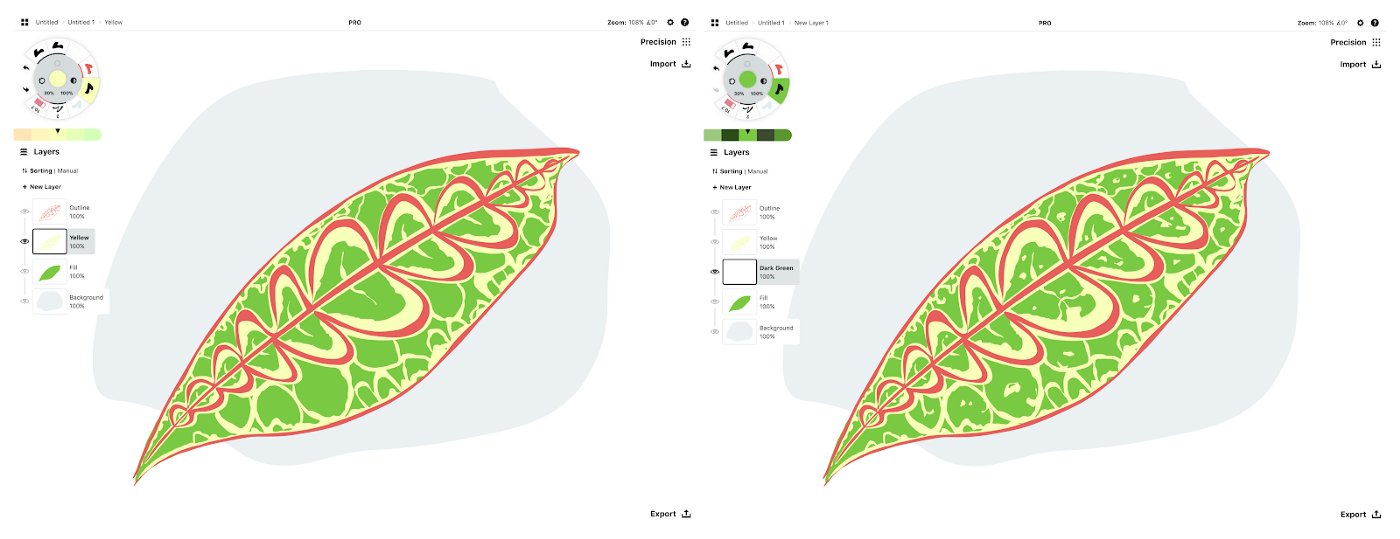
See how random and squiggly you can get? No leaf is ever the same, so give it some character and uniqueness.
I like to use the analogous colors palette in the color mixer to choose darker or lighter tones of the same color. (Tap it in the dynamic palettes section of the colors menu to activate it.) If you’re going for a true representation of the leaf, you can import the photo straight onto your canvas and use the color picker to extract the exact colors from the photo.
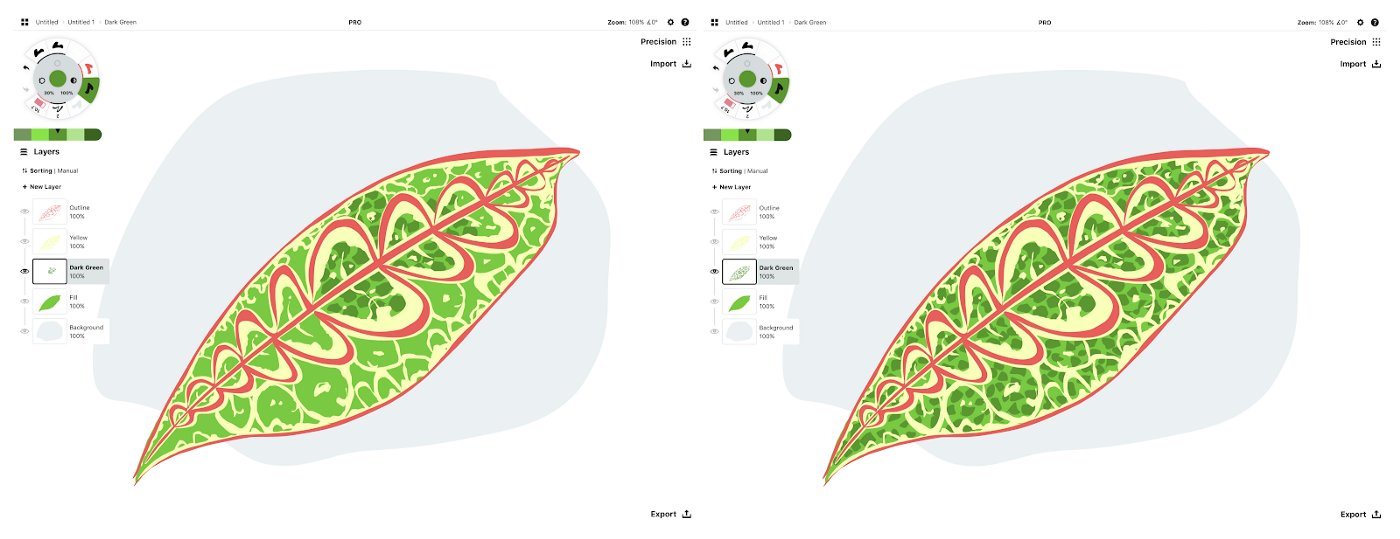
Looking closely at the leaf, there are dark blotches all over it. I’m adding them in.
Exercise 5 - Draw Highlights and Shadows
Now let’s create some depth. Study the photograph and see where the light illuminates the color tones. Or you can imagine your own light source and apply highlights where it hits the surfaces of the leaf. In a new layer, using a white fill at ~15% opacity, draw in those lighter shapes.
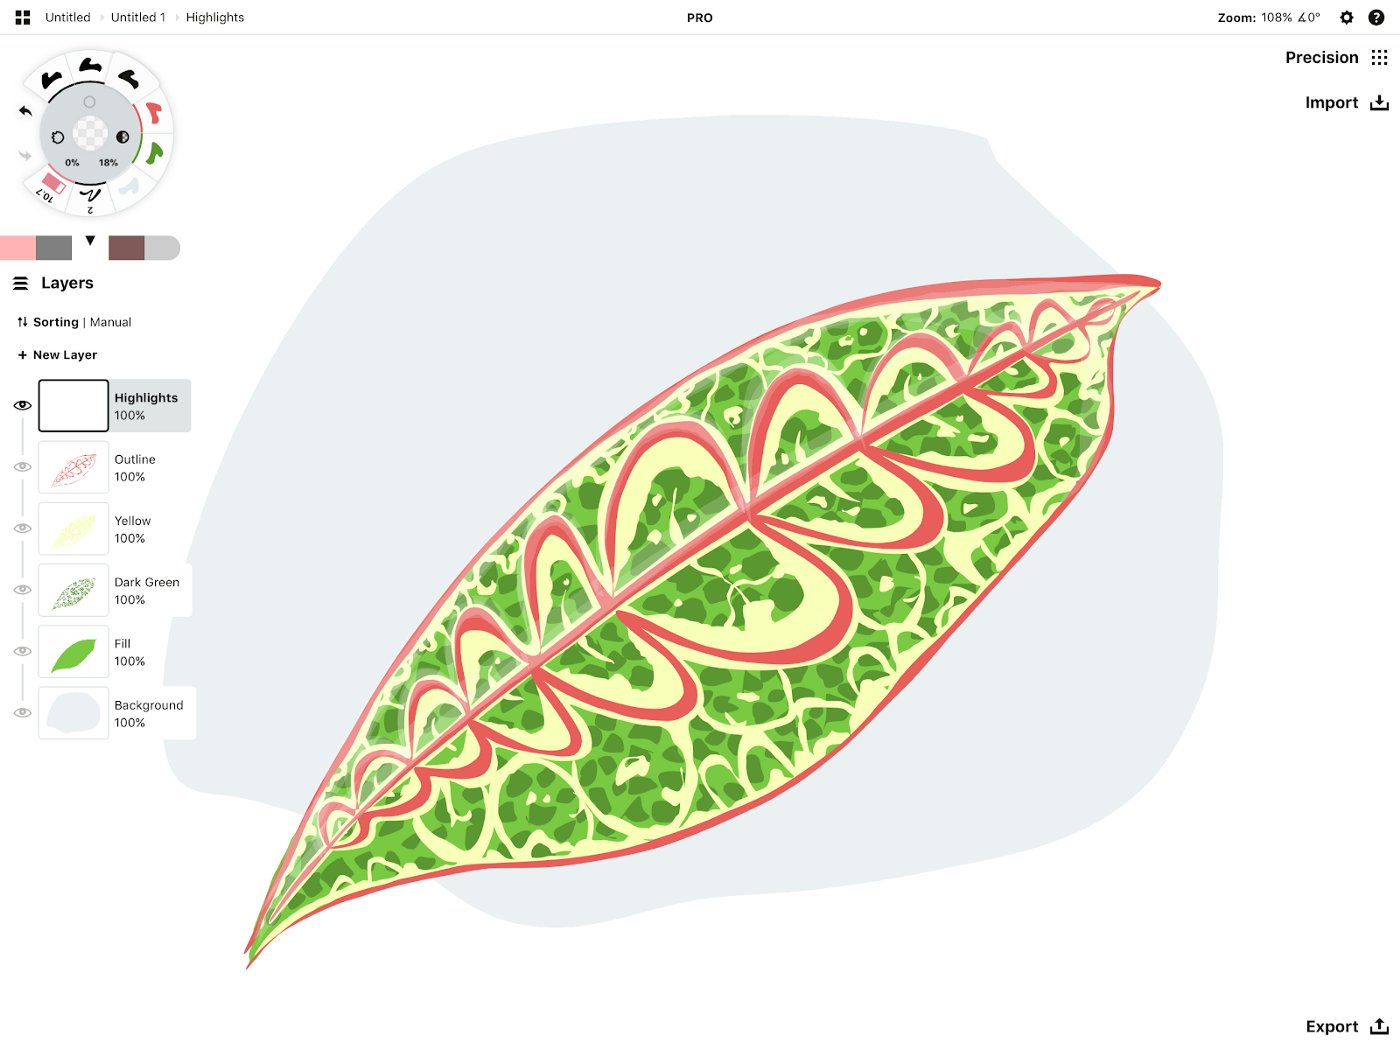
Can you see the sheen? I’ve kept to the upper edges of the leaf where I’ve imagined the light spills over, leaving the lower edges alone for shadows.
Now create one more layer and set a black fill to 12% opacity. Look at the photograph or imagine in your universe where both the full leaf and more specific areas of the leaf are darker. Draw the shapes in, layering the strokes on top of each other and paying attention to your contours.
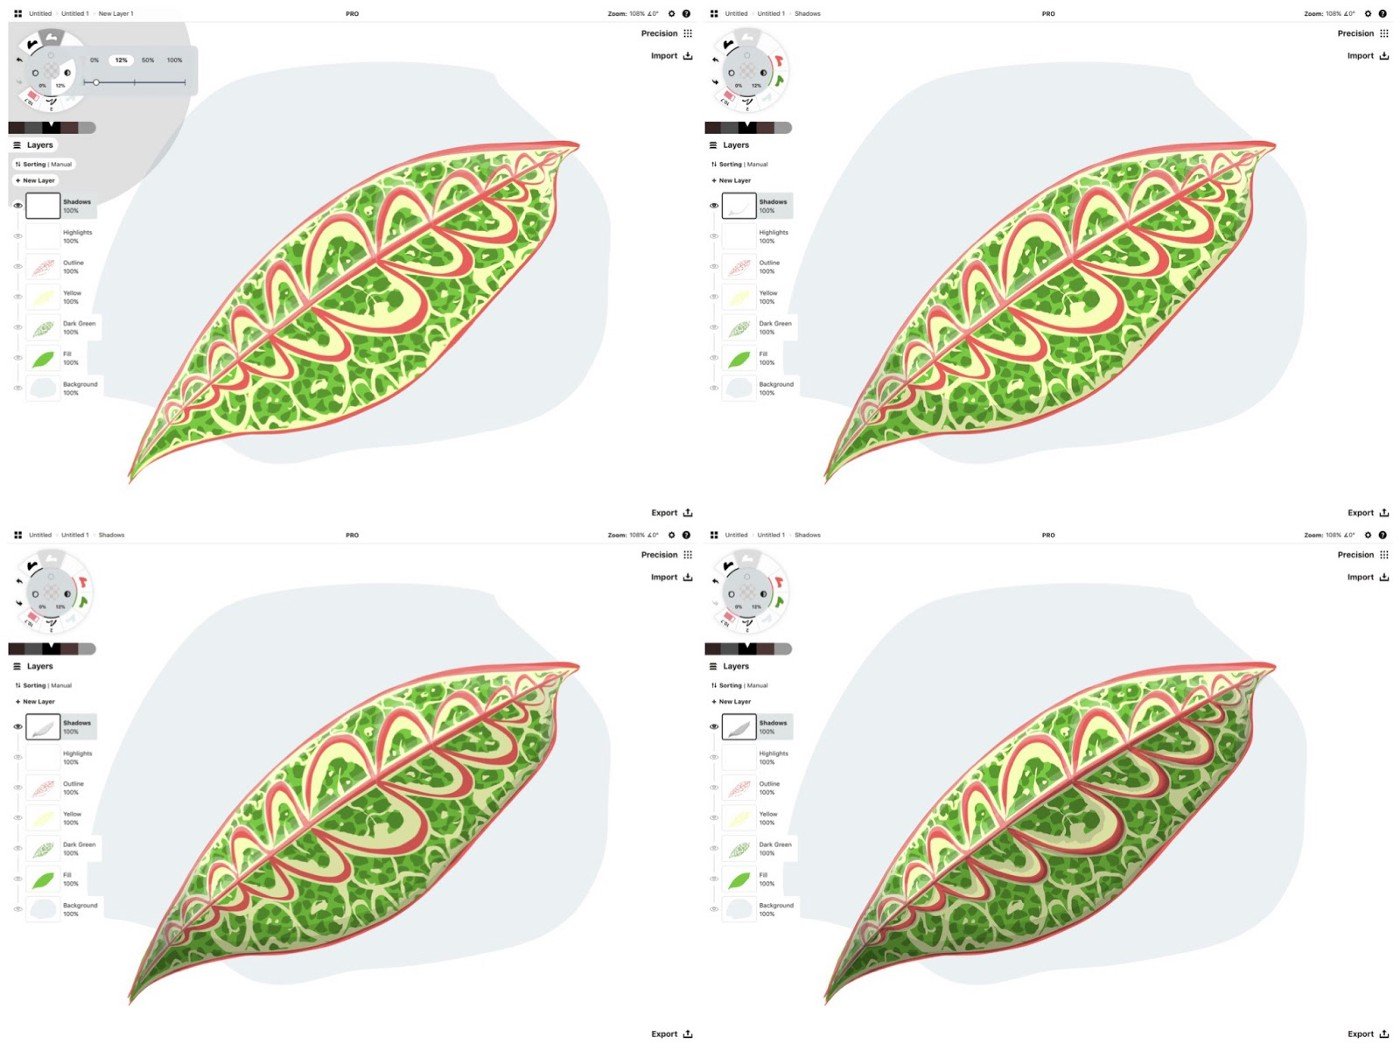
Allow the light and the dark to balance each other on either half of the leaf. Don’t be afraid of contrast — bring it out to give your object life.
Mission accomplished! Are you feeling more comfortable with this tool? Let’s try a few more exercises to stretch you a bit.
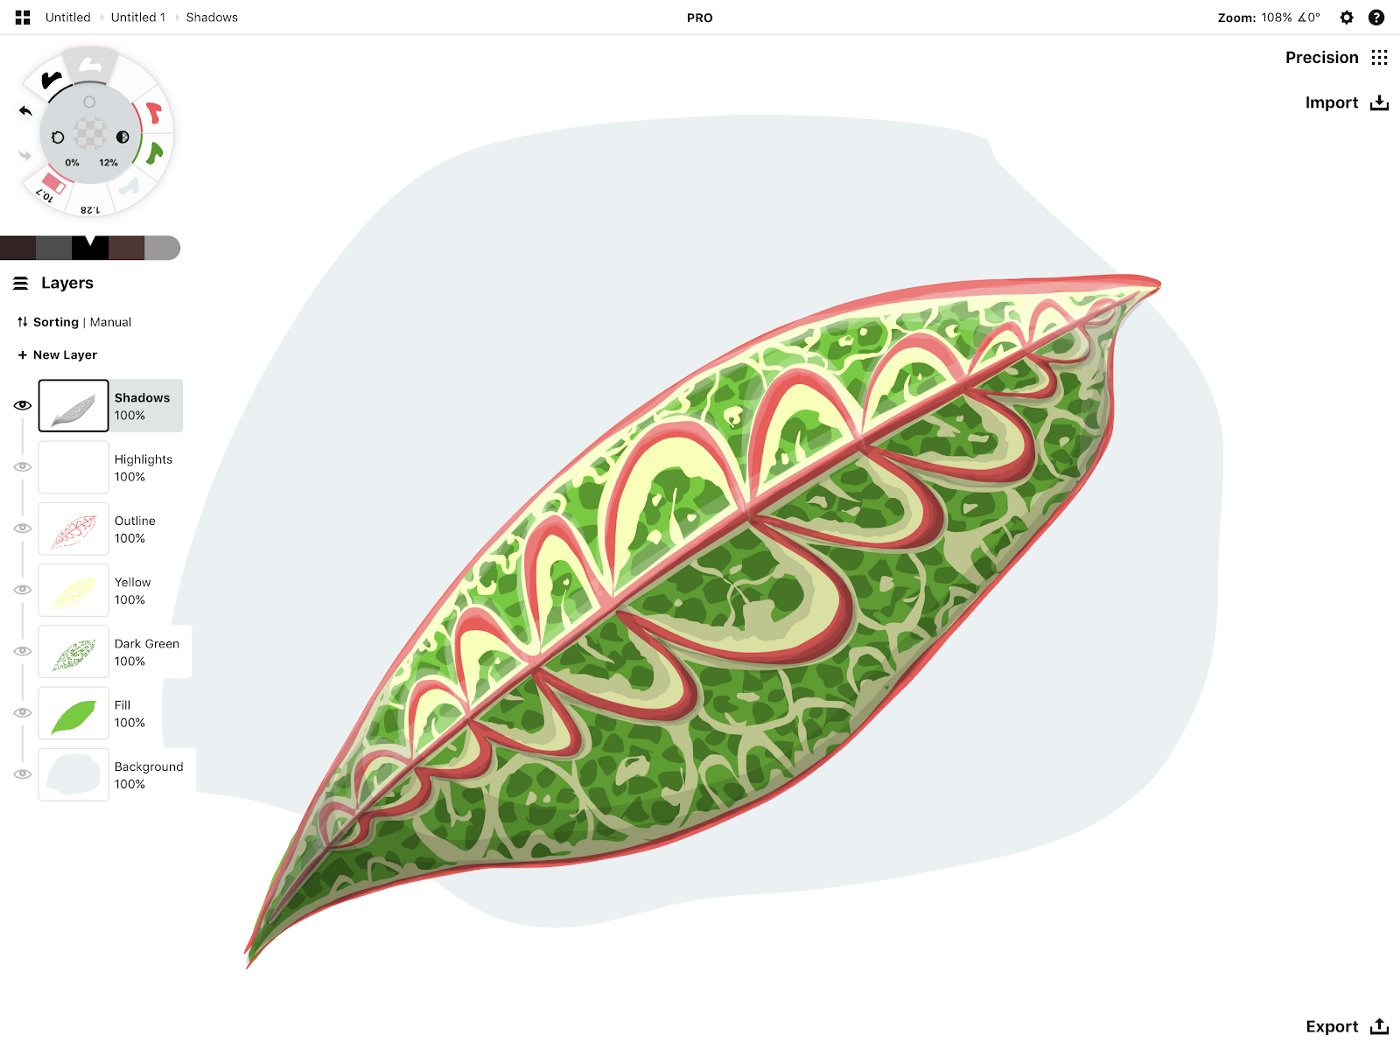
Exercise 6 - Draw with Negative Space
Take a photo of something interesting to you, and try using only a 12% opacity black fill to draw the object.
Define the full shape first, as most objects have a little bit of mass and the outermost edge will be the lightest. Then study the shapes of the shadows, and use the fill to draw only these. Layering them on top of each other will create contrast and a sense of solidity.
As we draw, we tend to think about the positive shape of an object, like what a feather looks like, or a wing. Drawing only shadows forces you to think about the negative space, instead. In this case, I’ve started by defining the line of feathers, but then pulled the shadow down beneath them.
Exercise 7 - Draw Topography
Try creating a topographical map. In a similar manner with a single color, or using gradients of solid colors, use darker saturations to represent deeper areas. You can also create a dark base shape and use a low-opacity white fill to create the upper contours of the map. Remember to vary your shapes some to give them a true, organic feel.
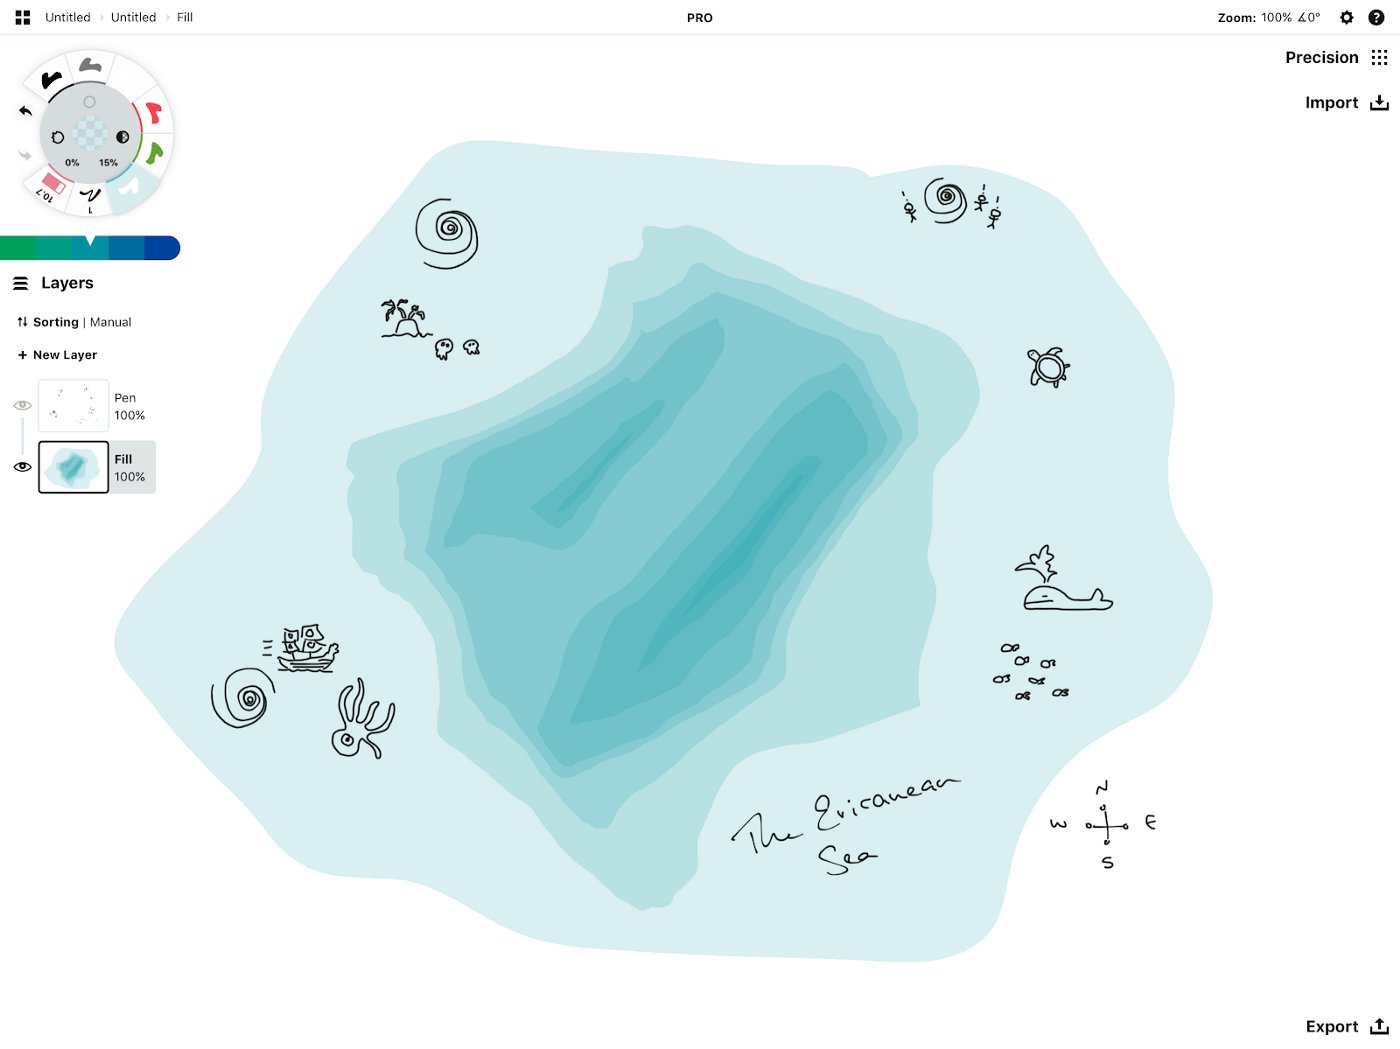
A map from my imagination, but it works great for landscape plans to show grading differences, too.
Exercise 8 - Reimagine a Space
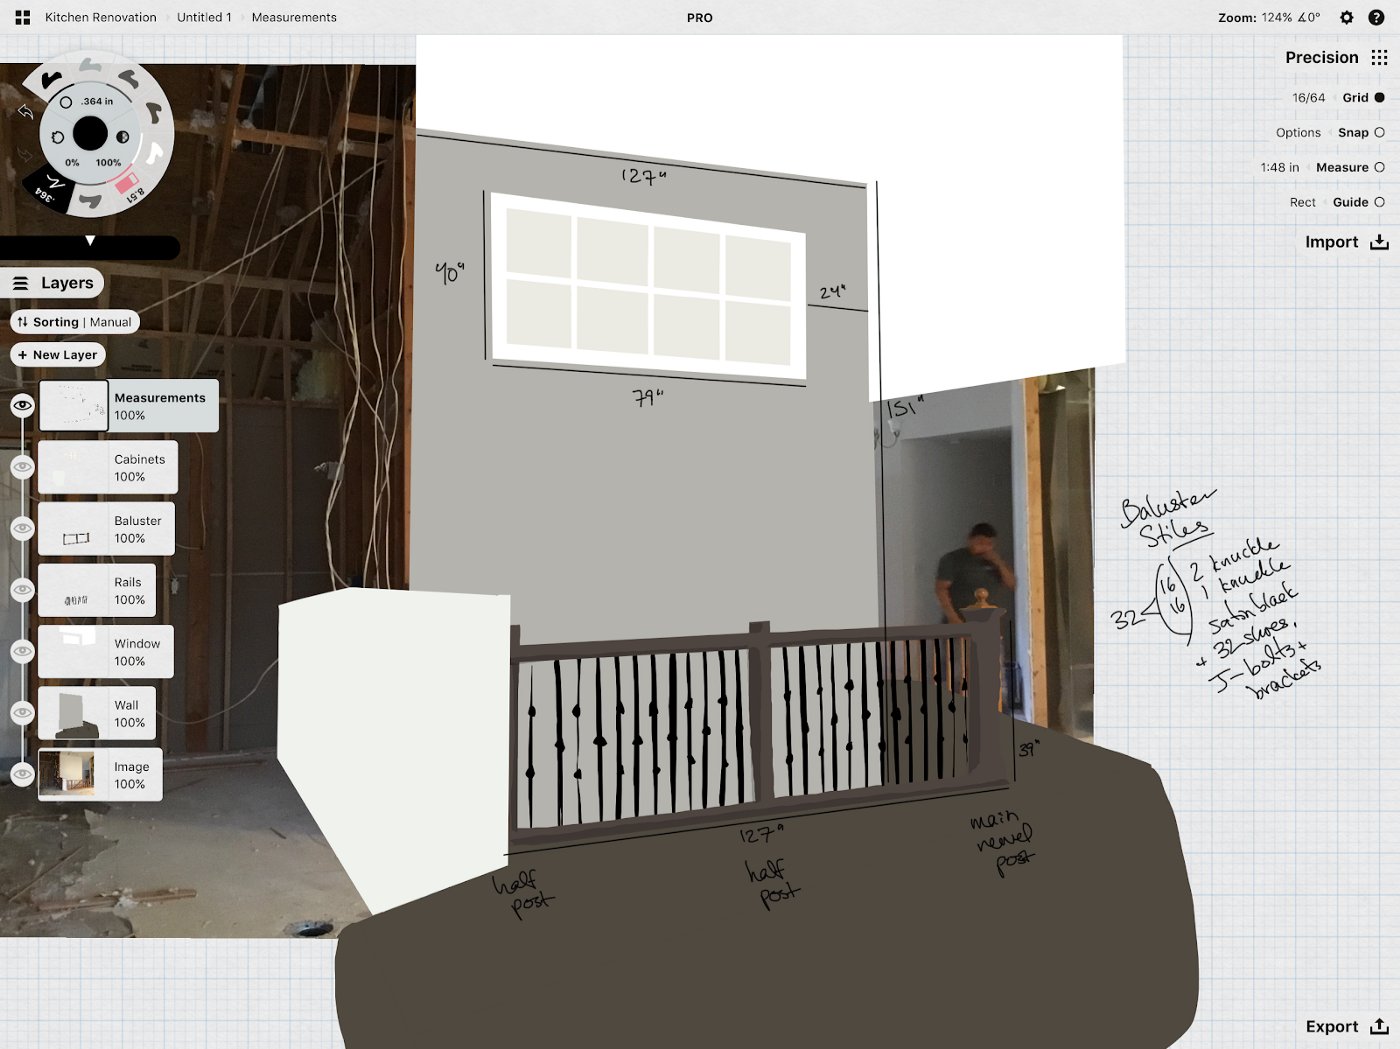
Use Filled Stroke to reimagine an existing space. Take a photo of a room or outdoor area and paint right over the top. You can apply the Filled Stroke with the precision guides for fast, perfect shapes with crisp edges. And if you select the shape once drawn, you can tap a control point or two and skew it to fit your perspective.
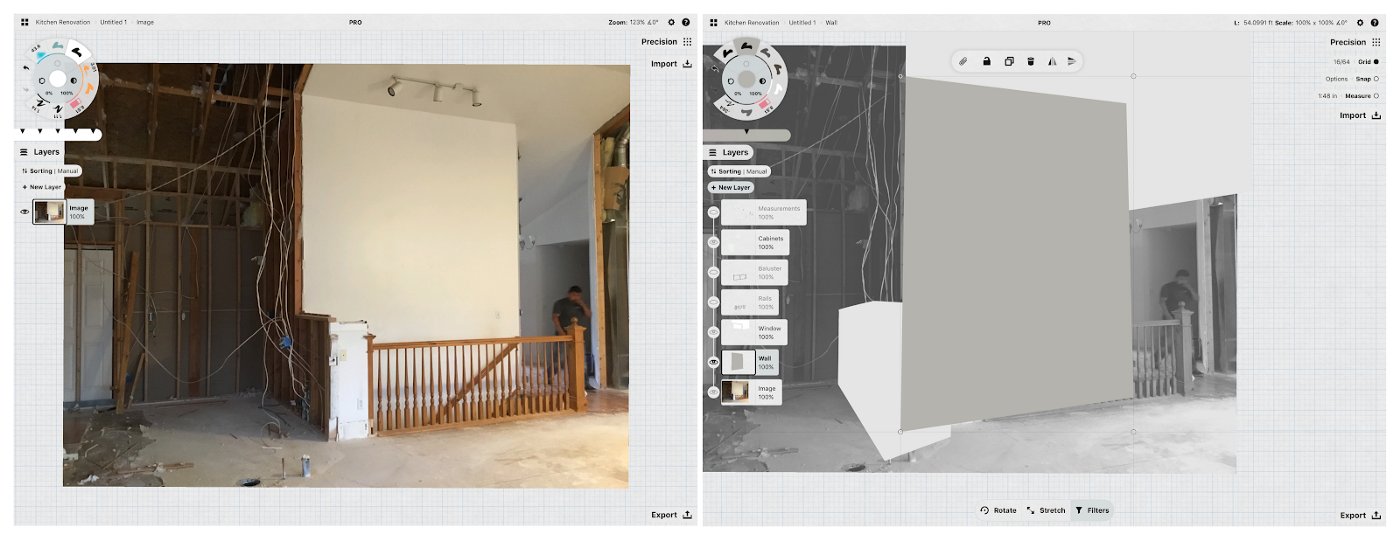
This is what my house looked like a couple months ago — torn apart, no kitchen, ceiling or floors, and a very dated stair rail we left to keep the little ones from falling over the edge. I needed to order a new one but was having a hard time deciding what I wanted — the old rail sucked my imagination away.
I snapped a photo with my phone, framer included, and roughed in my vision straight over it. From there, I was able to add measurements, finalize style choices and make the order.
How did your reimagined space turn out?
Great work! You are now a Filled Stroke master. I hope you’ve learned to see and sketch shapes a little better, and can appreciate how versatile the tool is for creating anything you’d like to imagine.
Do you have other ways you like to use this tool or techniques you’d like to see? Share your work in the comments or email us at support@concepts.app, and tell us what else you’d like to know. Thanks!
By Erica Christensen
Recommended
Creating a Project Template - Instead of changing tools every time you change direction, save yourself some valuable sketching time by creating a template for your project.
The Concepts Sketchnoting Toolbox - Learn sketchnoting tips so you can sketch ideas and take notes visually, and use this guide to set up your infinite canvas and pens in Concepts.
Turning an Interior Design Vision into a Visualization - Interior Architect Jessika Wendel shares how everyone can learn how to create an interior design.