Architectural Design Series
From Floor Plan to Axonometric View
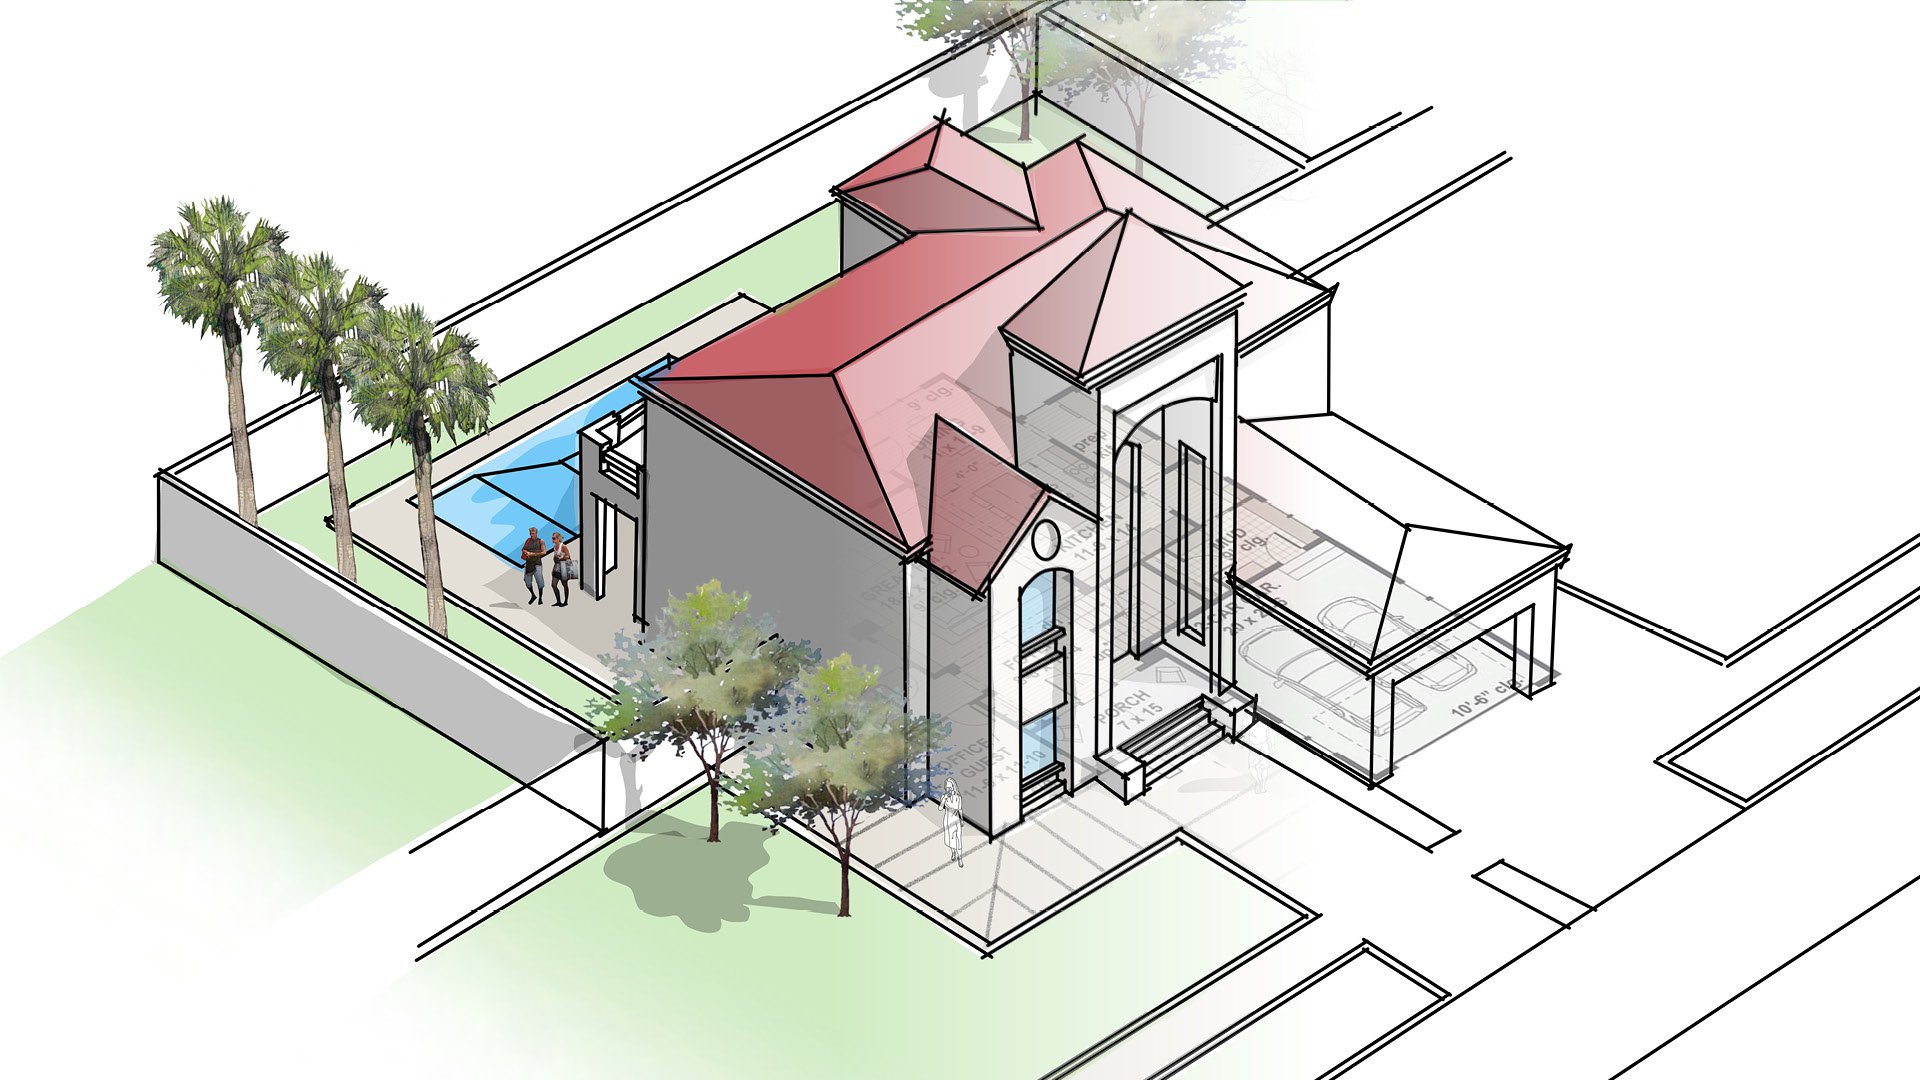
Learn how to take a floor plan to Axonometric view with Architect Osama Elfar.

Read below for additional insights by Osama Elfar along with tutorial details, tips and brush settings from the video.
Interview
Can you give us a brief overview on what Axonometric view is and why you use it as an architect?
Axonometric view is a quick way to get a 3D view. It is easier than drawing a perspective drawing, as architects can draw from a floor plan directly and use parallel lines, instead of starting from scratch with the vanishing points necessary in perspective.
Having the opportunity to deal with images and PDFs in Concepts has made it super easy to get an Axonometric view out of a floor plan, especially with the 100% smoothness pens.
How do clients generally respond to your drawings and how do they help sales?
Sometimes our clients have a hard time understanding 2-dimensional architectural drawings. They need to have illustrations that can help them to imagine their buildings and how they will look. On the other side, this helps the architect to get approval on their design.
Video Details
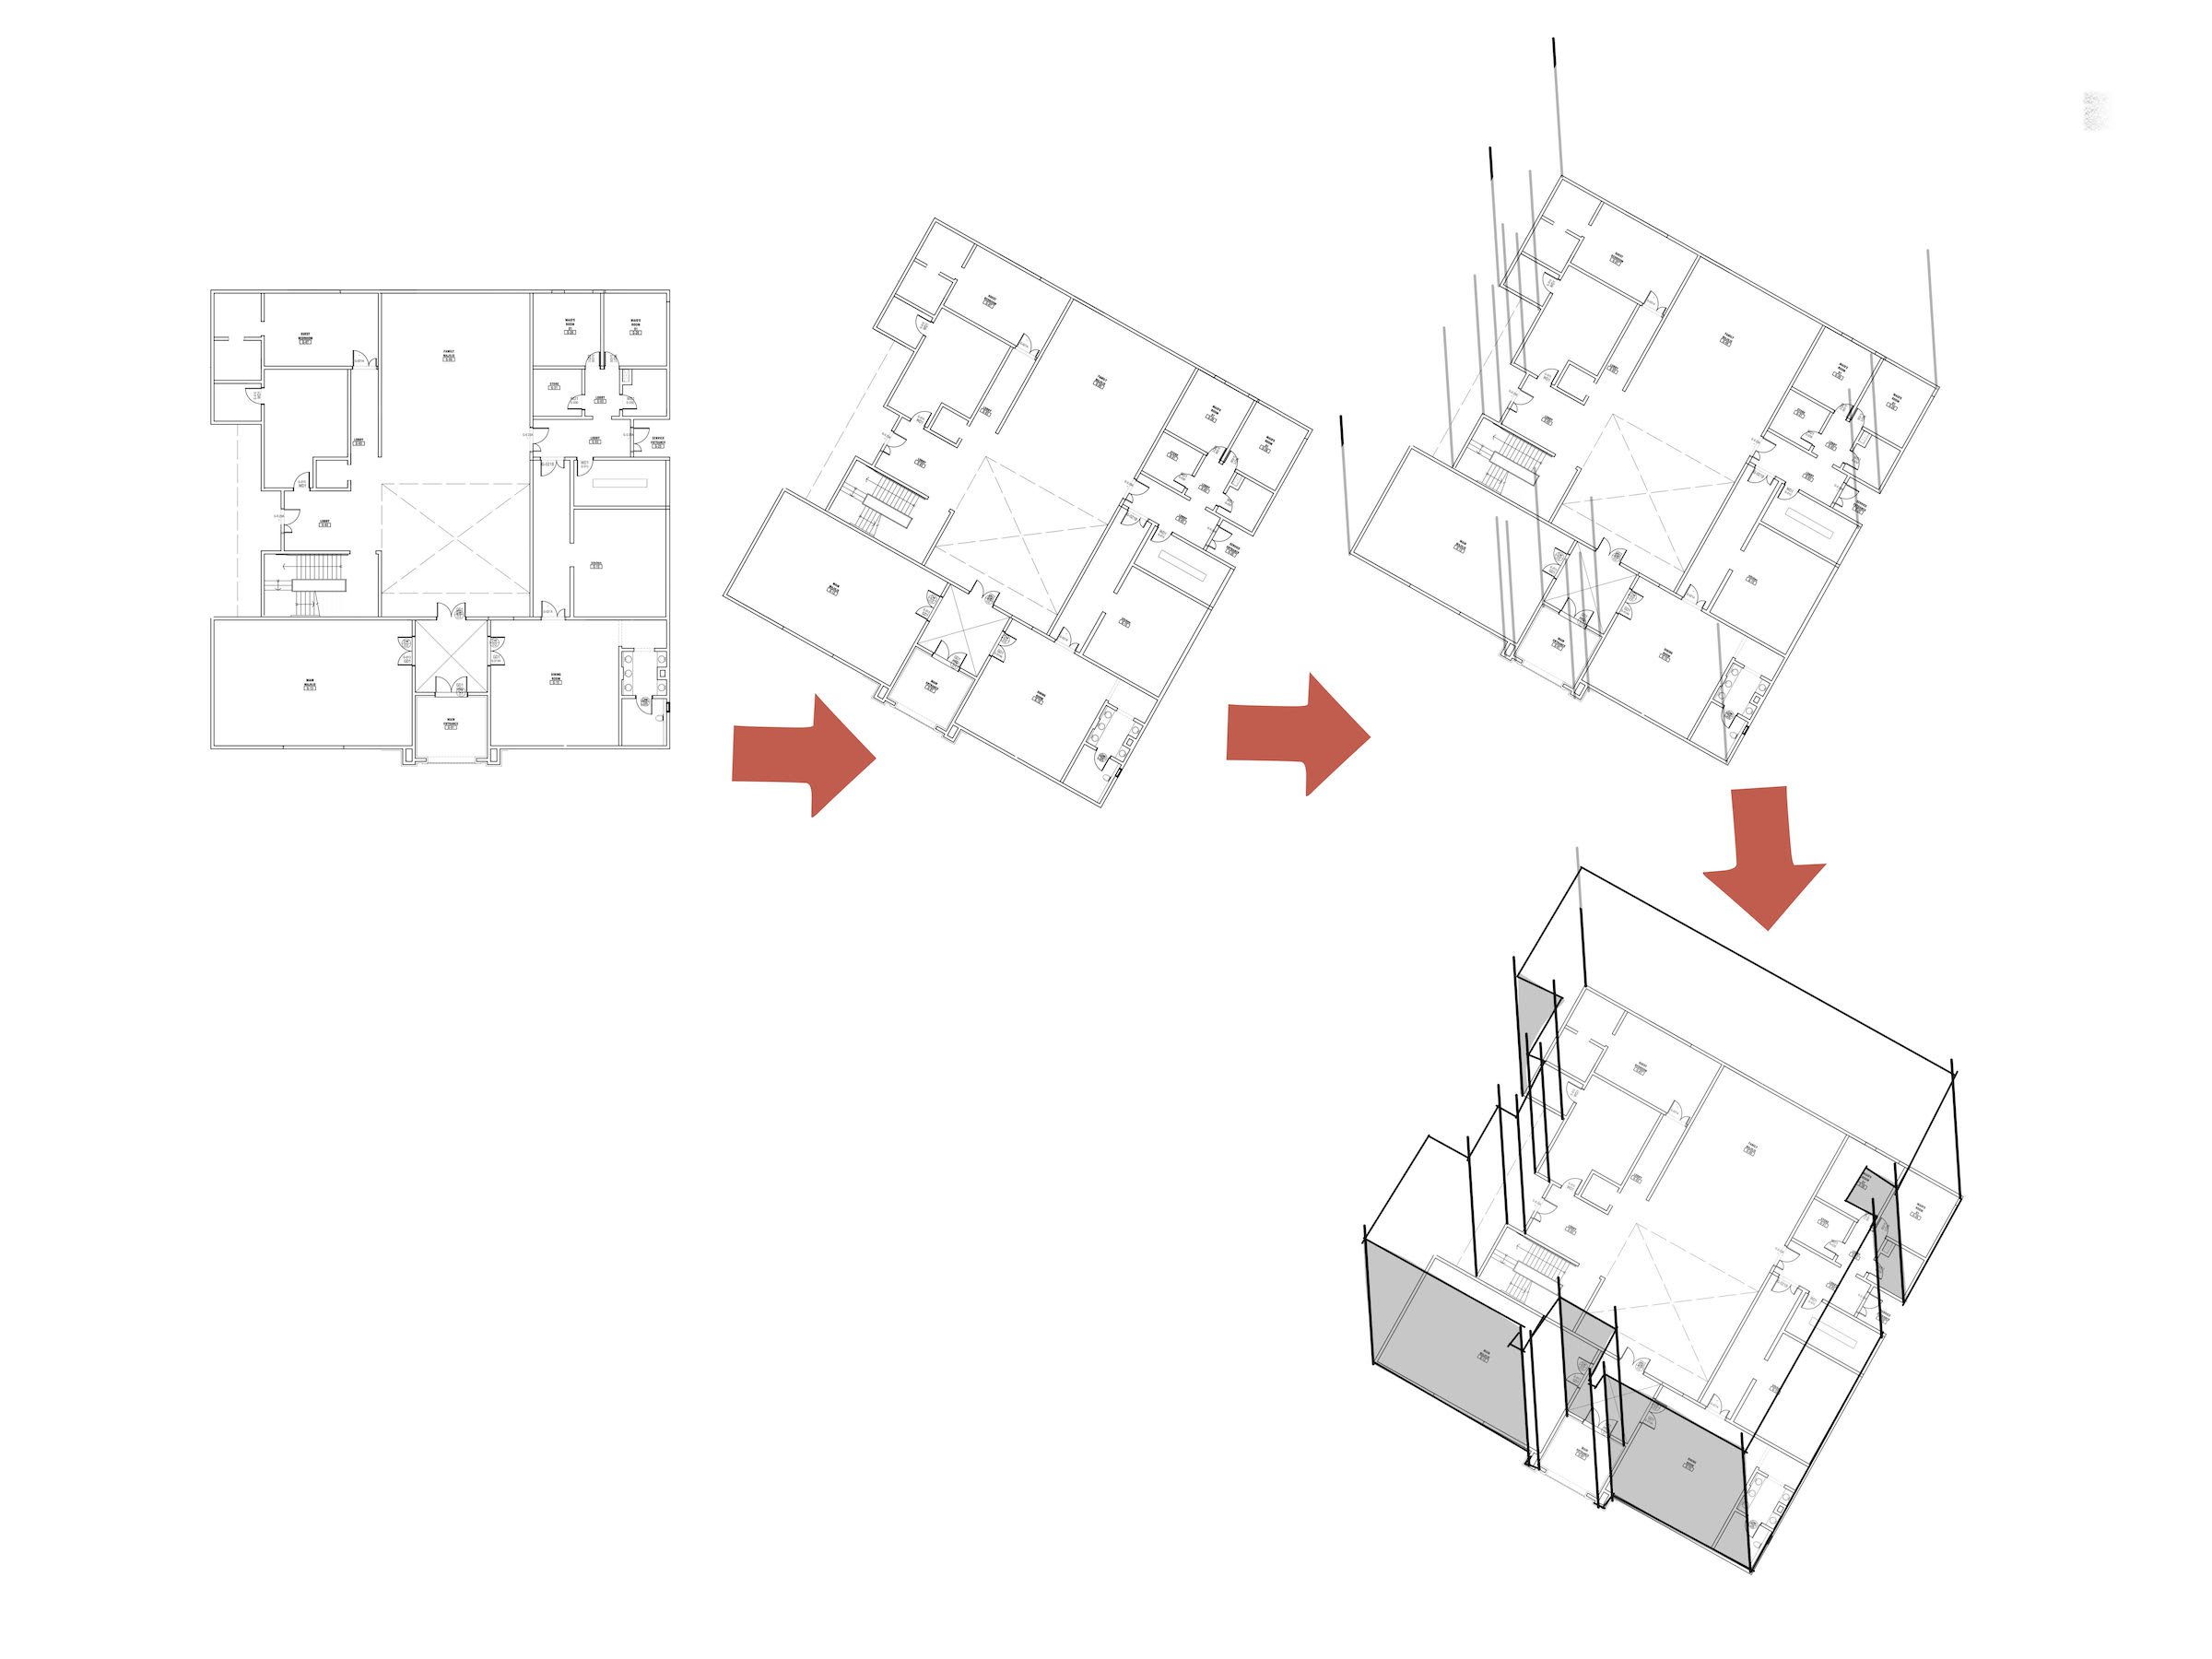
The Initial Design
1. Import a floor plan (PDF or image) from your photos or files.
2. The image will appear Selected. Tap the top two handles and skew the image to get a perspective view.
3. In the active Image layer, tap the layer thumbnail to bring up the layer menu. Using the opacity slider, drop the opacity of the layer to around 50%.
4. At one corner of your floor plan, draw a vertical straight line using a pencil with 100% smoothing applied. It may help to activate the grid in the Precision menu.
5. Select and duplicate your line, and place a line at each corner of the floor plan.
6. Pencil in the outline of your floor plan.
7. Then select and duplicate the skewed floor plan image to create a second floor.
8. Pencil in the outline of the second floor.
9. Take one more copy of the floor plan and create the roof of the structure.
10. Pencil in the outline of the roof.
Refining the Design
1. Use the Hard Mask to erase the internal sections of line work that don't add to your overall exterior design.
2. With a pen set to 100% smoothing, use your existing linework to wire-frame your design. Outline the structure of your building.
3. Feel free to pencil in the occasional extra vertical line to center your slope lines.
4. As you move forward with framing in your outline, you'll find you gradually figure out the shapes of your building. It becomes easier to perceive your details and draw a compelling and cohesive design.
5. Once you have a solid outline, use the Precision tools or drag in objects for windows. Use the control points to skew them to Axonometric angle.
6. With a pencil, sketch in landscape lines around the building, including drive, sidewalk and yard to add reference for landscape details.
7. Ink in your landscape details with a pen including fencing, backyard and front area lines.
Coloring the Design
1. Create a new layer below your ink for coloring your design. If you are already in Automatic Mode, the new layer will be automatically be created for you below the Pen layer when you select the Filled Stroke tool.
2. Select the Filled Stroke tool and set it to a low opacity. This has the benefit of being able to add fills more than once to the same area. Keep in mind your light source as you color (it generally highlights the front of the building). Draw one layer of fill at the front, two layers of fill for secondary angles, and three for back lighting.
3. Create drop shadows using a low opacity black or grey fill. Add shadows to doorways, windows, walls and roof lines. Outline secondary slopes one or twice, and remember to allow for shadows on the landscape.
4. Color in your landscape and details such as windows, walk ways and water features.
5. Use the Soft Eraser to blend out edges on your landscape for a simple polish.
7. Import people and landscape objects from the Object Library into your design to give a sense of scale to the building and add life to the scene. Transparent PNG objects are extremely easy and fast to use in Concepts (here is how to make them).
8. Use the Hard Eraser to mask objects that overlap your line work.
9. Create drop shadows for your people and landscape objects with the Filled Stroke tool.
Brush Settings
0:36 - Soft Pencil, Grey, Opacity 94%
0:53 - Soft Pencil, Grey, Opacity 94%
2:06 - Hard Mask, Opacity 100%
2:27 - Pen, Black, Opacity 100%
3:46 - Soft Pencil, Grey, Opacity 94%
5:23 - Soft Pencil, Grey, Opacity 94%
6:00 - Pen, Black, Opacity 100%
8:11 - Filled Stroke, Red, Opacity 62%
9:08 - Filled Stroke, Grey, Opacity 25%
10:23 - Filled Stroke, Light Grey, Opacity 55%
10:48 - Filled Stroke, Green, Opacity 33%
11:05 - Soft Eraser, Opacity 100%
11:11 - Filled Stroke, Light Blue, Opacity 33%
11:59 - Hard Eraser, Opacity 100%
12:23 - Filled Stroke, Grey, Opacity 25%
12:35 - Soft Pencil, Grey, Opacity 94%

Architect Osama Ahmad Elfar graduated from Alexandria University in 1992. He is a Partner at UNii Engineering Consultancy with offices in UAE, Qatar and Egypt. He has won several recognized design competitions. His work spans across many different building areas including high rise, mixed use, residential, commercial and hospitality. He has projects located in several countries including UAE, Qatar, Egypt, KSA, USA, Switzerland, Belgium, Oman, Libya and Japan. He also does design training, teaches courses and speaks at events.
Follow Osama on YouTube, Instagram and Facebook. Find more of his work at www.uniidesign.com and www.osamaelfar.com.
Content created by Osama Elfar
Edited by Lasse Pekkala
Text by Erica Christensen
Recommended
How to Create a Floor Plan - Everything you want to know about creating a floor plan in Concepts.
How to Make a Transparent PNG Object - Transparent objects are instant creative assets in Concepts. Learn how to create one in five easy steps.
How to Use Objects and Make Your Own Objects - All about Concepts’ object libraries and how to make your own vector objects.