Concepts is an infinite, flexible creative tool for all your good ideas. Available on iOS, Windows and Android.
Tips for Exporting Your Designs
Learn how to flexibly format your drawings for export in Concepts.

Connection matters for good design work. Whether you’re giving feedback to teammates, editing across applications, or sending drawings to engineering teams, clients or portfolios, the flexibility to communicate your project’s needs is vital. Concepts gives you many methods to compose, export and share your designs.
To help you find your ideal outcome, we’ll share techniques to help you format drawings before exporting, what to expect when working with different file types, and tips for exporting your work.
Exporting from the Infinite Canvas
With the wide expanse of Concepts’ infinite canvas to work from, you have several ways to define your drawing boundaries before you export. You can:
• zoom in on the canvas and export as a screenshot
• frame and crop your drawing to a custom size with an artboard
• capture the entire canvas on export, including what you can’t see on screen
• drag+drop a selection straight from your canvas into an email, text or other app
Screenshots
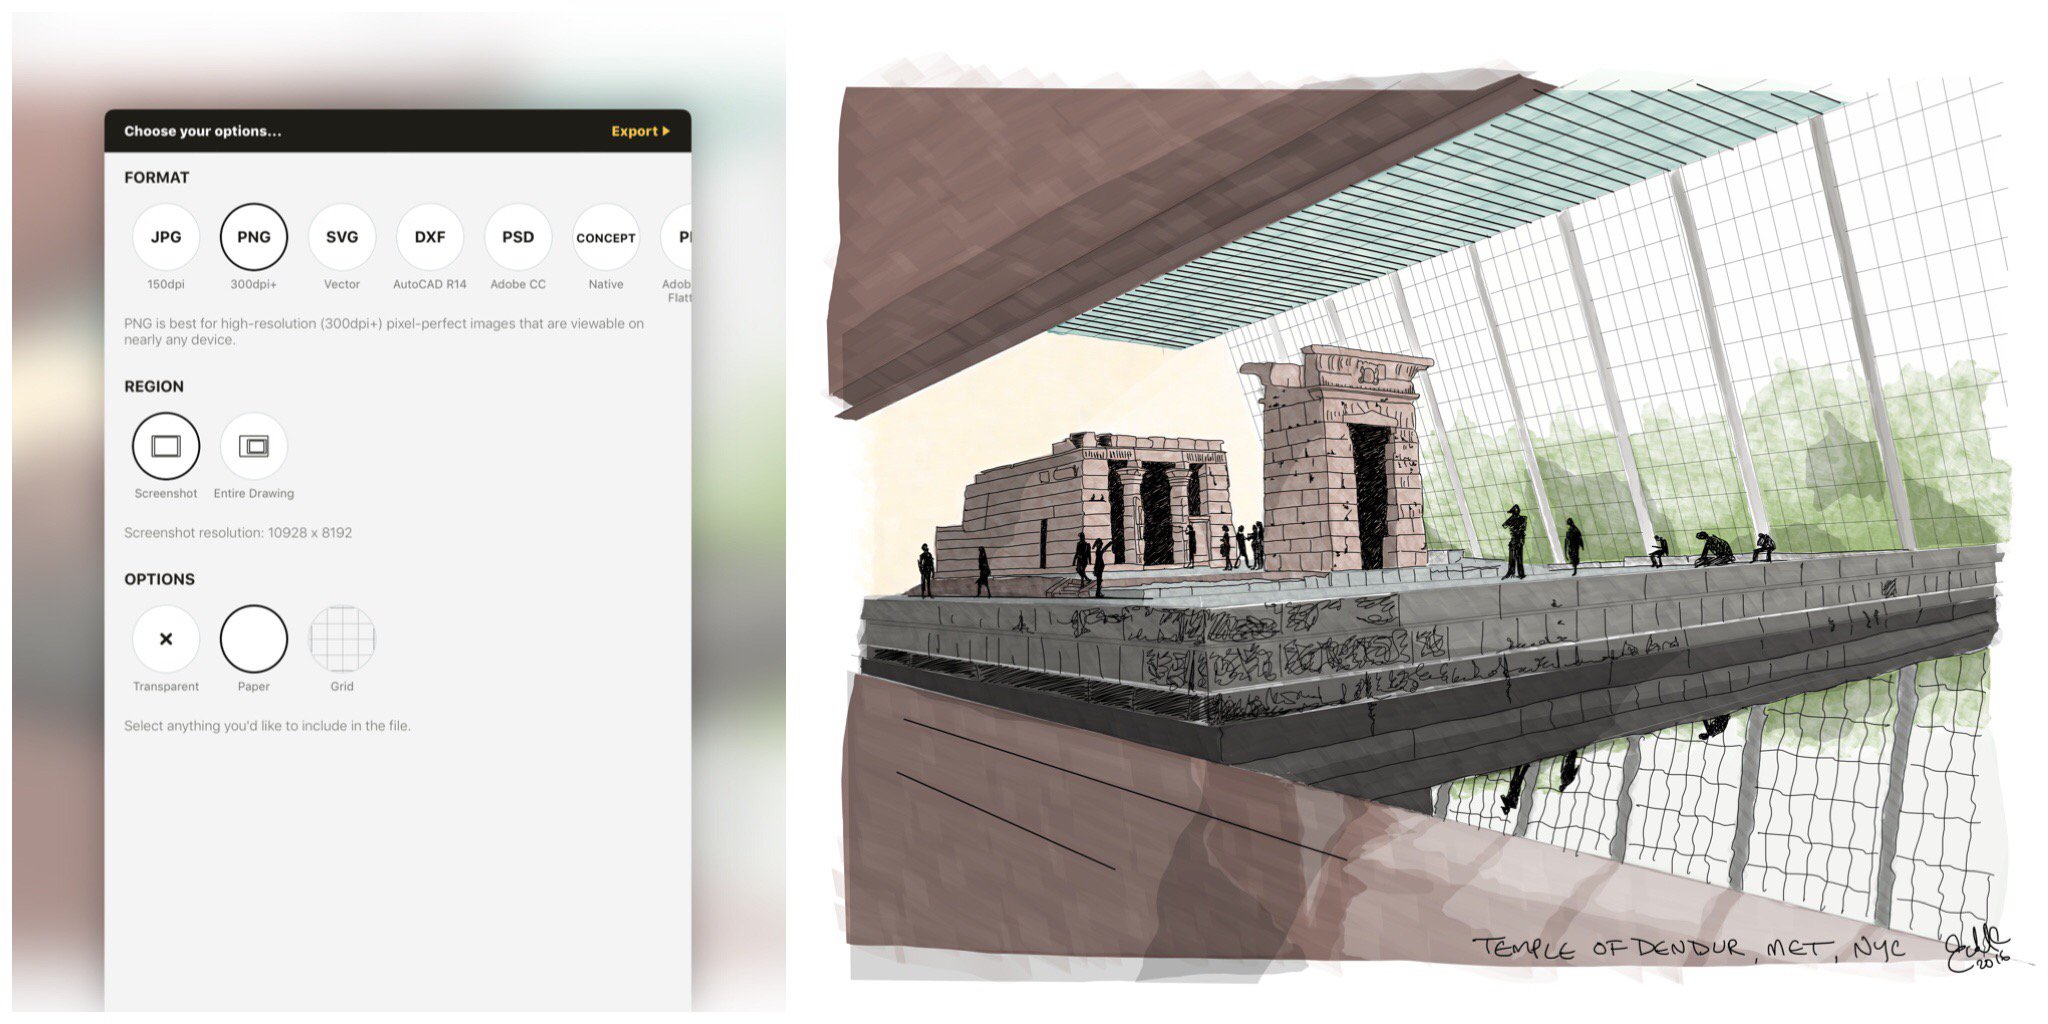
If you want to zoom in on a piece of your drawing and maintain clarity, a screenshot can be your friend. When you choose Screenshot from the Export menu (we’ll describe the menu below), you’ll find the export captures exactly what was displayed on your screen without app menus in the way. Resolution is defined by your device, here is a handy reference.
Artboards
Differing from traditional drawing apps you may have used, you can create an artboard at any time during a drawing or switch artboard sizes while you work.
To create an artboard on your canvas, enter the Settings menu and under the Workspace tab, find Artboard Size. Here you’ll see a couple fields allowing you to manually enter your artboard dimensions (including inches, millimeters, pixels etc), or you can choose from some quick shortcuts.
If you tap a field to bring up the keyboard, you’ll find a much larger list of shortcuts — from business card size to large formats, to US and European paper types, and even sizes that work with Ponoko’s laser-cutting services. When you export and print to these sizes from your iPad, they will print to the resolution you selected.
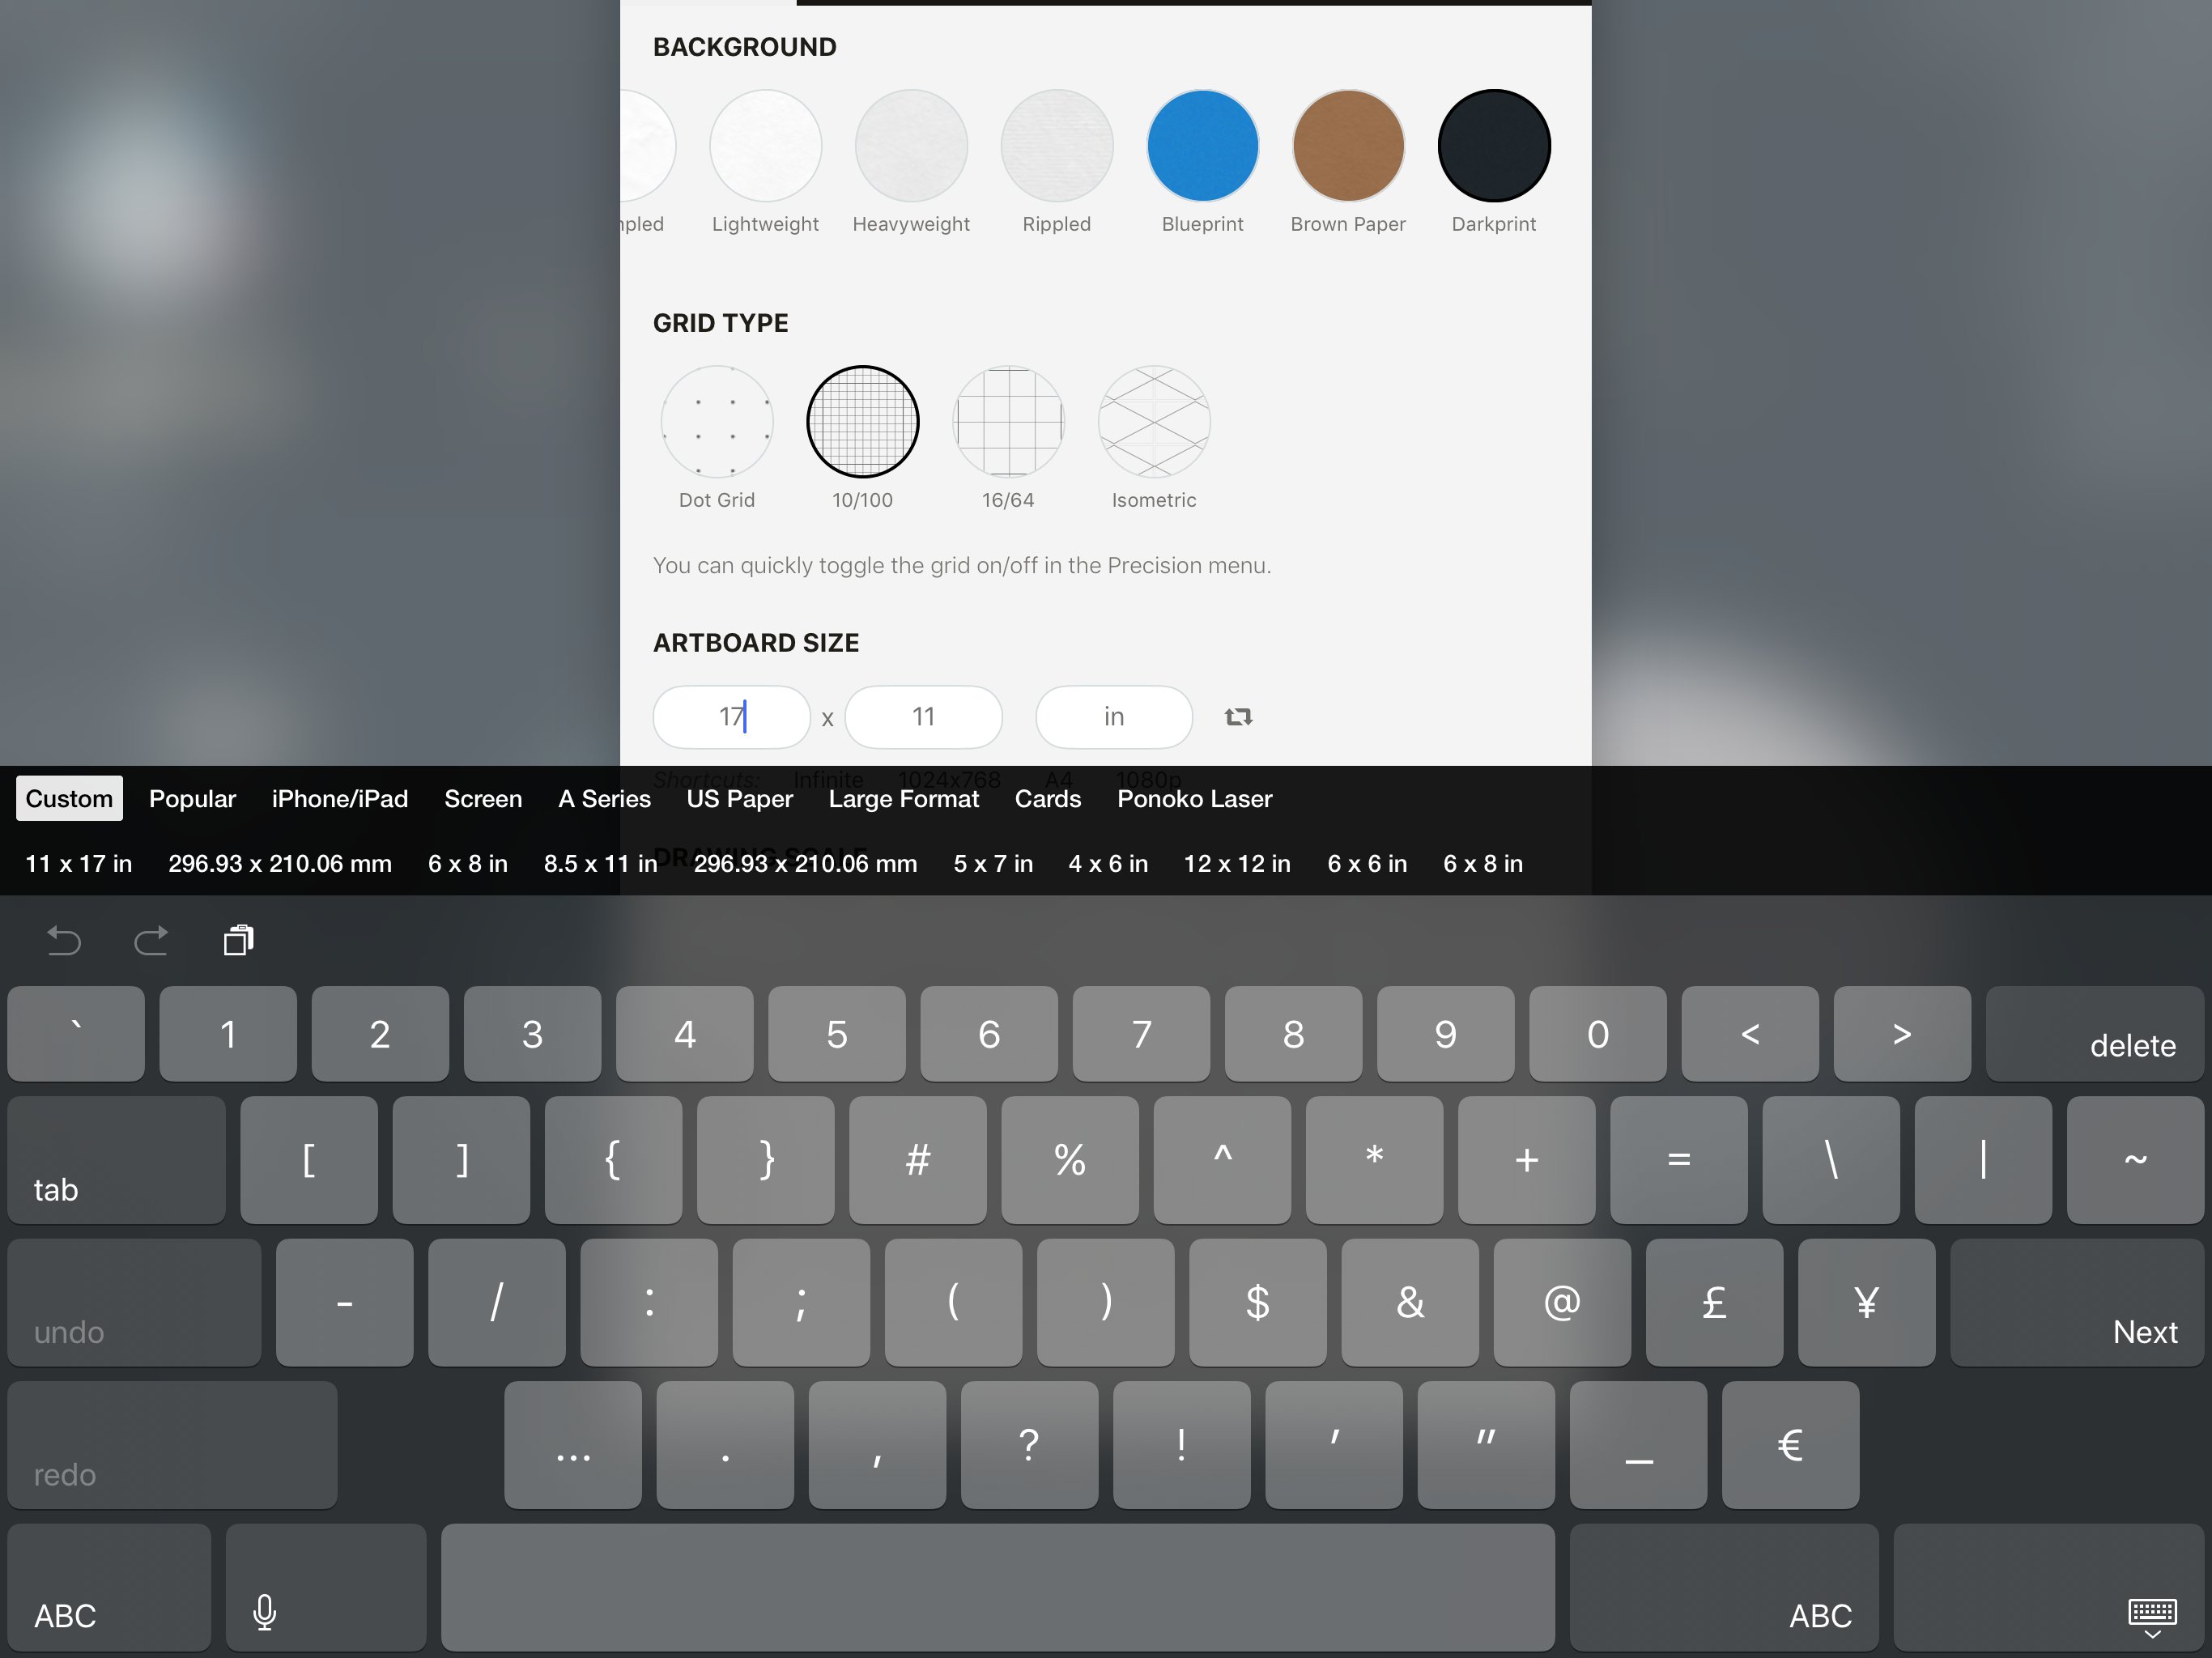
Once you’ve selected an artboard size, head back to the canvas. You’ll see the artboard defined by a simple boundary. Everything inside the boundary is your defined drawing area. Everything outside will be lightly distinguished so you can tell the difference while in other areas of the canvas.
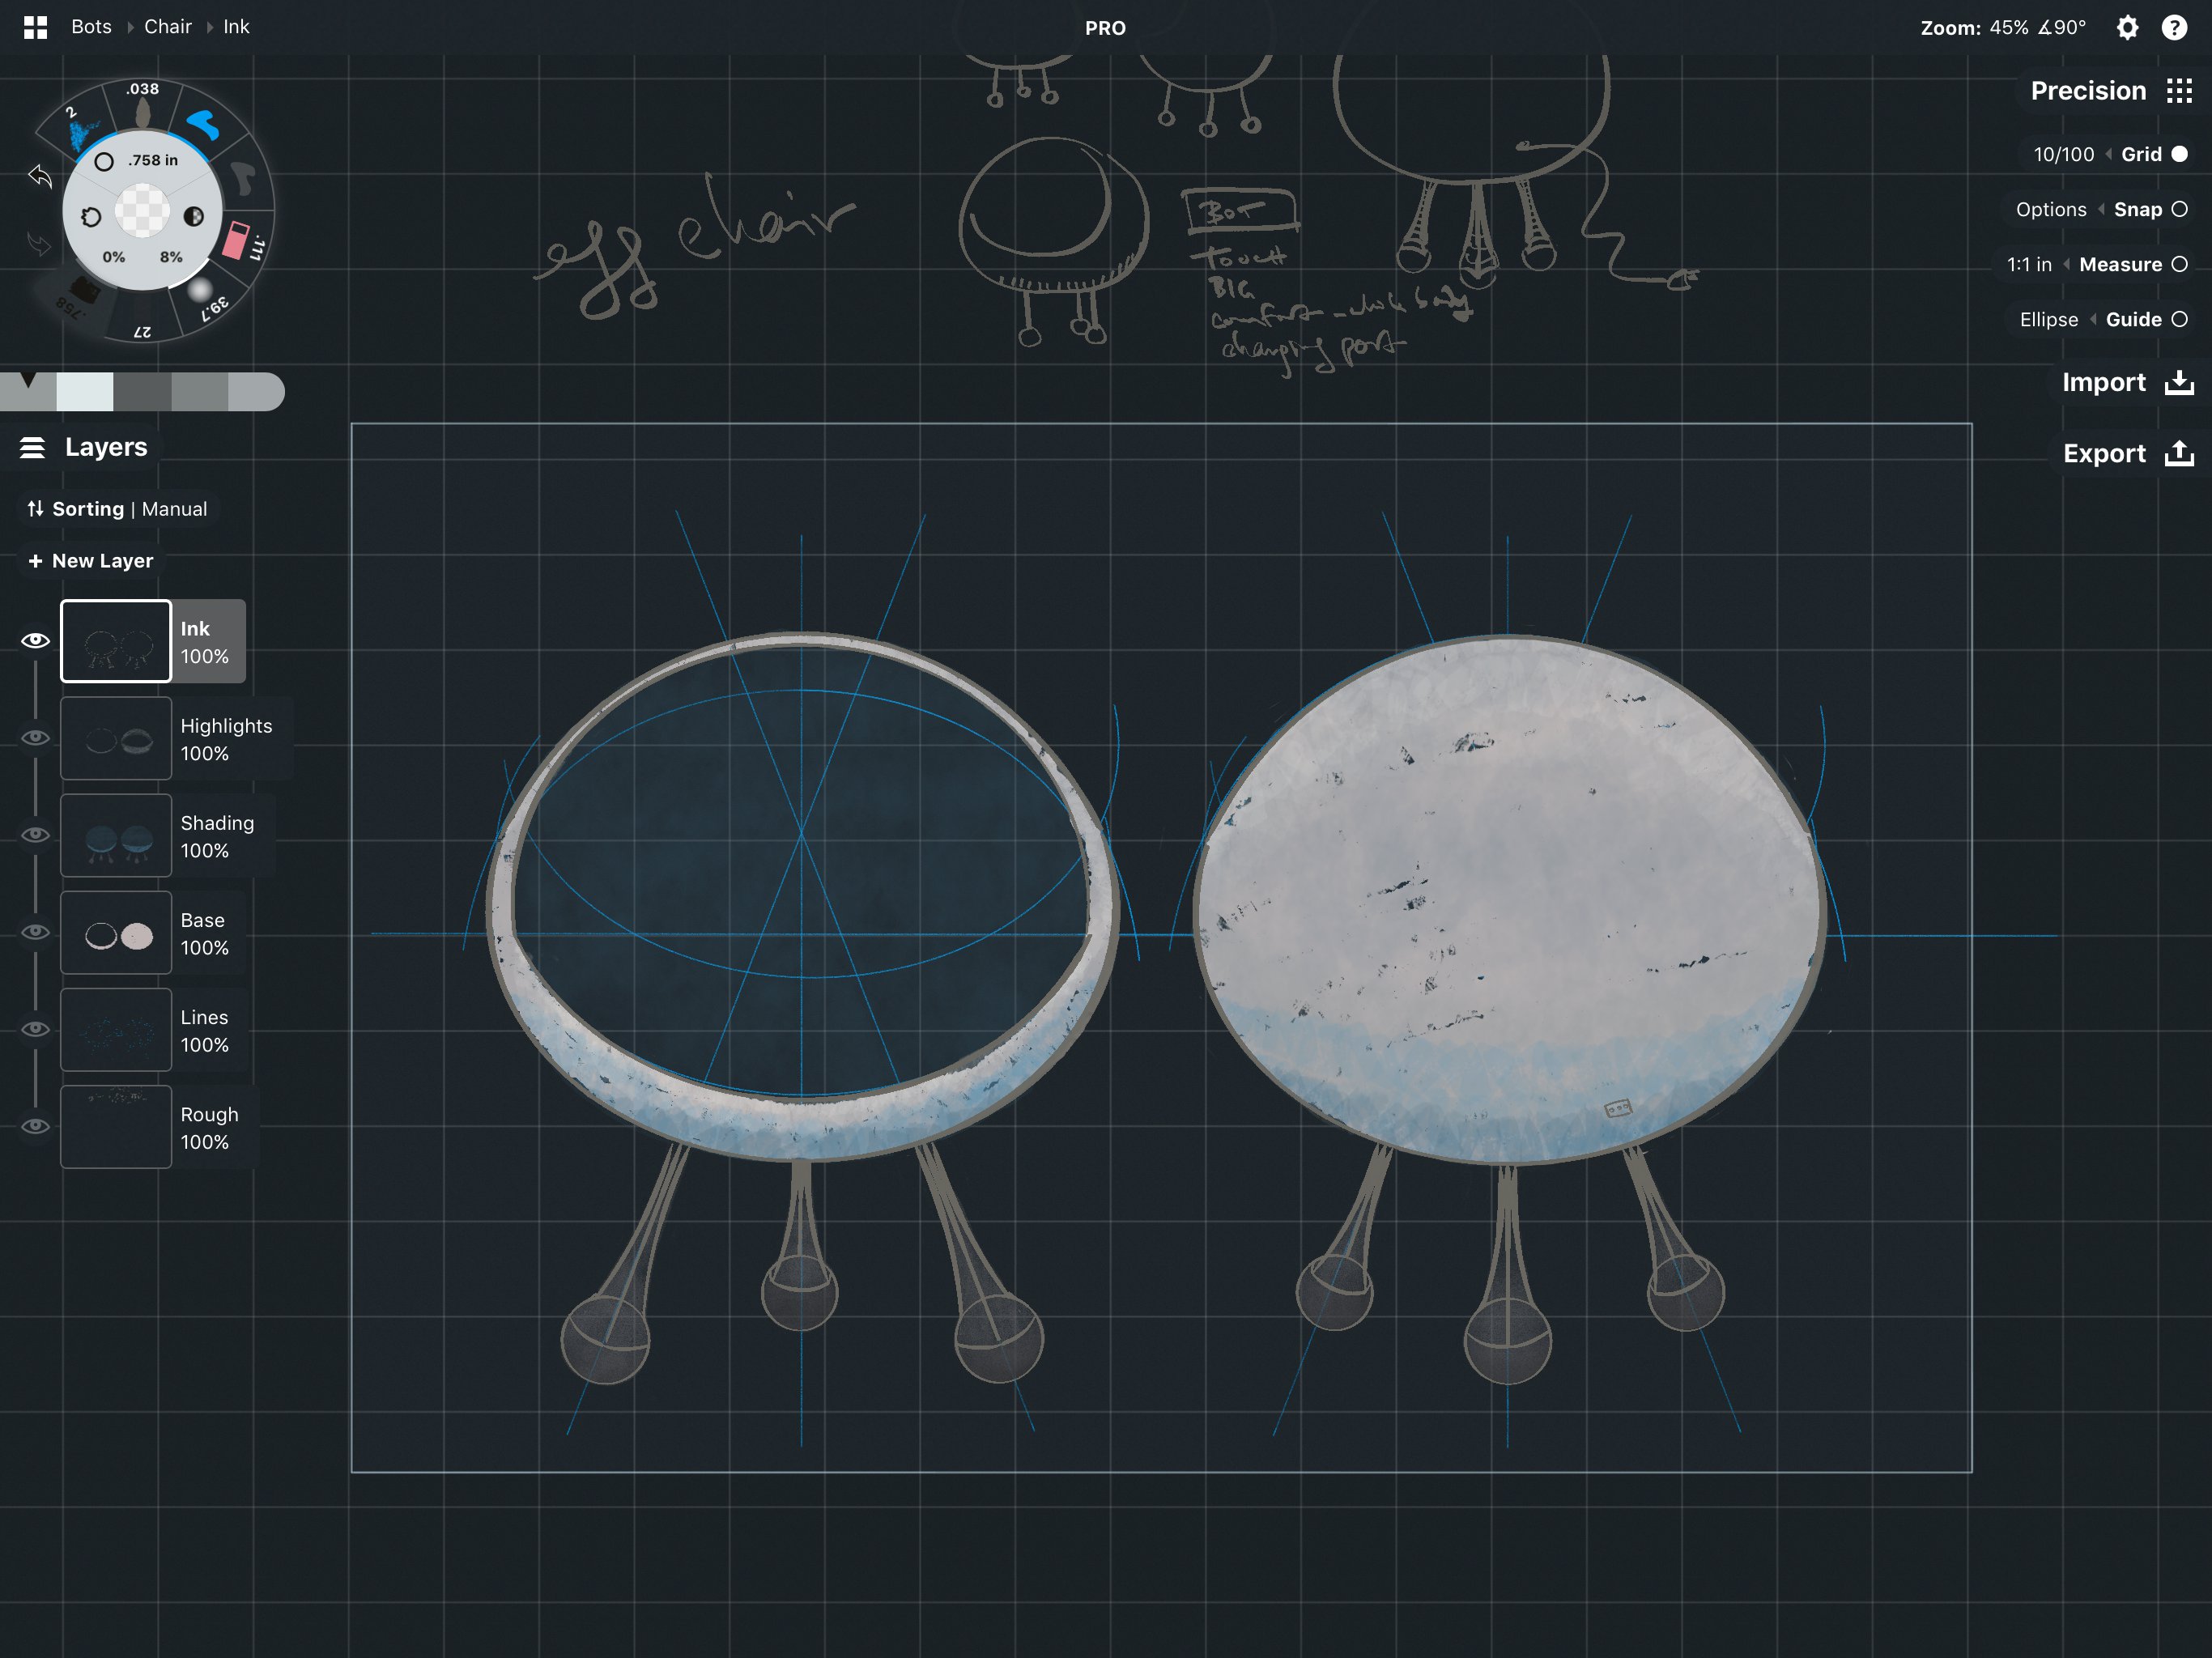
The canvas is still infinite — you can still draw and export sketches outside the artboard if you choose — but whatever is inside the boundary will be displayed in your Custom Size region in the Export menu.
The artboard boundary is movable. If you drew all over the canvas and want to share only certain areas, you can tap+hold the edge of the artboard — it will turn red — and drag it around the canvas to frame any part of the sketch.
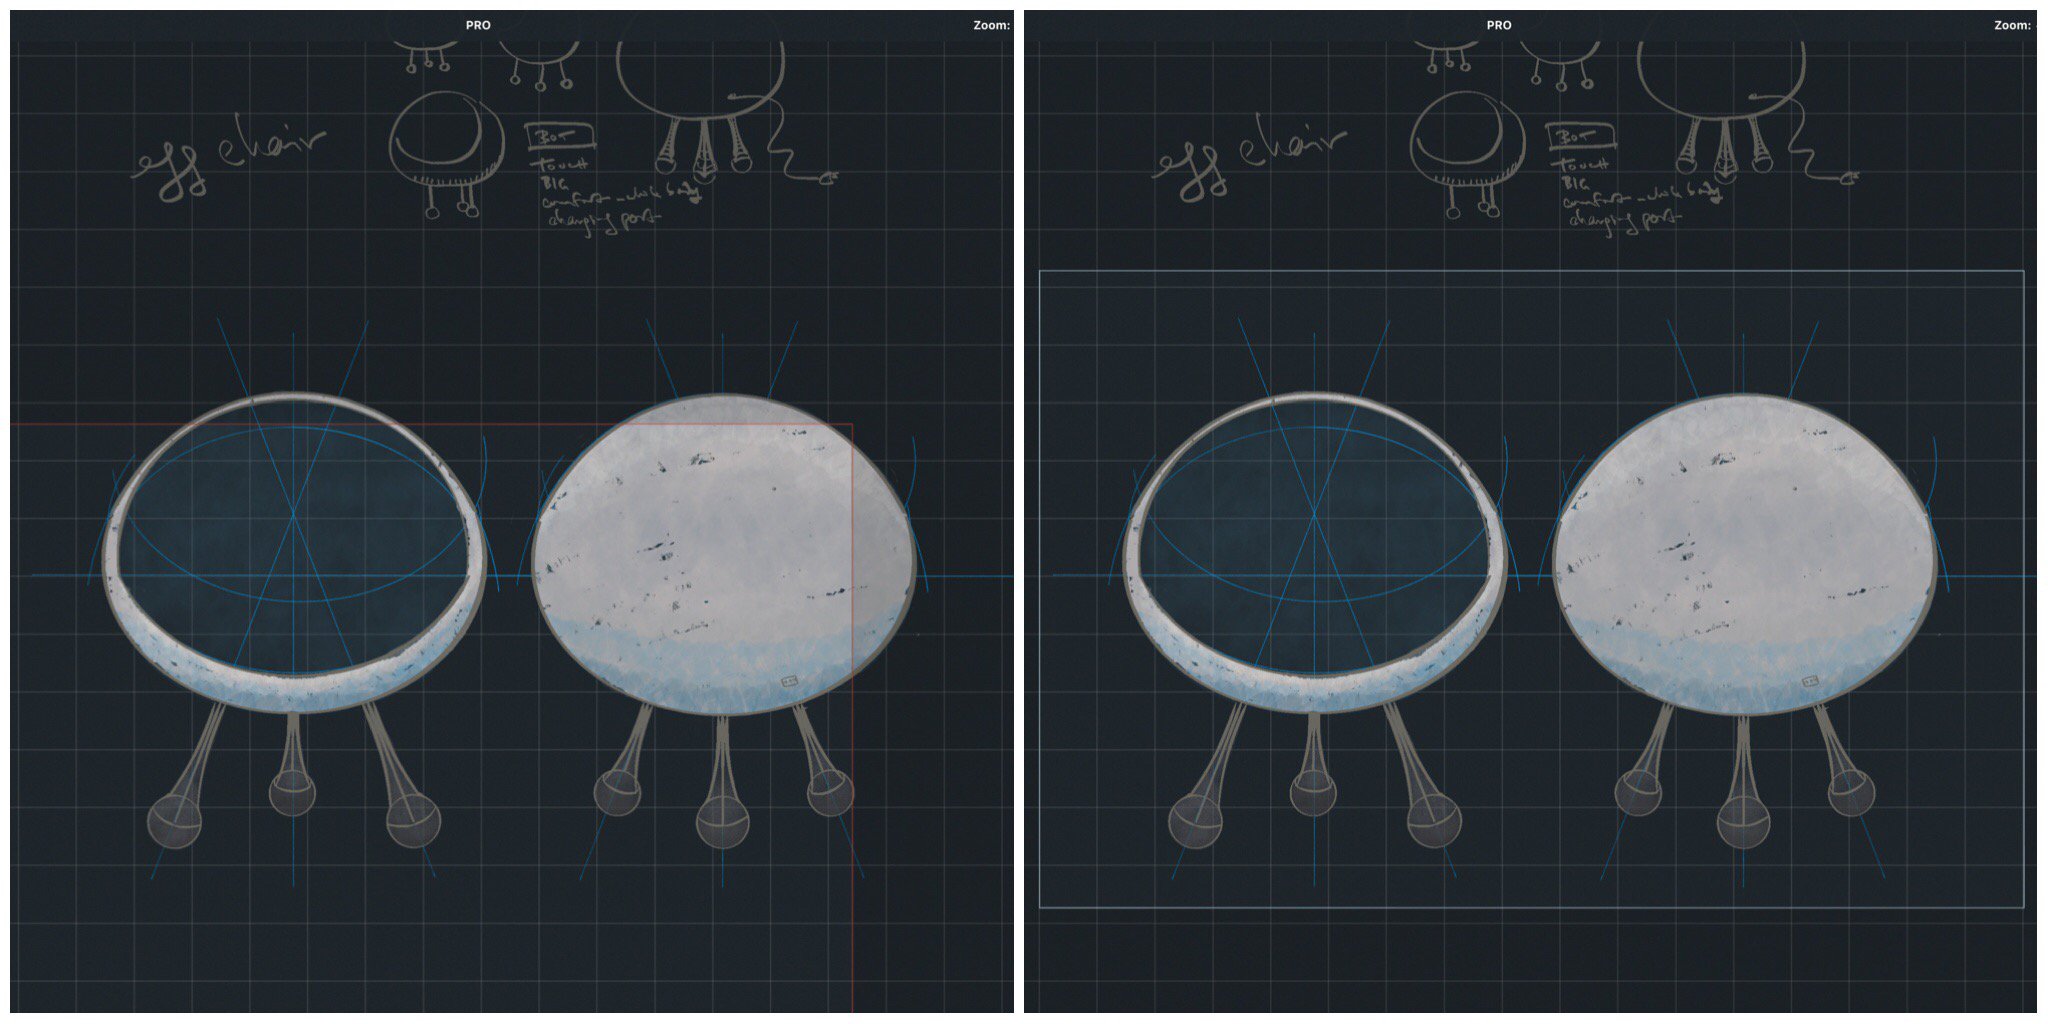
See how the artboard boundary turns red when you tap+hold it — drag it to a new location on the canvas.
If the artboard is larger or smaller than the drawing, select your drawing and resize it to the artboard. A few tips for resizing work:
• Use the Lasso to select your work with a quick drag.
• Make sure All Layers is active if you have multiple layers.
• Check Scale is active on the Selection menu, not Stretch. Not all tools resize the same, but they will scale proportionally.
• For designs aligned to the grid, it helps if Rotate is set to Off.
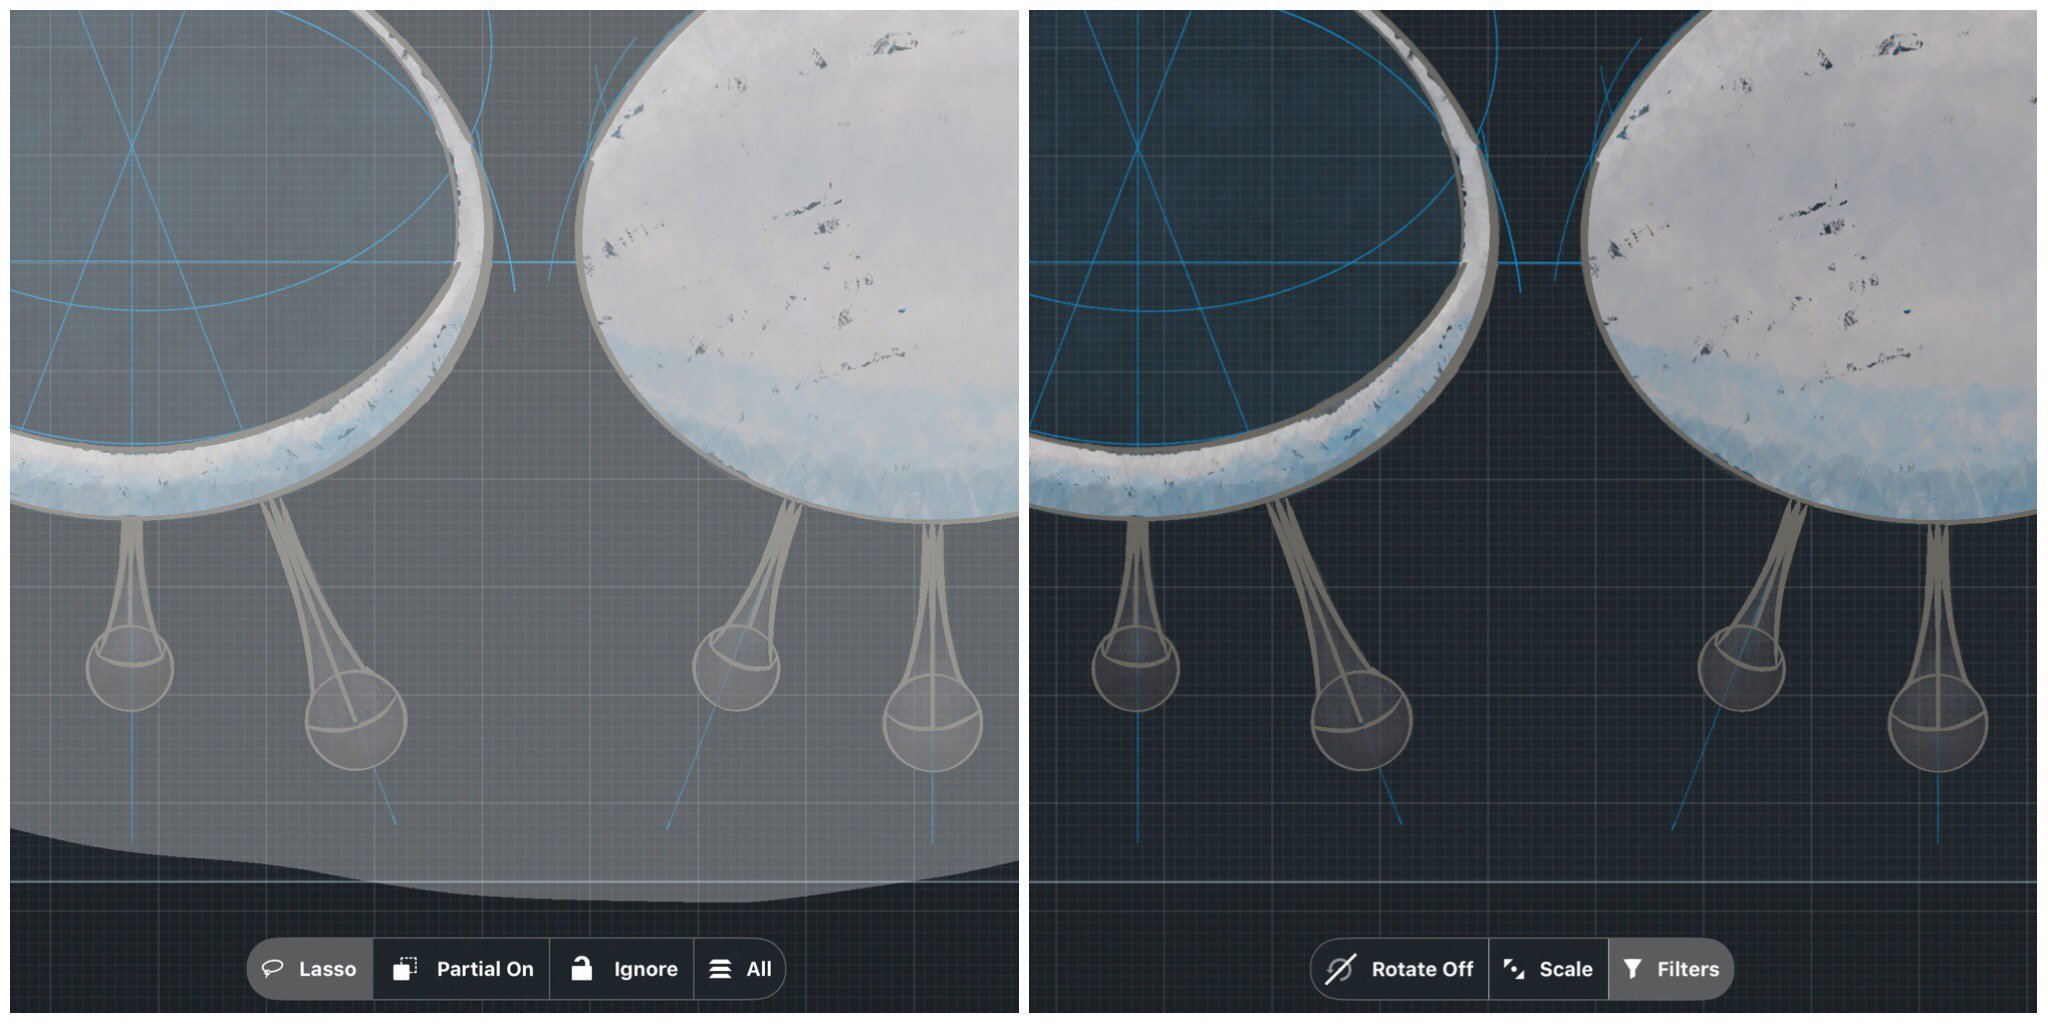
The Selection menu. Here you can see Selection is set to Lasso, and once selected, Rotate is Off.
Tap Export, return to the screen, move the boundary, export again… the boundaries are flexible and up to you.
Entire Canvas
No matter how far your drawing spreads across the canvas, you can export the entire thing at once. Choose the Entire Canvas region in the Exports menu.
If you have imported an image or PDF onto the canvas and marked it up within the original boundaries of the file, Concepts will automatically export to the same size and scale of your original import.
Drag & Drop a Selection
Drag & drop is supported on iOS11 and later on the iPad or iPad Pro. Apple does NOT support drag & drop on the iPhone. To export a selection from your canvas as a PNG file:
• Using Selection, select the area you’d like to export.
• Tap+hold the selection and start dragging it. Dragging it initiates the drag & drop sequence.
• Swipe to reveal the command bar or your open apps, and drag it to your destination app.
• Tap the new app with another finger and drop the selection into place.
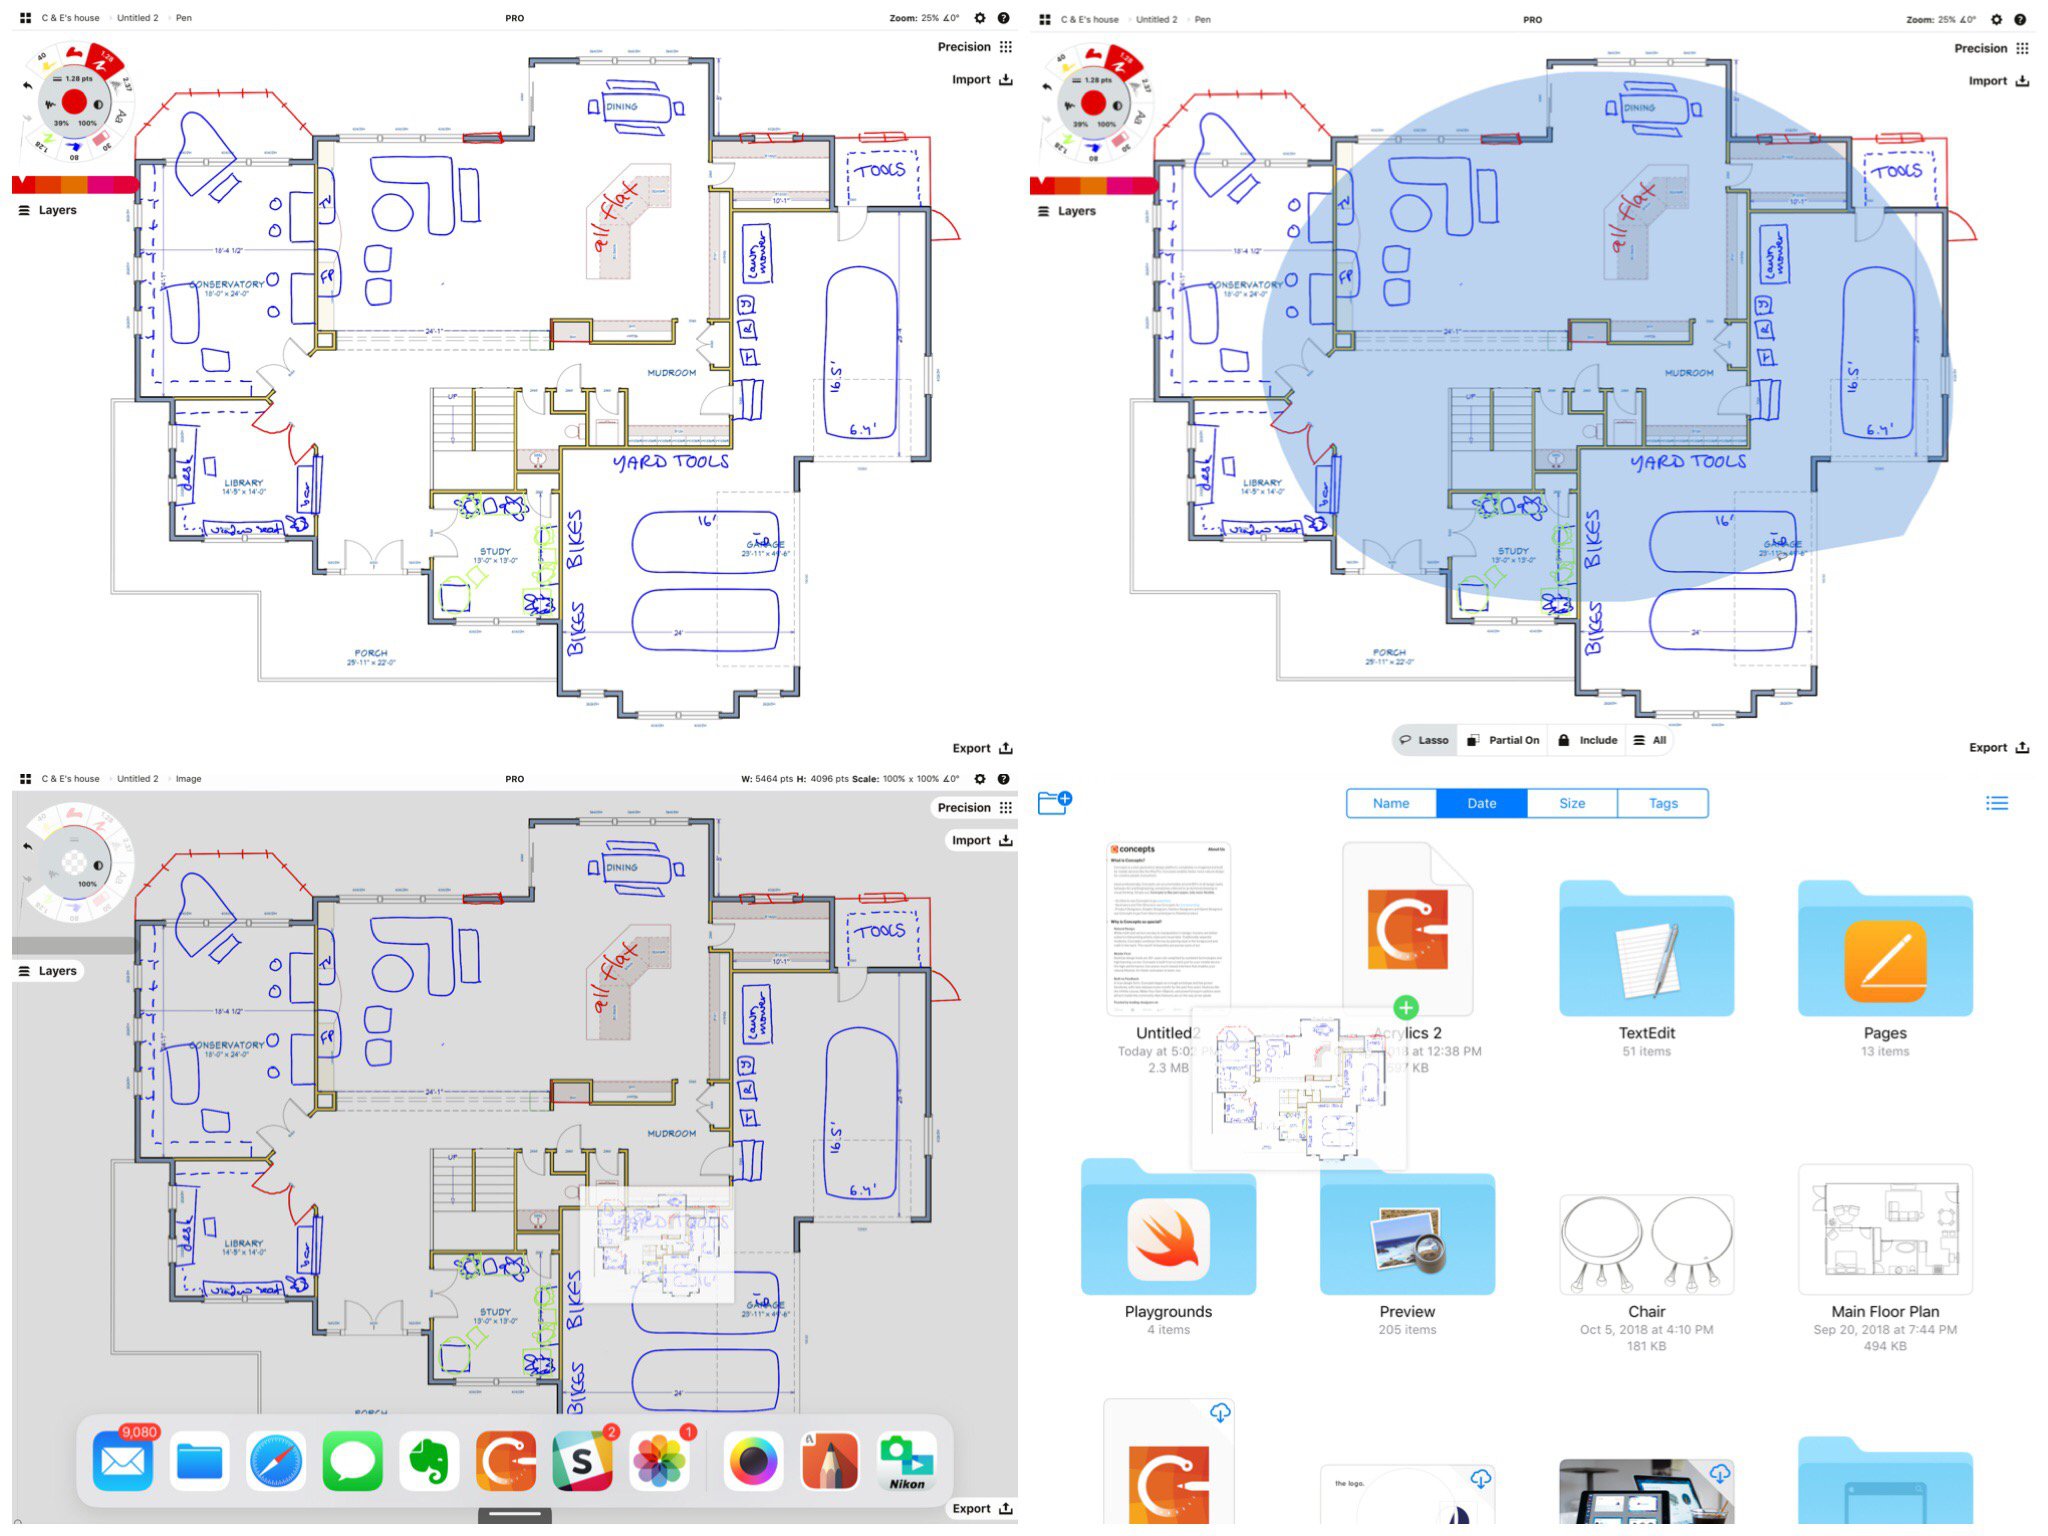
Exporting a marked-up home plan to Files. Alternatively, you can drag it straight to email and send it off as an editable Concepts file.
Great! We’ve covered how to select and frame your drawings for export. Let’s move to the Export menu itself.
The Export Menu
Once your design is ready to go, tap the Export menu on canvas. The overlay will look like this, with categories to help define your export:
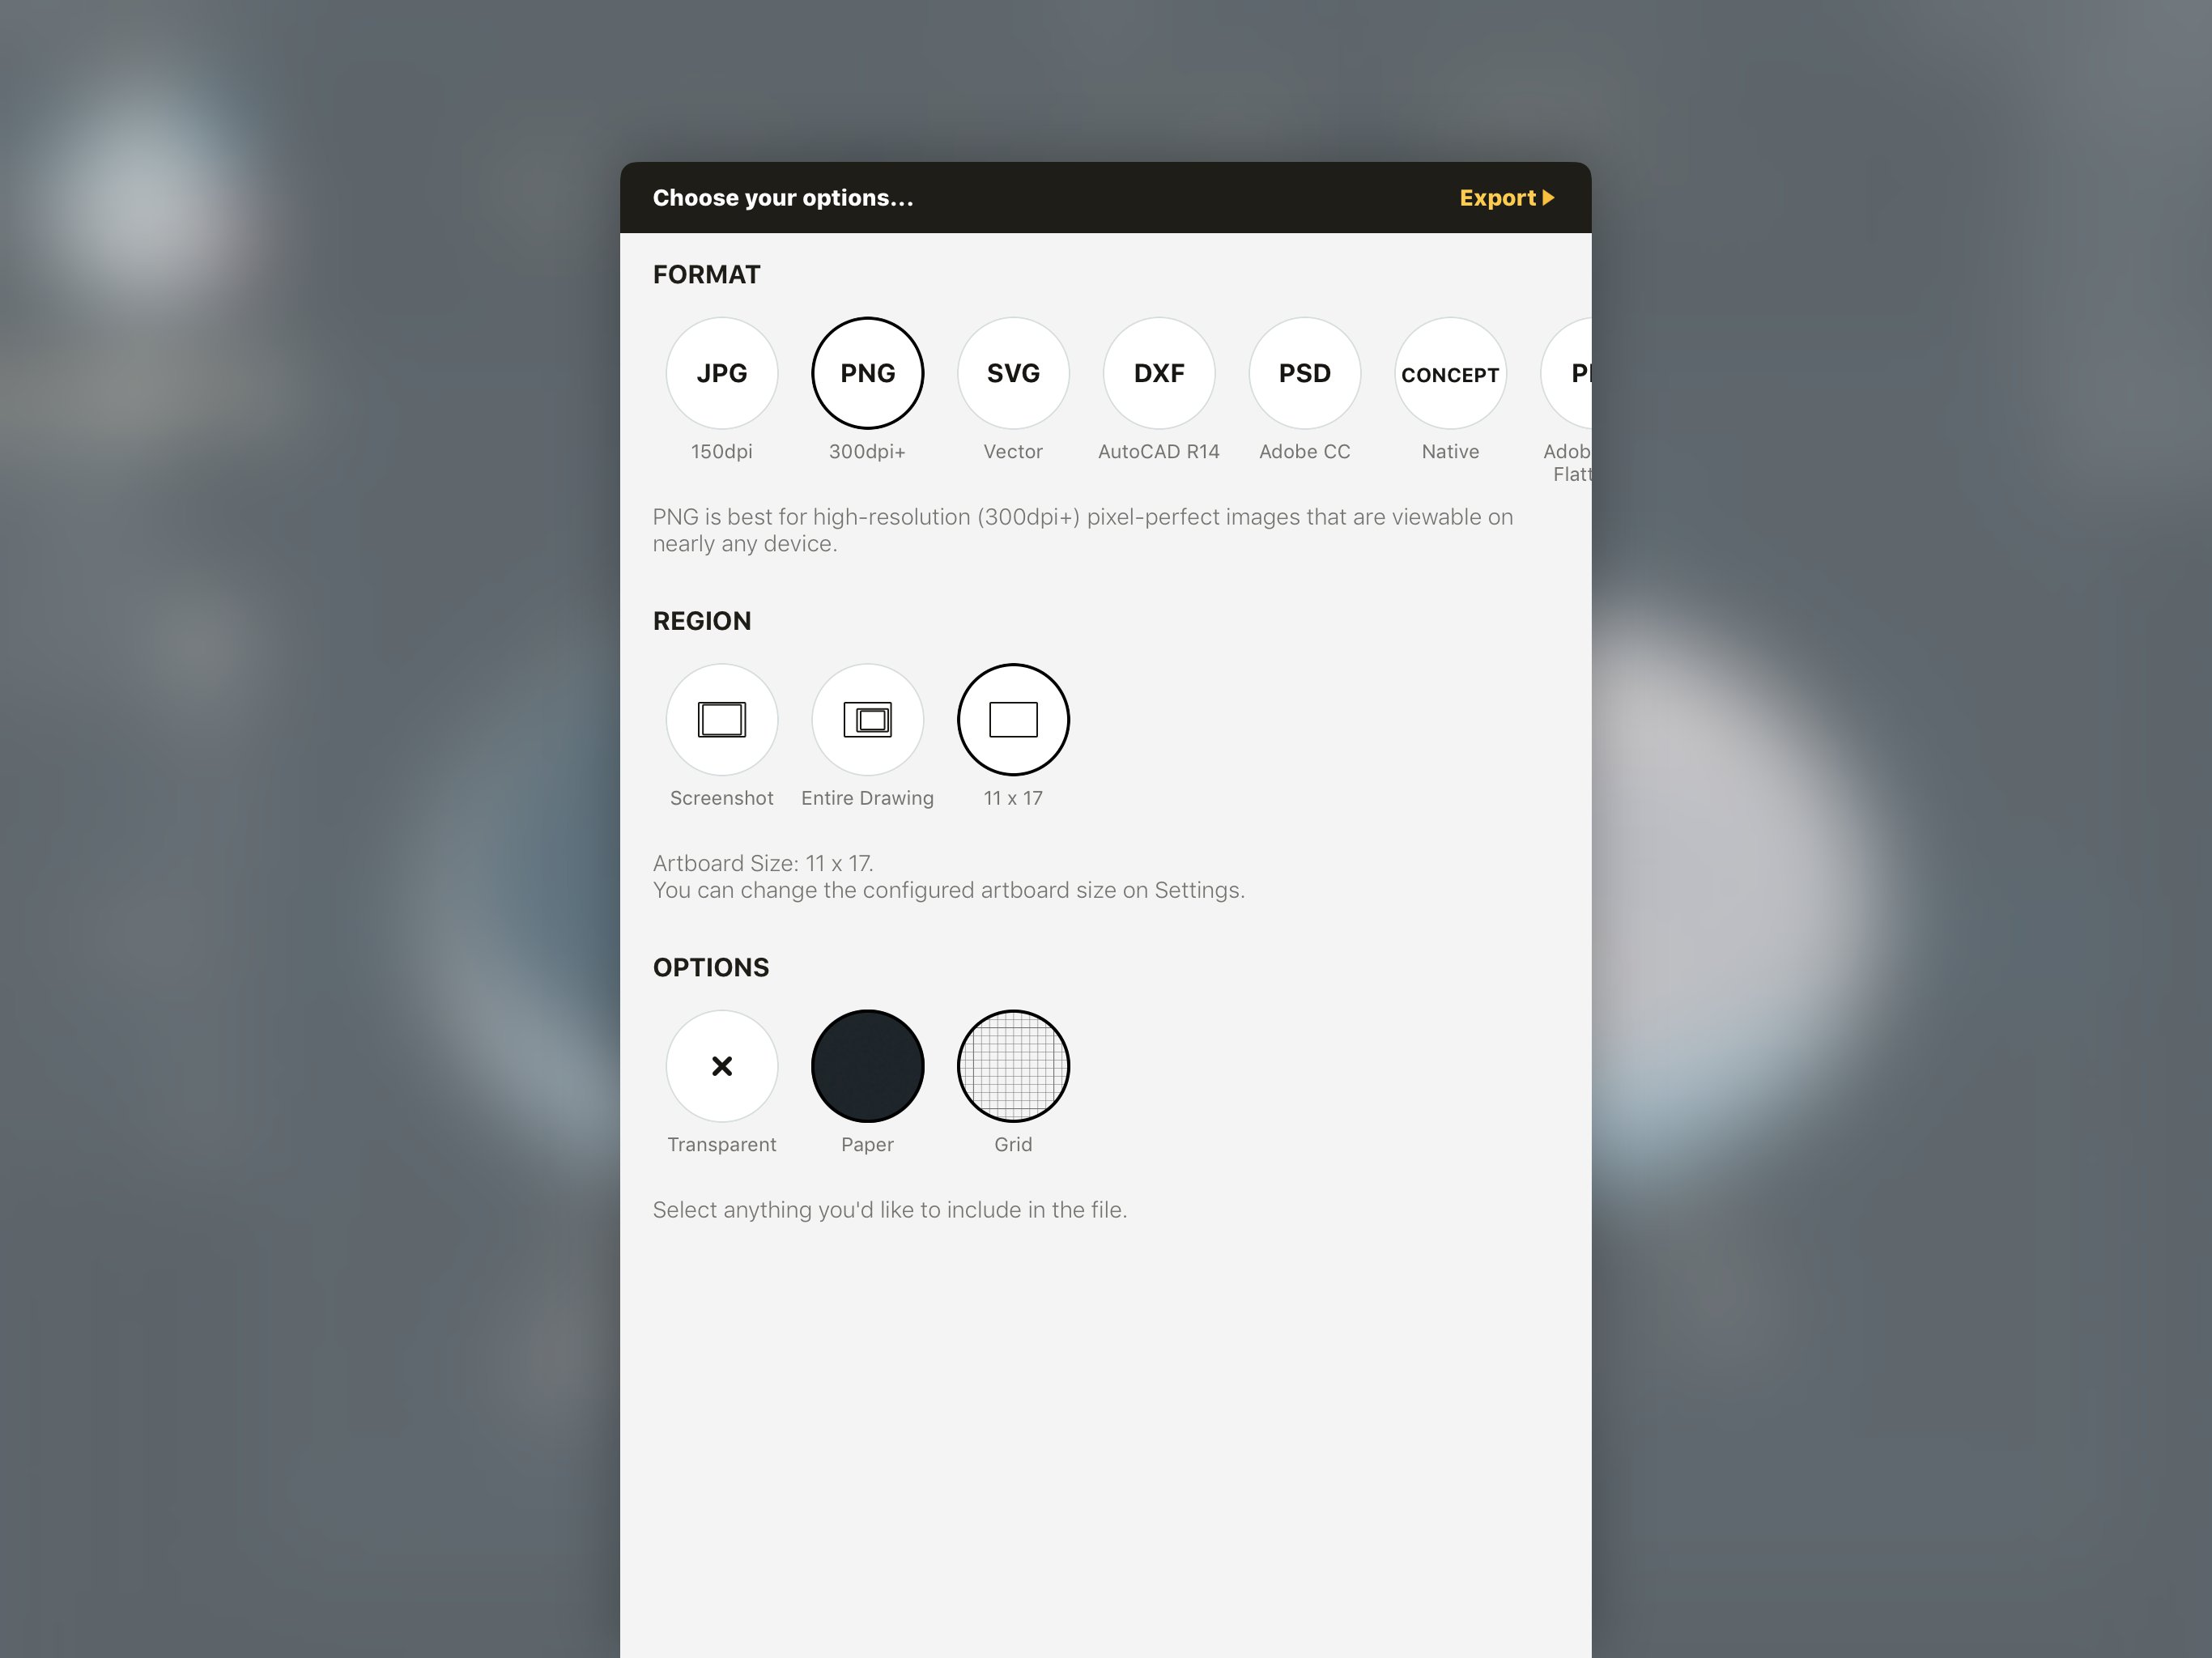
Format
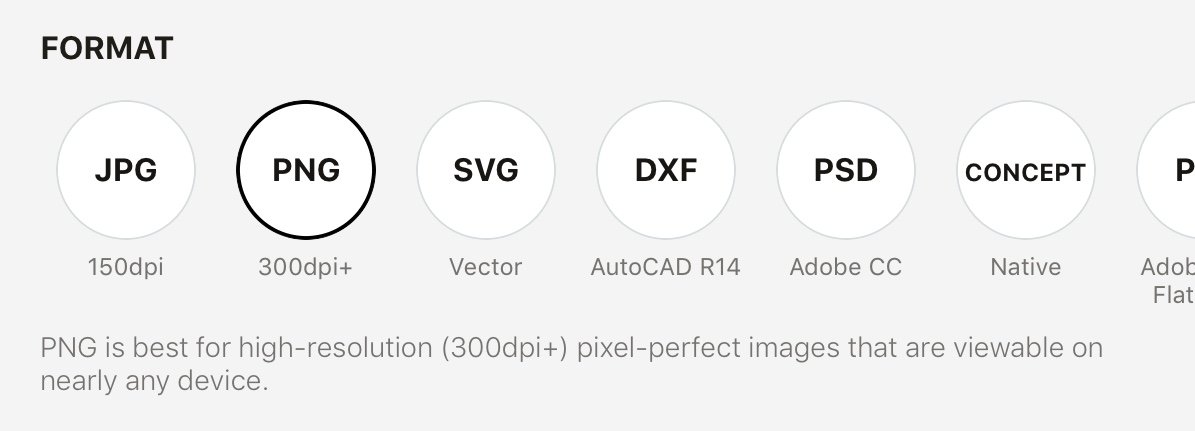
You have many file formats to choose from - scroll through the menu to see all the file types. It's a flexible export list that supports multiple app workflows. Included are standard JPG, high-resolution PNG, vector SVG, DXF (CAD), PSD to Adobe Creative Cloud, native Concepts files, flattened high-resolution PDF and simplified vector PDF exports. If you would like more information on how these file types work, check out our manual.
Choose the file type that works best for your workflow.
Region
Next, choose the Region you’d like to export. This can be Screenshot, Entire Drawing, or Custom (what is framed in your artboard).

Background
Finally, choose your background option. You can export with a Transparent background (think logos, transparent PDFs, hand-scripted lettering…), the Paper type you chose in Settings, and whether you want the Grid to appear or not (nice for some plans). You can choose both paper with grid or without grid, both can be active at once.

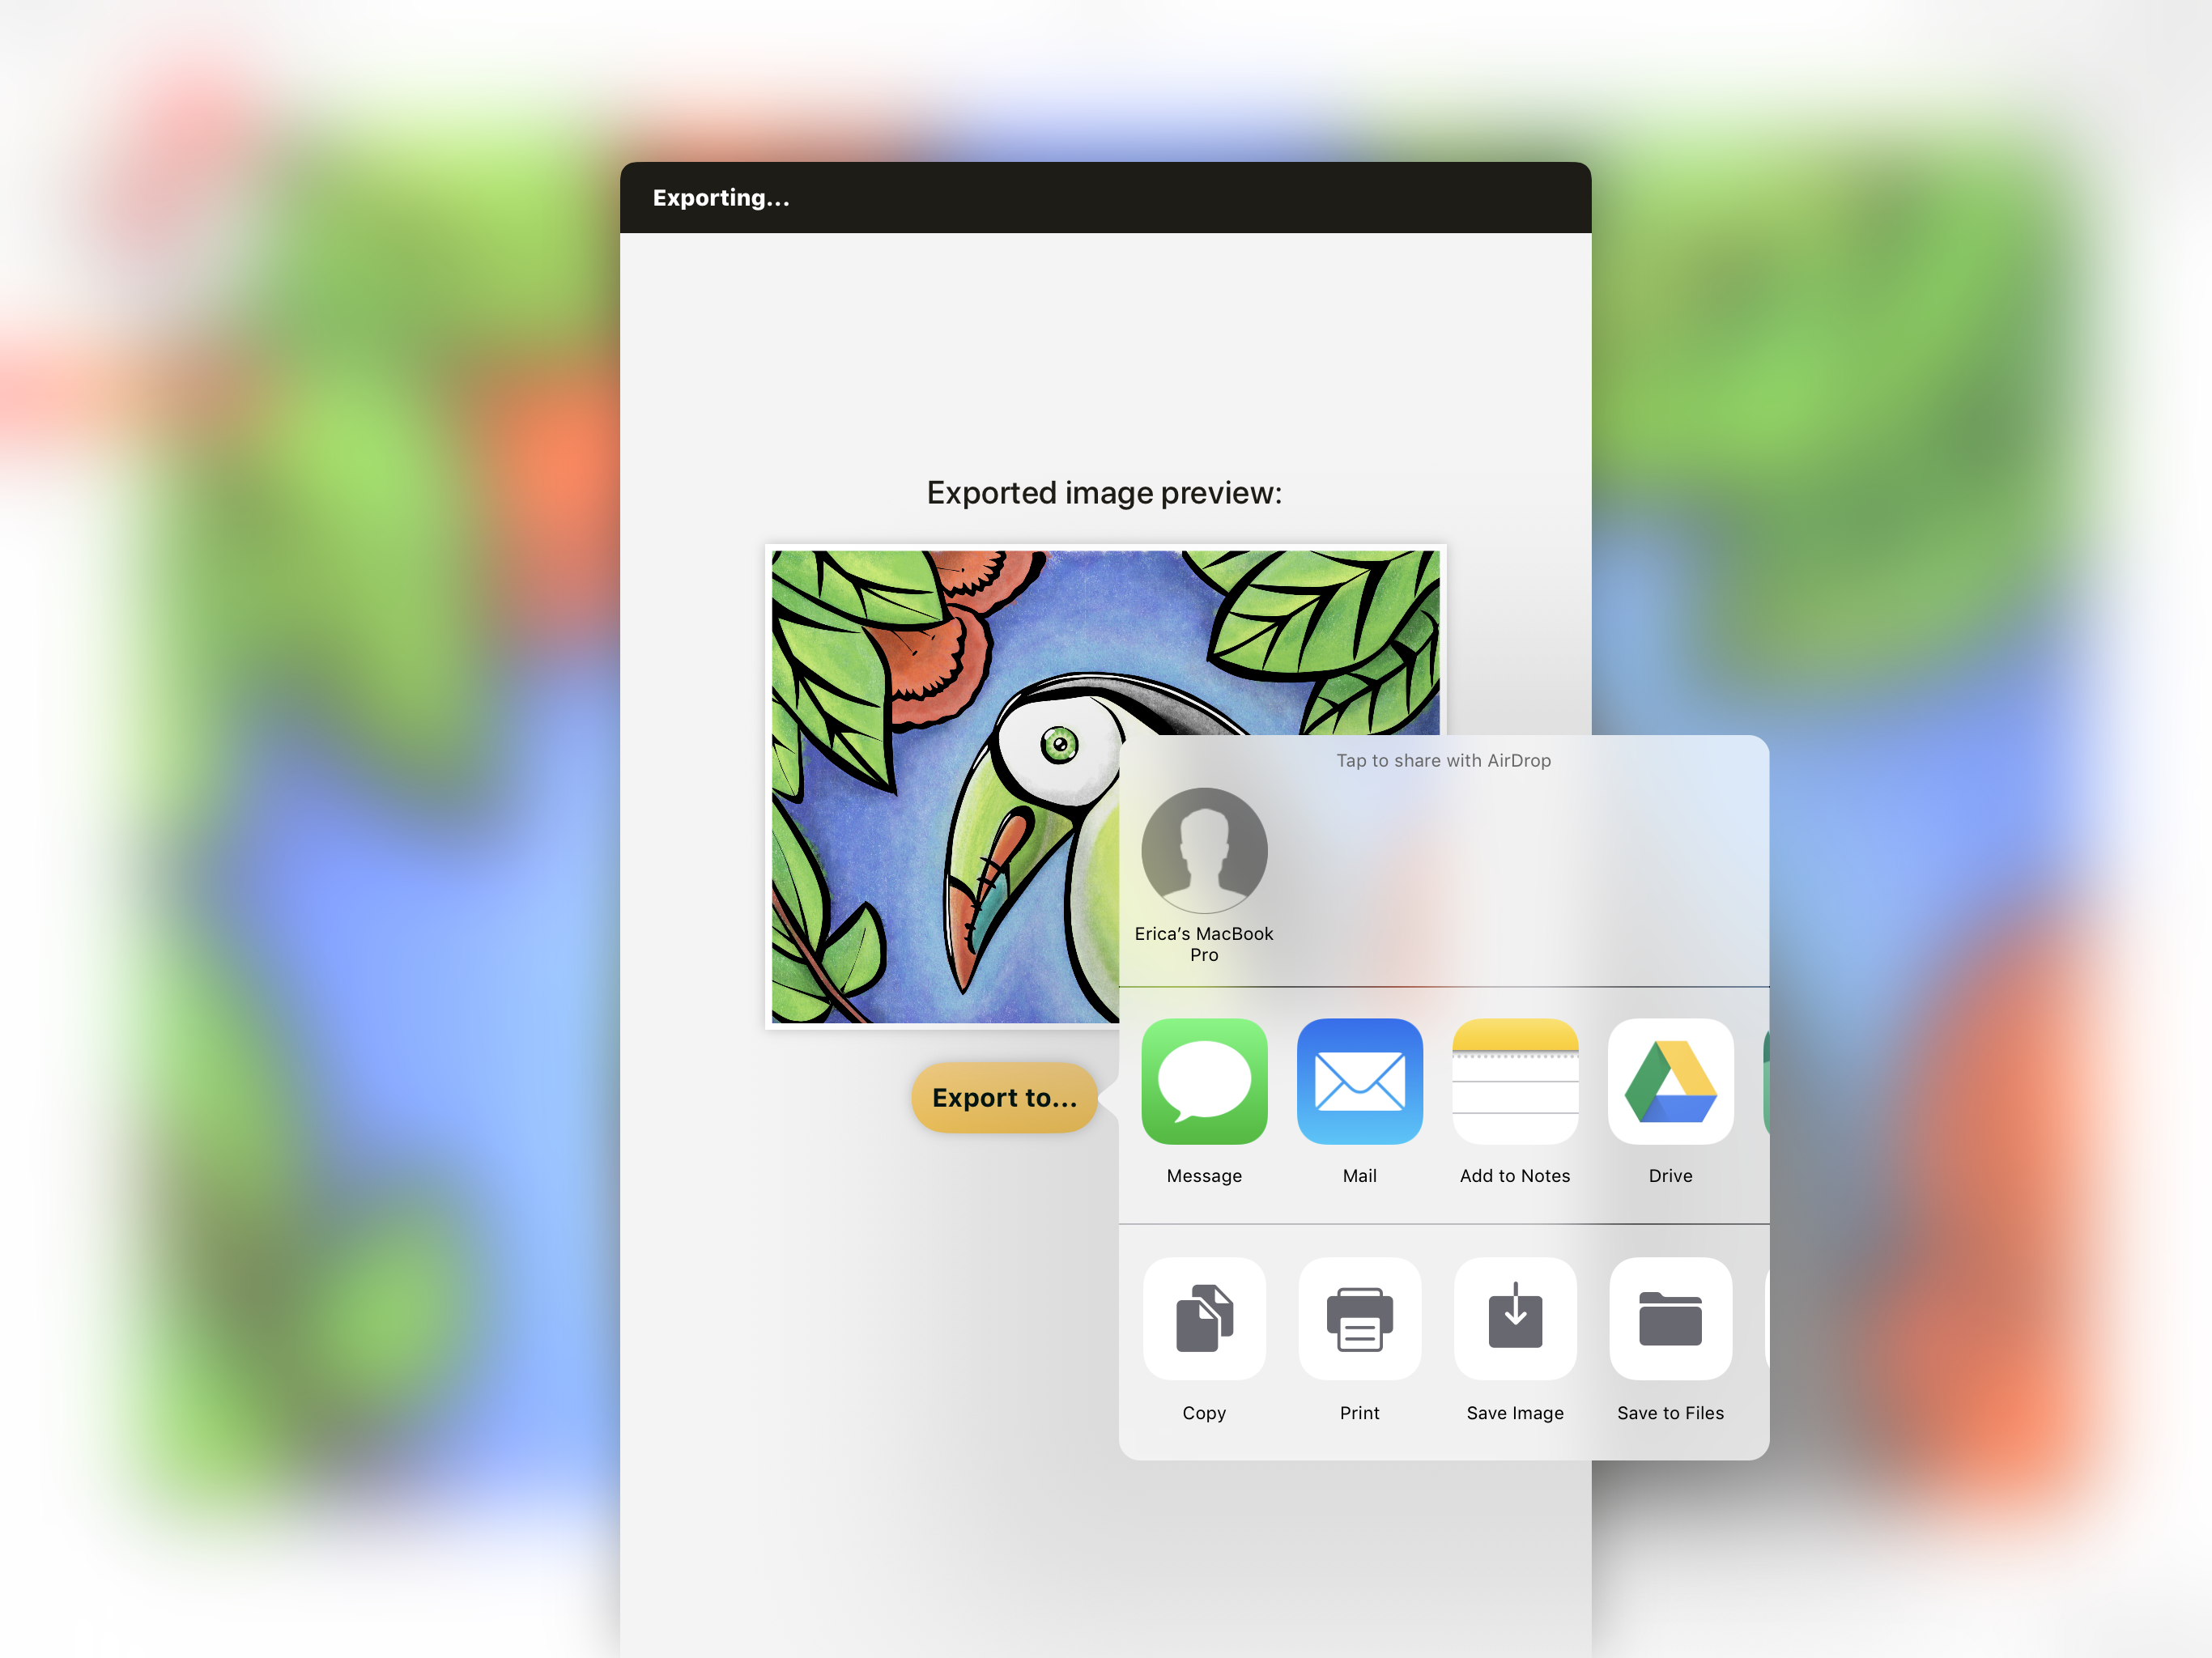
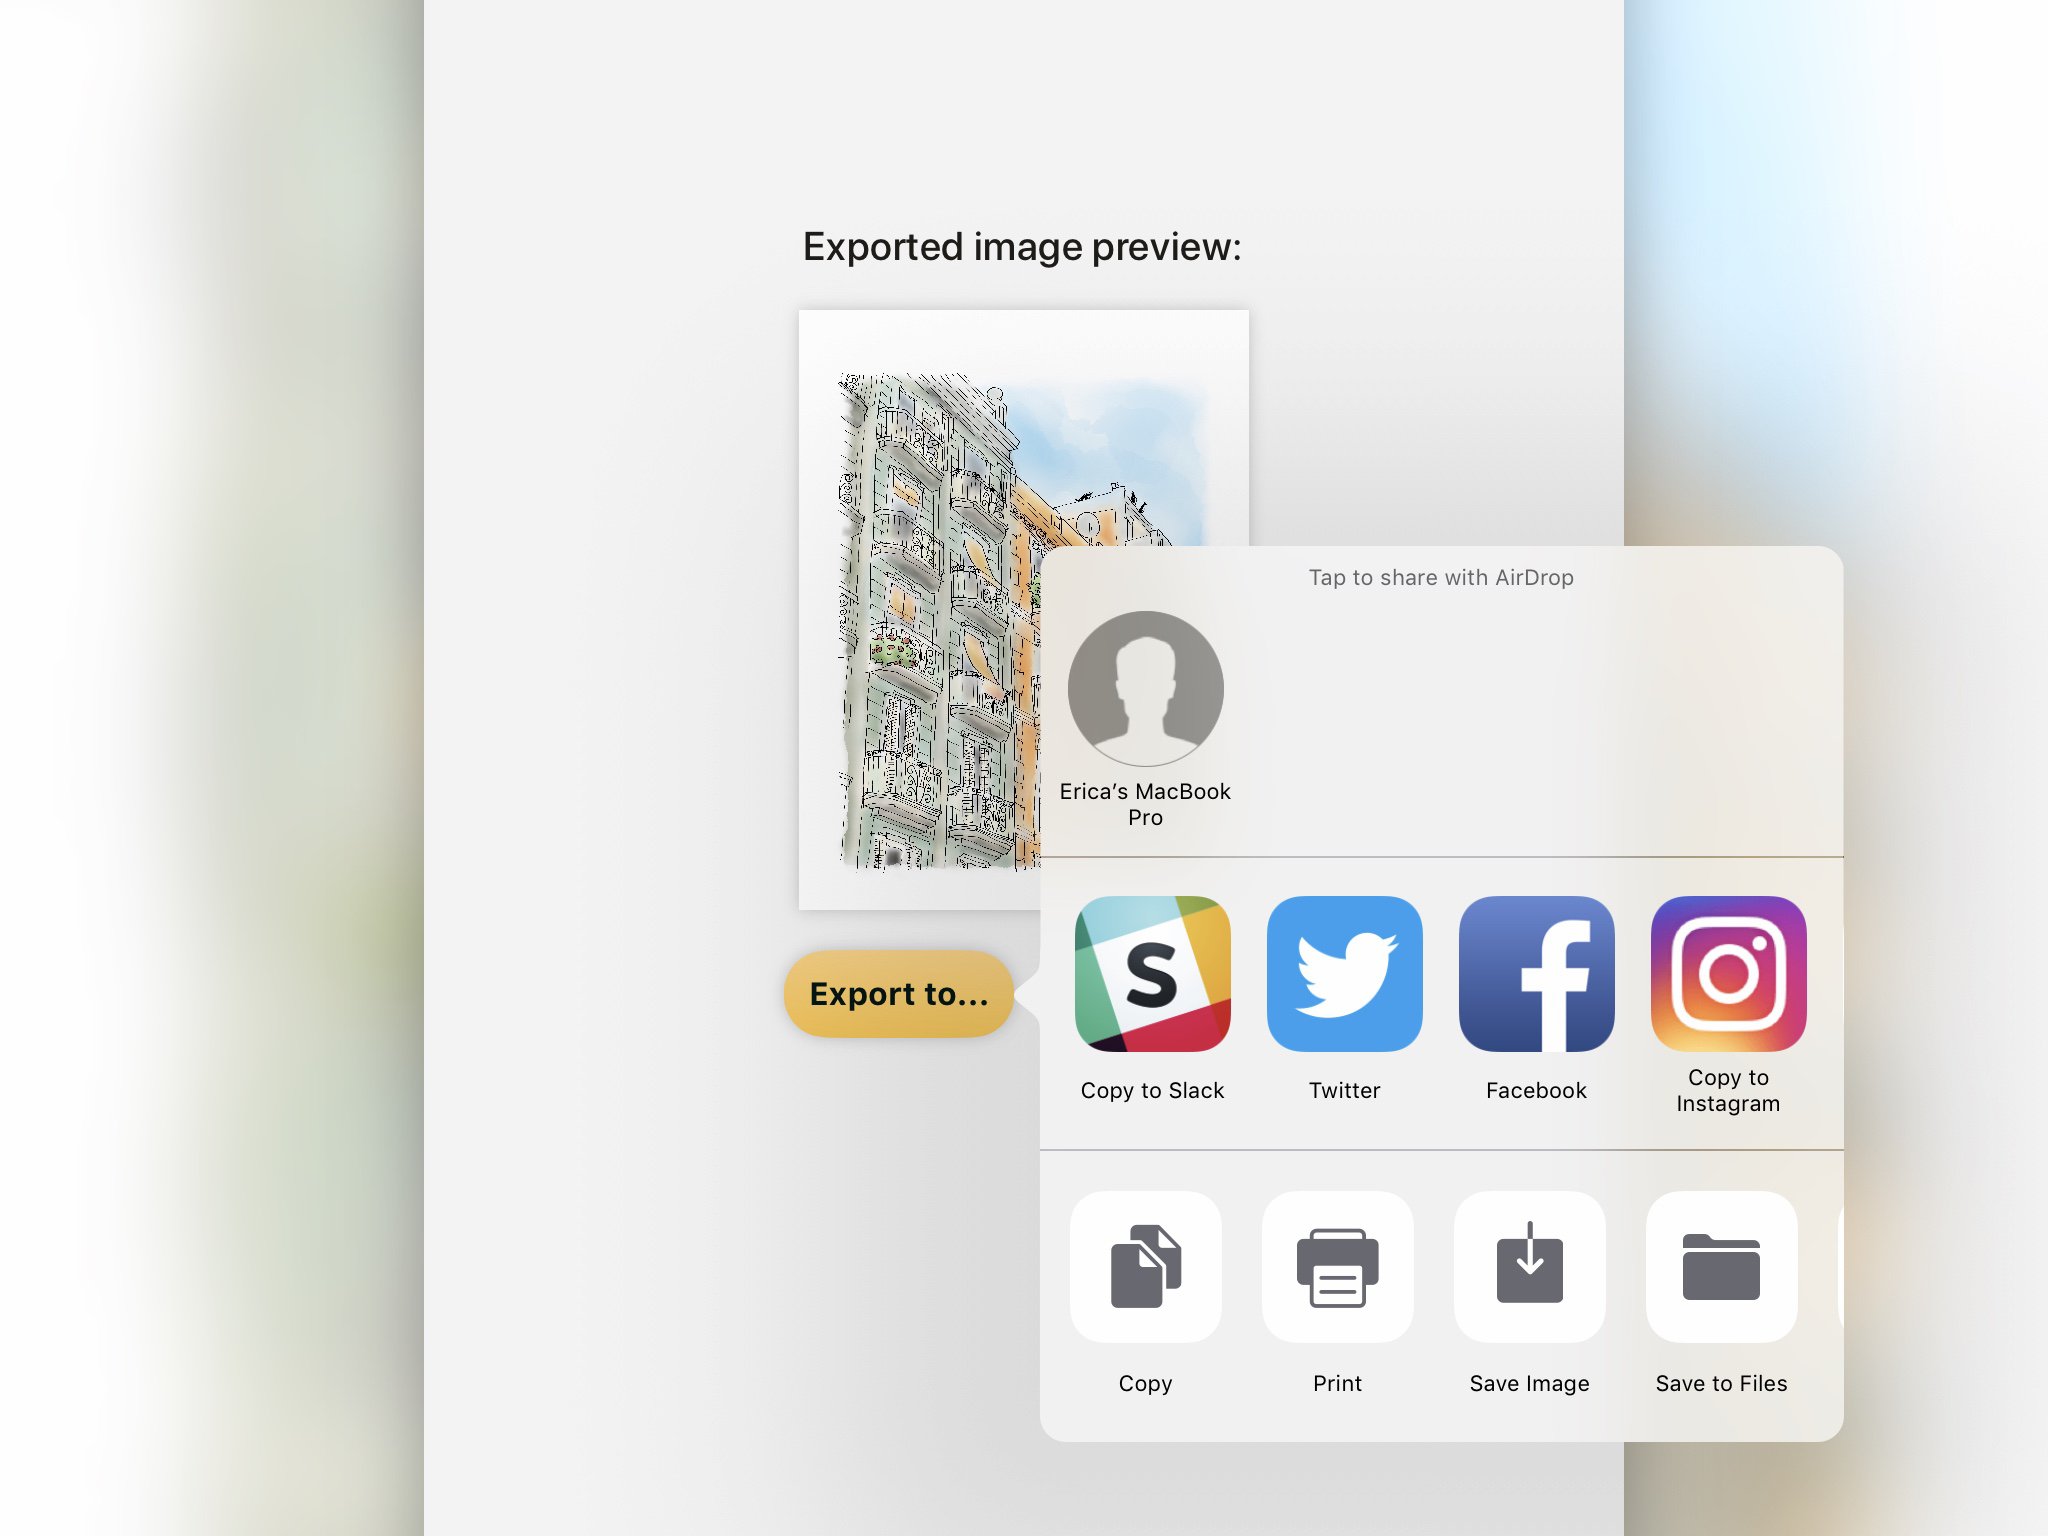
Once you’re happy, tap Export in the upper right corner. You’ll see a preview of your drawing and options to export to any of your available apps on your iPad.
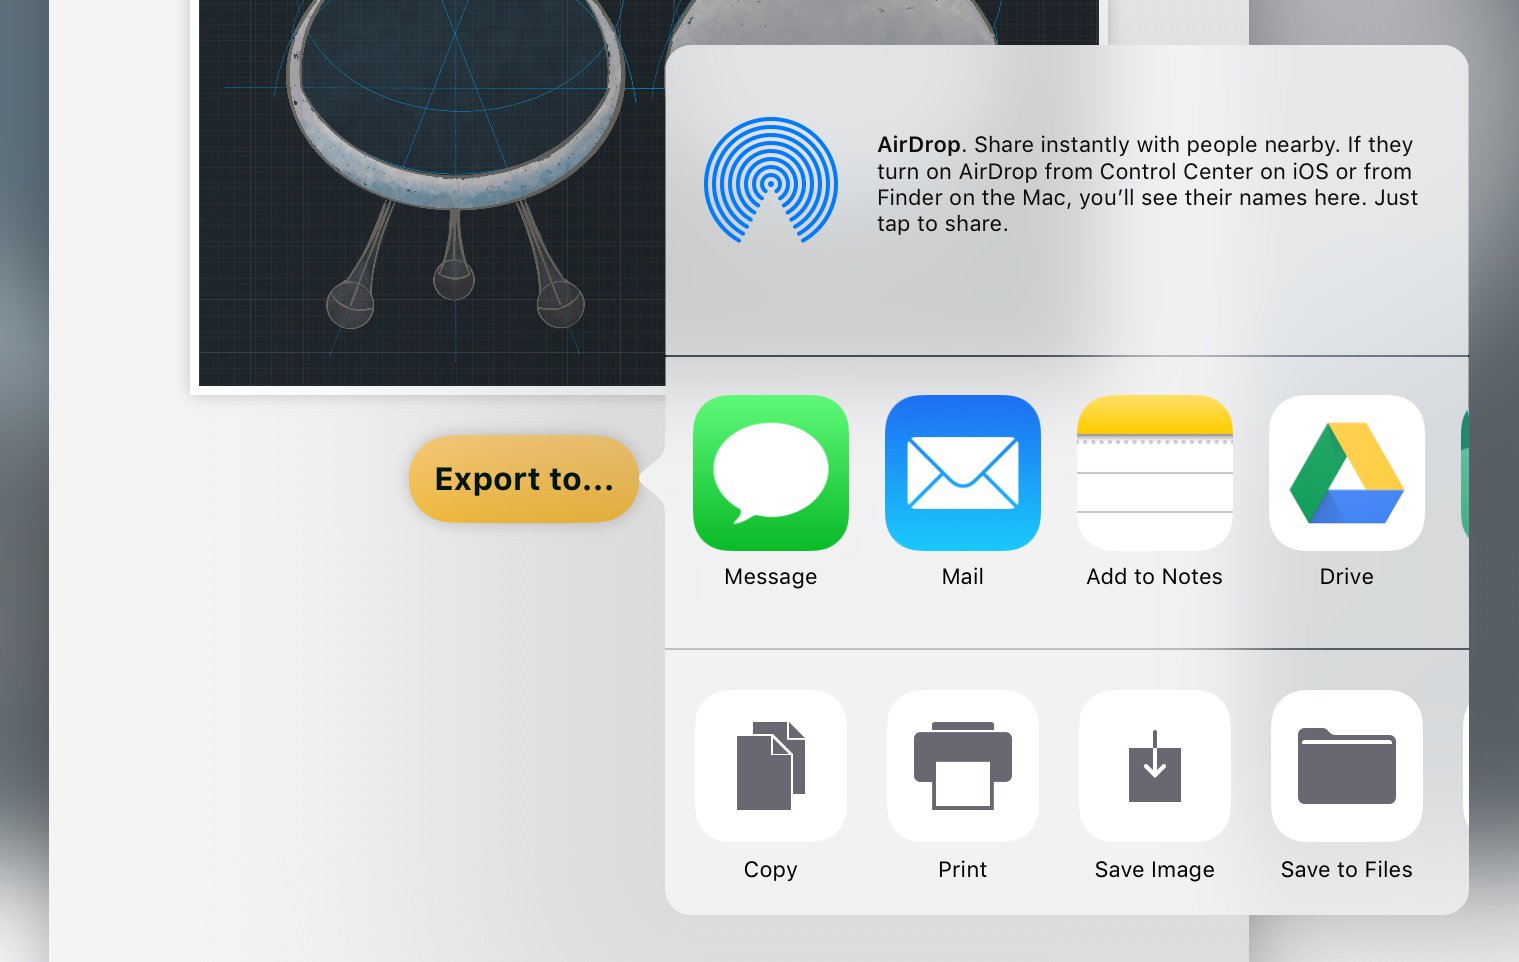
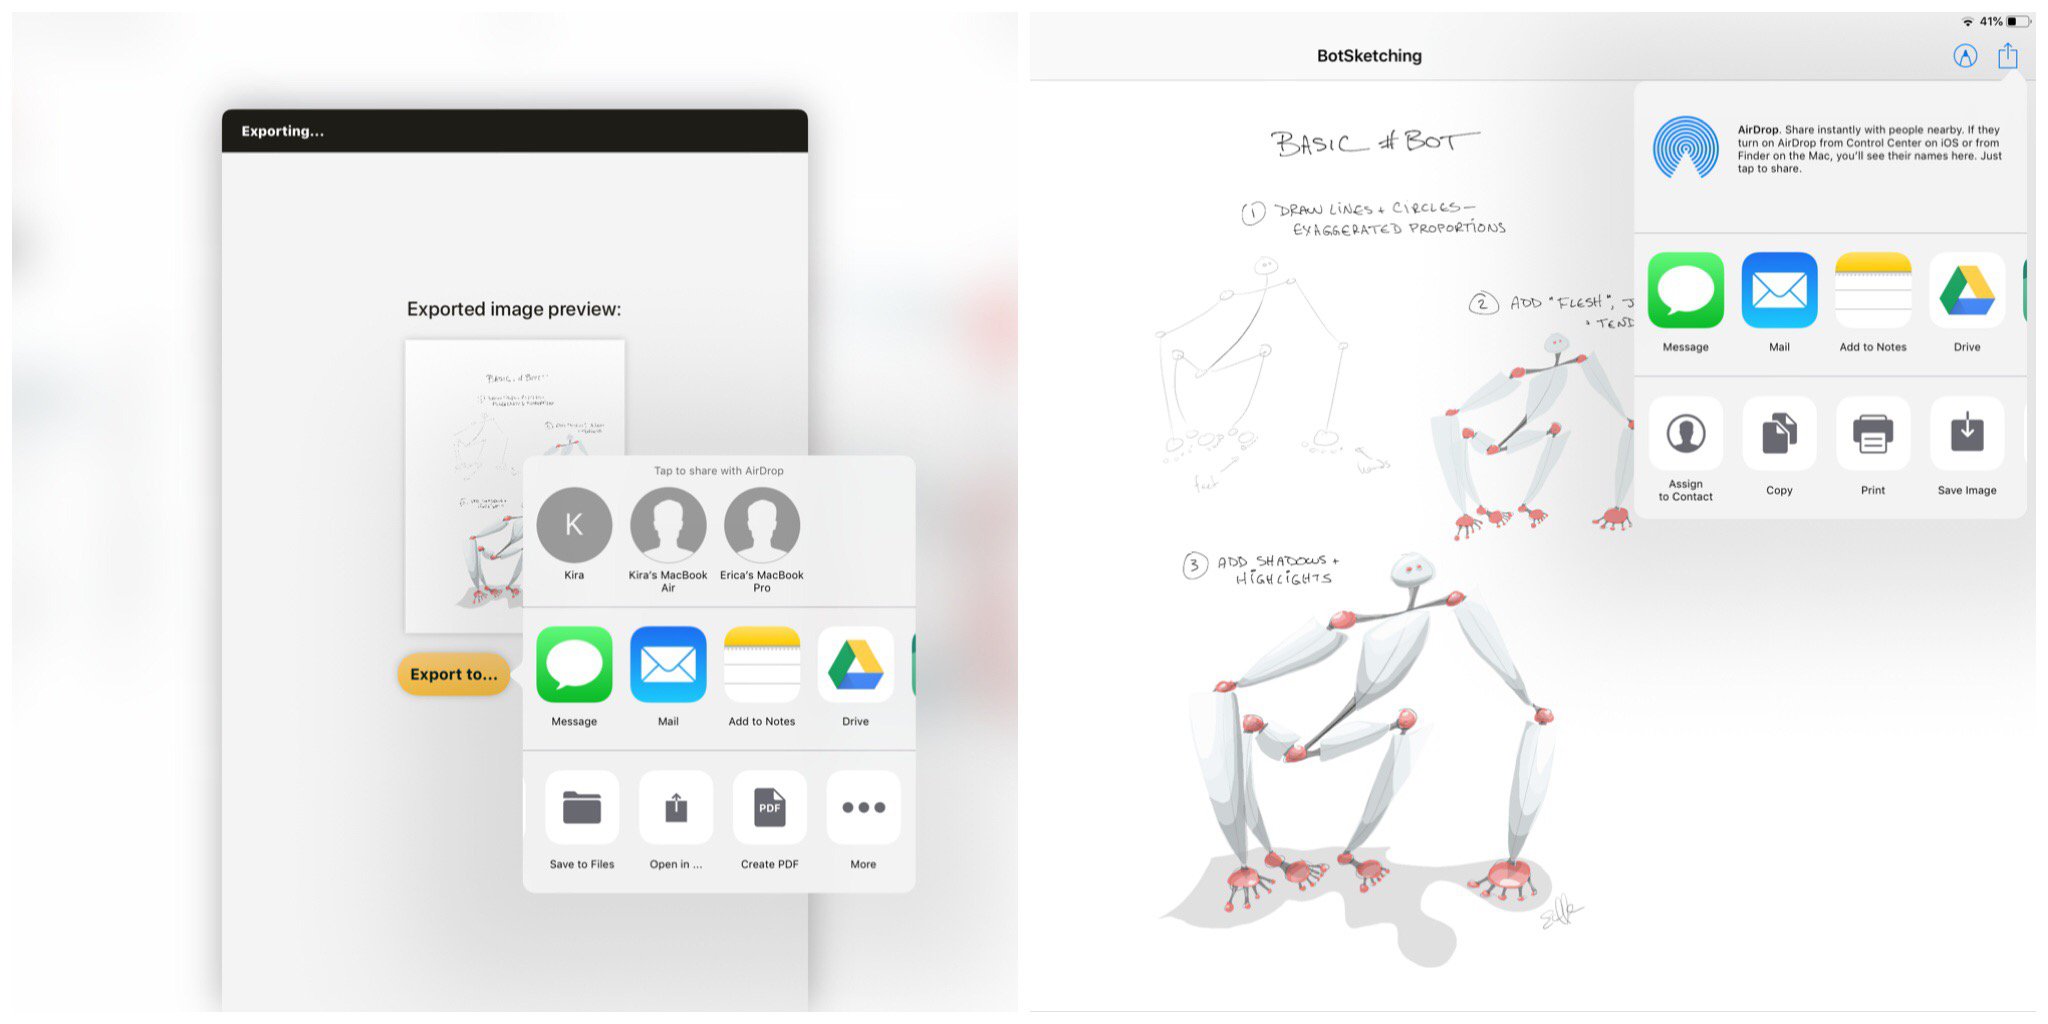
Export directly to iMessage, Mail, Notes, and any other iOS apps you’ve enabled in your iPad Settings, like Facebook or Twitter. Also choose Copy, Print, Save Image, Save to Files, Open in, and Create PDF (a single image PDF via iOS). If you don’t see what you’re looking for, tap More and enable the app.
Exporting from the Gallery
From the Gallery, you can export single or multiple drawings and a full project at a time via drag & drop. Again, iOS supports drag & drop on iPad and iPad Pro, but not on the iPhone.
Exporting a Single Drawing
To export a drawing from the Gallery, tap+hold the drawing and begin to drag it. Drag & drop will initiate, minimizing your drawing into a draggable file.
• Drag to iMessage or iPhoto and it saves as a PNG.
• Drag to Apple Mail, Files or Cloud and it will save as a native Concepts file that can be opened in the app later. This is great for backing up your drawings or sending to teammates for collaboration.
You can either drag this to a split screen with another app already open, or swipe upward with your thumb on the bottom edge of the screen to bring up the command bar, then drag the drawing into your preferred app.
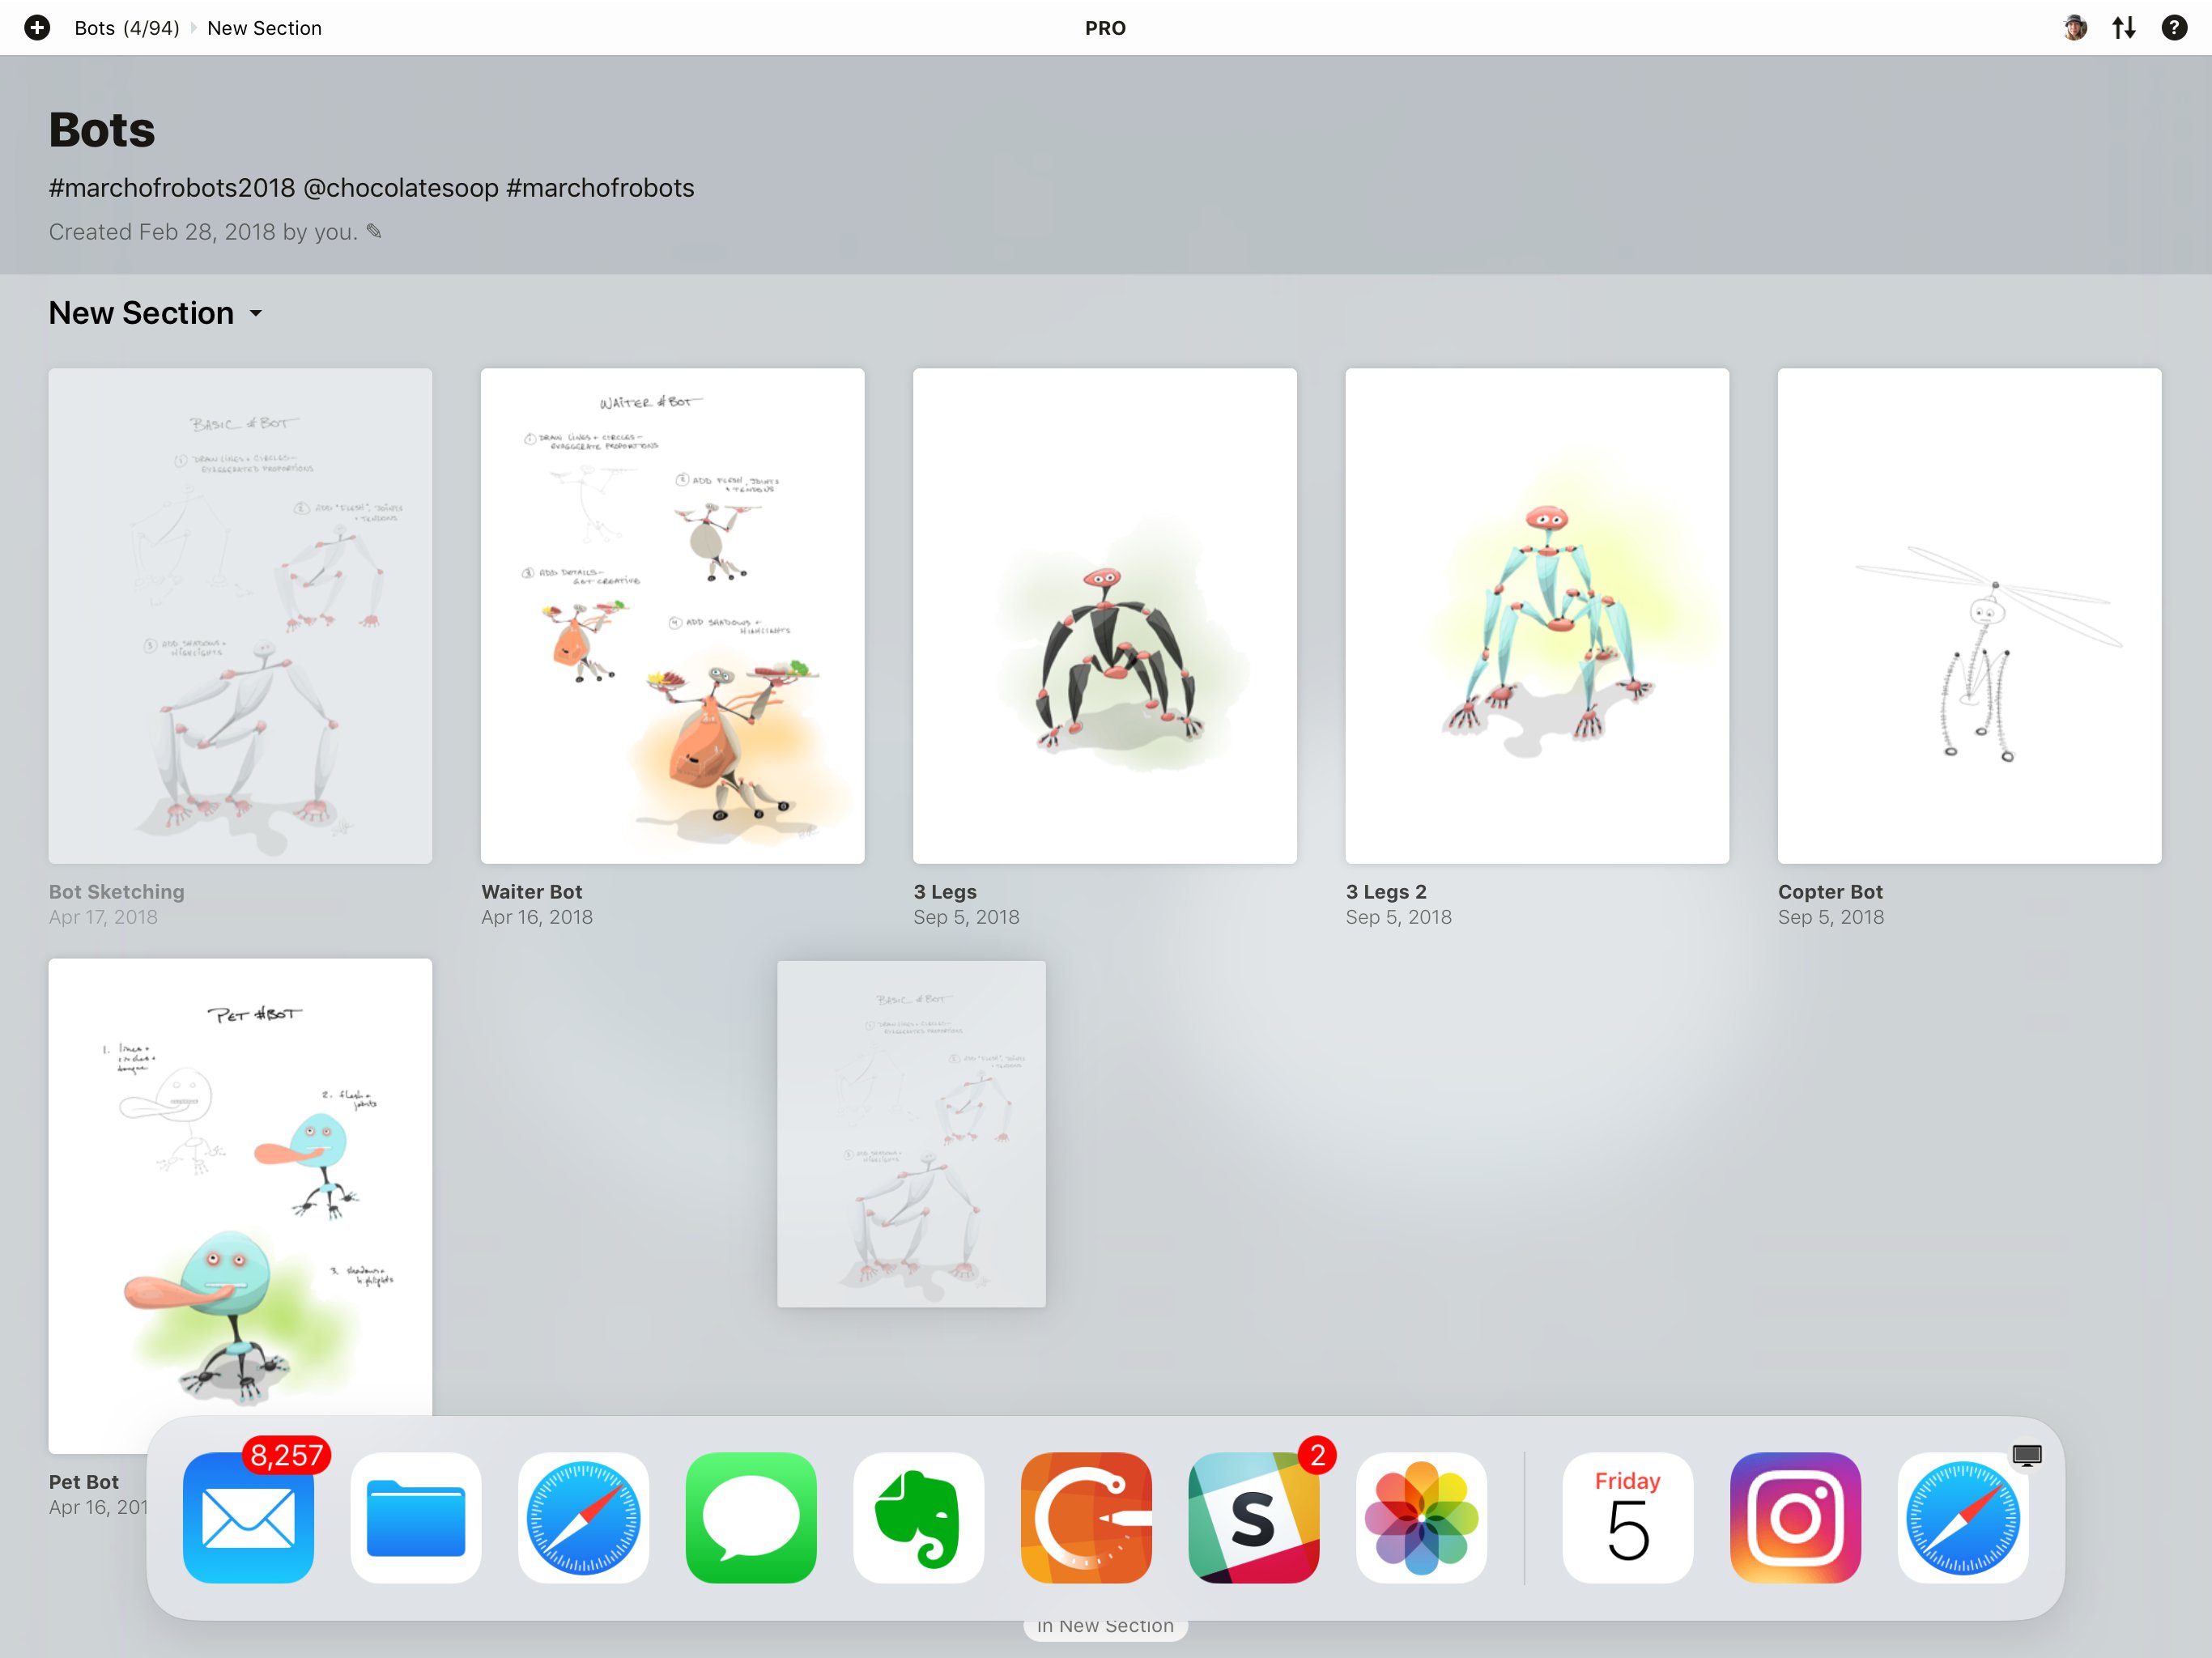
Drag & drop via command bar.
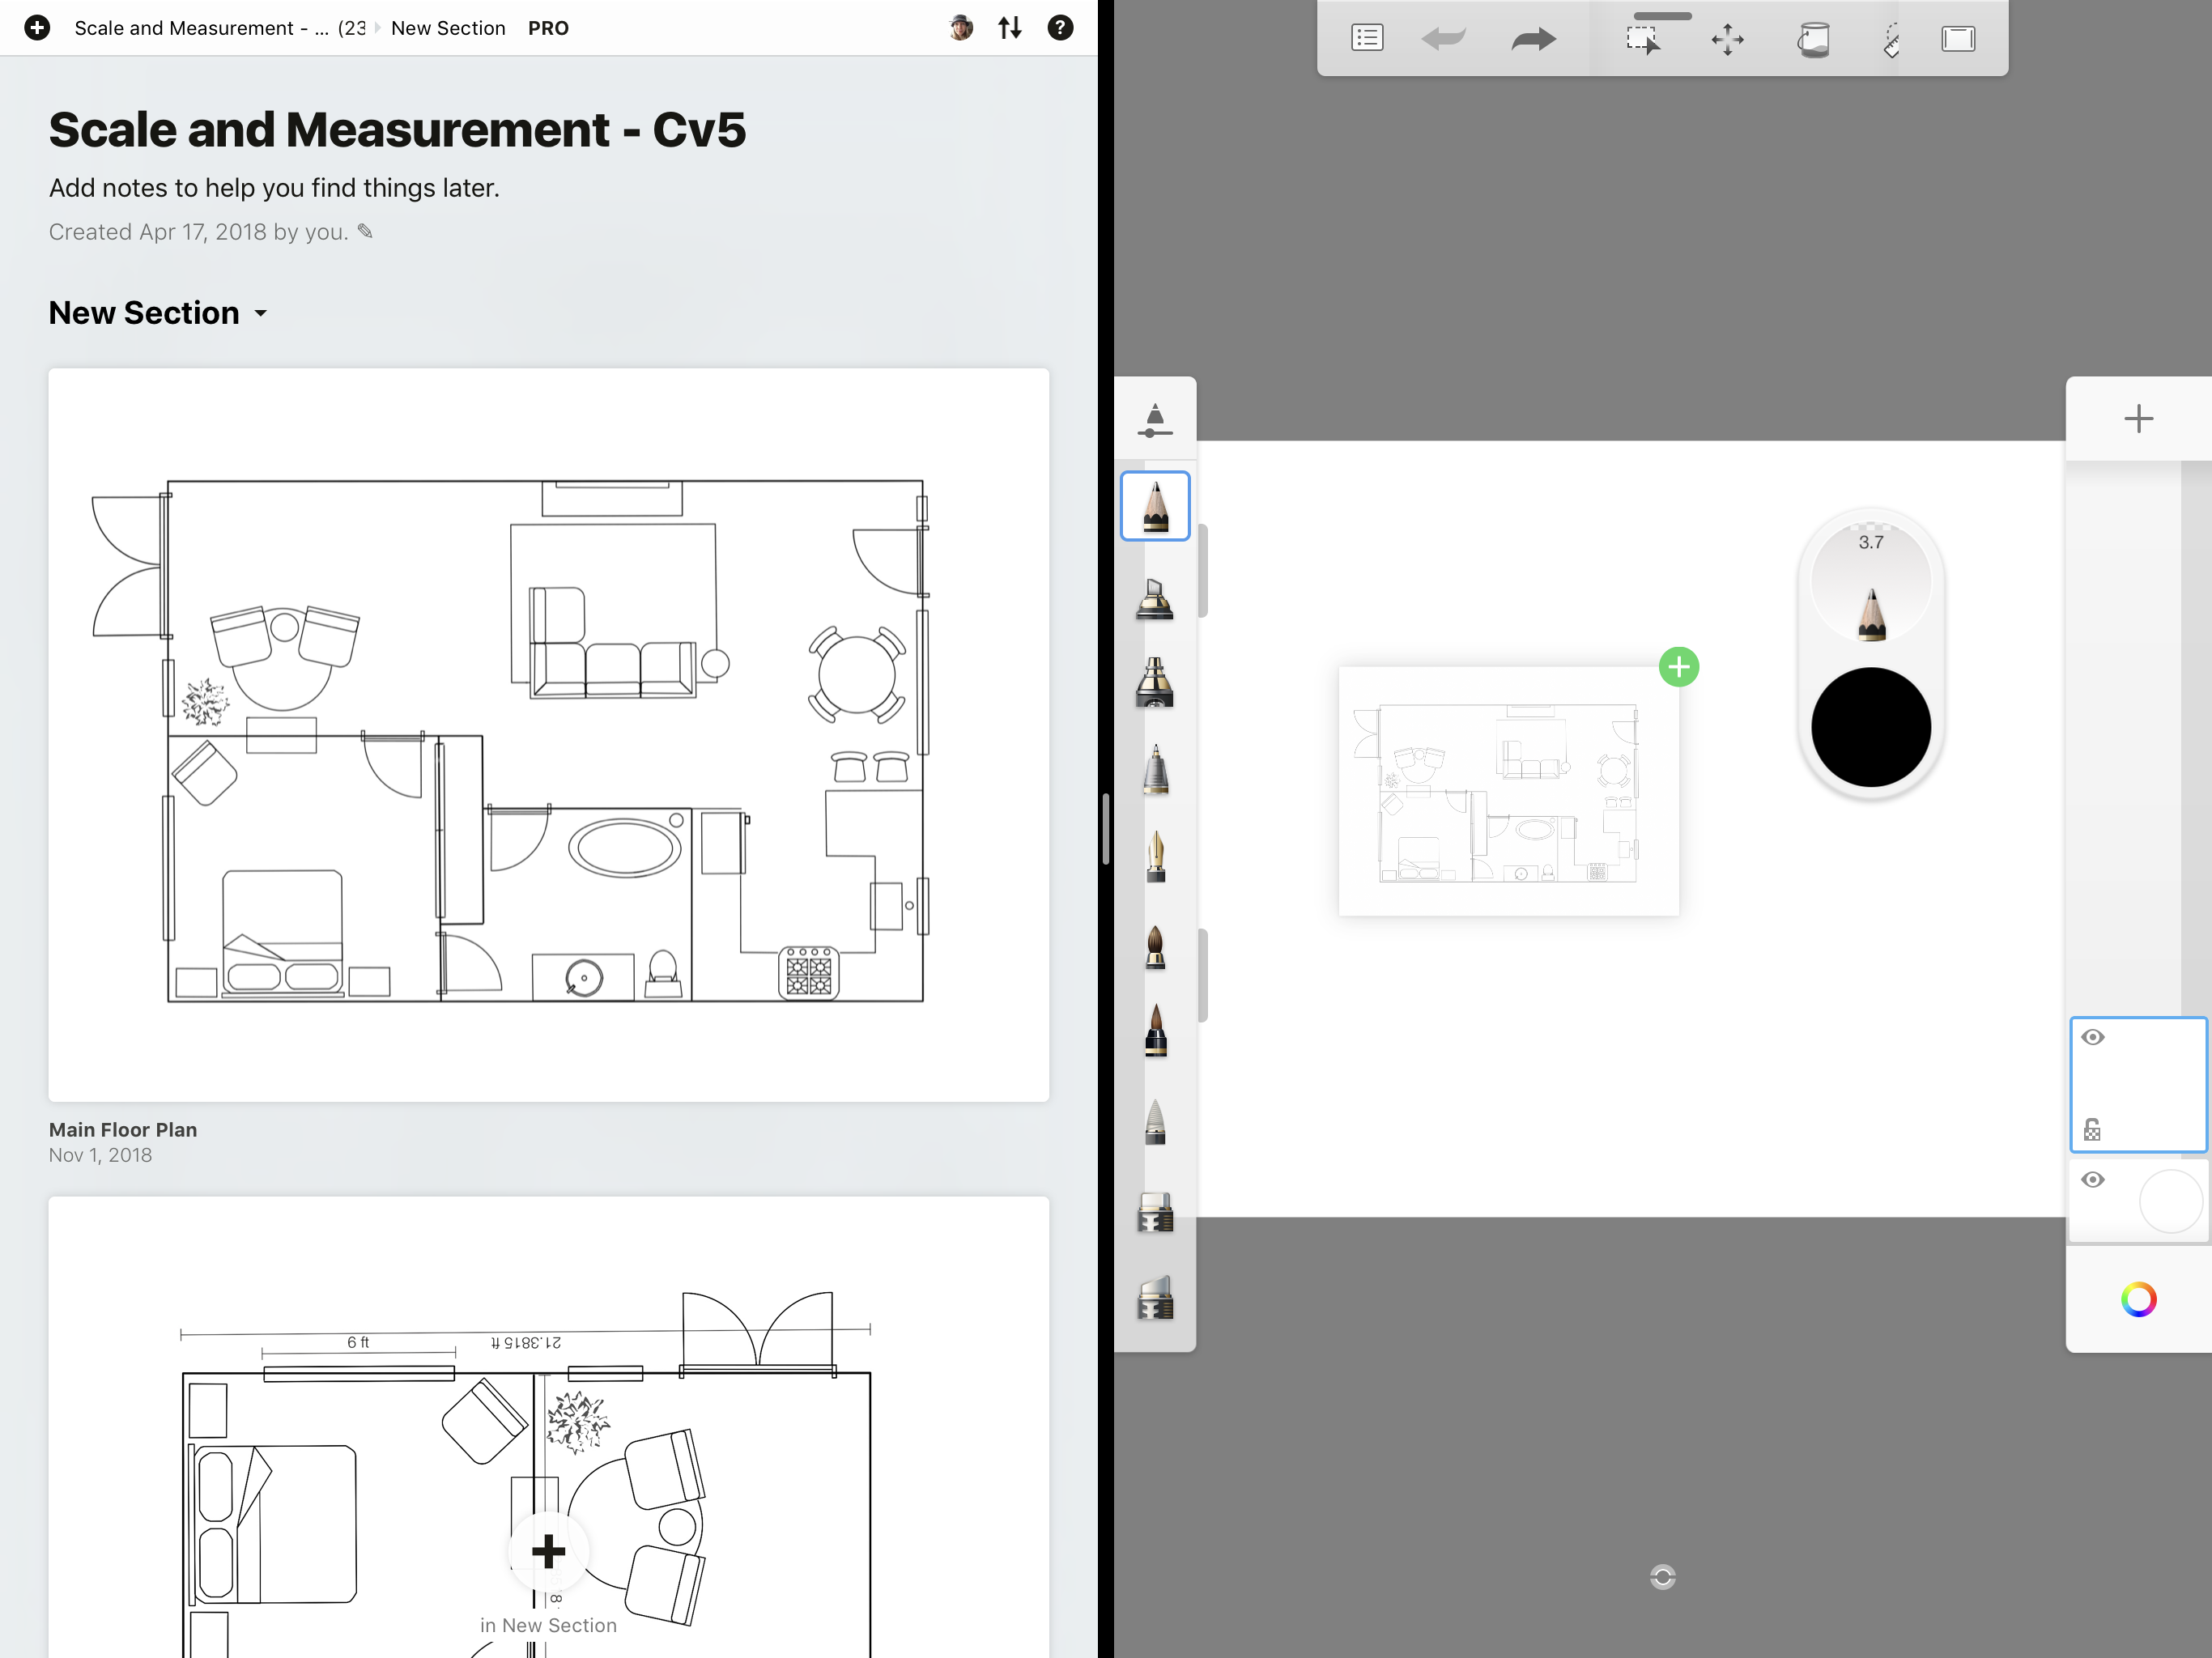
Drag & drop via split screen.
Exporting Multiple Drawings
You can export multiple drawings at once, picked selectively from within a project or between projects.
To export several drawings, tap+hold one of your drawings and begin to drag it. The image will turn into a small thumbnail. Tap other drawings to add them to the stack. You can swipe sideways between projects and add more drawings or use the project menu to navigate between projects, then continue adding to the stack.
Swipe up from the bottom edge of the screen to reveal the command bar, or pull slowly upwards from the same edge to reveal your open apps, and tap the app you wish to drop the files into.

To email multiple drawings at once, make sure they all have unique names before drag & dropping them into the email. iOS seems to have a bug where dropping multiple files of the same name (for example, “Untitled”) results in files being overwritten with the initial file’s data (the first “Untitled” drawing). Alternatively, you can drag & drop into iPhotos or Files first, which assign unique names to each file, then email from there.
Exporting a Project
At the very top of the screen, on the left side of the status bar, you’ll see the project’s breadcrumbs aka the title of your working project (the tiny version of the title, not the big title on the project). Tap these breadcrumbs and a drop-down menu of your projects will appear.
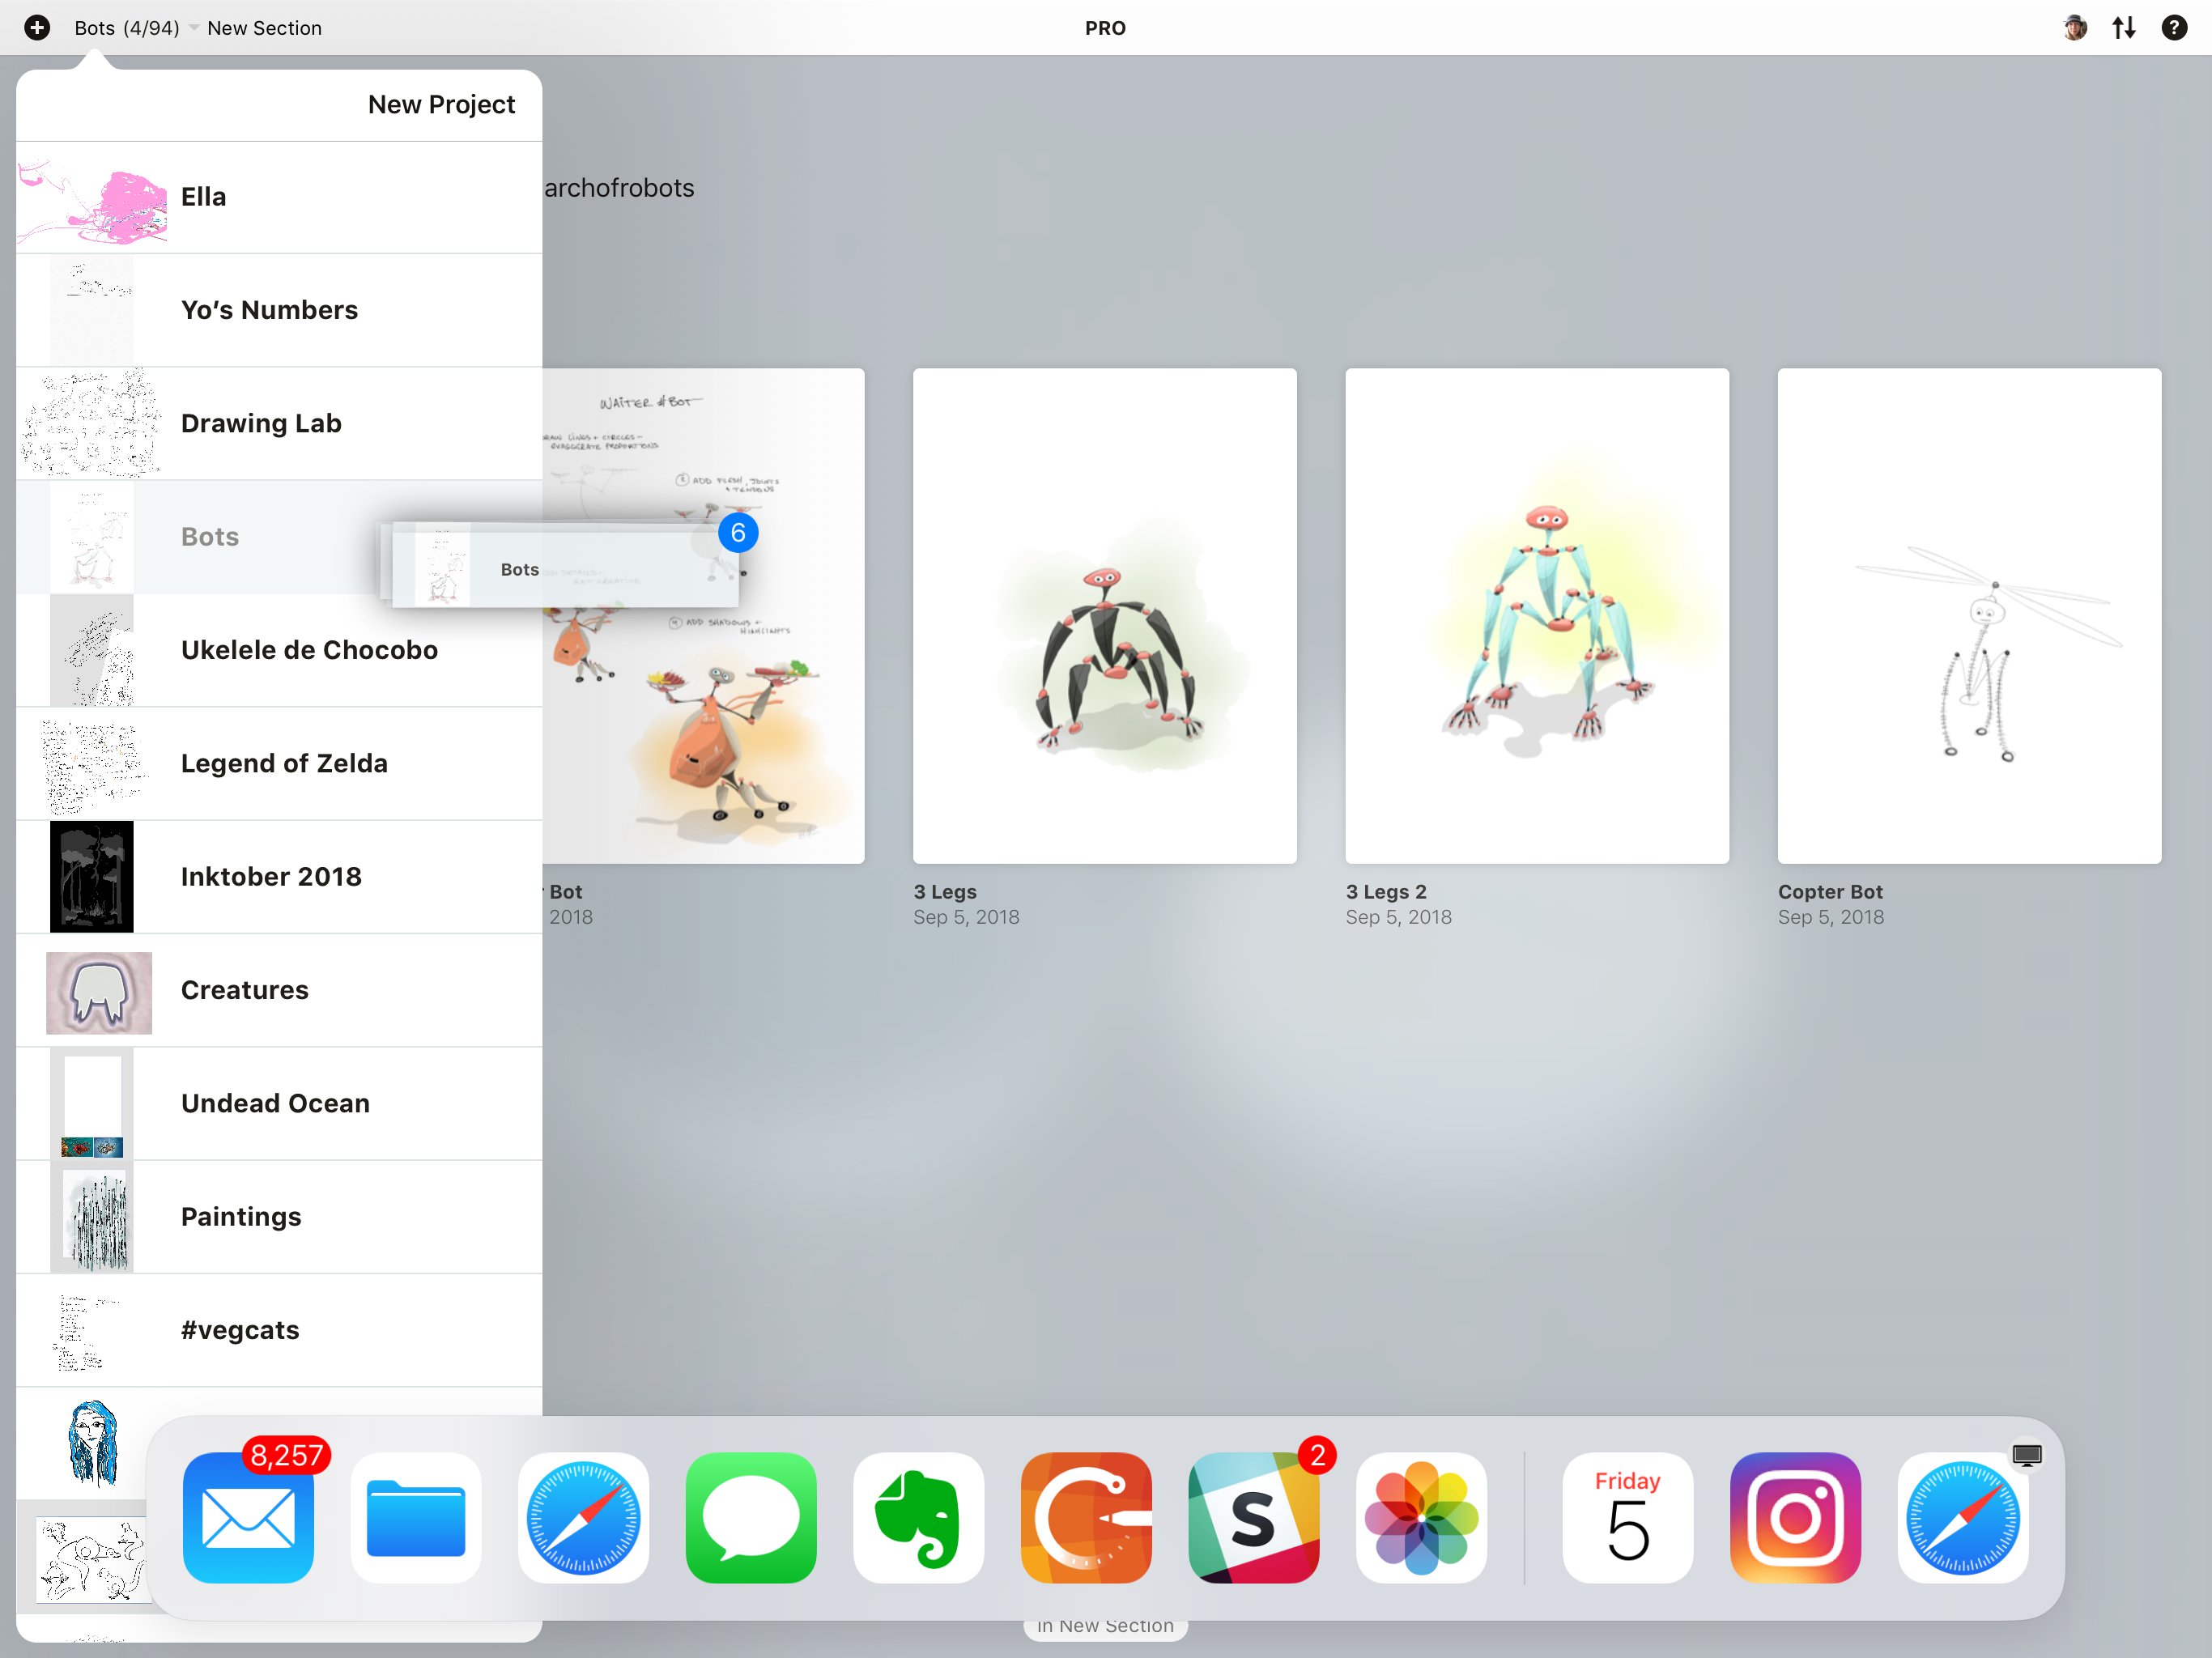
Tap+hold the project you want to export and begin to drag it. Swipe upward from the bottom of the screen to show the command bar or open apps, and drag the drawing into your app of choice. Every drawing in the project will copy over to the app. This is a great way to back up your project.
Helpful Export Tips
Social Sharing
Share your work straight from Concepts to any social app installed on your device, including Twitter, Facebook, Instagram, SnapChat, Pinterest, LinkedIn etc.
After choosing your export options, hit Export and iOS’s file sharing menu will appear. Choose your destination. If you don’t see the app you want on the list, enable it by touching More and turning it on.
Cropping Images to a Specific Size
If you need to export only sections of your work, or if you’ve imported a drawing and need to crop or resize it to a specific size:
• Go to the Settings menu and select your preferred image size under Artboard.
• The artboard boundary will appear on your canvas. Resize your image or drawing to fit, as discussed above in Artboards.
• Export to Custom Size.
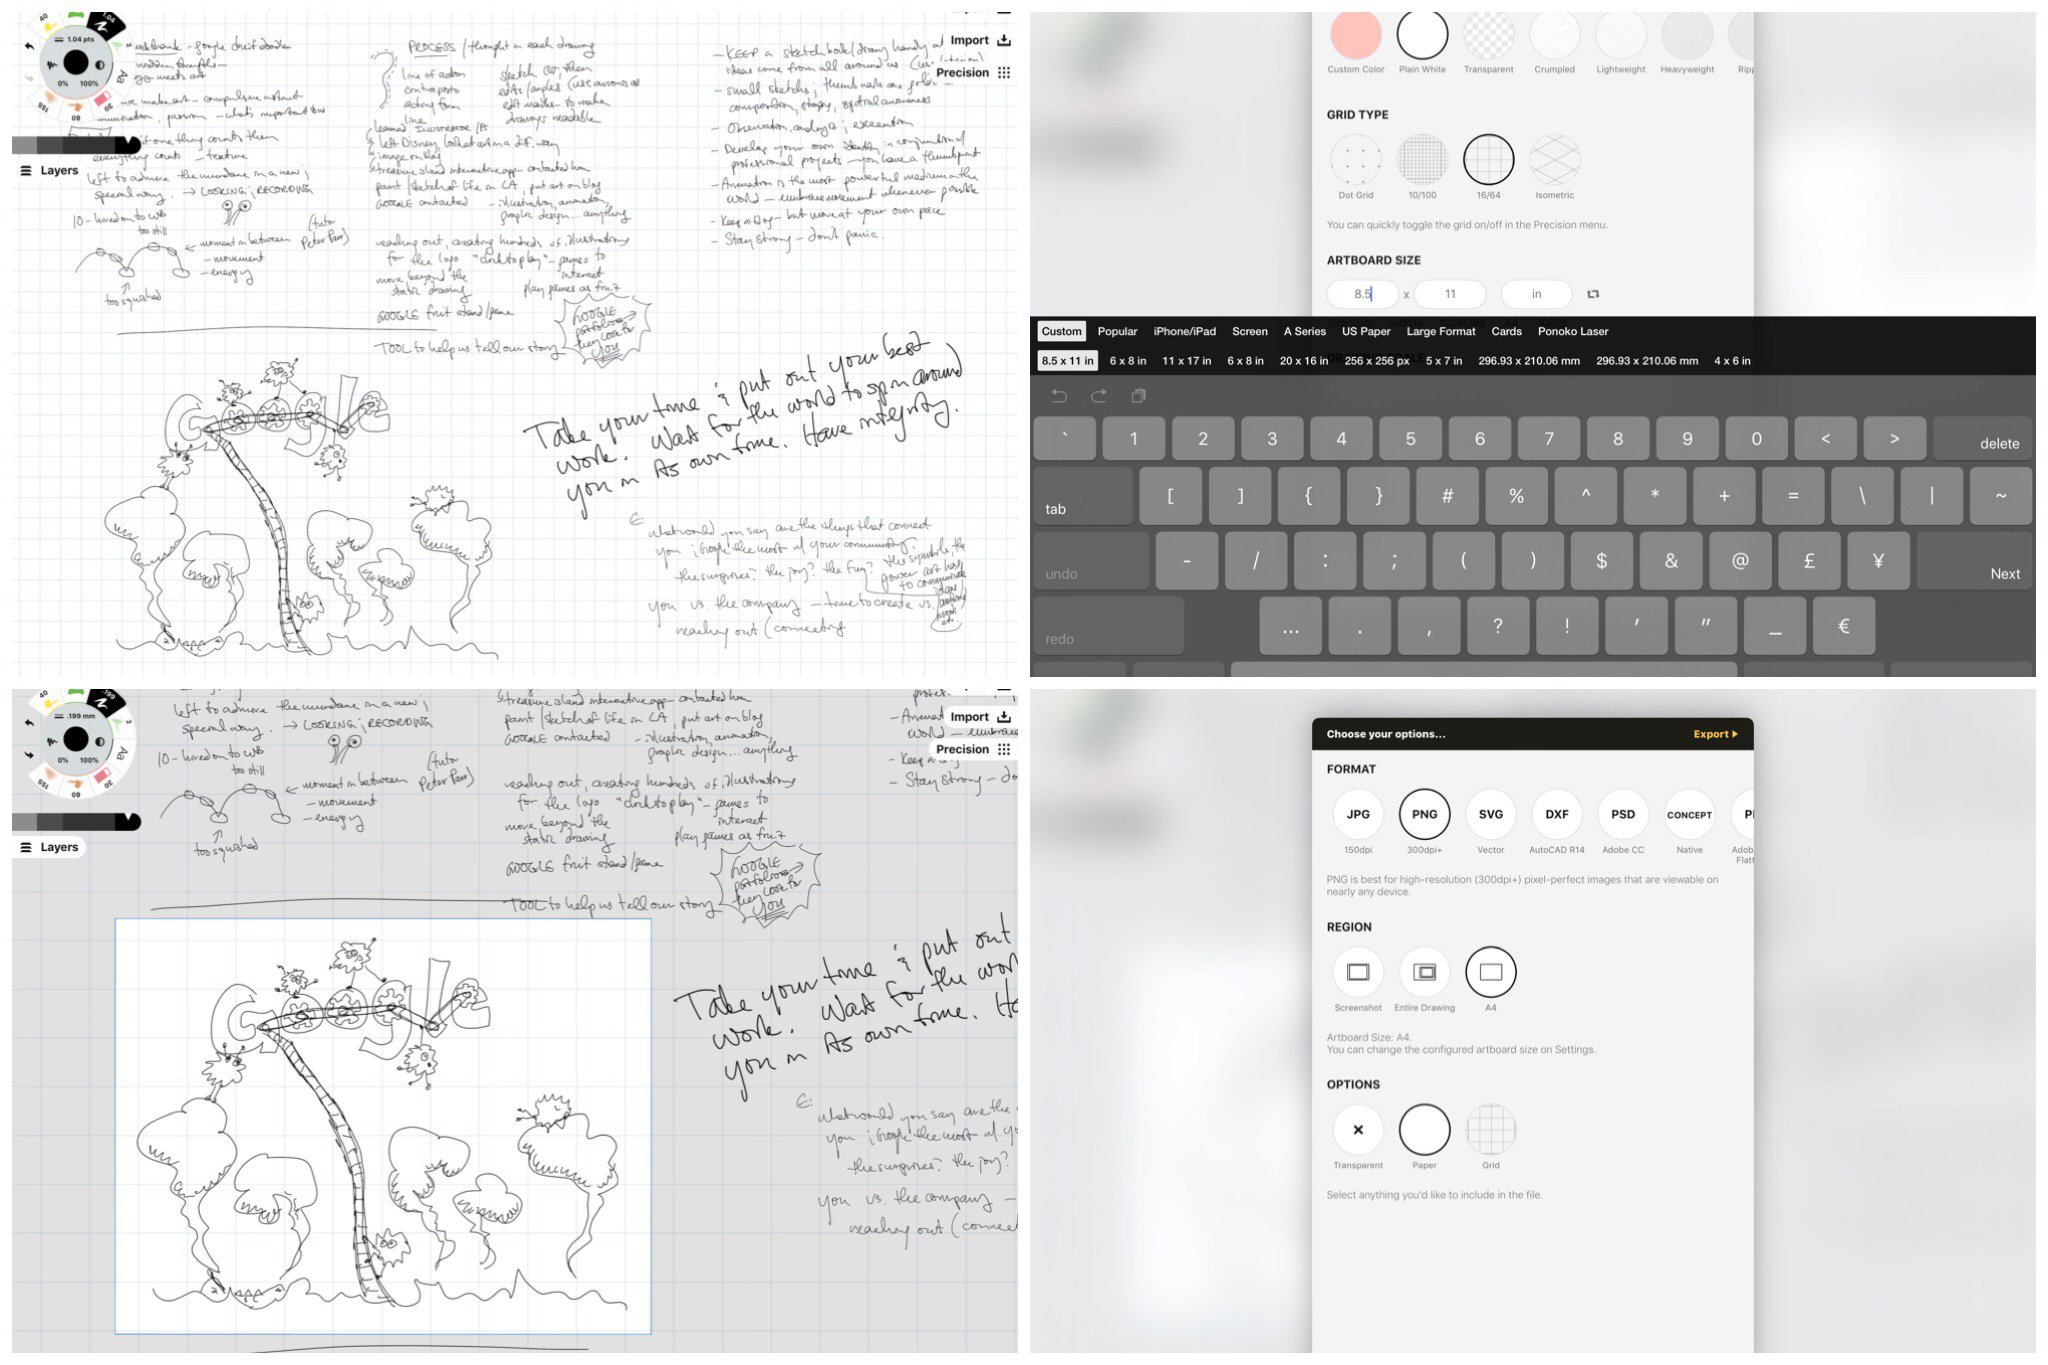
Isolating a section of notes for export with an artboard.
Exporting with Measurements
If you’ve drawn a plan and want to display any measurements you’ve added, make sure Measure is turned ON in the Precision menu. Export your design. A polished set of measurements will show up in your exported version.
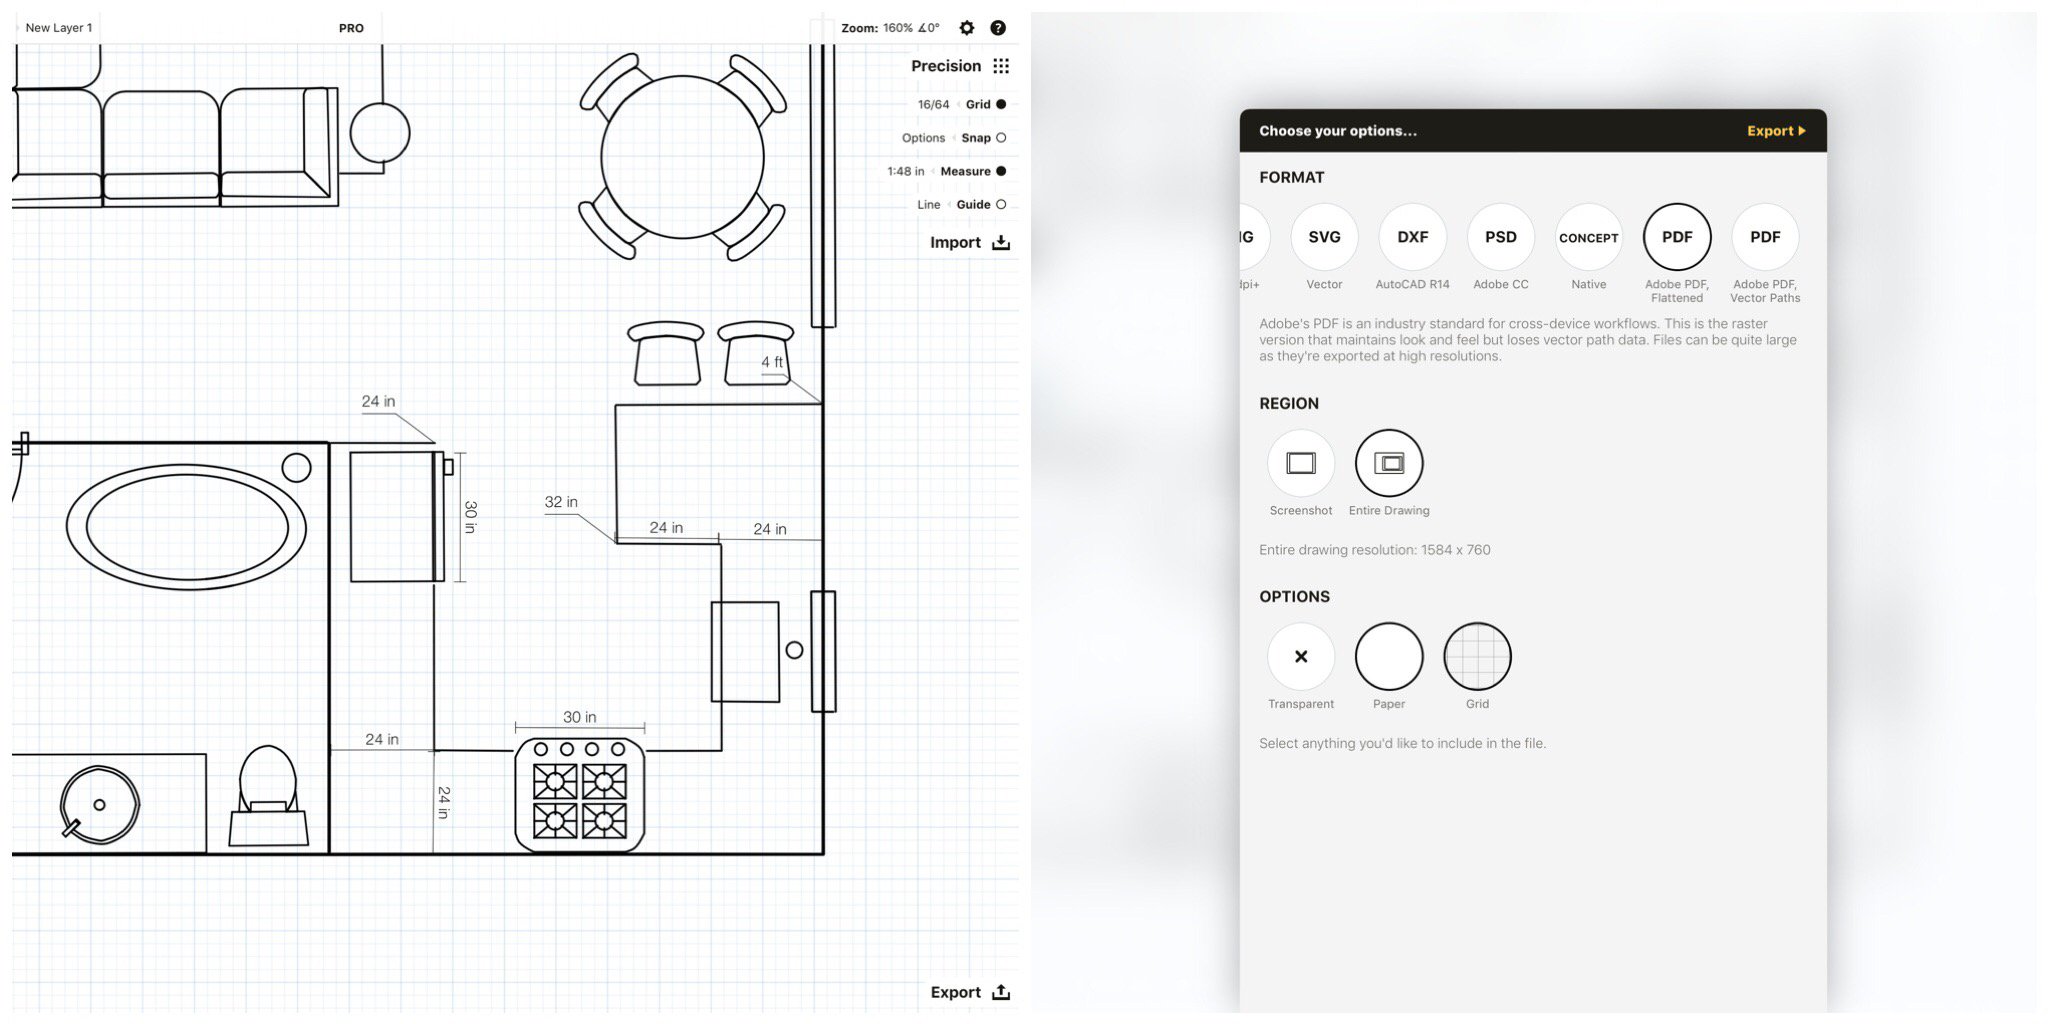
Creating a Single-paged PDF
When you’re ready to export your sketch, choose PDF (Adobe PDF, Flattened) in the Export menu. Save the PDF to Files, Cloud, or any destination enabled in your iOS file sharing menu. These PDF files are high-resolution and can be quite large in size.
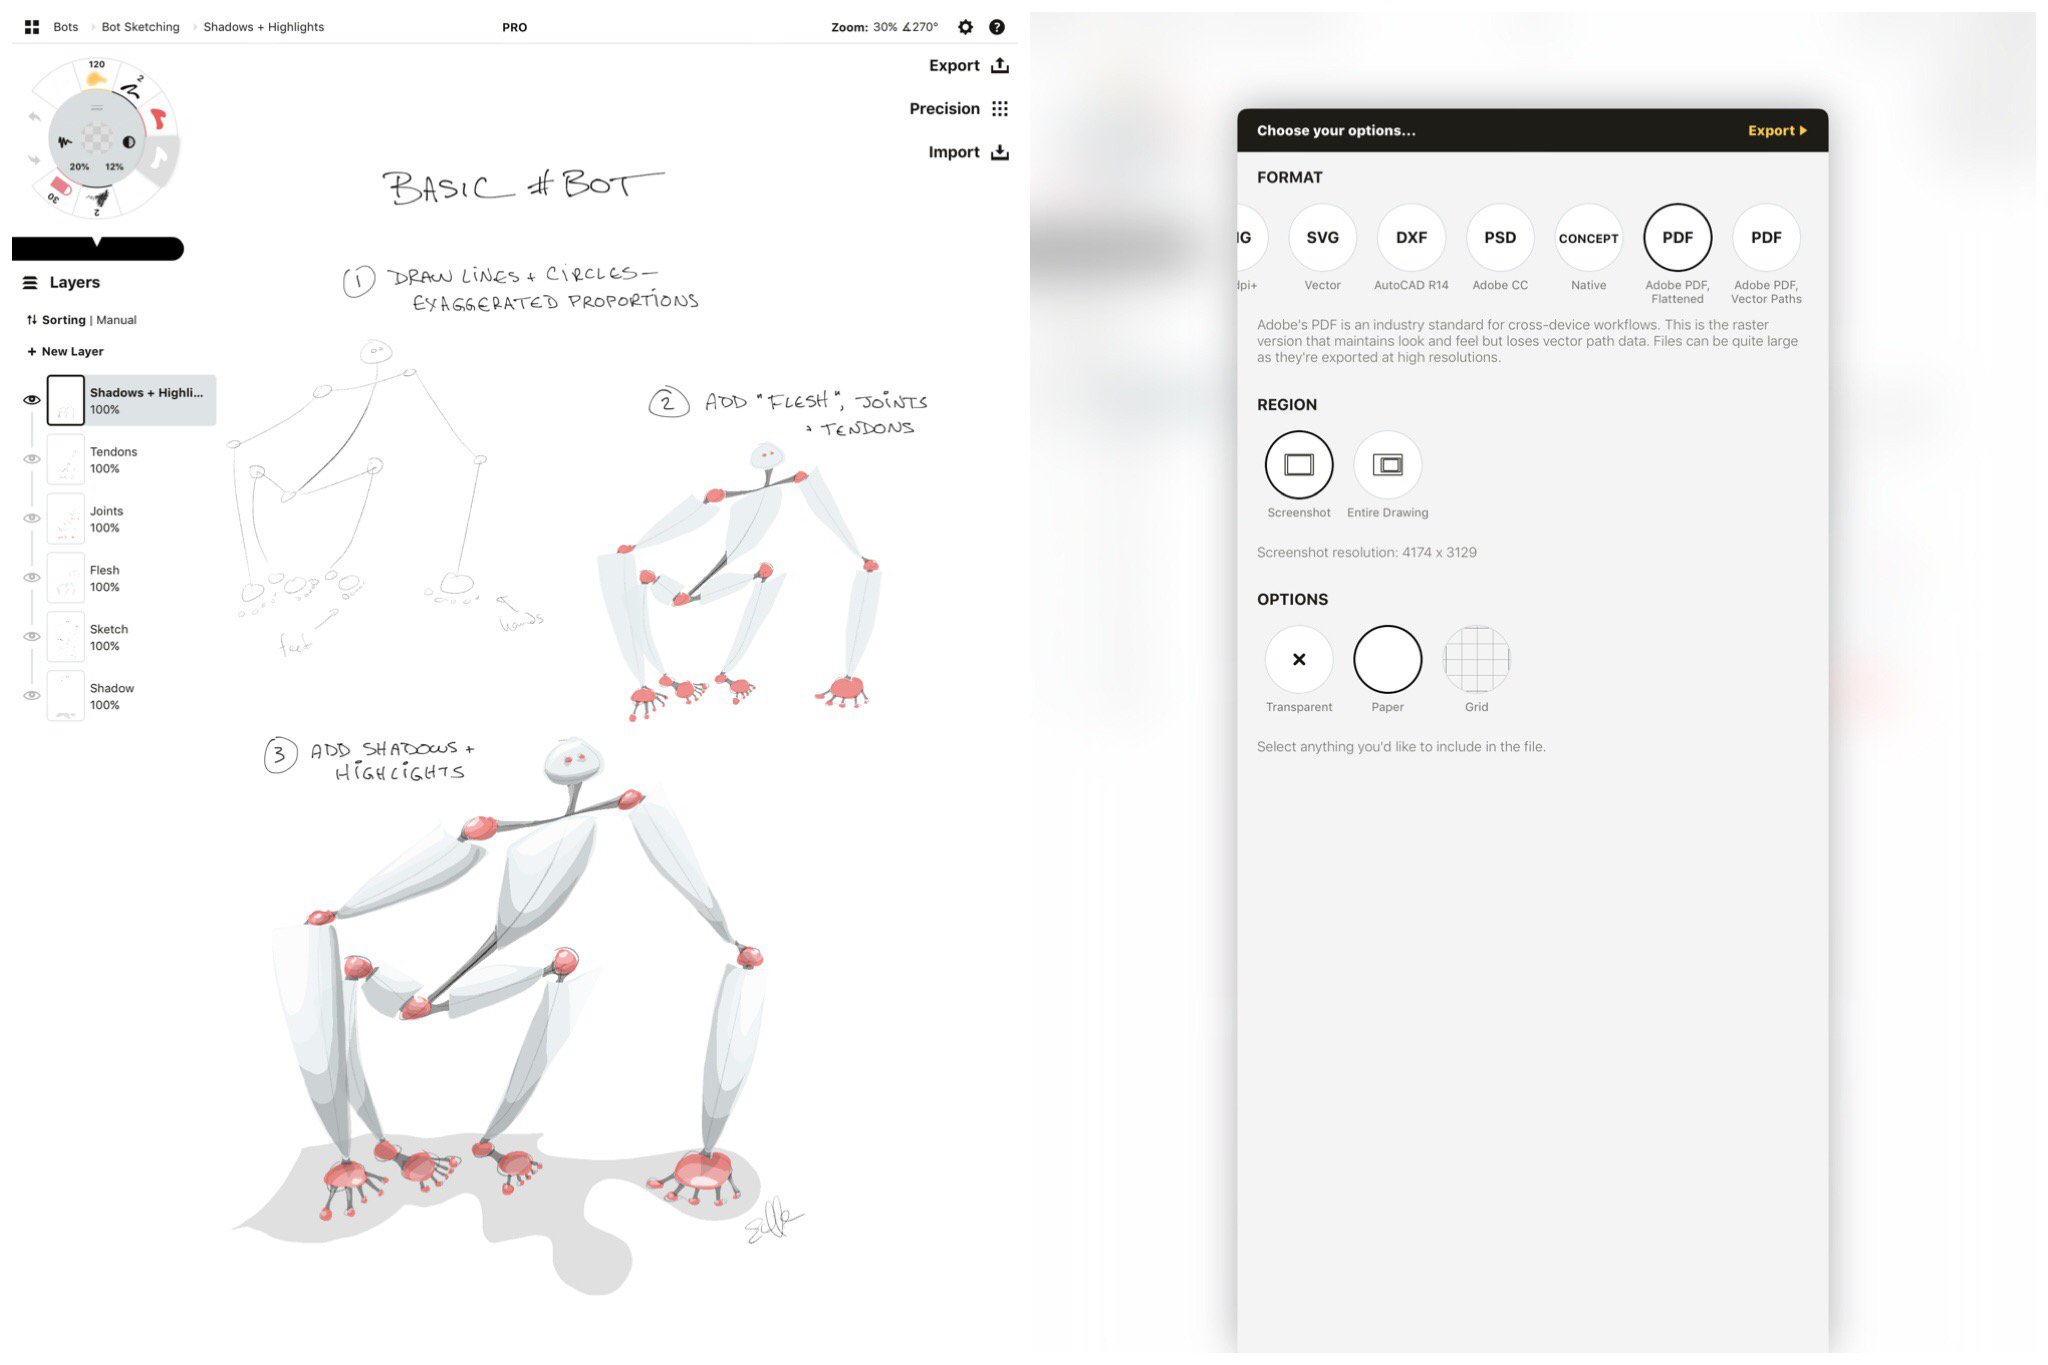
Try exporting a PDF with a transparent background for logos, fonts, collages and other work where high-resolution overlays matter.
If you haven’t purchased PDF Import / Export from Concepts’ Pro Shop, you can still export a single-page only PDF via iOS’s file sharing menu. Choose JPG or PNG, your region and options, and tap Export.
At the bottom of iOS’s file sharing menu, scroll until you see “Create PDF”. Tap it and your drawing will open as a markable PDF. Tap the Share icon up top to save it to your device or Cloud.
Document Signatures and Substituting Pages into a Multi-paged PDF
If you’re signing a document or marking up a pre-existing PDF, and want to include only the edited pages back into the original PDF:
• Import the PDF from Files or Cloud.
• Drag just the pages you need to edit onto the canvas, right to left, top to bottom order.
• Make your marks, sign your signatures etc.
• In the Export menu, select PDF (Adobe, flattened), PDF Bounds, and Original Pages. Email your document directly back to your colleagues or save to Files / Cloud directly from the app.

At this time, you can’t create new, multi-paged PDFs from within Concepts — it’s something we’re working on. You can import a blank multi-page PDF, however, add content, and send it back out as an updated PDF file.
Exporting a Vector-based File
If you prefer hand-sketching on your tablet to working on the desktop, draw your idea in Concepts first, then export your file as a set of simple vector paths you can edit in other vector applications such as Illustrator or AutoCAD. For the same look and feel across platforms, use our Wire tool, which displays the pure vector line no matter how far your zoom.
• Select your file type in the Export menu (SVG, DXF or PDF (Vector Paths)).
• Export to Files or Cloud for desktop / web access, or Adobe’s Creative Cloud (requires an Adobe CC account).
• Open the file in your application and you’ll find simple, editable vector paths in basic colors.
• Remember not to use the eraser if you’re exporting vectors, other apps don’t like our masking strokes and they will display as white lines.
Printing Drawings from Concepts
To print a drawing, plan, or notes you’ve sketched in Concepts:
• Frame the drawing to your desired size with an artboard (as described above in Artboards).
• Select PNG, Custom Size, and tap Export. PNG works great for all high-resolution prints — you can print large-sized prints, posters, banners, blueprints, gift wrap etc.
• If you’re printing to a local AirPrint-enabled printer, choose AirPrint from among the iOS Sharing options and print directly from Concepts.
• For other printing needs, email yourself the file, save to Files or Cloud, or transfer to a USB stick, Micro-USB, card or other device. Take it to a local printer or upload the file to a printing site online. You can work with the printers directly to find paper-types, inks and mediums that work best for your project.
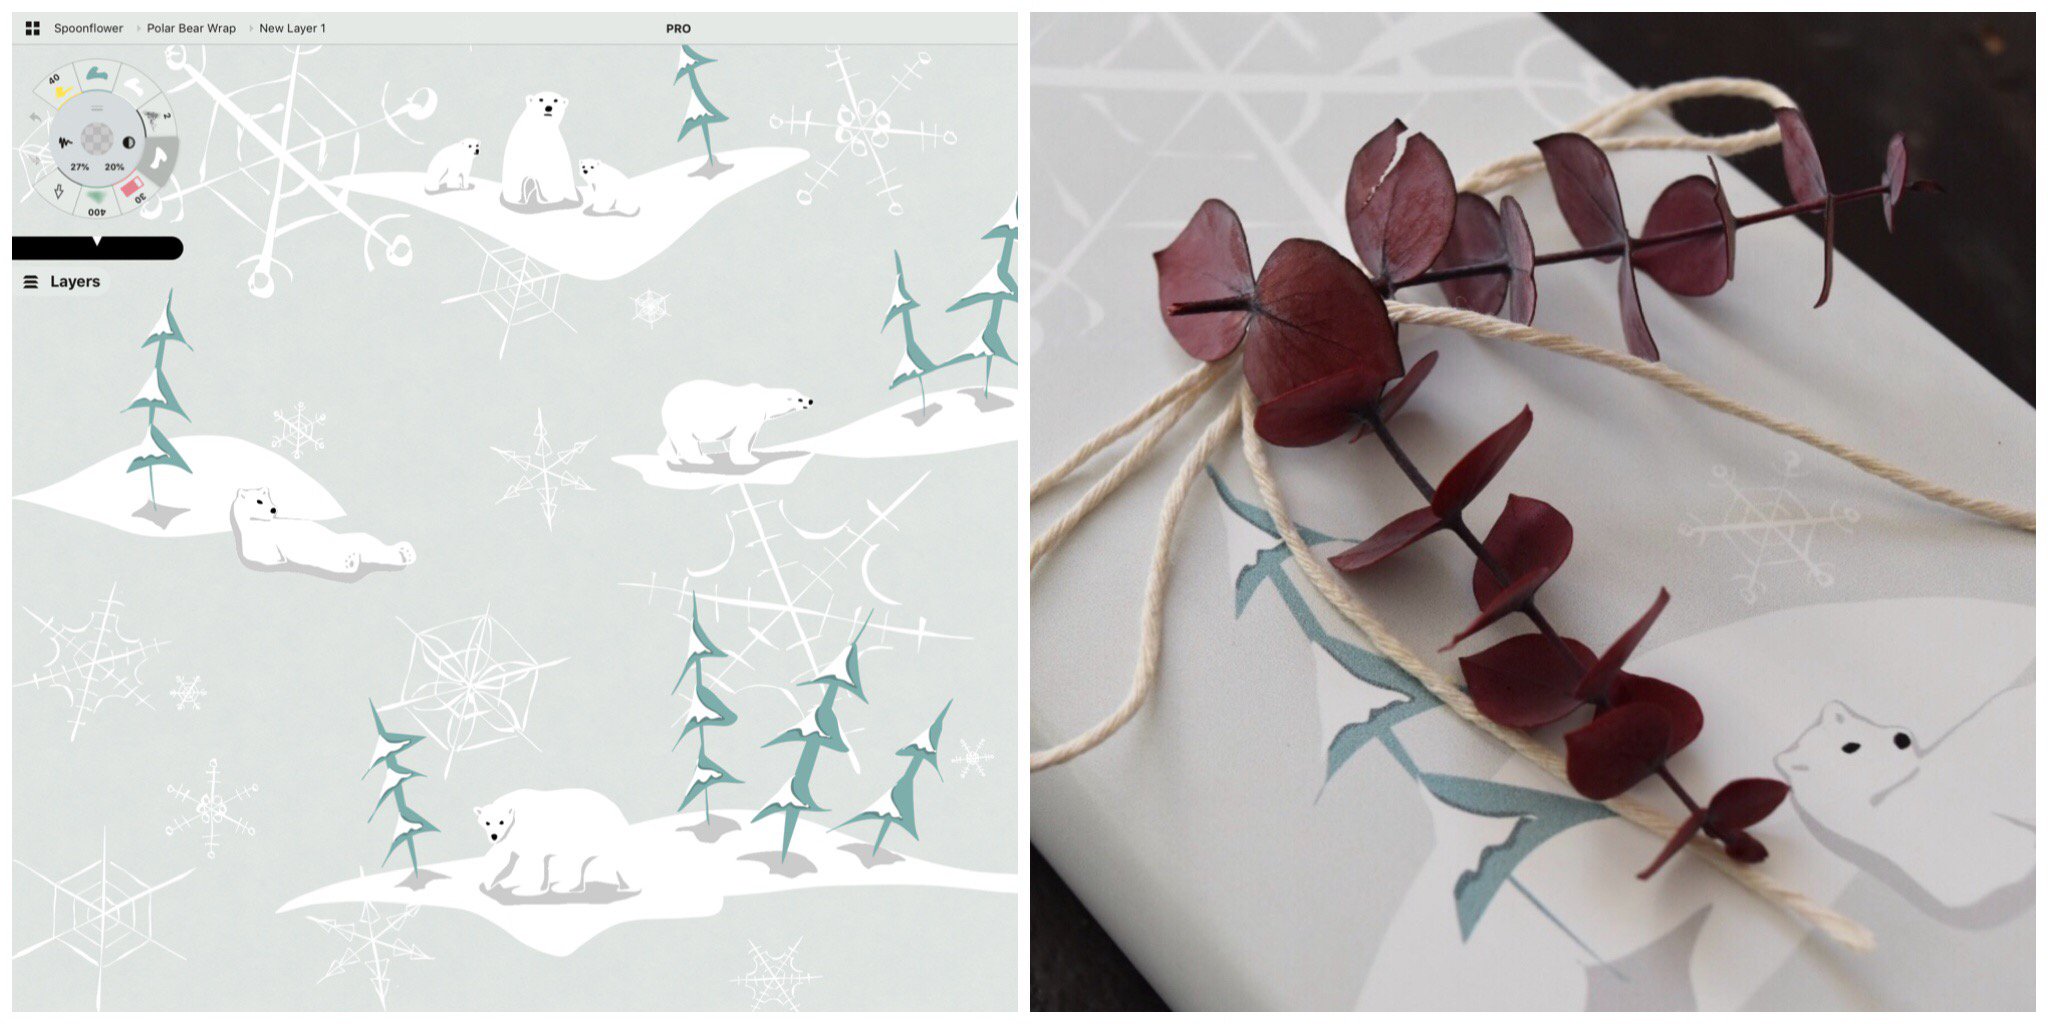
A Concepts design printed onto giftwrap via Spoonflower.
You can see the huge amount of flexibility Concepts gives you. With all of these export options in your hands, we hope you’ll find a solution for every project. If you need help or don’t see the export type you’re looking for, please email us at support@concepts.app. Thanks!
By Erica Christensen
Recommended
Select and Edit Your Notes, Drawings and Designs - Learn how to select and edit anything you draw in Concepts.
How to Clean Up a PDF or Image on Your iPad - 5 tricks to help you clean up your PDF or image on your iPad.
Working with Your Infinite Canvas - Explore your ideas, sketch everywhere, and export just what you need on Concepts' infinite canvas.