Concepts is an infinite, flexible creative tool for all your good ideas. Available on iOS, Windows and Android.
Scale and Measurement in Concepts
Learn how to apply accurate scale and measurements to your plans and drawings.
The first steps in drawing a design plan are 1) setting your project’s scale and 2) applying accurate measurements. A successful plan needs to communicate both your overall vision and how its pieces fit together accurately, so that when it comes time to estimate costs, purchase materials and build your final design, you can do it with confidence.
Concepts makes it simple to set your drawing scale for a project, align a plan with the app for accurate measurements, and apply a known scale to an imported plan or image. You can also draw and trace lines to exact dimensions, discover area calculations, and apply measurement labels to your designs.
This tutorial outlines the following workflows:
Scale
- Applying Scale to a New Drawing
- Applying Scale to an Imported Drawing with Unknown Scale
- Aligning an Imported Drawing to a Known Scale
Measurement
- Types of Measurement Labels
- Working with Measurement Labels
- Area Measurement Labels
- Exporting with Measurements
Scale
Scale is a multiplier that defines how big an object is in real life compared to its size on paper or screen. Standard scales for house plans, for example, are 1/8 in or 1/4in:1ft imperial (in the US), or 1:100 metric (everywhere else). This indicates that 1/8 in or 1/4 in on the plan equates to 1 ft in reality. Component drawings might be 1:20 or 1:5; gaming models are popularly 1:72. For smaller objects where details matter, a scale of 1/2:1 allows you to see the design at twice the size.
Applying Scale to a New Drawing
If you’re creating a new design from scratch and know the scale you’d like to use for your design, make a new drawing and open the Settings menu (the gear icon in the status bar). In the Workspace tab, find Drawing Scale.
Here, you can easily select one of the standard ratios or enter your own scale. Tap an entry field to bring up a full list of options or type in your units with the keyboard. Tap the corresponding unit field beside the numbers to enter your unit type.
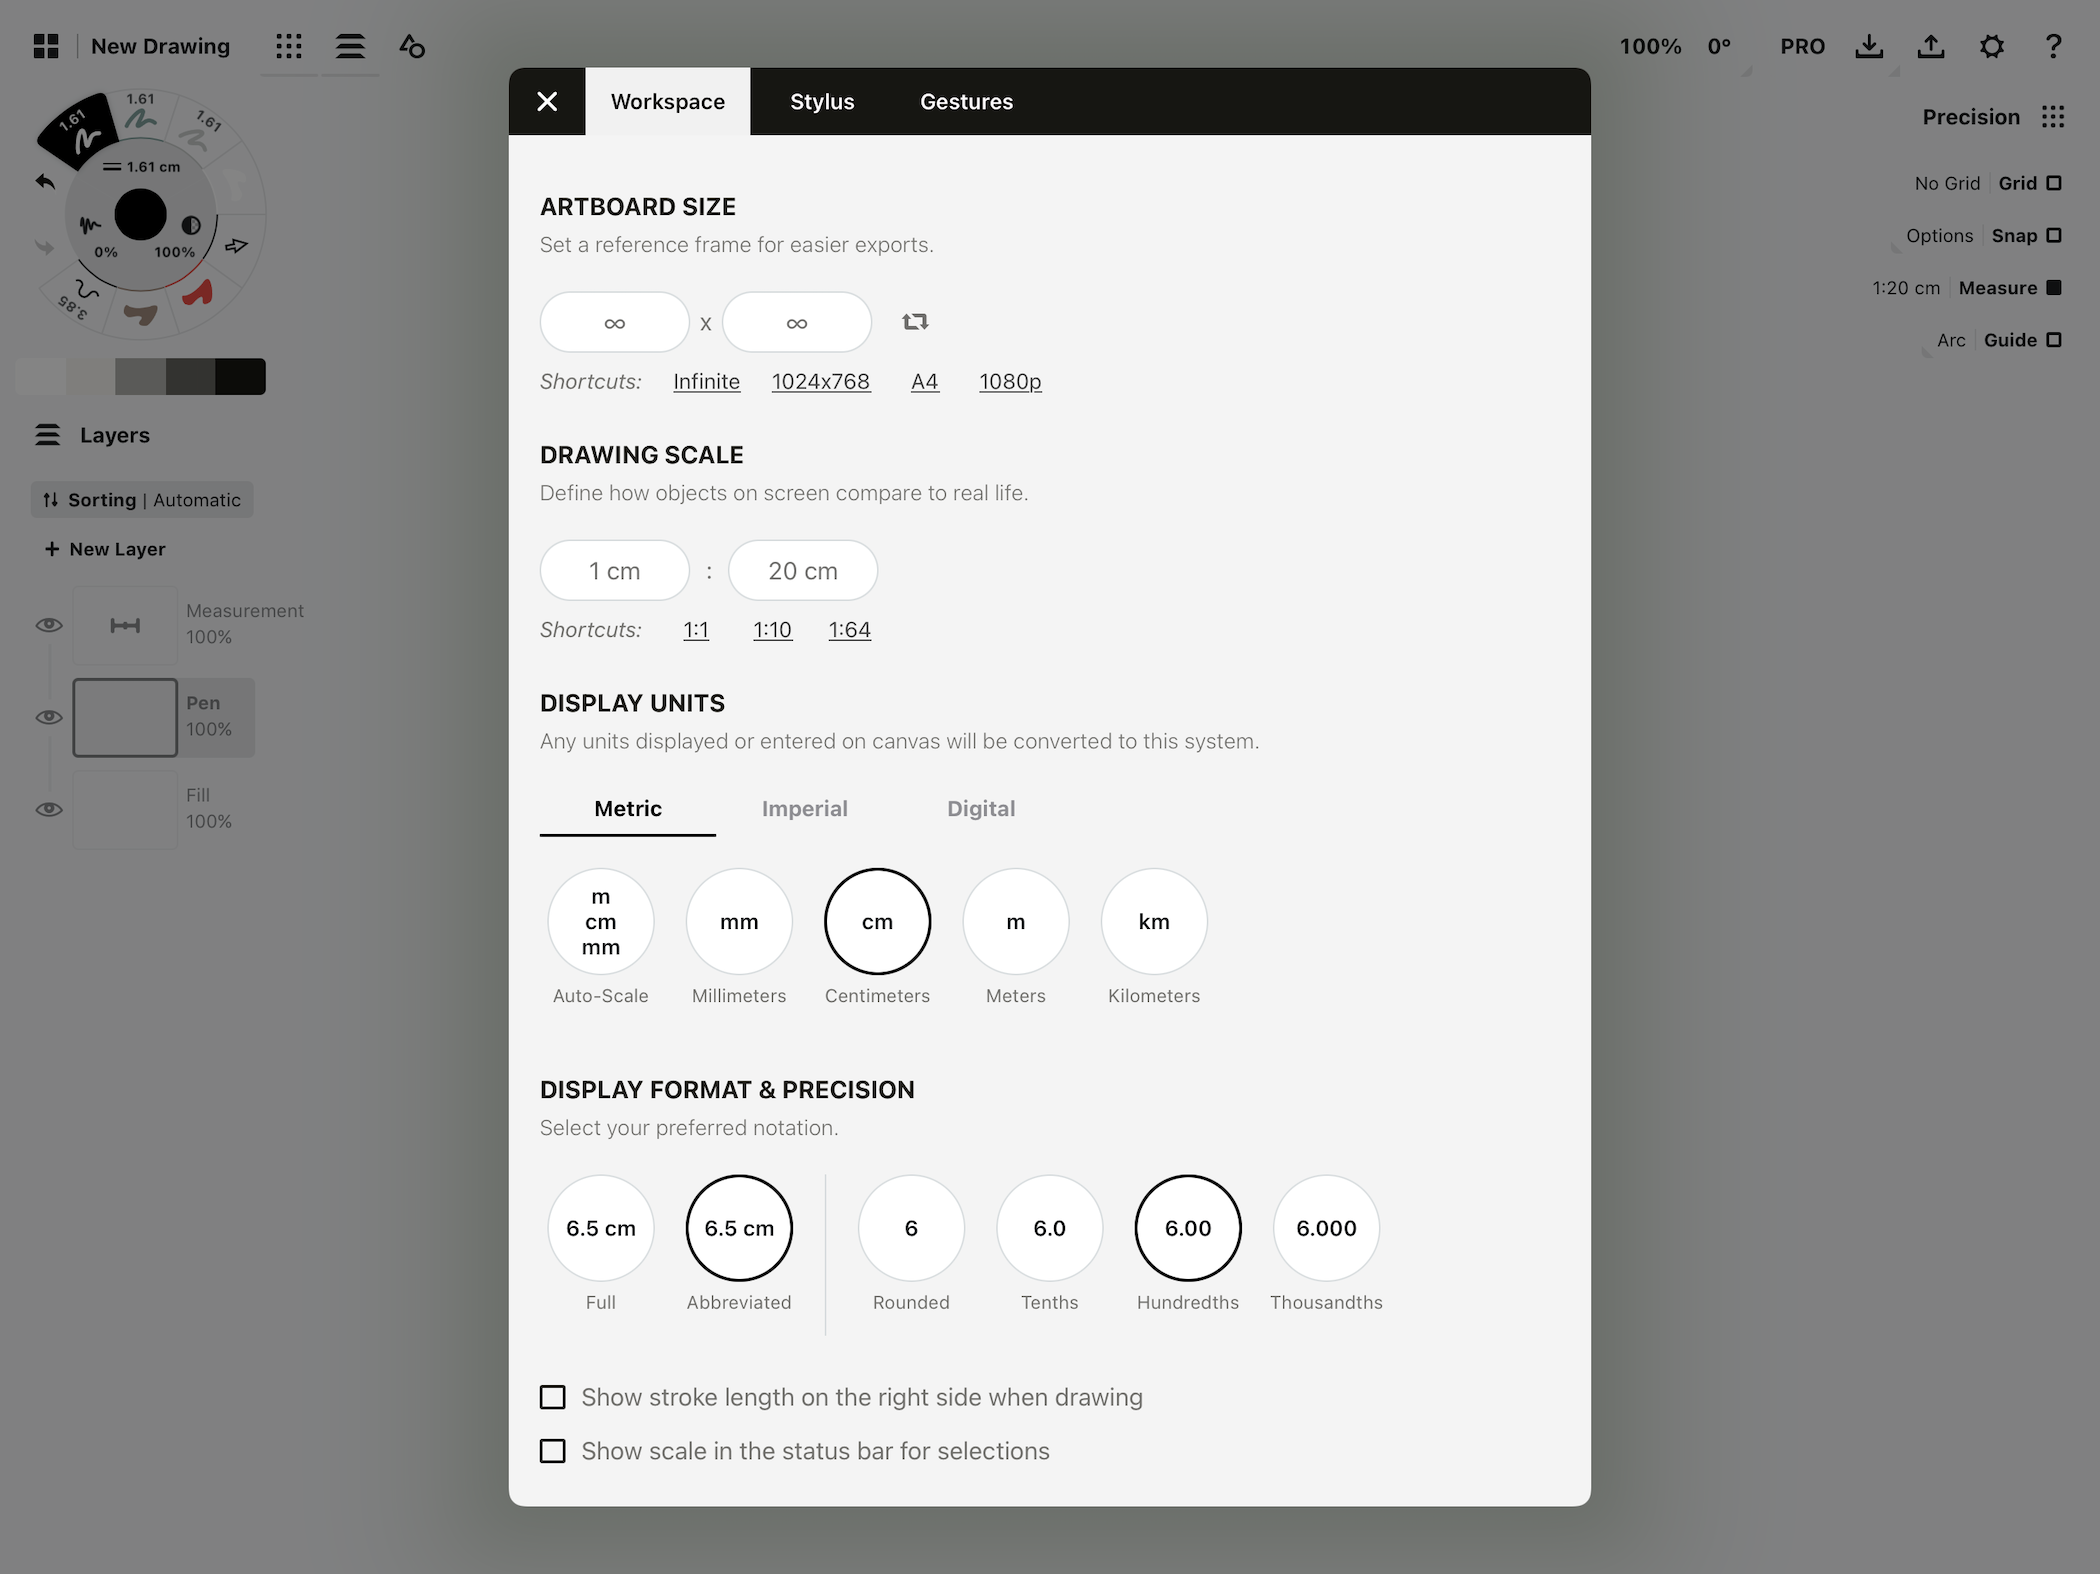
Drawing Scale, Display Units and Display Format options in the Settings menu.
Next head down to Display Units (immediately below Drawing Scale) to match your drawing’s unit setting to the scale you've applied. This updates your measurement labels to reflect your scale and metrics.
You can also decide how to customize your metrics in the Display Format & Precision section.
Since these settings are drawing-wide, note that every tool and guide in your drawing will reflect these metrics. It doesn’t mean your tool presets have changed, they’ll just be displayed with the new units.
From here on, everything you draw will reflect the scale you’ve set regardless of zoom levels. When you open the Precision menu on canvas, you’ll see this scale ratio displayed beside the Measure option. Tap the ratio or head back to Settings (same screen) to adjust it at any time.
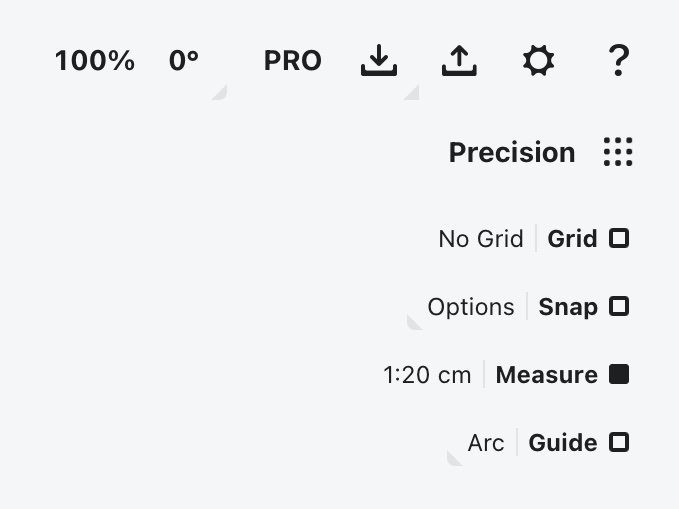
The ratio beside Measure shows your drawing scale.
Read about applying measurements that reflect this scale with Concepts’ rulers below in the Measurements section.
Applying Scale to an Imported Drawing with Unknown Scale
If don’t know a scale but want to accurately reflect your plan’s real-world dimensions on screen, you can line up a known real-world measurement on your plan with a measurement on canvas, and the app will calculate the scale for you.
The Short Version
1. Know one real-world measurement for your project.
2. Import your plan.
3. Tap the Precision menu and activate Measure.
4. Activate the Line guide. Double-tap the crosshairs, and align the handles to the segment on your plan that corresponds with your real-world measurement.
5. Tap the scale ratio beside Measure in the Precision menu, and enter your real-world measurement into the second field. When you exit the overlay, you’ll see the new scale ratio, 1:your-new-calculated-value.
The Illustrated Version
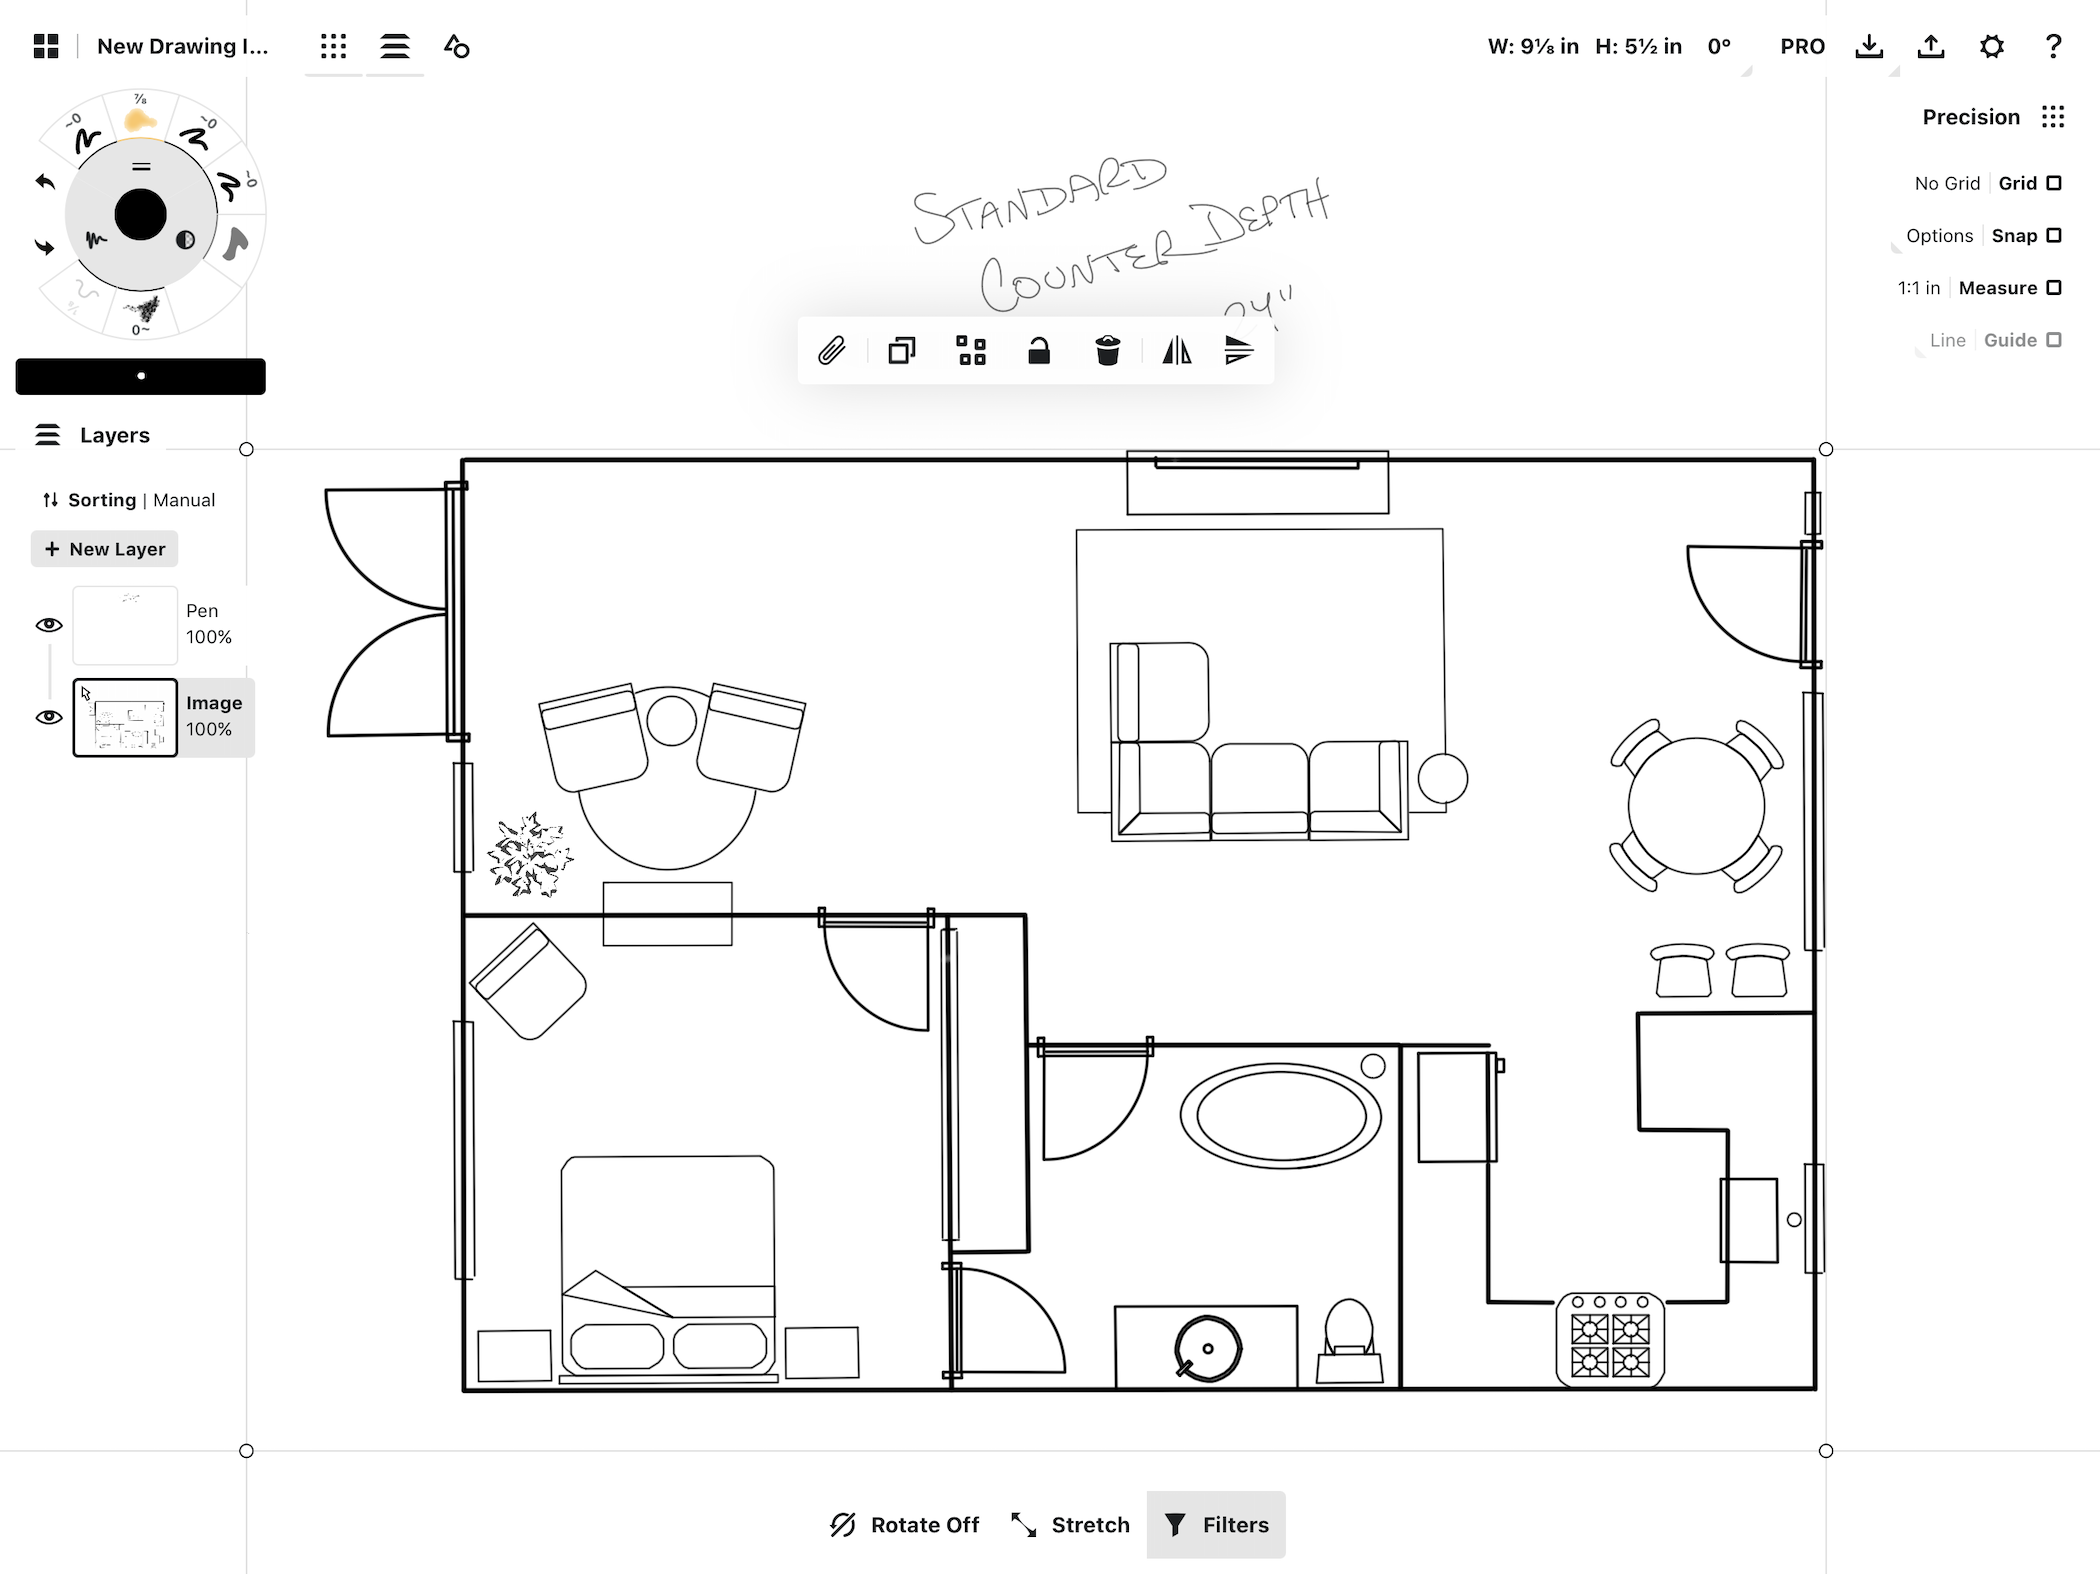
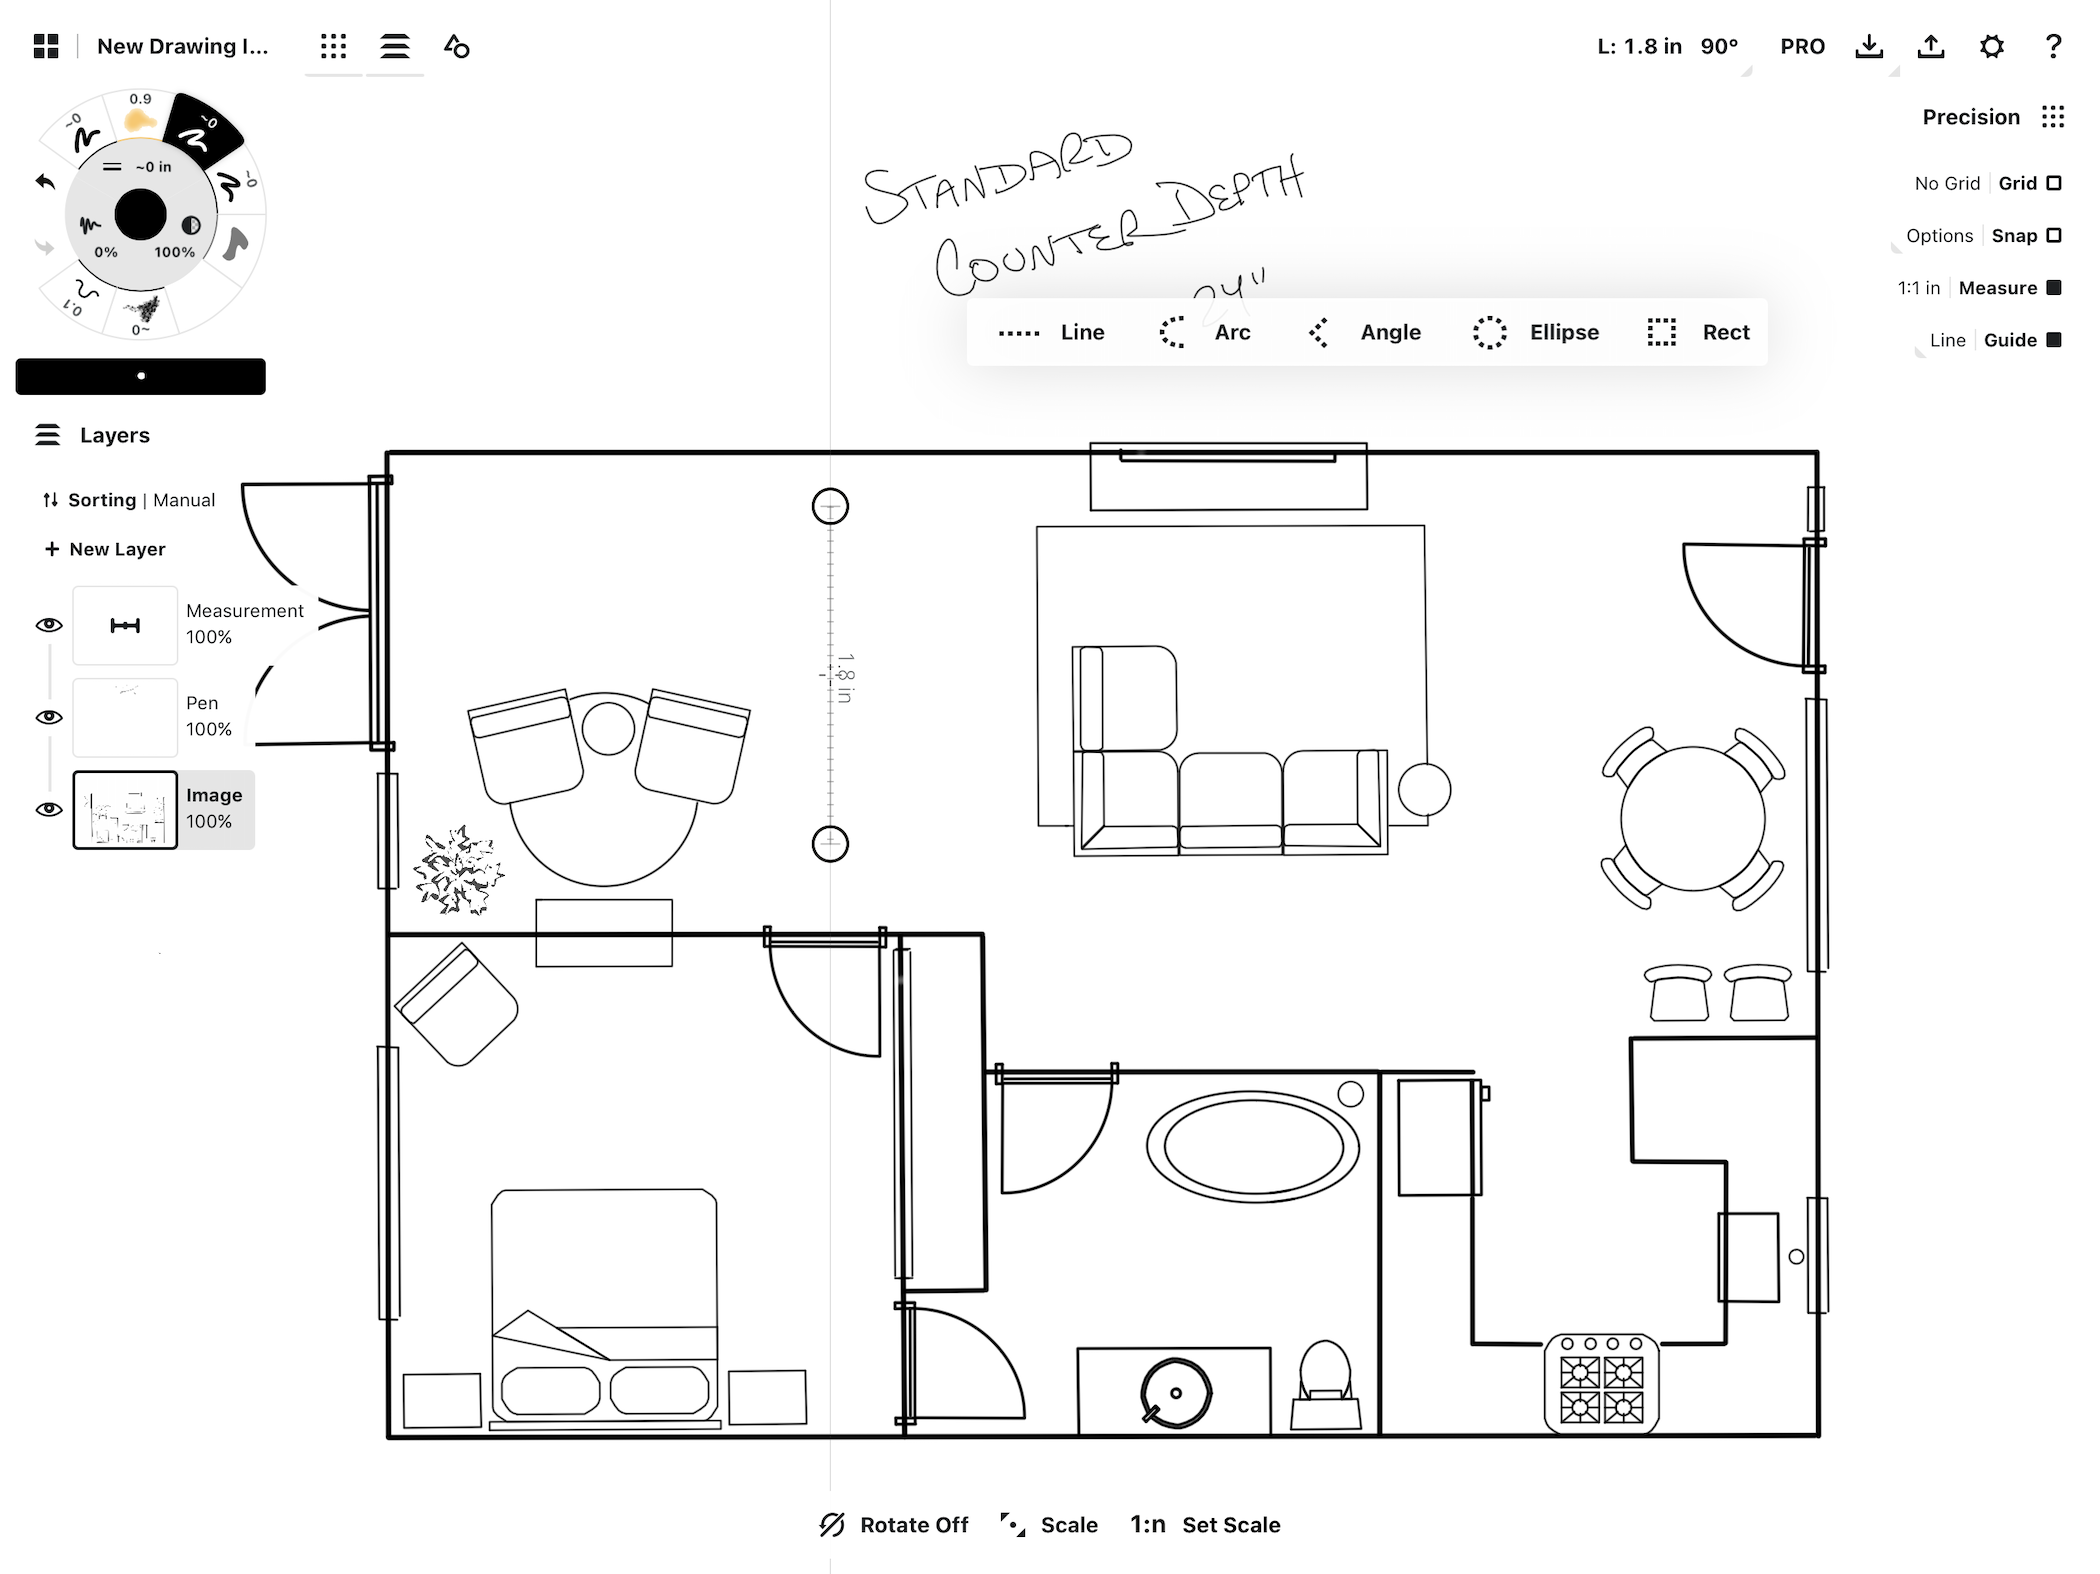
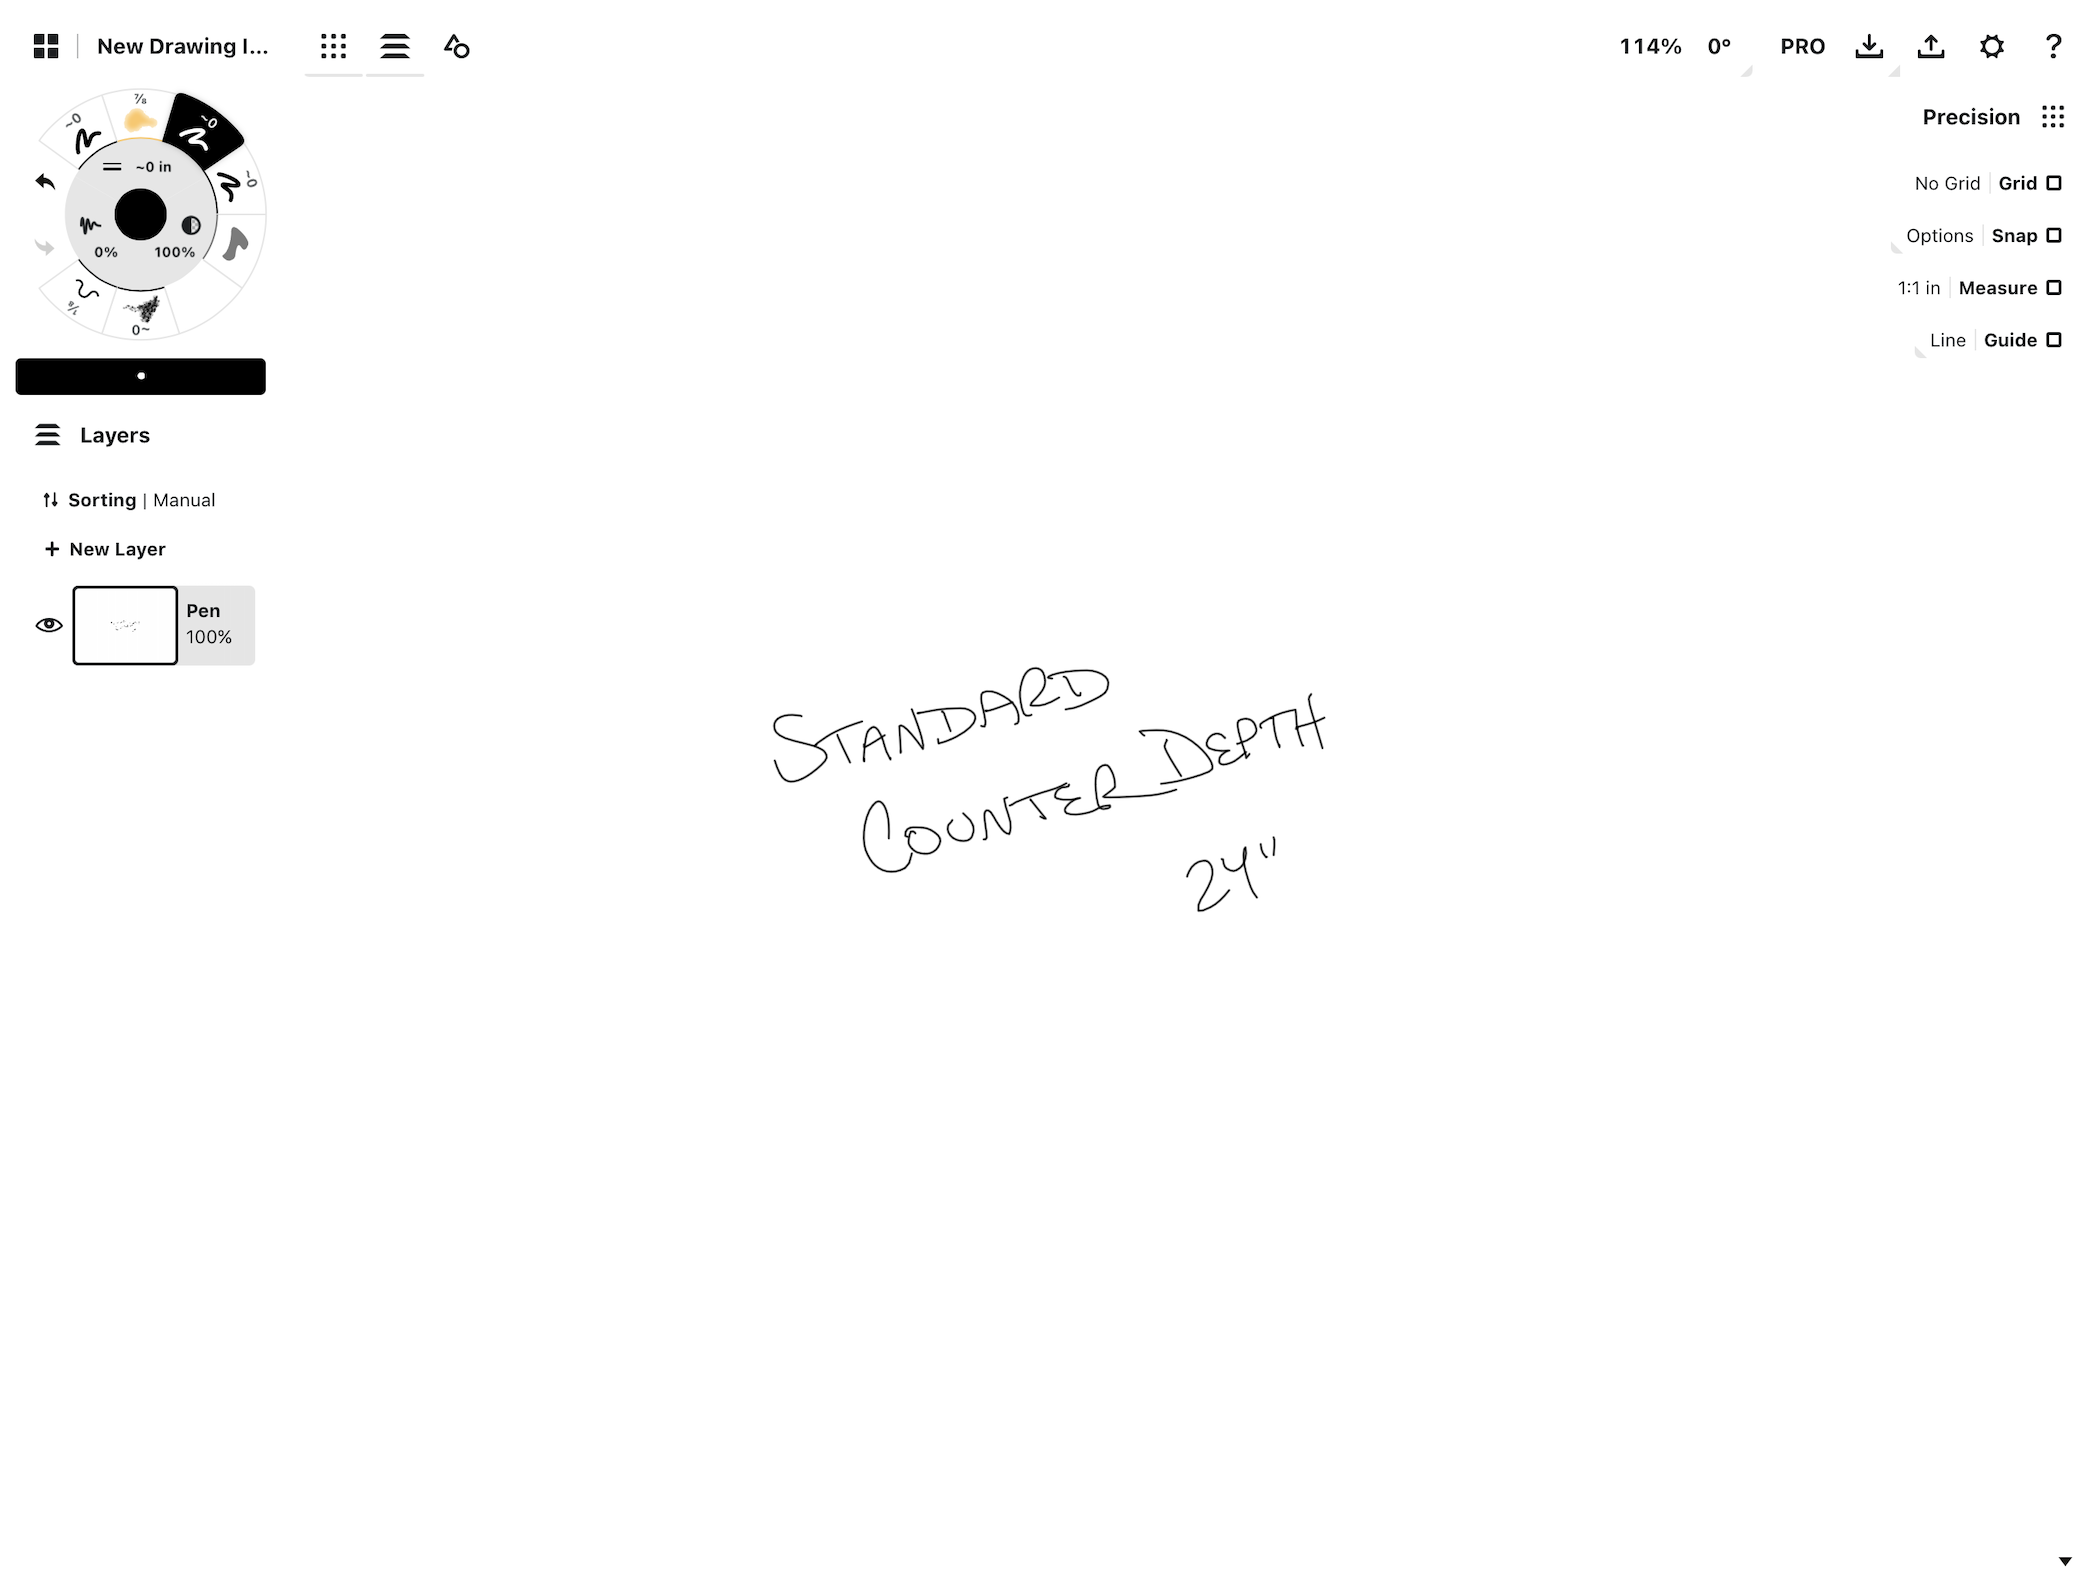
1. You can align any PDF or image to a particular scale on your canvas. To tie your design on screen to its real-world counterpart, it’s important that you know one real-life measurement of your plan. Check your plan for an already-noted measurement, or take out your tape measure and find an exact measurement of one wall, door, lot line or deck length. If you need to, jot it down on your canvas to remember it.

With an infinite canvas, you can write anywhere and still have room for your plan.
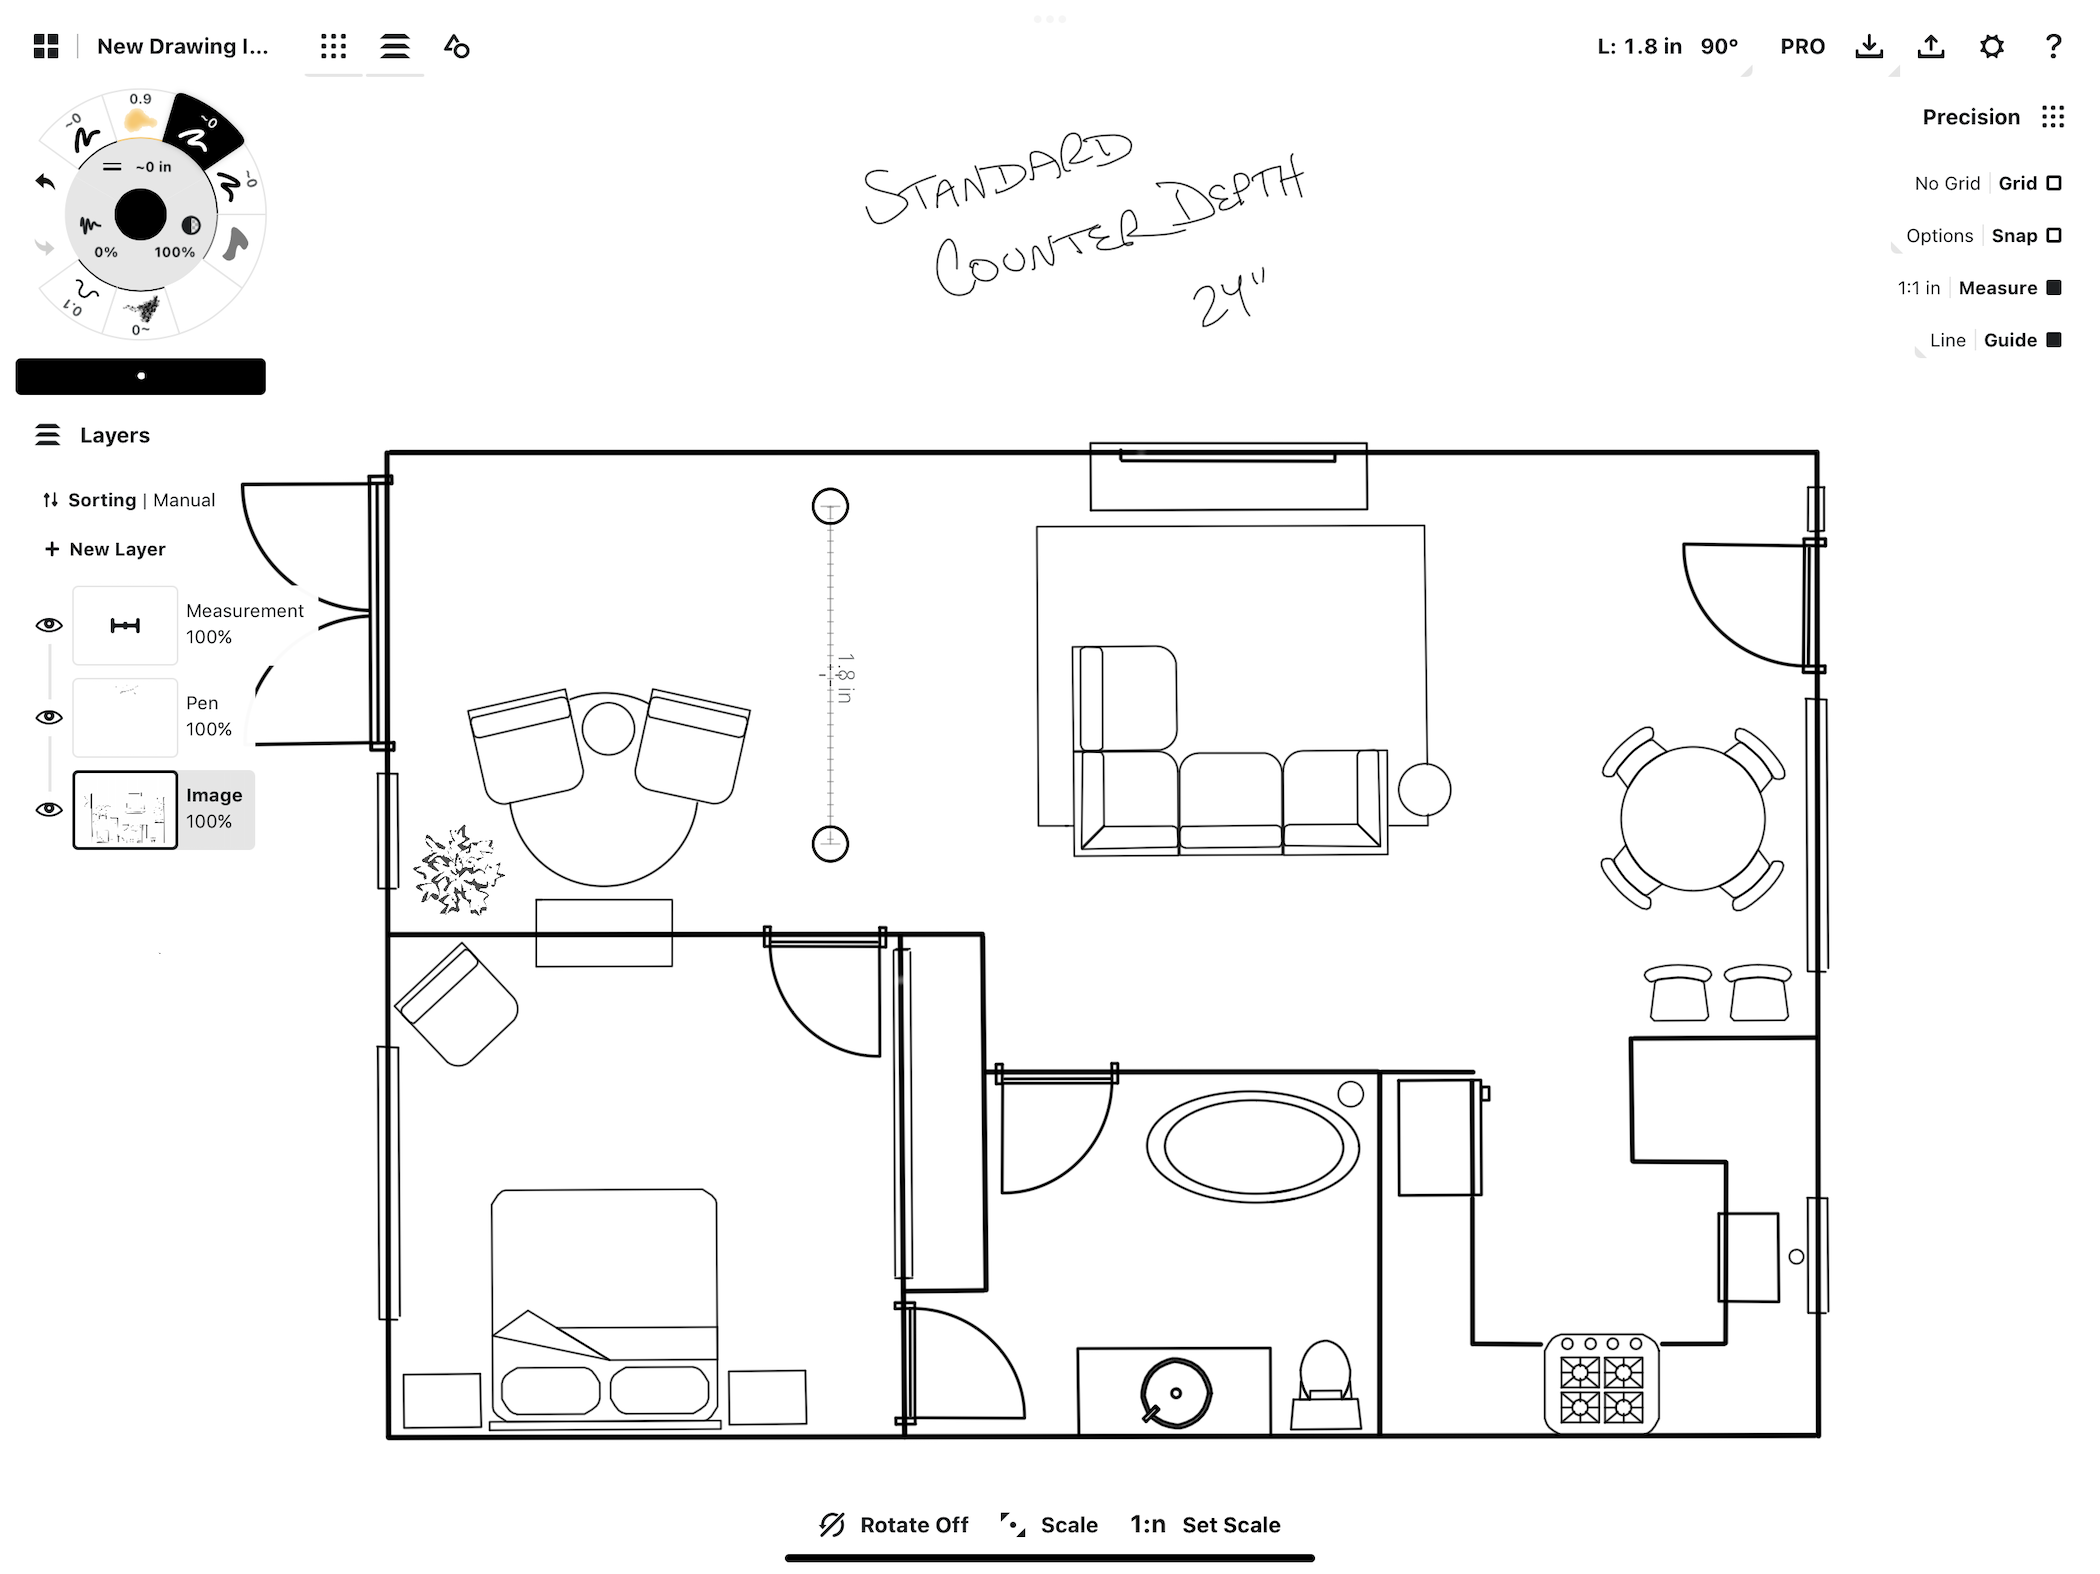
2. Import your plan onto the canvas. Drag+drop it onto the canvas from another app or tap the Import button and locate your file.
You can import any photo or PDF and align it to a scale.
If you import the plan as an image or PDF, it will appear in its own layer, default with automatic layering. If you’re in manual layering mode, it will appear in the current layer.
If it’s a complex or colorful image, we recommend you tap the image layer and set the opacity down to ~40% so you can see your sketching and measurement tags clearly on the plan.
If the plan is discolored or needs cleaning up, try taking a screenshot and running it through a photo-filter first on high contrast (like in this tutorial). This keeps the main lines of the plan clear while washing out the background. Then import it into Concepts and use the hard eraser to mask out any extra marks.
3. Tap the Precision menu open. Find Measure and tap it to activate live measurement displays and labeling.

Activate Measure.
4. Find Guide in the Precision menu, right below Measure. Tap the icon beside it to display guide options and tap the Line guide active. You’ll use this Line guide to align your known measurement to your plan.
The rest of the Shape Guides work with Measure just like the Line guide. Use them to apply exact radii, angles and perimeters to your shapes.
The Line guide is one of Concepts’ smart rulers (100% Smoothing + Measure is another). Besides helping you trace straight lines, it measures your lines as you draw while Measure is active, and allows you to customize its length.
Activate the Line guide and double-tap the crosshairs at the center. This contains the boundaries of the line and keeps you from tracing beyond any measurements you’ve set.
Contain the boundaries of the guide by double-tapping the crosshairs at the center of the guide.
You can rotate the guide freehand with your fingers, or rotate it an exact number of degrees using the Measurement Popup on the status bar. Tap the measurement field to open the Measurement Popup, and tap a value shortcut to rotate the guide. (In the example image, the Line guide is already at 90 degrees, so tapping 180 degrees positions it horizontally.)
It also helps to lock your guide rotation so it doesn't change when moving it on the canvas. While the guide is active (or if you choose to rotate it later as a selection), tap the toggle at the bottom of the canvas to "Rotate Off".
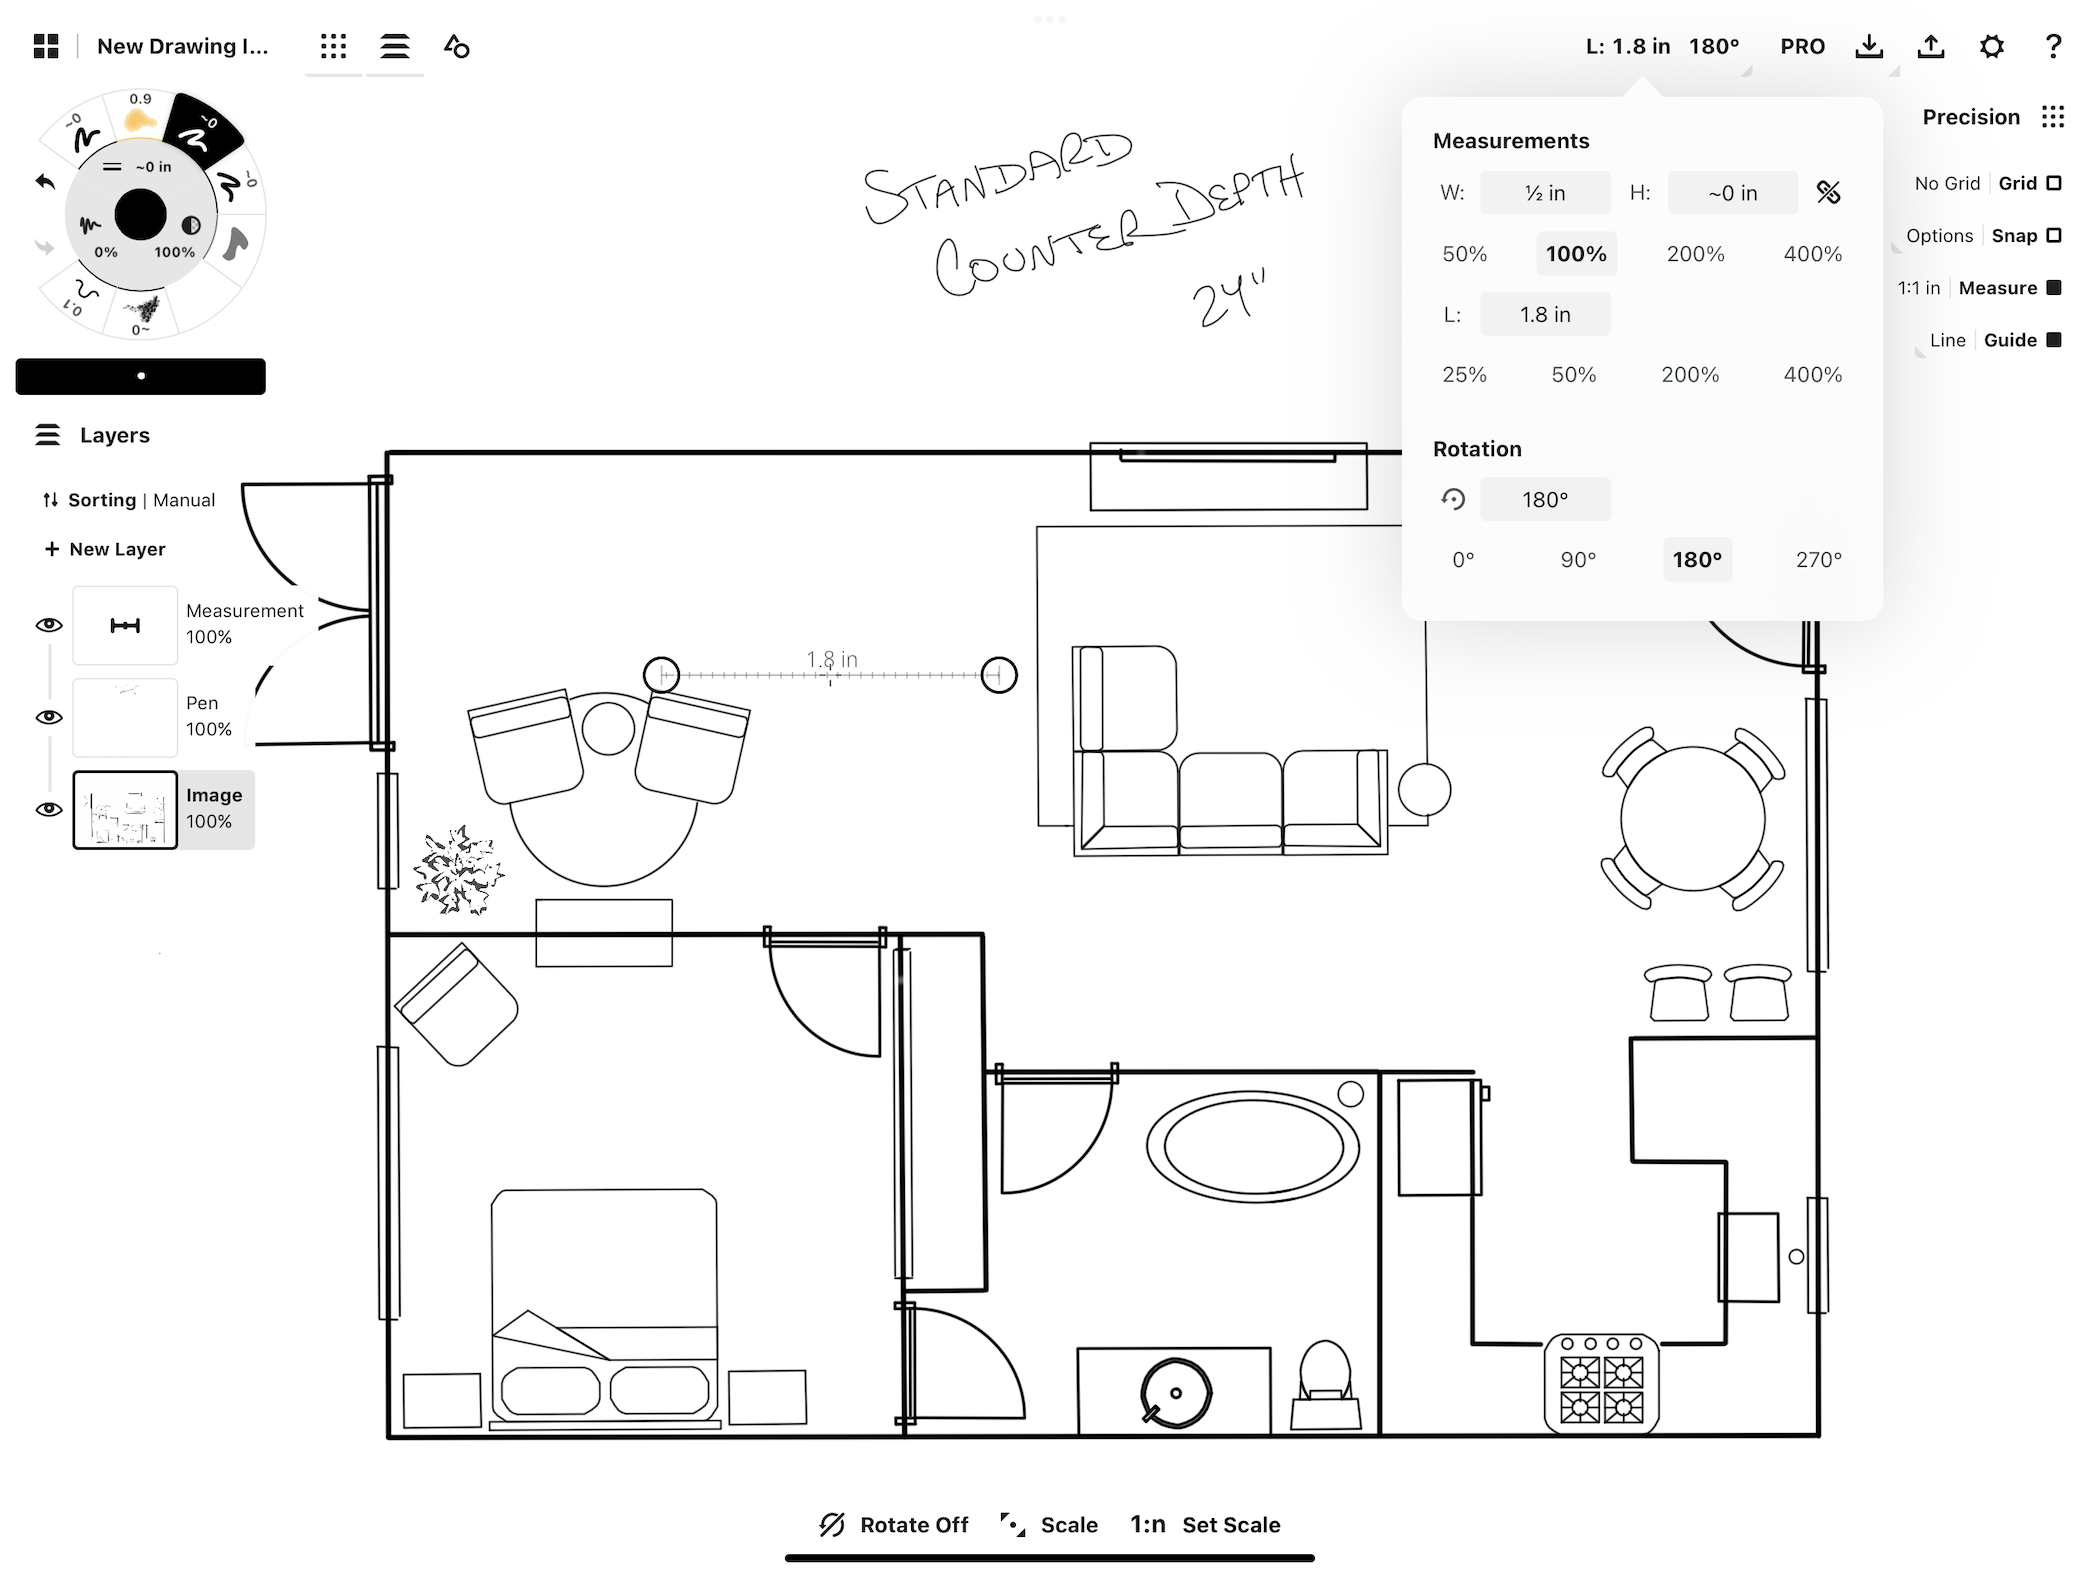
The Measurement Popup allows you to rotate guides and selections, and set exact dimensions to your selections.
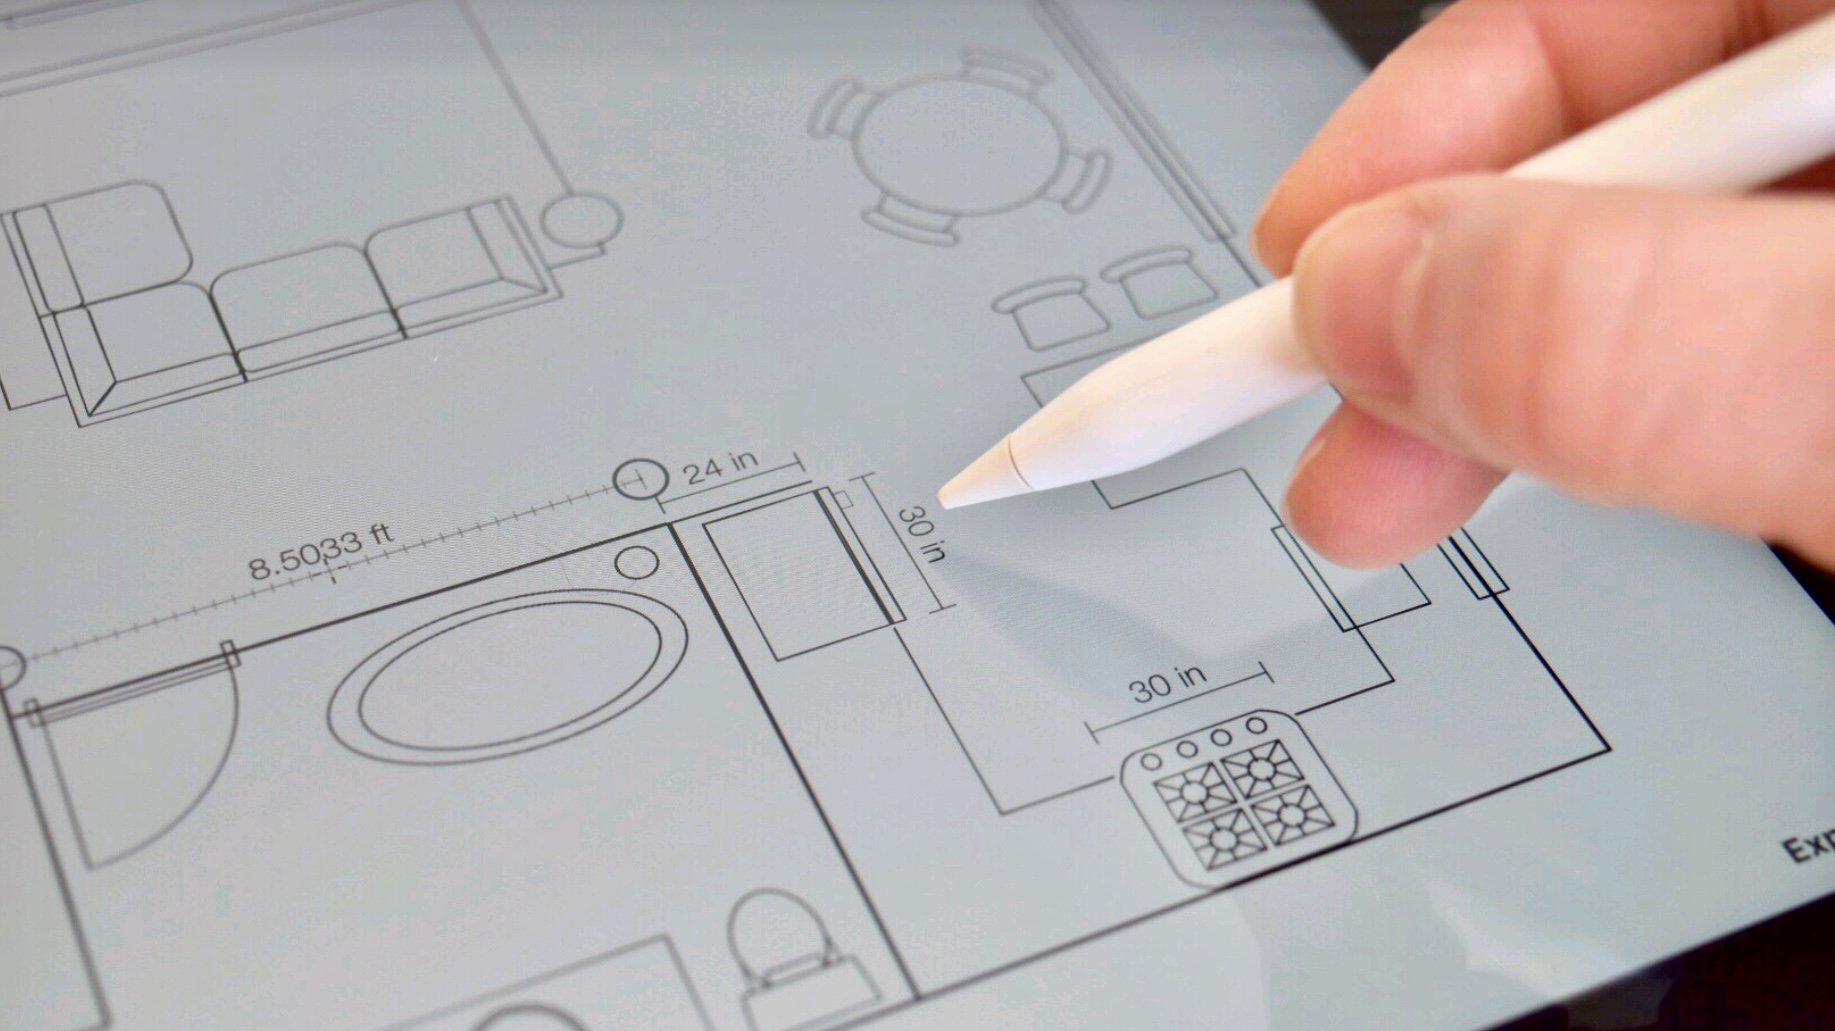
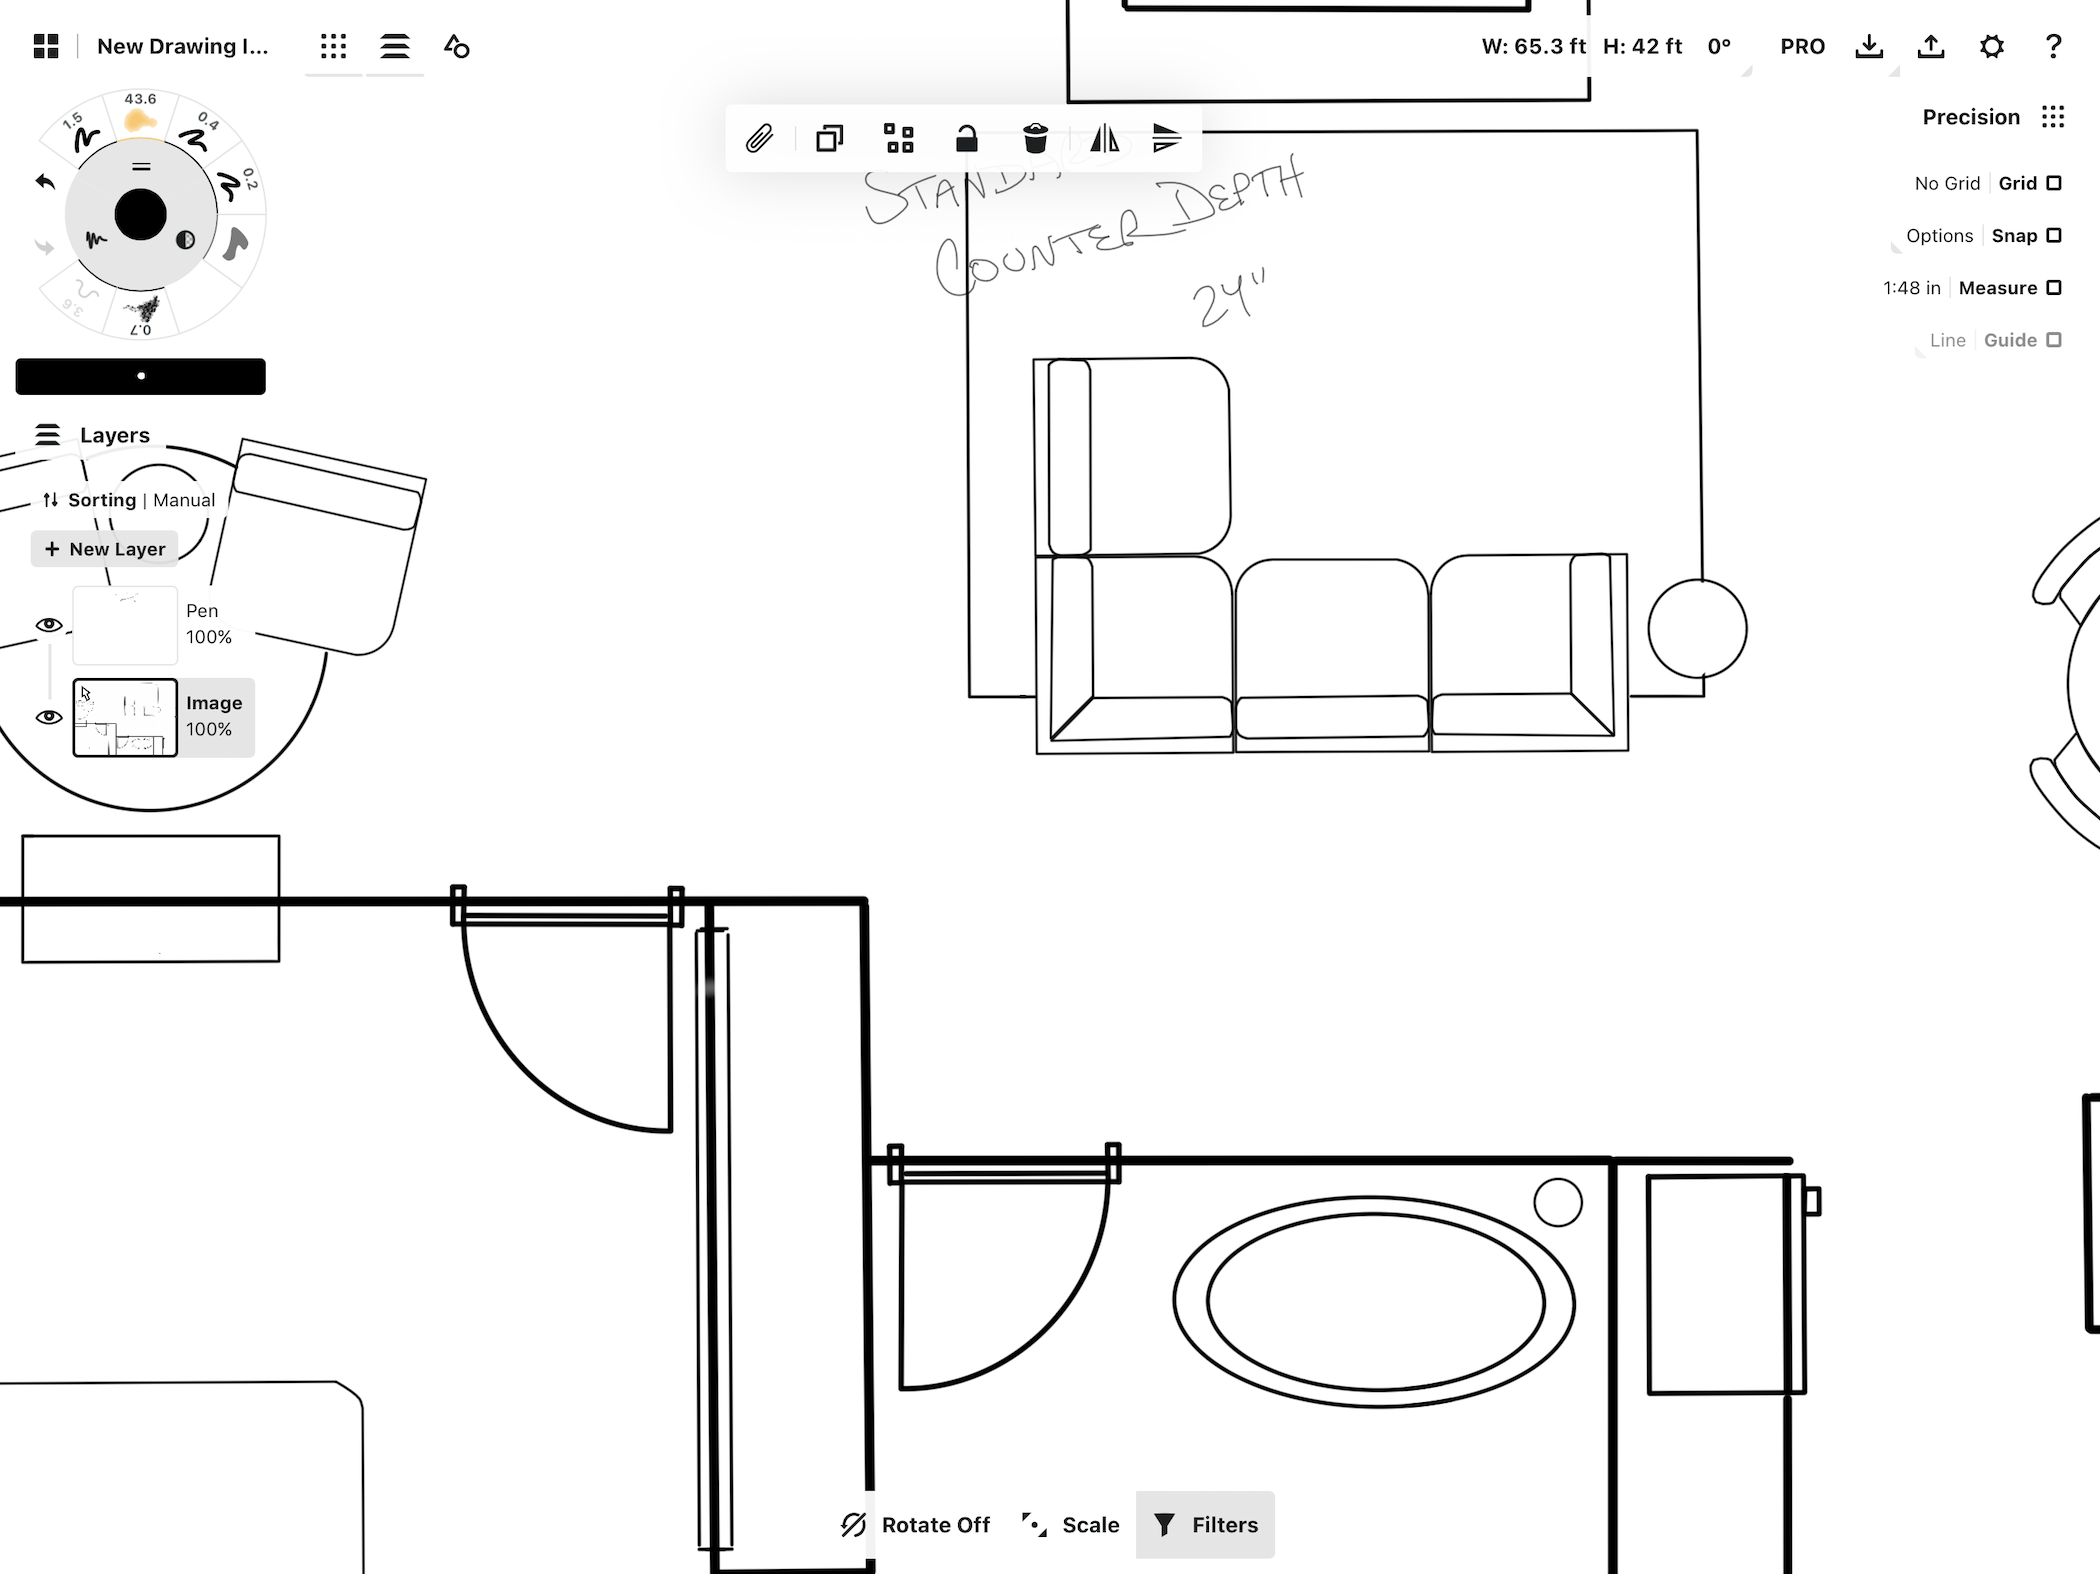
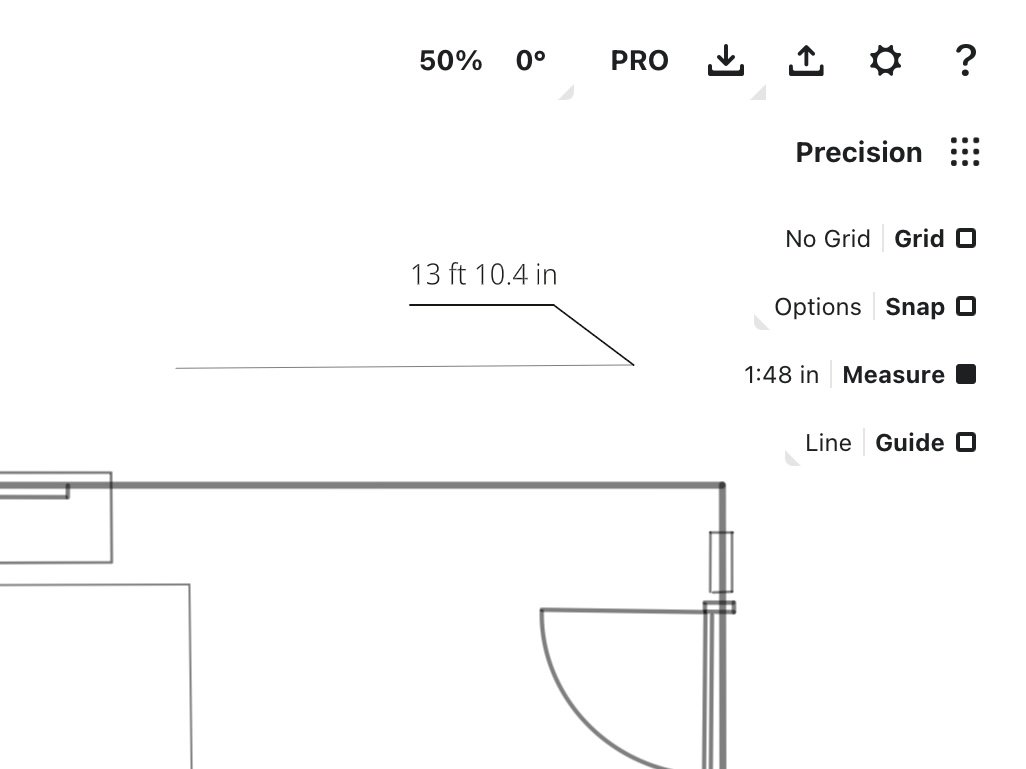
Align the handles on your plan to the same segment of wall or other length that you measured in real life. The measurement on the guide will not be the same as your real-world measurement yet. That's okay, as we haven't set the scale for the drawing yet.
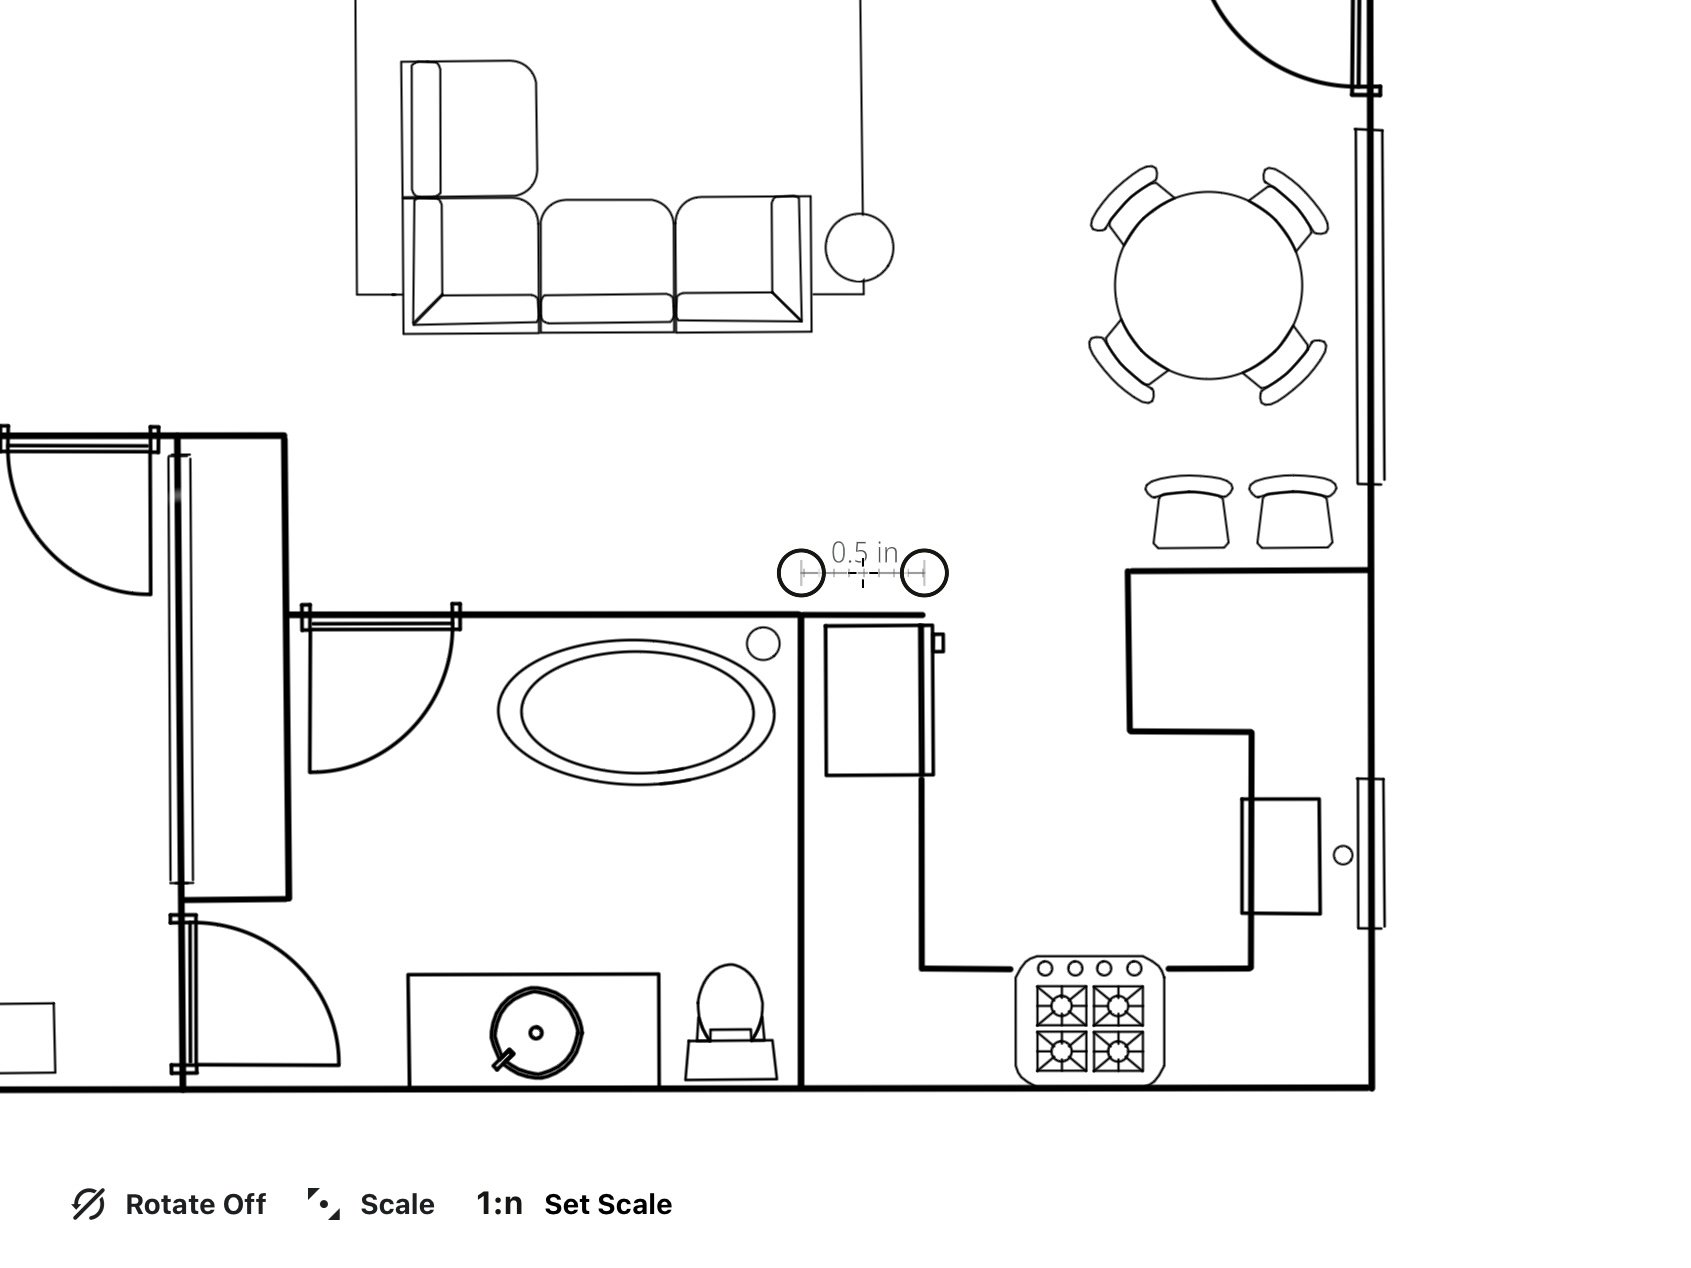
.5 inches does not equal 24 inches... yet. In this example, the depth of the counters seems to be half an inch, but that's just a digital reference for now. Yours might be different. It doesn't actually matter what the value is, the app will calculate the plan's real world scale according to your known measurement by going through this process.
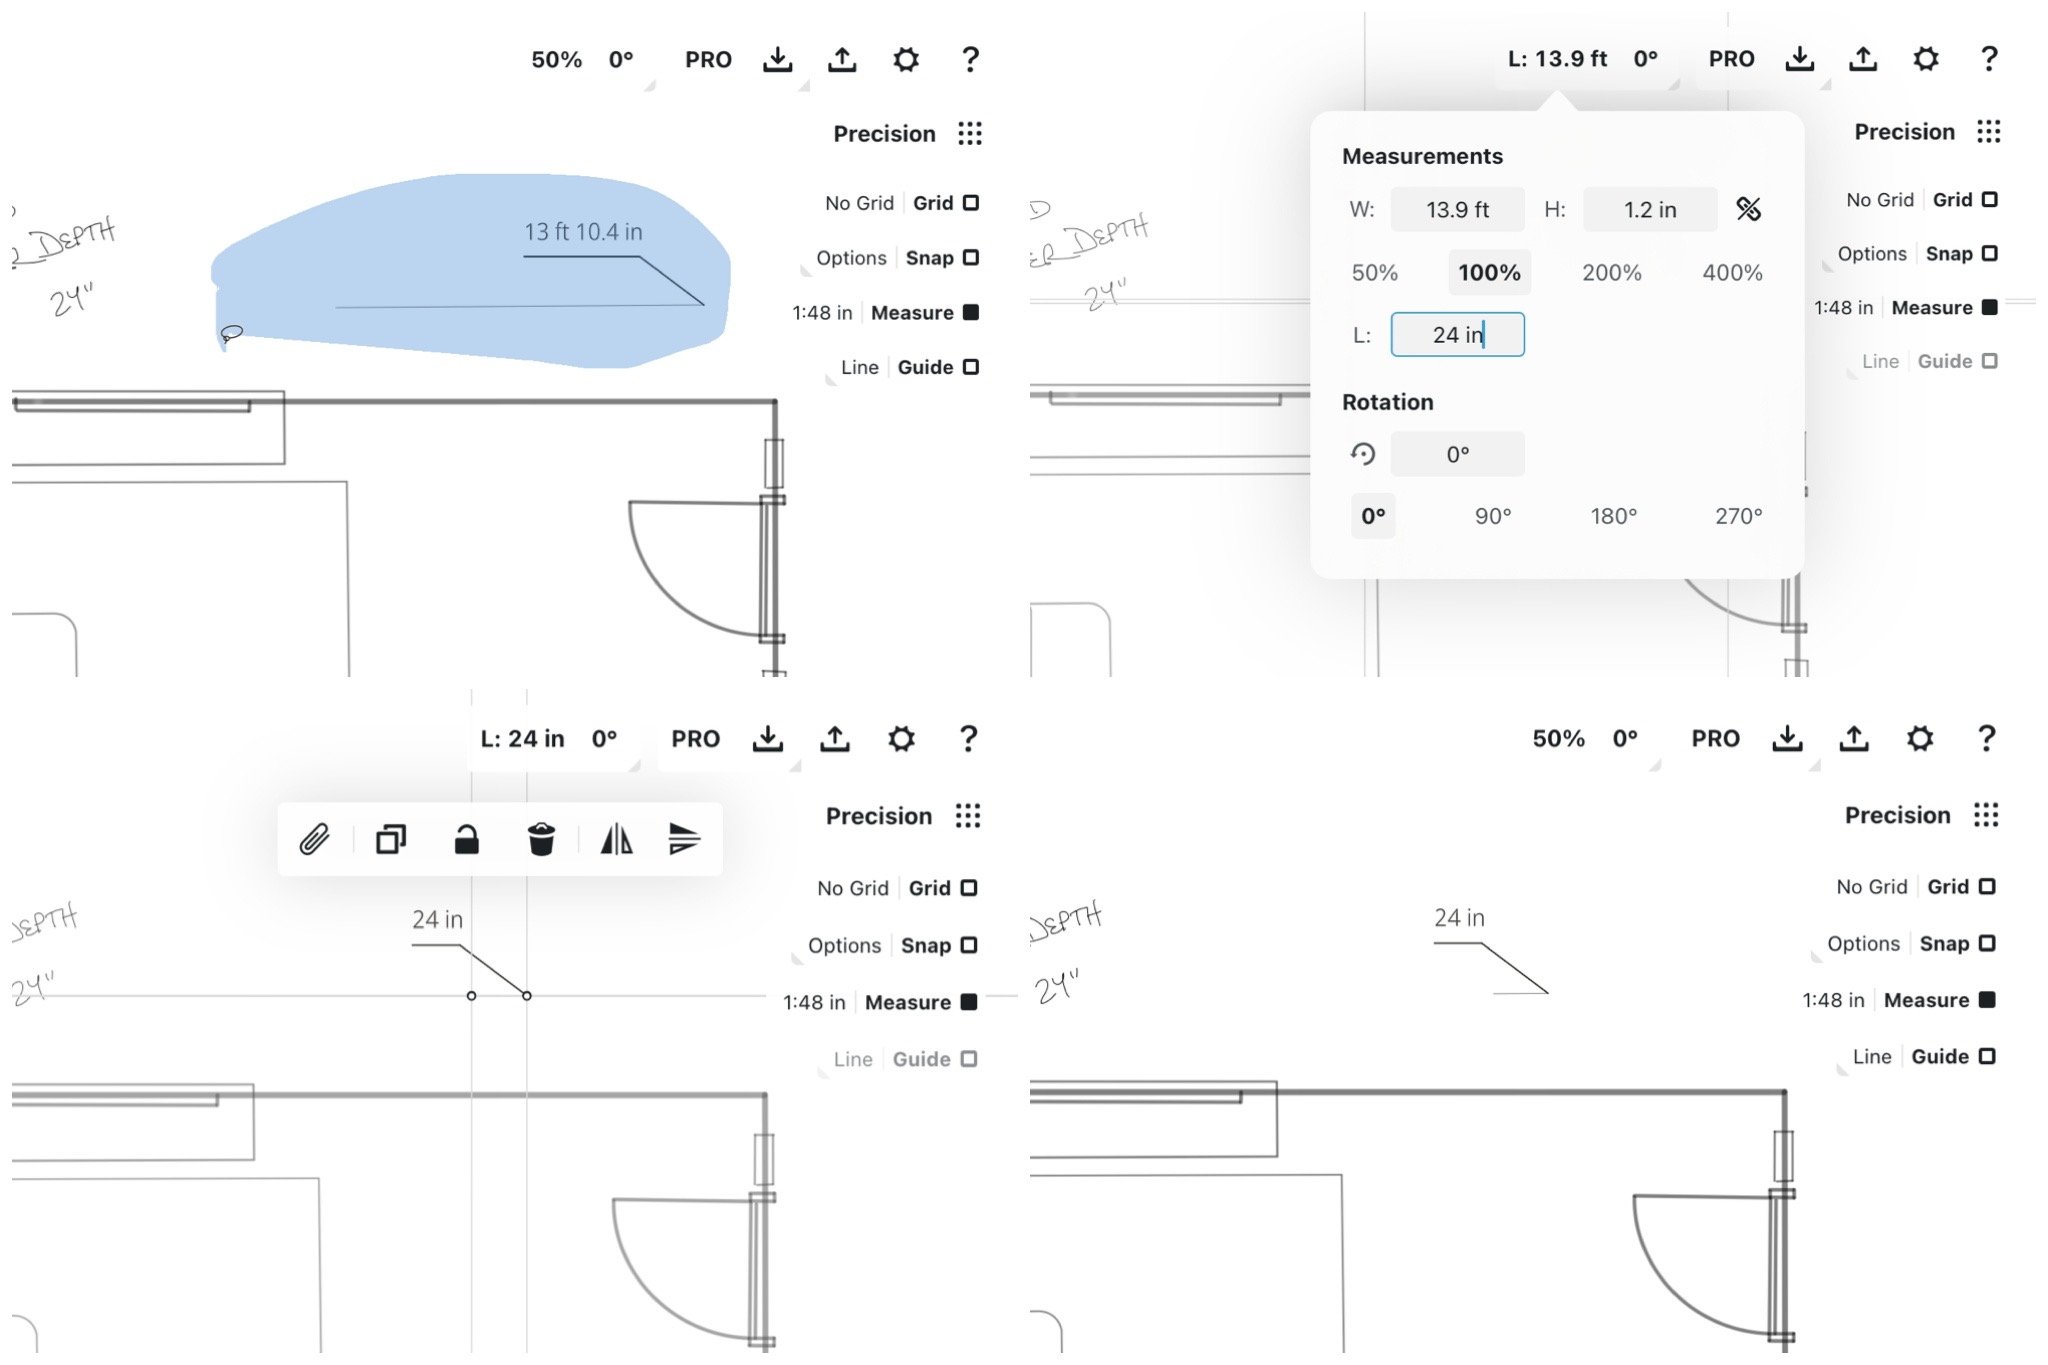
5. Tap the scale ratio beside Measure in the Precision menu. (You can also access this under Settings > Workspace > Drawing Scale.)
You’ll notice the values in the Drawing Scale fields have been filled with the current length of the Line guide according to the current scale and units of the drawing.
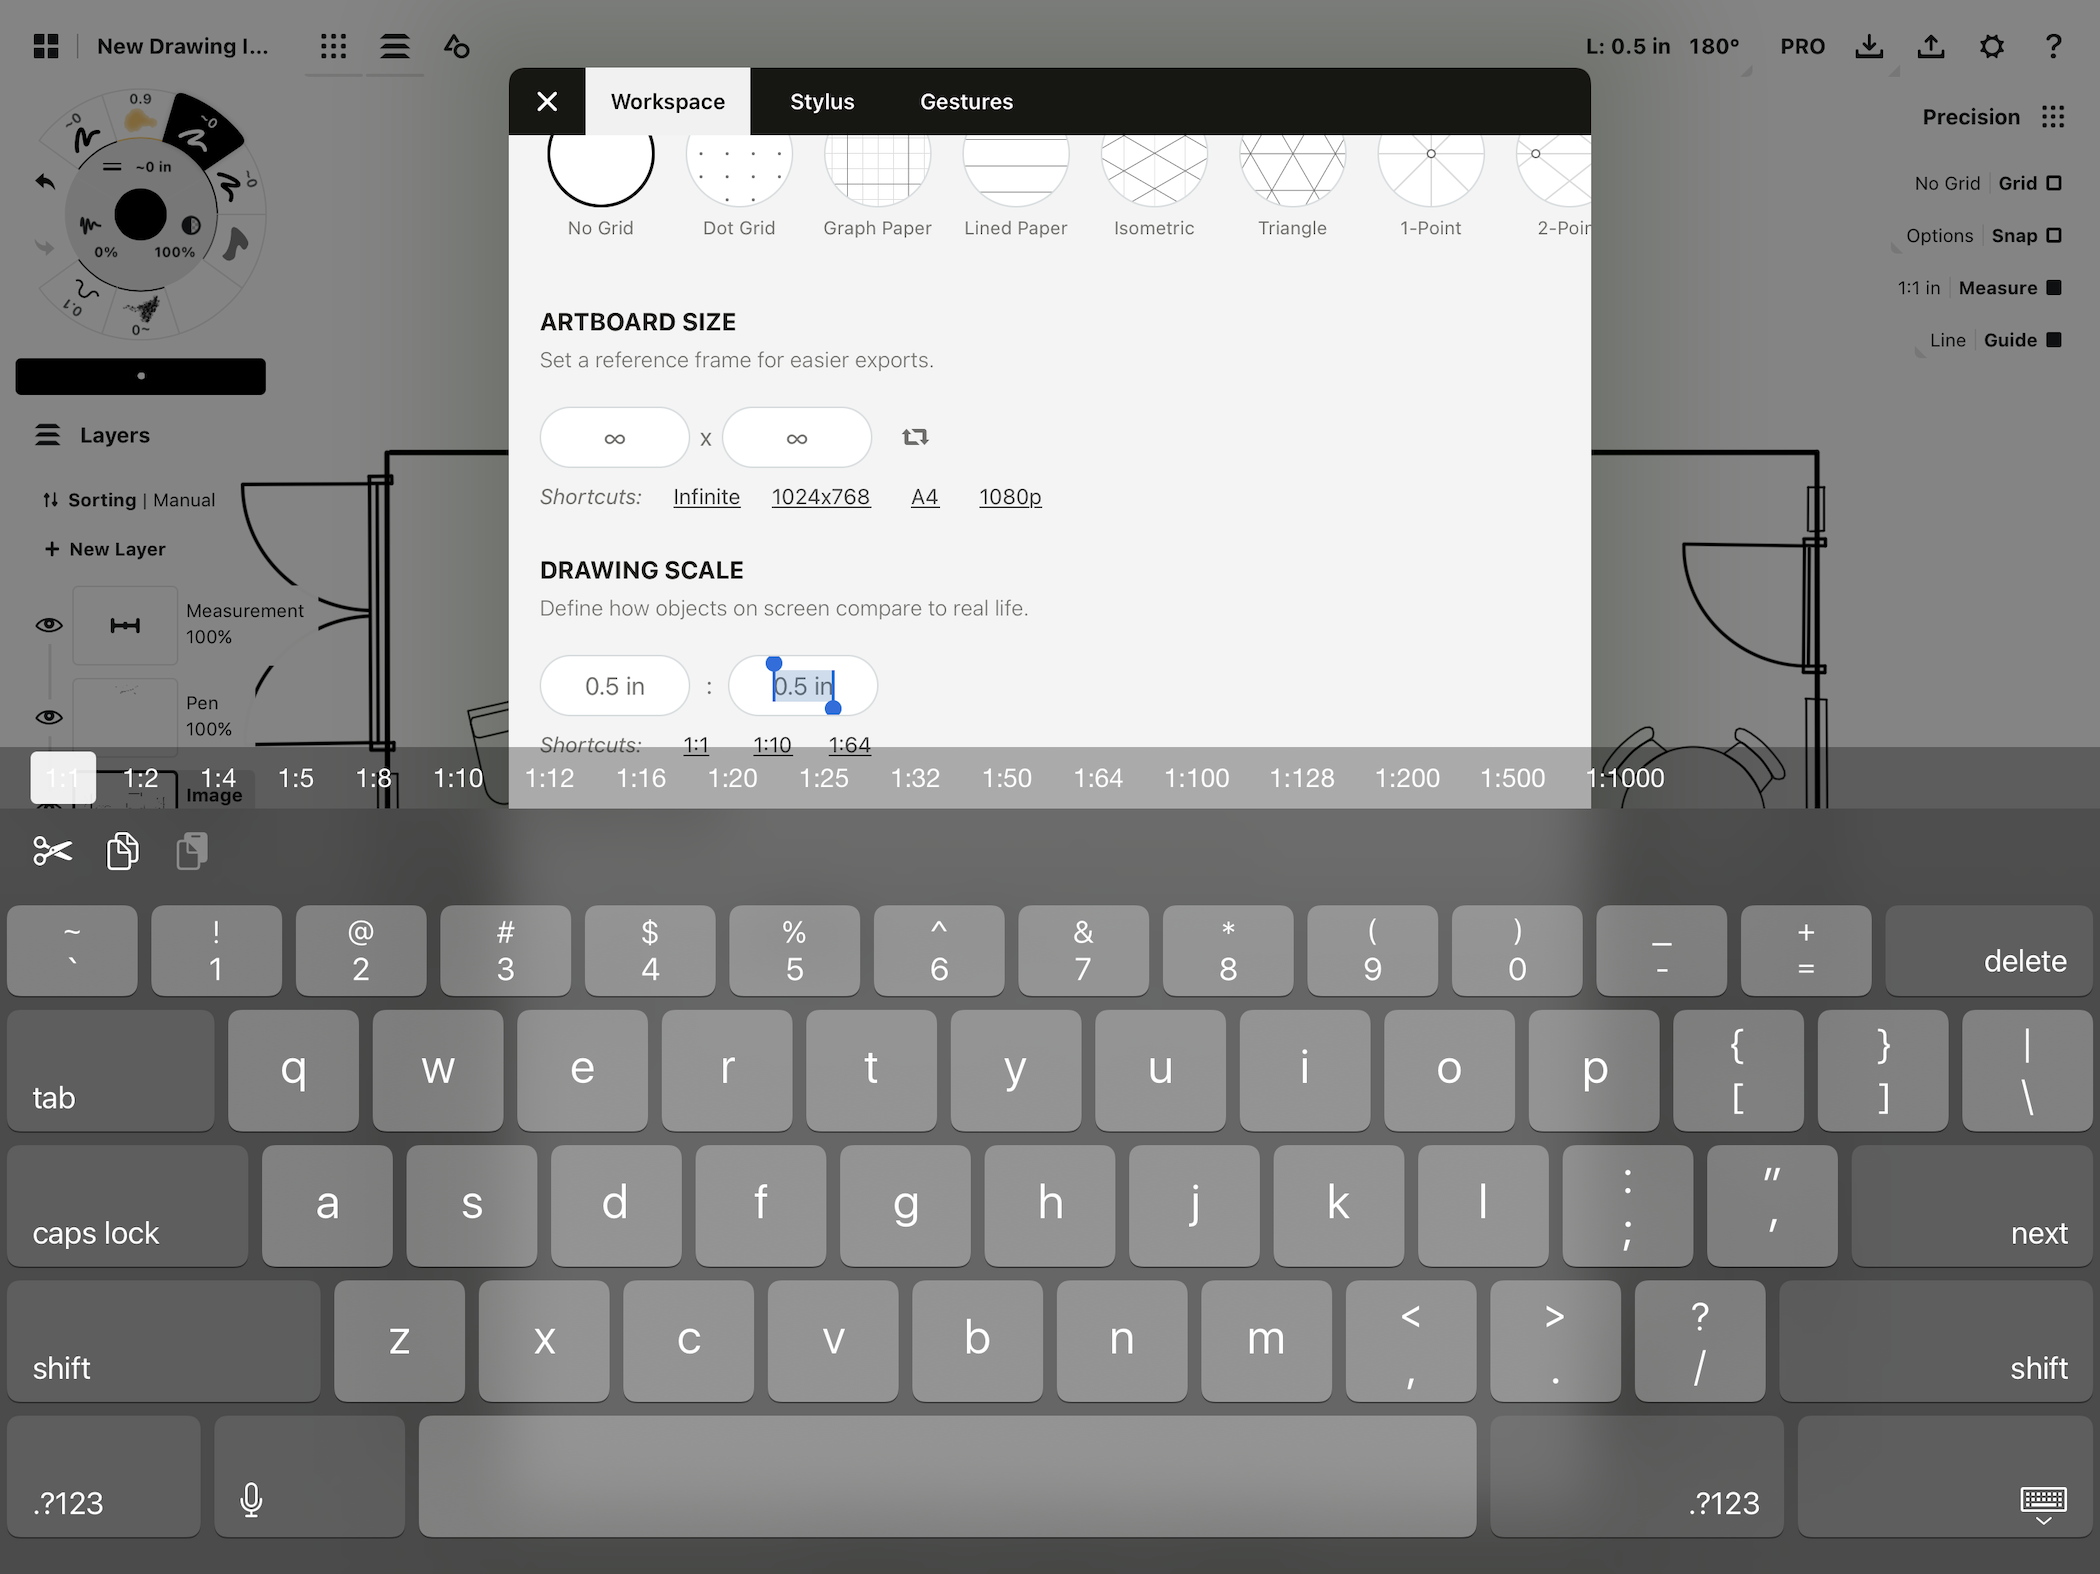
The ratio is still 1:1, but the “0.5 in” value in each field is the same as the measurement aligned to the counter on the plan.
Now take your real-world measurement and enter it into the second field. Then tap anywhere to dismiss the menu.

Ignore the first field, and enter your real-world value into the second field.
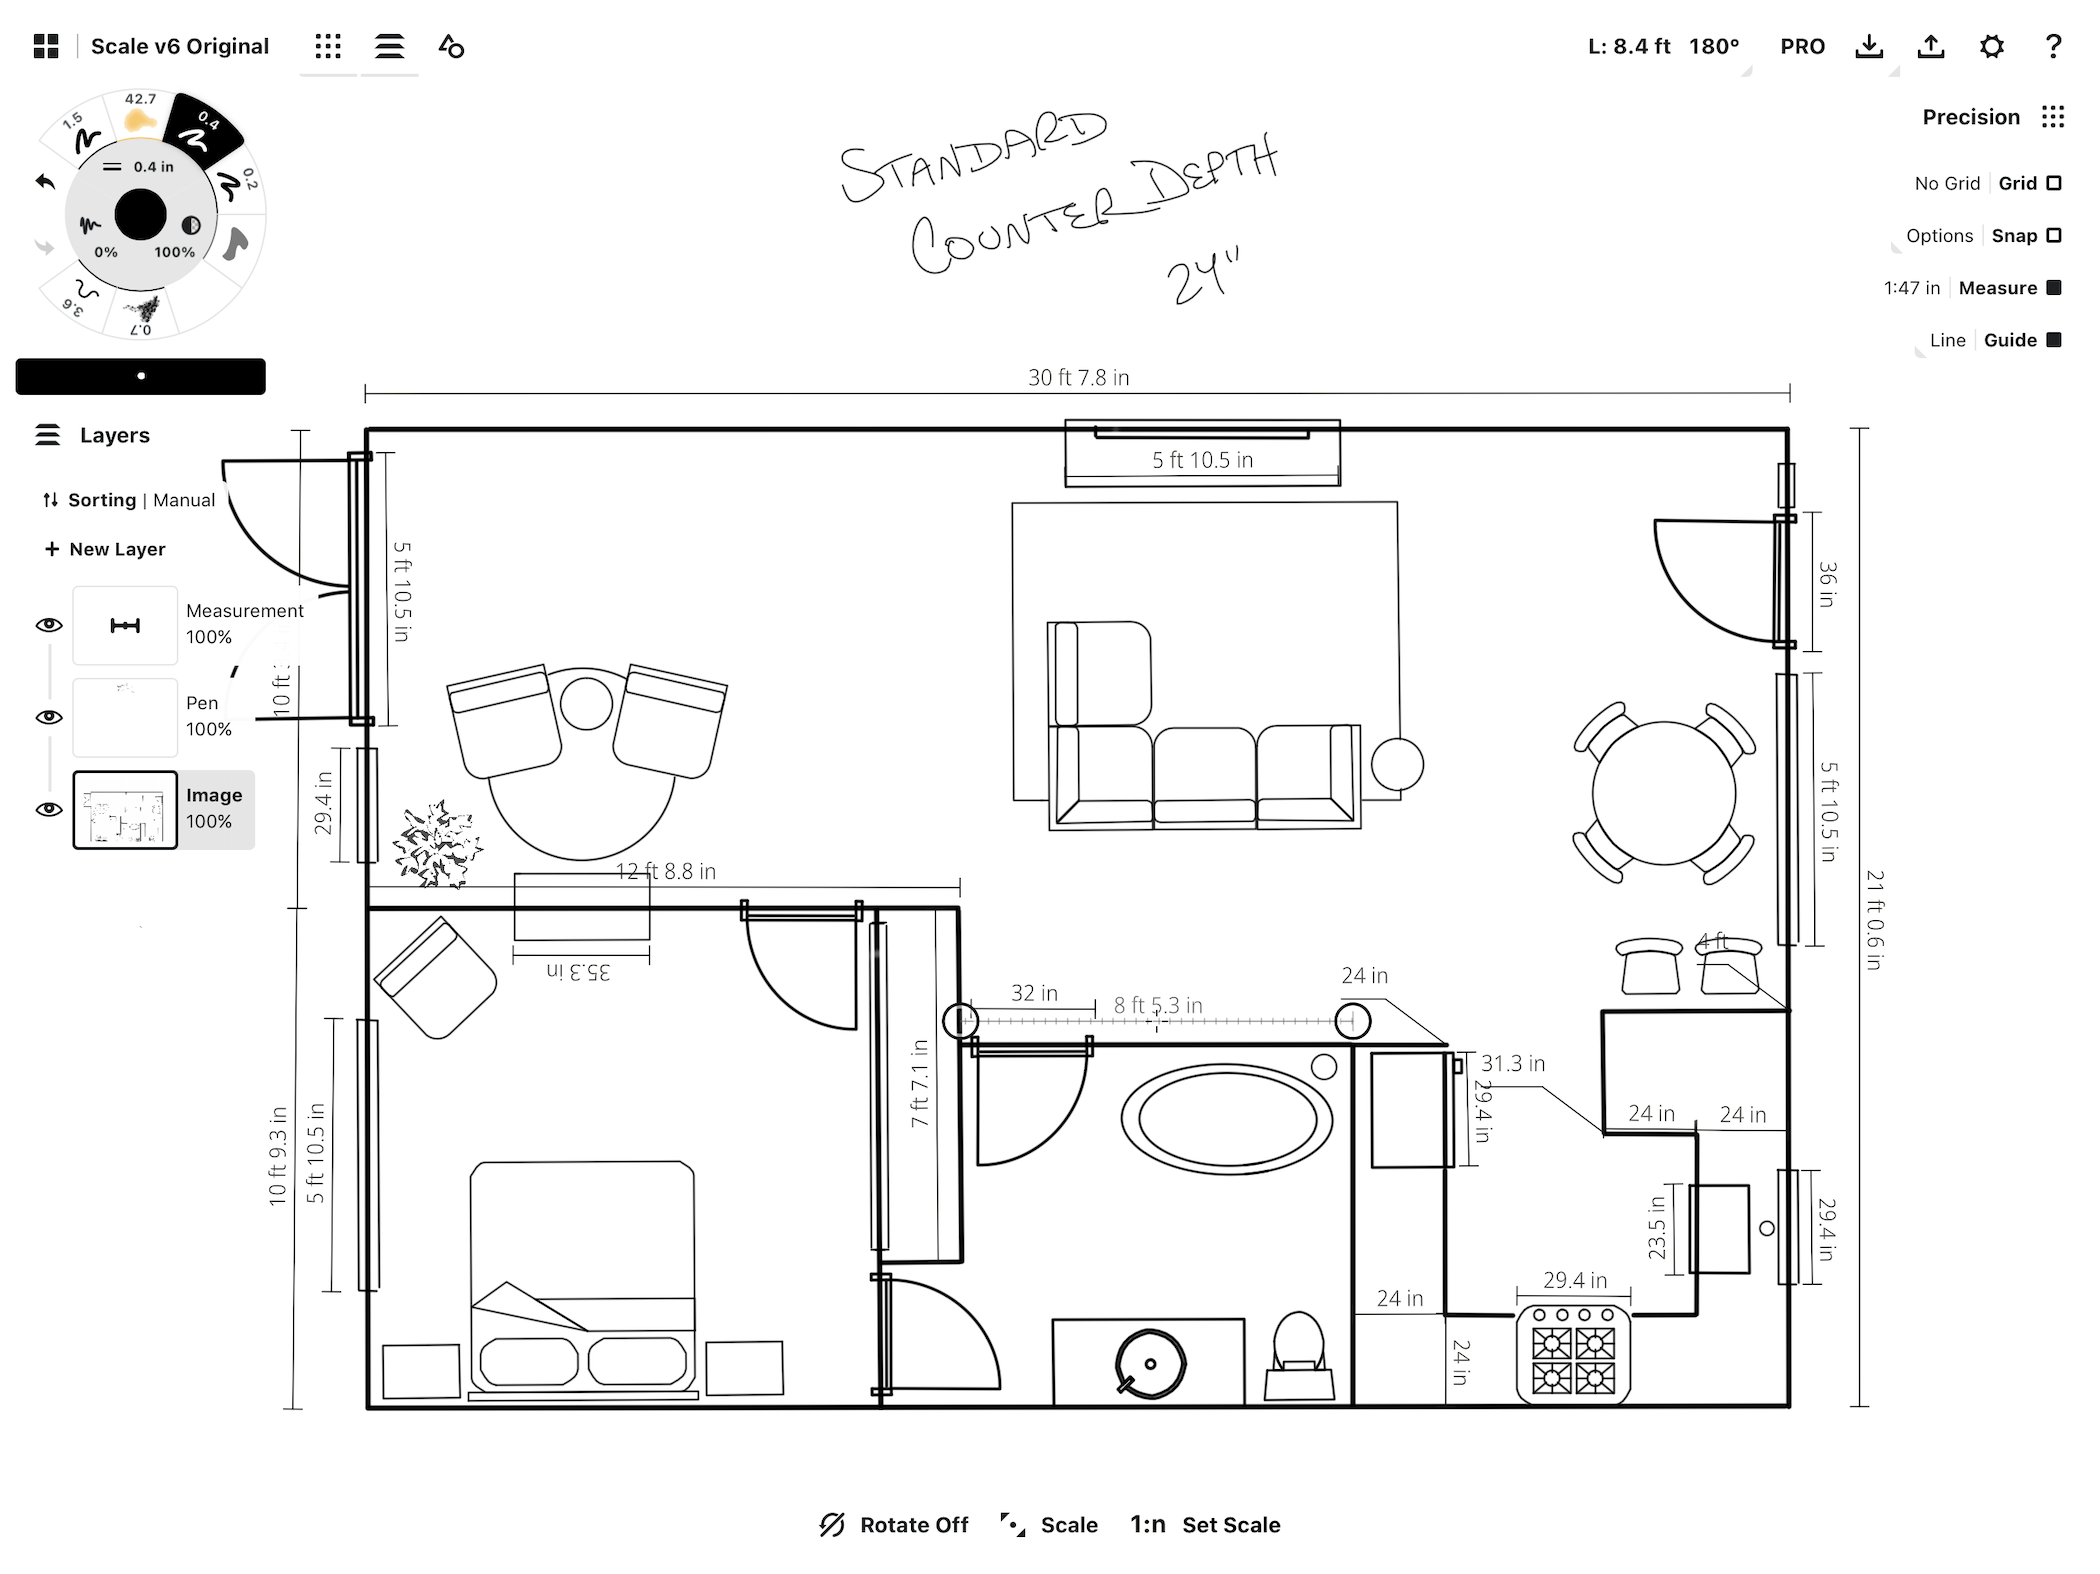
When you look at the ratio beside Measure on the canvas, you’ll see a new ratio - 1:your-new-calculated-value. The .5 inch measurement label on the plan in the example now reads 24 inches, the cabinet measurement.

The ratio is now 1:48 inches, and your measurement now reads 24 inches.
What this did was match the line length on screen to the value of the line in real life. Half an inch on this plan is now the same as the 24 inch cabinet depth. That is a 1:48 inch scale.
Of course, your own plan will be scaled according to the real-world dimensions you entered into that second drawing scale field.
From here on out, your drawing scale will reflect in all measurements drawn, measured or labeled on canvas, regardless of zoom level.
Aligning an Imported Drawing to a Known Scale
If you’re importing a plan and want to align it to a particular scale, you will also need to know one real-life measurement on your plan.
The Short Version
1. Know one real-world measurement for your project.
2. Import your plan into a new layer. Lower the layer opacity to ~50%.
3. Open the Precision menu and tap the scale ratio beside Measure. Enter your known scale and units into the Drawing Scale fields. Also define your units and display preferences for the drawing in the sections below.
4. Activate Measure.
5. Draw a line with the Line guide or with 100% Smoothing to the length of your real-world measurement.
6. Select your imported plan and scale it larger or smaller until the measured segment on your plan aligns with the line you drew.
The Illustrated Version
1. Make sure you have one real-world measurement from your plan on hand. It can be a wall, lot line, cabinet depth, door or anything else on your plan. This will be used to align the plan with the app.
Know your measurement before you start.
2. Import your plan into a new layer.
To import, drag+drop it onto the canvas from another app, or tap the Import button to locate your file.
If your layers are in Automatic mode, the image will import by default into the bottom-most layer. If they are in Manual mode, it will import into your active layer. You can select and drag the image into a new layer and drag layers up or down as necessary. Set it as the bottom layer so you can see anything you draw over the top.
The image layer is at the bottom.
Optional - Lower the opacity of the layer to ~50%. This helps because when you select and scale the image later, you’ll want to be able to see through it to match it to your measurement. Not all plans are visually cluttered, but it can help with visibility.
To lower the opacity, tap the image layer to make it active, then tap it again to bring up the layer’s menu. Use the slider at the bottom to lower the opacity of the layer.
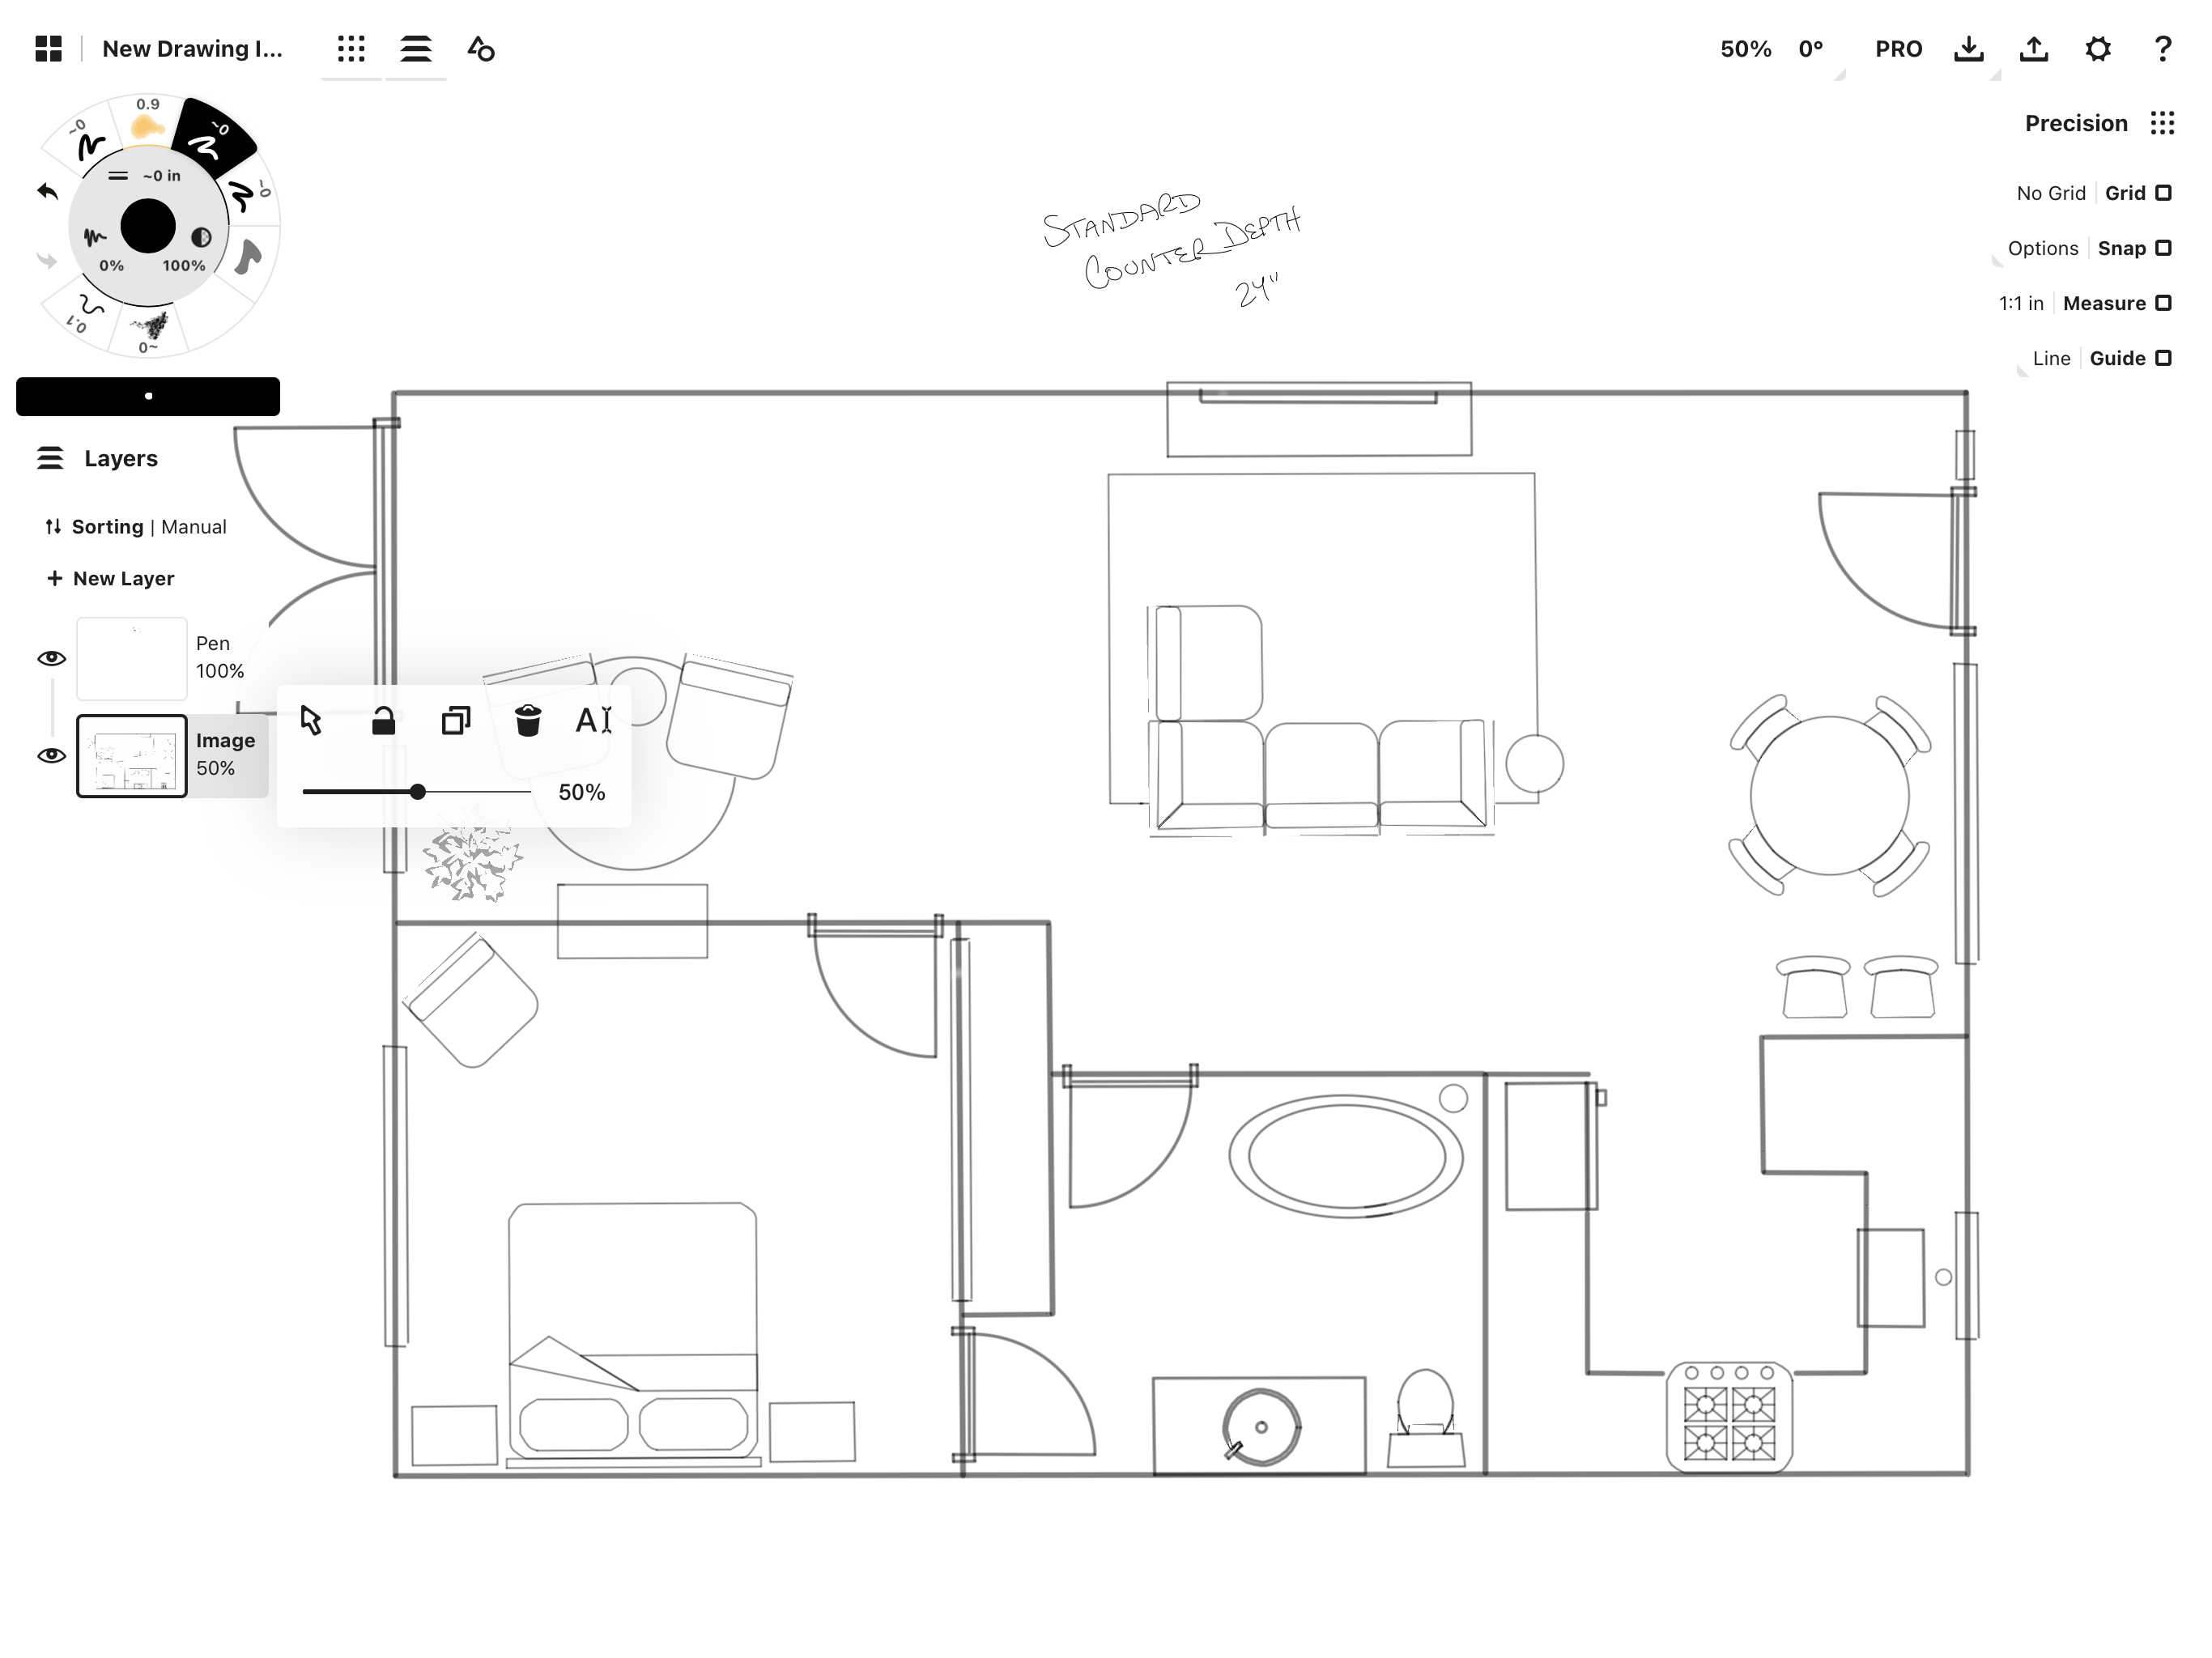
Lower the opacity so you can line up the image layer with the measurement you’ll draw.
3. Open the Precision menu and tap the scale ratio beside Measure.
Enter your known scale and units into the fields. Head to the Units section below and define your drawing metric so it corresponds with your scale metric.

This is the same Drawing Scale field found in Settings > Workspace > Drawing Scale. You can change it from either place at any time.
4. Open the Precision menu and tap Measure active. Any strokes you've drawn in Concepts may now display measurement labels beside them, and any strokes you draw from this point will show real-time measurements as you draw.
A stroke drawn with 100% Line Smoothing and a measurement label.
5. Using the Line guide or by setting a tool’s line smoothing to 100%, trace or draw a straight line onto the canvas that is the exact length of the real-world dimension from your plan. It helps to do this in a layer above the imported image layer.
• If you use the Line guide, you can just tap+hold the measurement label and enter your exact length. Then trace the line between the handles. (Double-tap the crosshairs to keep your line to length.) Tap the measurement label to “stick” it to the canvas. This "static" label will save to your Measurement layer.
• If you use 100% smoothing, draw the line, select it, then tap open the Measurement Popup on the status bar to enter a new length (L). You'll see the line and label update to match. Tap the label to set it to the canvas. Note that this "dynamic" or live-drawn label is associated with your stroke, and will save to the layer you drew the stroke.
1. Select the line you drew. 2. Tap the length field in the status bar to open the Measurement Popup. Enter your new Length value. 3. Both the line and measurement label will update. 4. Tap the measurement label to "stick" it to the active layer.
6. Select your imported plan. You can use the Layer menu to select the entire layer.
Scale the plan larger or smaller in relation to your known dimension, until the line you drew corresponds with the known dimension on the plan.
Remember to set rotation to "Off" on the Selection menu so it locks your plan from turning. Keep Scale or Stretch "On" so you can resize the image.
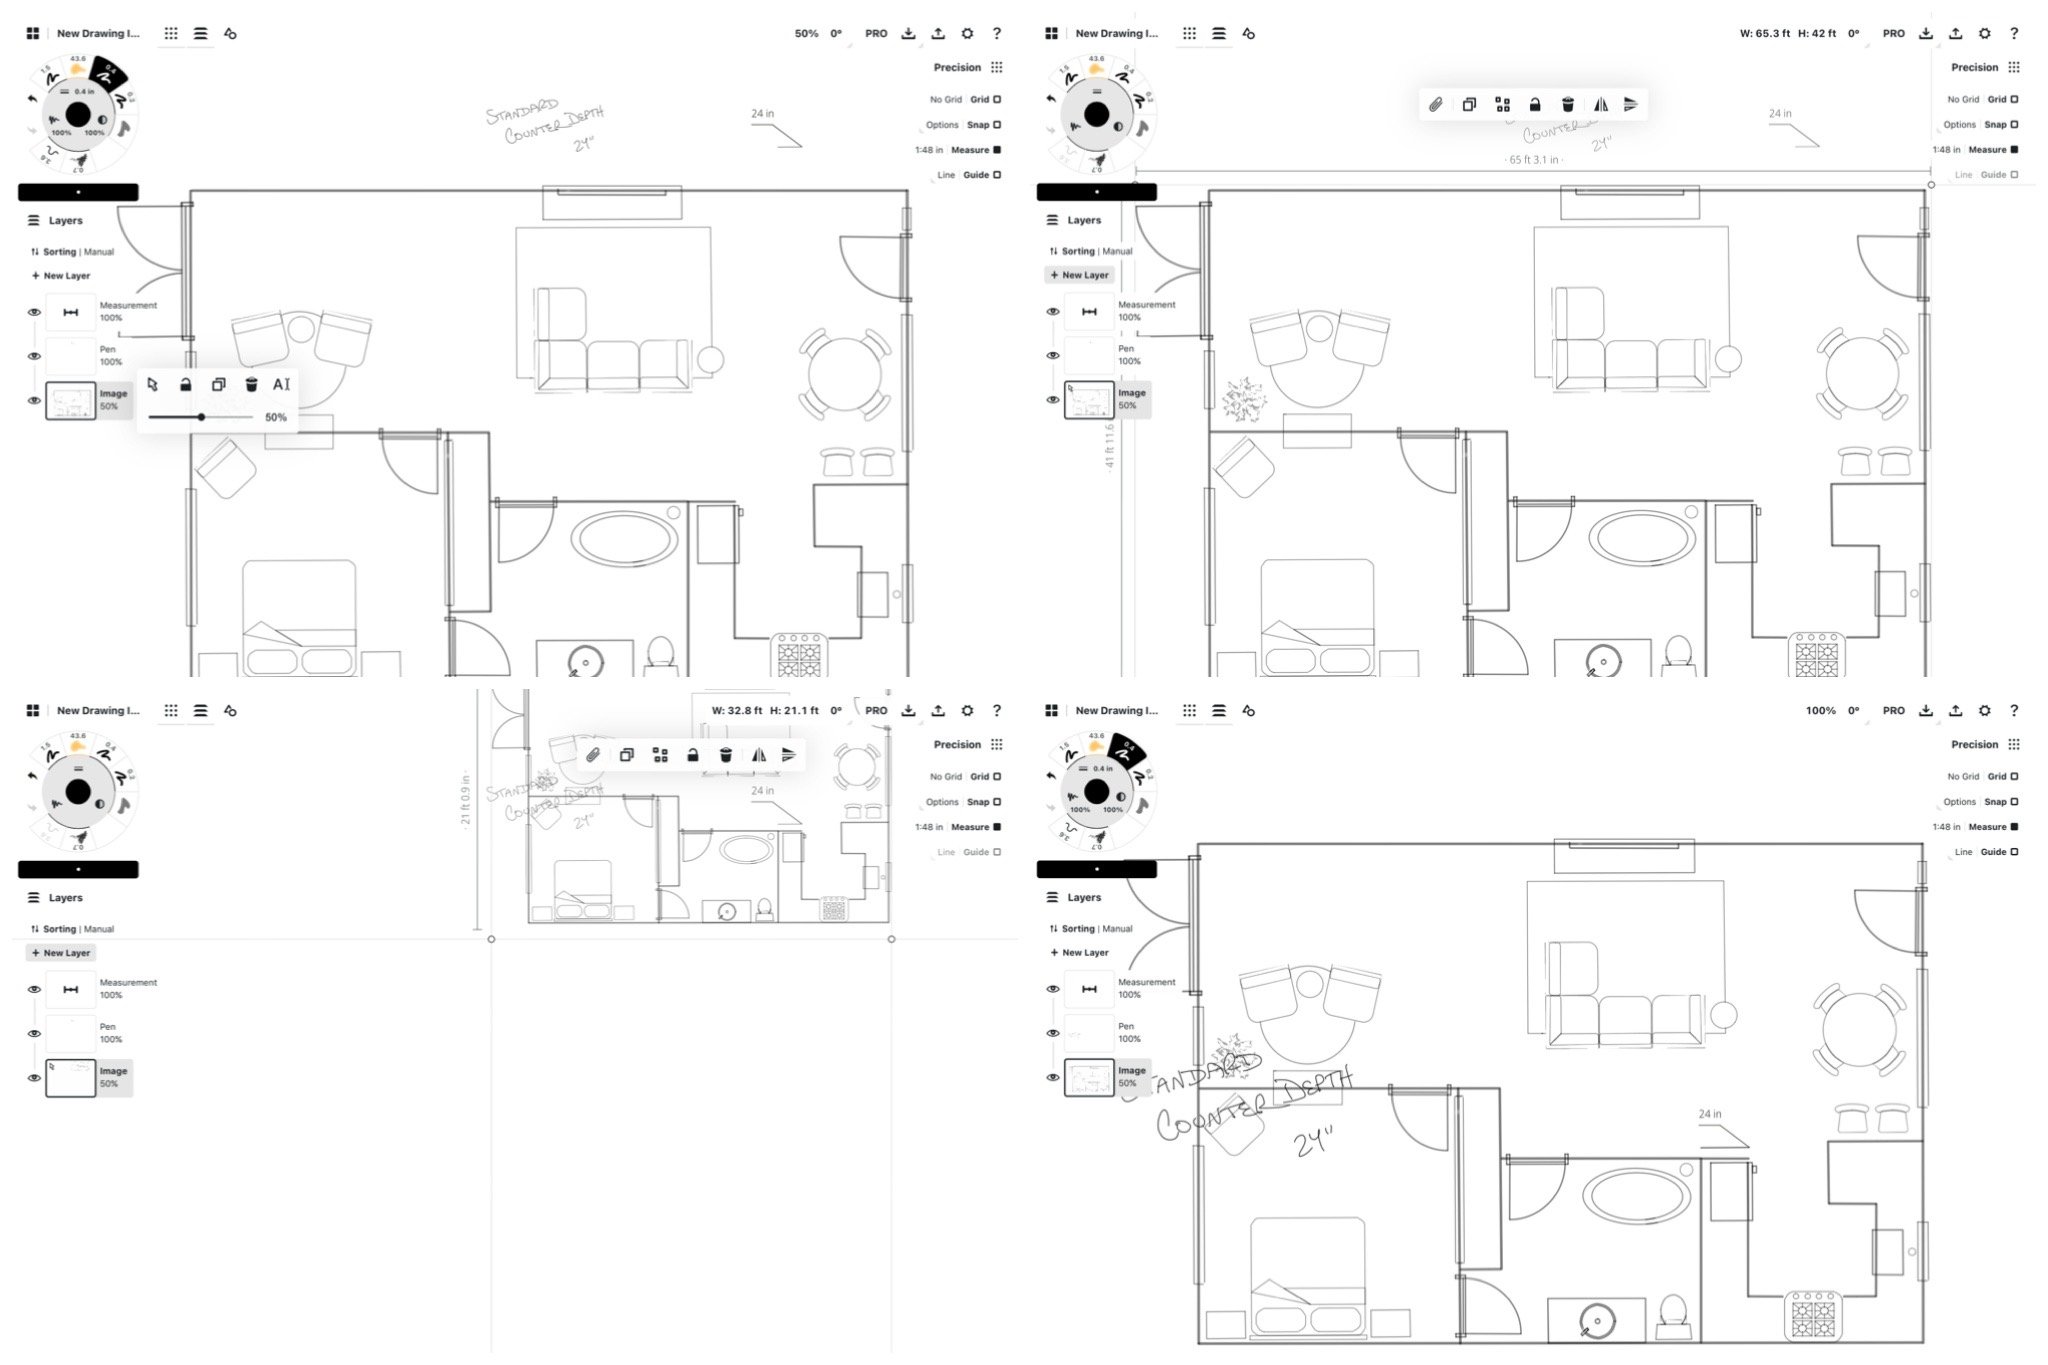
1. Open your layer menu. 2. Select your plan layer. 3. Scale it to align your known dimension with the line you drew. Tap to set it in place. 4. Zoom comfortably in on your plan. It is now to scale.
Then zoom in or out afterward so your plan is comfortably in view.
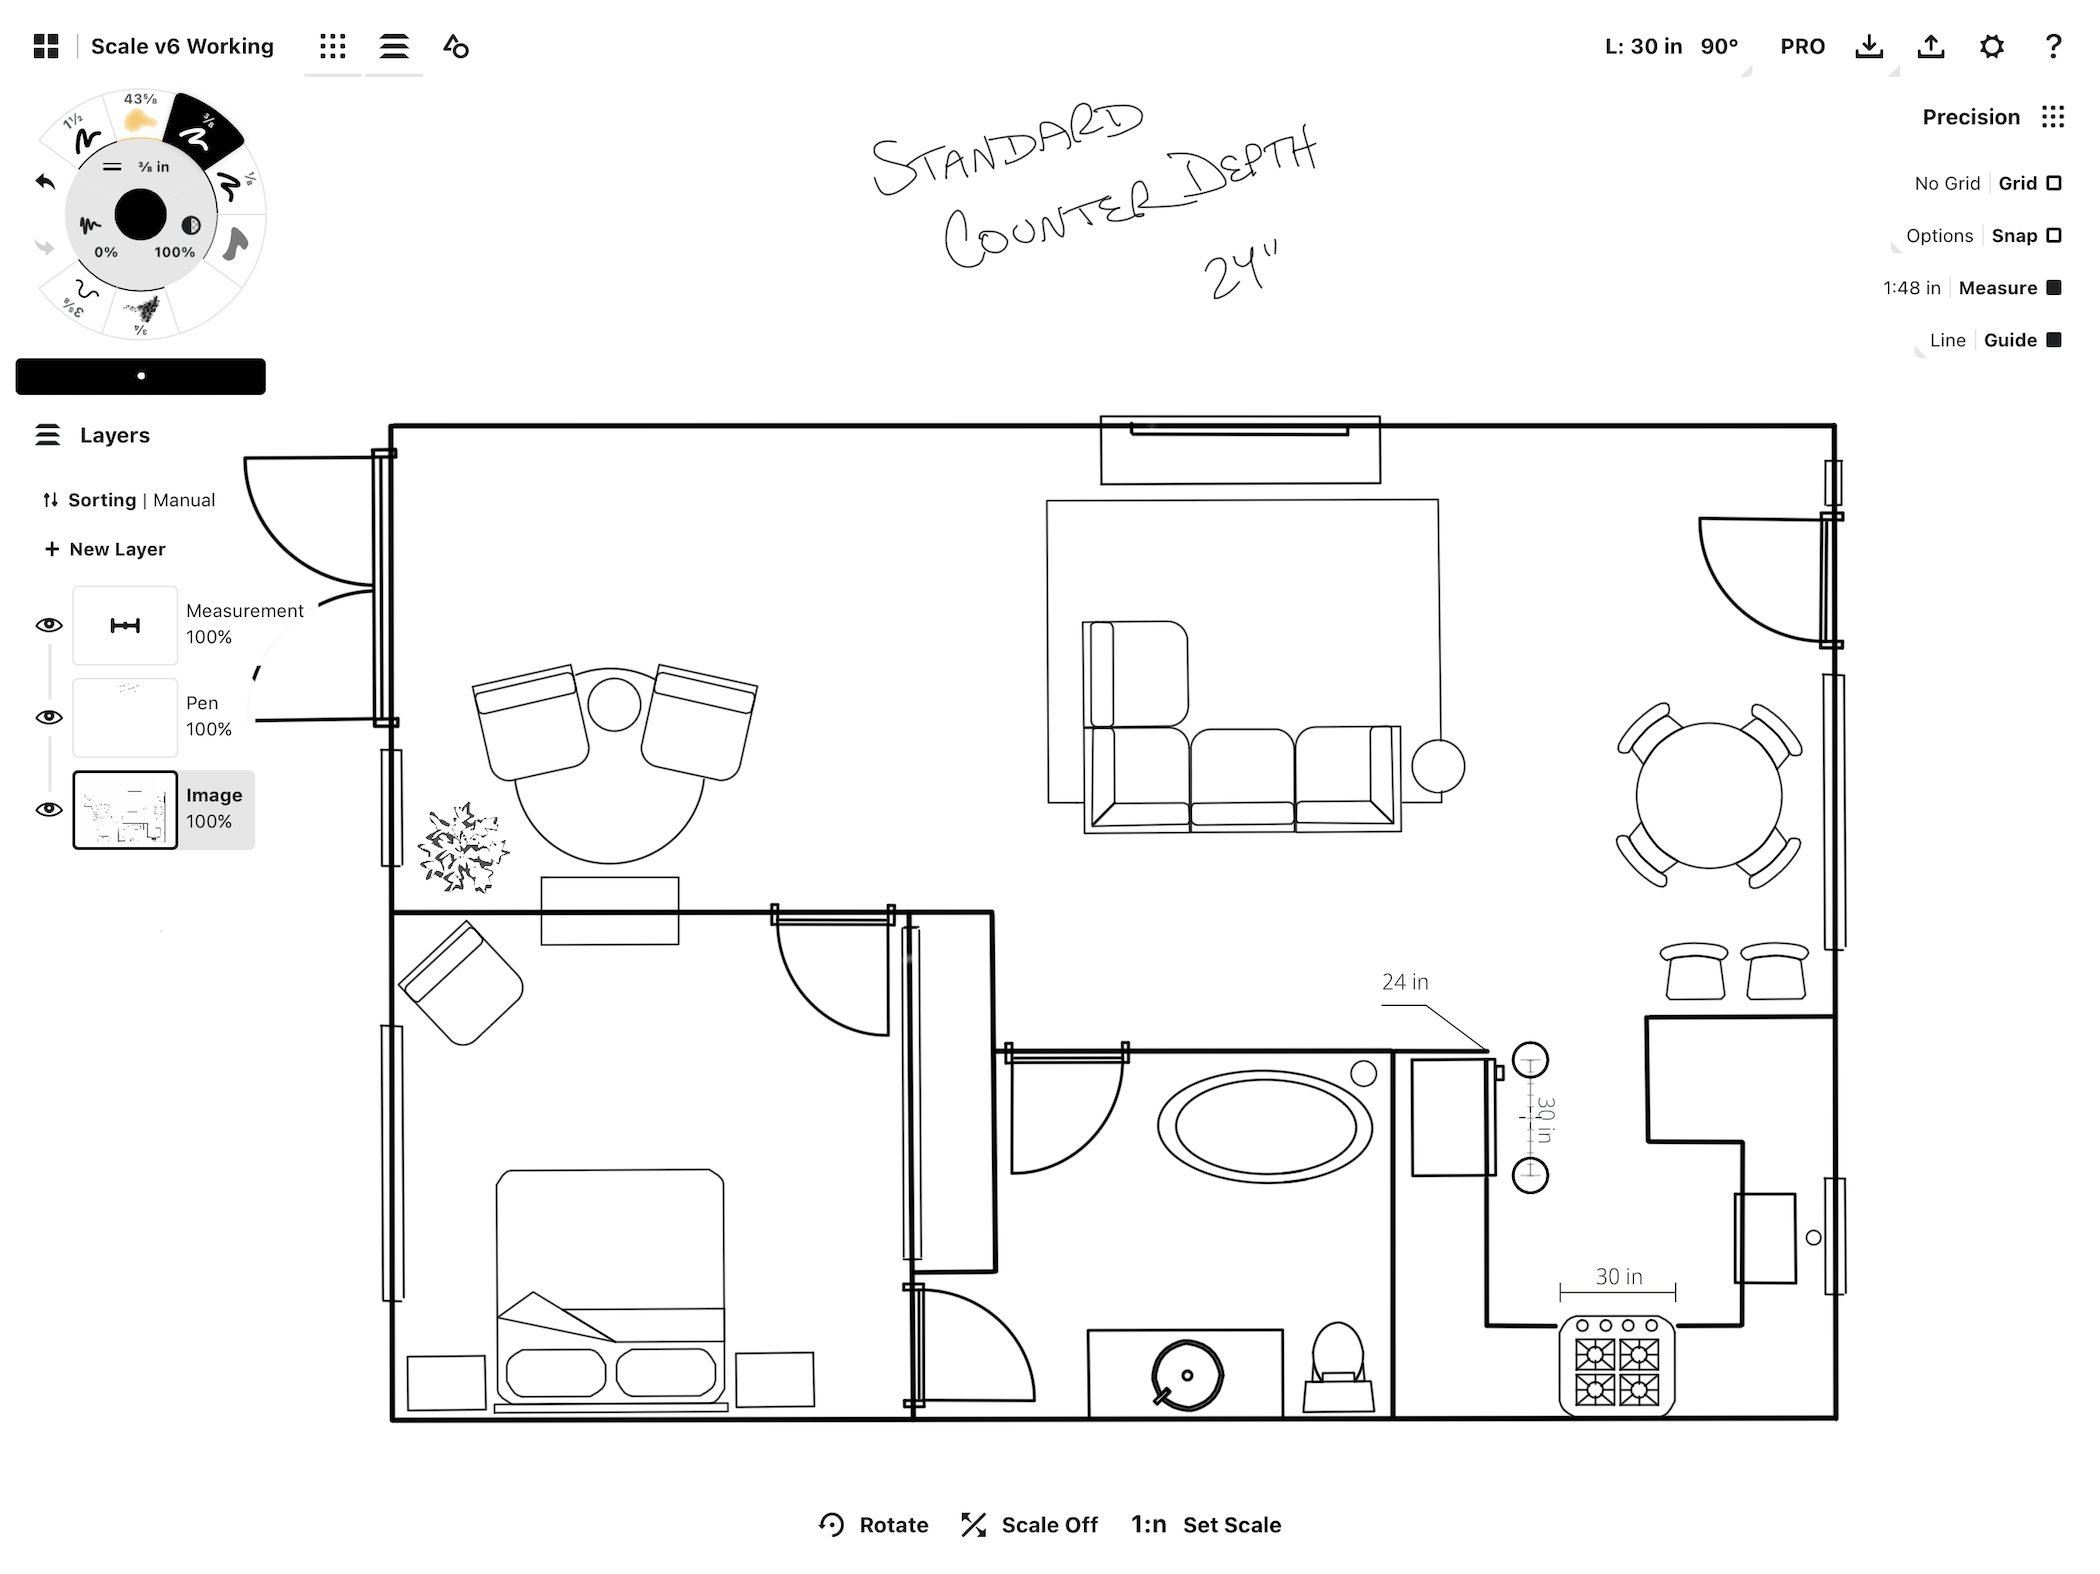
You’ll see that any lines you draw with Measure now align accurately with your plan.
Measurement
Now that you've set the scale for your plan, you can apply scaled measurements to your drawing.
When Measure is active in the Precision menu, any line or fill you draw will have a measurement associated with it, whether you've drawn freehand, used Line Smoothing, traced a Shape Guide, or imported an object (iOS). Measure measures everything. These measurements reflect the current Scale, Units and Display preferences set for your drawing in the Settings menu.
With Measure active, you can watch dynamic measurements update live with your stroke as you draw, useful for understanding and labeling real-world dimensions as you design. You can also add floating and static measurement labels to your plan using the Shape Guides and Selections, and export your plans with measurements attached.
Types of Measurement Labels
Dynamic measurements are live measurements associated with a live drawn stroke, such as drawing with a pen or pencil, drawing while Line Smoothing is applied to your tool, or filling in an area. You will see these measurements update as you draw.
- When you tap a dynamic measurement label, it remains attached to your stroke and will "stick" on the layer you drew it on.
- When you select a dynamic measurement, it will also select the stroke it is attached to. Edit them and they will be treated as the same object.
Static measurements are measurement labels applied to the canvas when a line or fill is Selected, or when using a Shape Guide.
- Select a line or fill you've previously drawn to show its measurement label. Tap it to set it on the canvas.
- A Shape Guide allows you to create a floating measurement, or a label without a line associated. Just tap the measurement label without tracing the corresponding line.
Static measurement labels are saved to their own Measurement layer to make managing and viewing them easier. This layer appears automatically when Measure is activated. If you open the Measurement layer's menu, you'll see you can select the layer, apply opacity, delete it, or bring up the Settings menu.

You'll find that floating labels made with the Line guide appear visually like traditional measurement dimensions. Labels made with Line Smoothing apply to the end of the line attached to their stroke. Choose whichever method you like best.
Working with Measurement Labels
Tap a measurement label to "stick" it to your canvas. Tap it again and it will disappear.
Select any measurement label to move, mirror, flip, rotate, edit, duplicate or delete its dimension. Use the Measurement Popup in the status bar to edit its value, scale and rotation, or tap+hold the Length value to quickly update its length. You will see the corresponding stroke length and the measurement label update when you edit a value.
Tap the Scale button on the selection popup to “Scale Off” so the measurement stays the same when rotating or moving the guide.
To rotate a label an exact number of degrees (such as an angled door or wall), select it and open the Measurement Popup. Choose from the shortcuts or enter a percentage. To rotate the Line guide, just tap+hold the angle value on the status bar and enter the new angle.
To apply the same measurement quickly to other locations, you can select and duplicate measurement labels, then tap them onto the canvas.
Alternatively with the Line guide, you can lock the guide's scale (turn Scale to "Off" in the guide menu at the bottom of the screen), move it to similar known dimensions, and tap to apply your floating labels.
Adding measurement labels to the plan.
Area Measurement Labels
While Measure is active, you can also calculate live areas for your material estimates using the Filled Stroke tool.
1. Draw your design outline.
2. In a layer beneath the outline, use the Filled Stroke tool to trace an area. You can use the Filled Stroke tool together with the Shape Guides for exact area measurements.
3. The area measurement label will appear at the center of your filled shape. Tap the label to apply it to the canvas. If you didn't catch it the first time, just select the fill and tap the measurement label that appears.
4. Editing the Area (A) of your fill in the Measurement Popup will scale your filled shape to the new area value.

Use the Filled Stroke tool to calculate live area measurements for your plans.
Exporting with Measurements
Ready to export your plan? If you want to show your measurements in the final export, make sure
- Measure is active in the Precision menu, and
- the Measurement layer is set to visible.
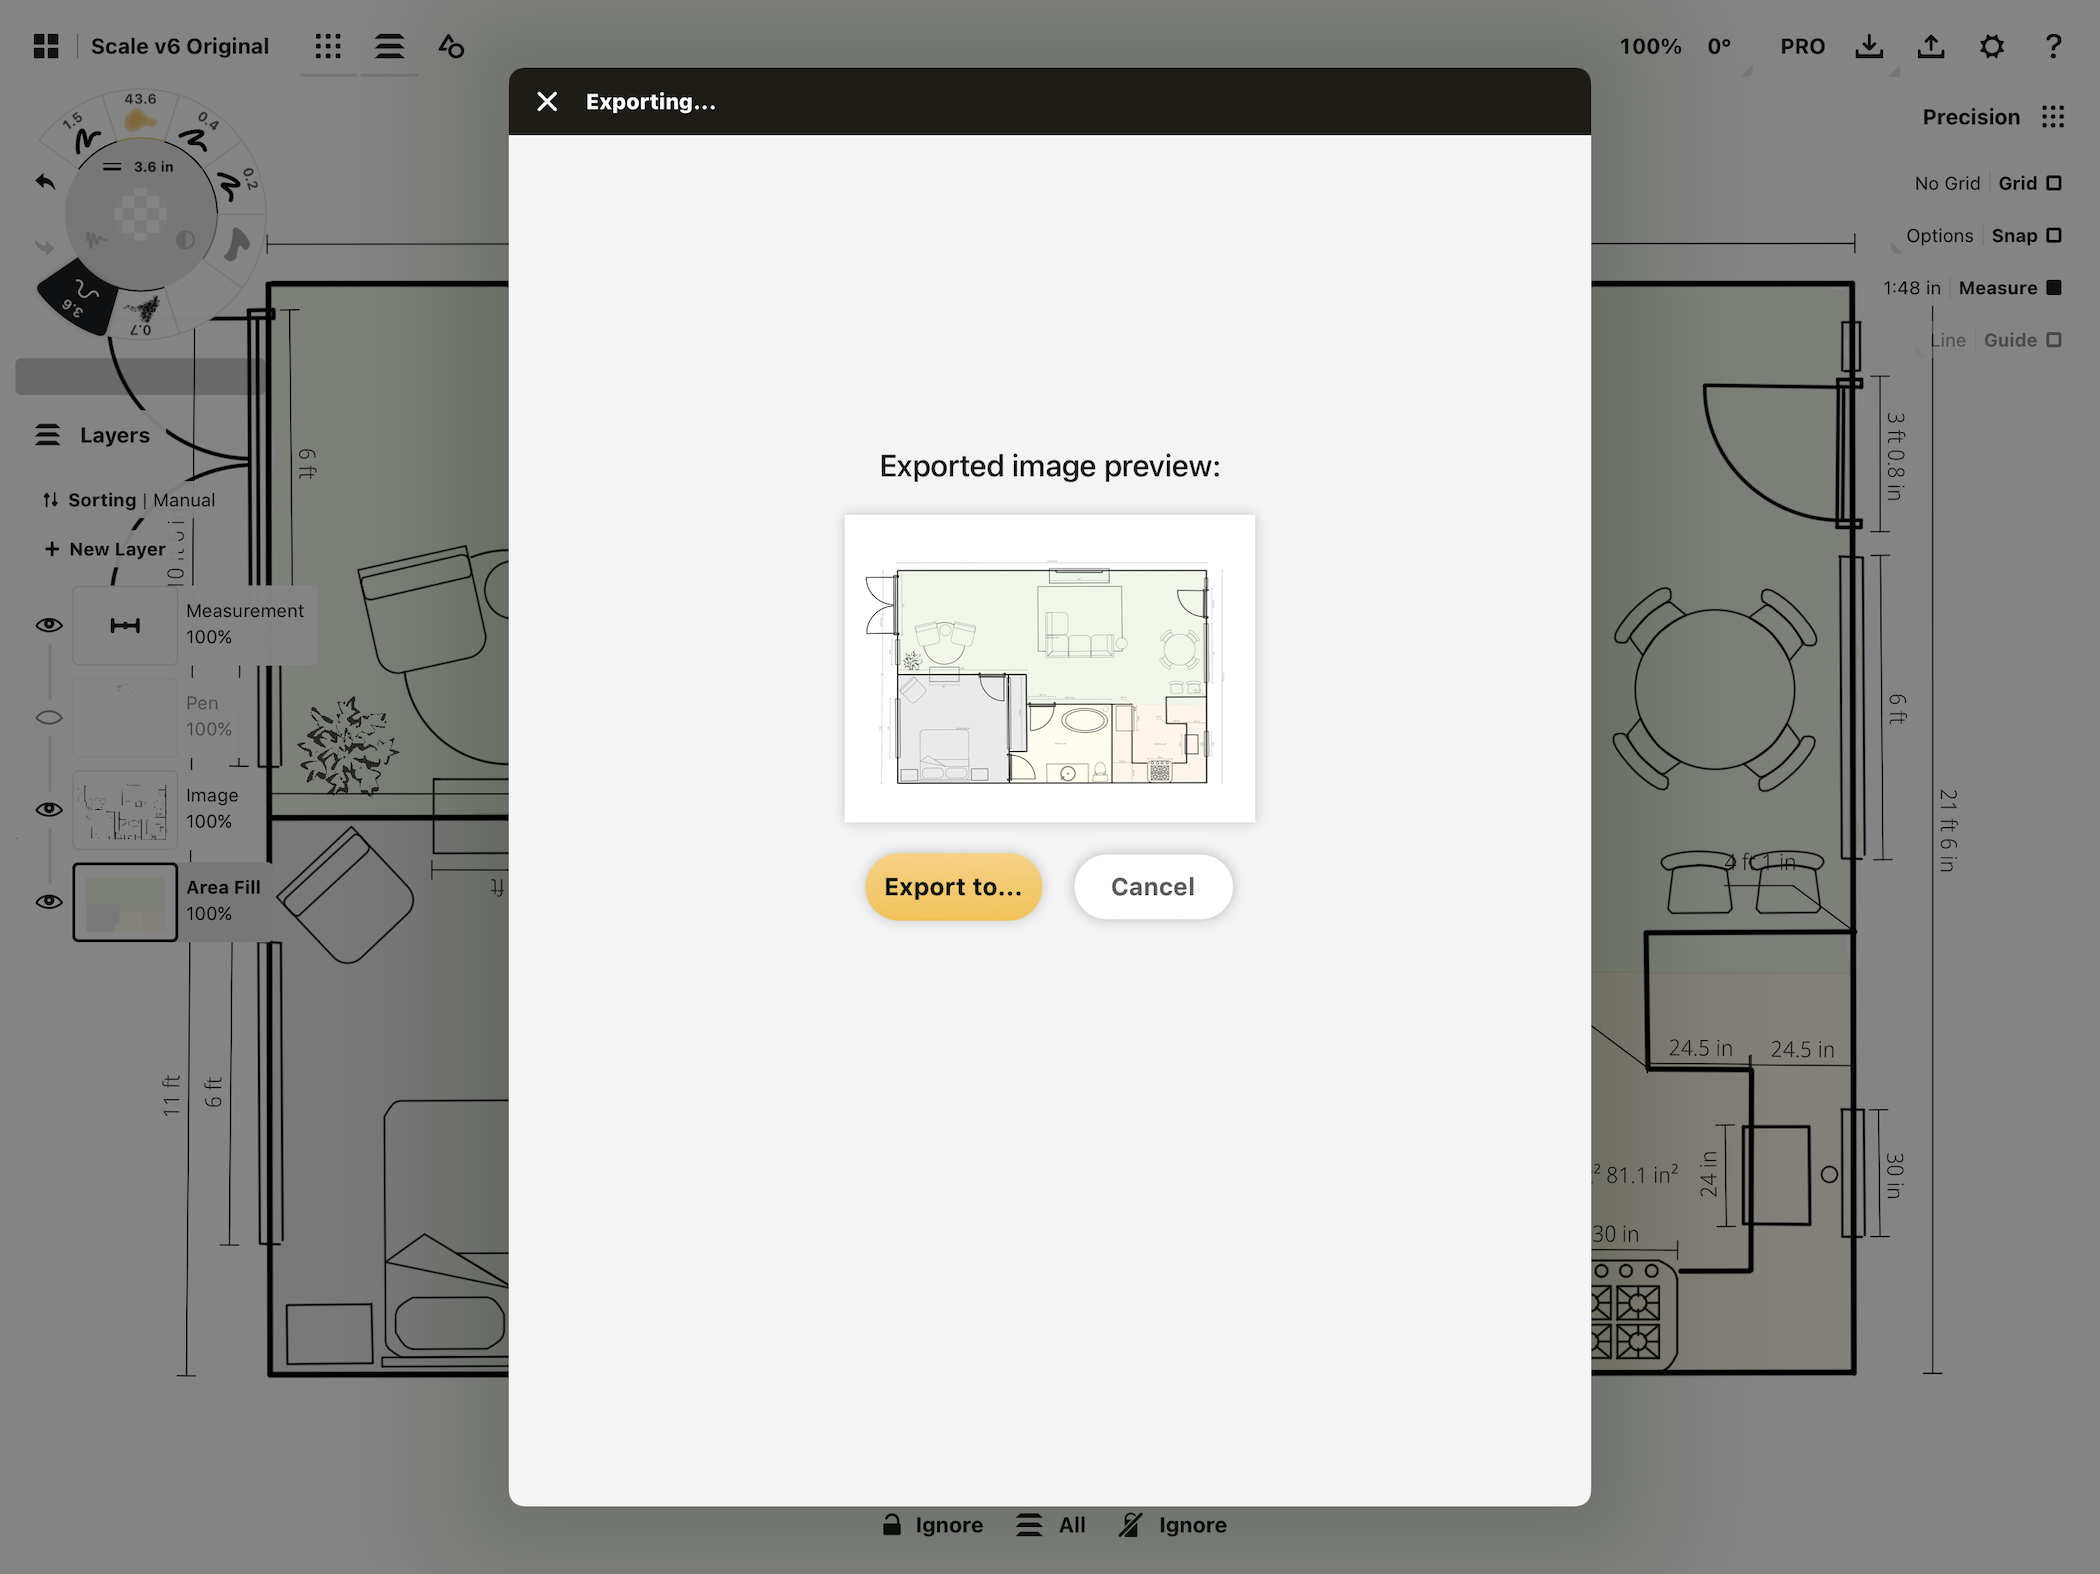
Exporting a plan with measurements.
If you don’t want to show labels in the export, just turn Measure off. The measurements will still be there when you turn it back on.
If you have any questions about applying scale or measurements in Concepts, please email us at support@concepts.app or head in-app to Help -> Ask Us Anything. We’ll be happy to help.
By Erica Christensen
Recommended
How to Create a Floor Plan - Everything you want to know about creating a floor plan in Concepts.
How to Use Layers to Take Notes, Illustrate and Design - Learn how to use Concepts' layers to take notes, illustrate and design your projects.
A Practical Evolution of Ideas and Tech in Architecture - Architect Ewen Miller shares how he uses Concepts and the iPad Pro to design improvements for residential communities in the UK.