How to Sketch with a Perspective Grid
These drawing exercises will help you learn how to use 1-point, 2-point and 3-point perspective grids to sketch designs and illustrations.

A grid is a framework to help you conceptualize and structure your ideas. Different grids can help you to sketch different views - for example, a square grid offers instant metric visualization, an isometric view shifts a workspace to a 30 degree angle, while a dot grid can provide loose frameworks for connecting the dots between ideas (pun slightly intended).
Perspective grids create a 3-dimensional framework on a 2D surface. The view is so realistic, they draw your eye straight to the focus point aka vanishing point at the "far end" of the paper, and you're drawn right into the third dimension. That's what they're there for, but at the same time, you need to get used to drawing in line with this 2D/3D system, and train your hand and eye to work through the visual tricks of the paper wormhole.
Here are some simple exercises to help you understand how to use 1-point, 2-point and 3-point perspective grids to sketch structures. If you want help setting up your grids first in Concepts, check out this tutorial here.
A Few Perspective Terms
A perspective grid is a drawing framework that combines a horizon line (a horizontal line representing your field of vision), orthogonal grid lines (lines that "vanish" into a focal point), at least one vanishing point (a point on the horizon line where all lines converge), and at least one corresponding plane (a surface that you, the viewer, see as represented by the grid lines).
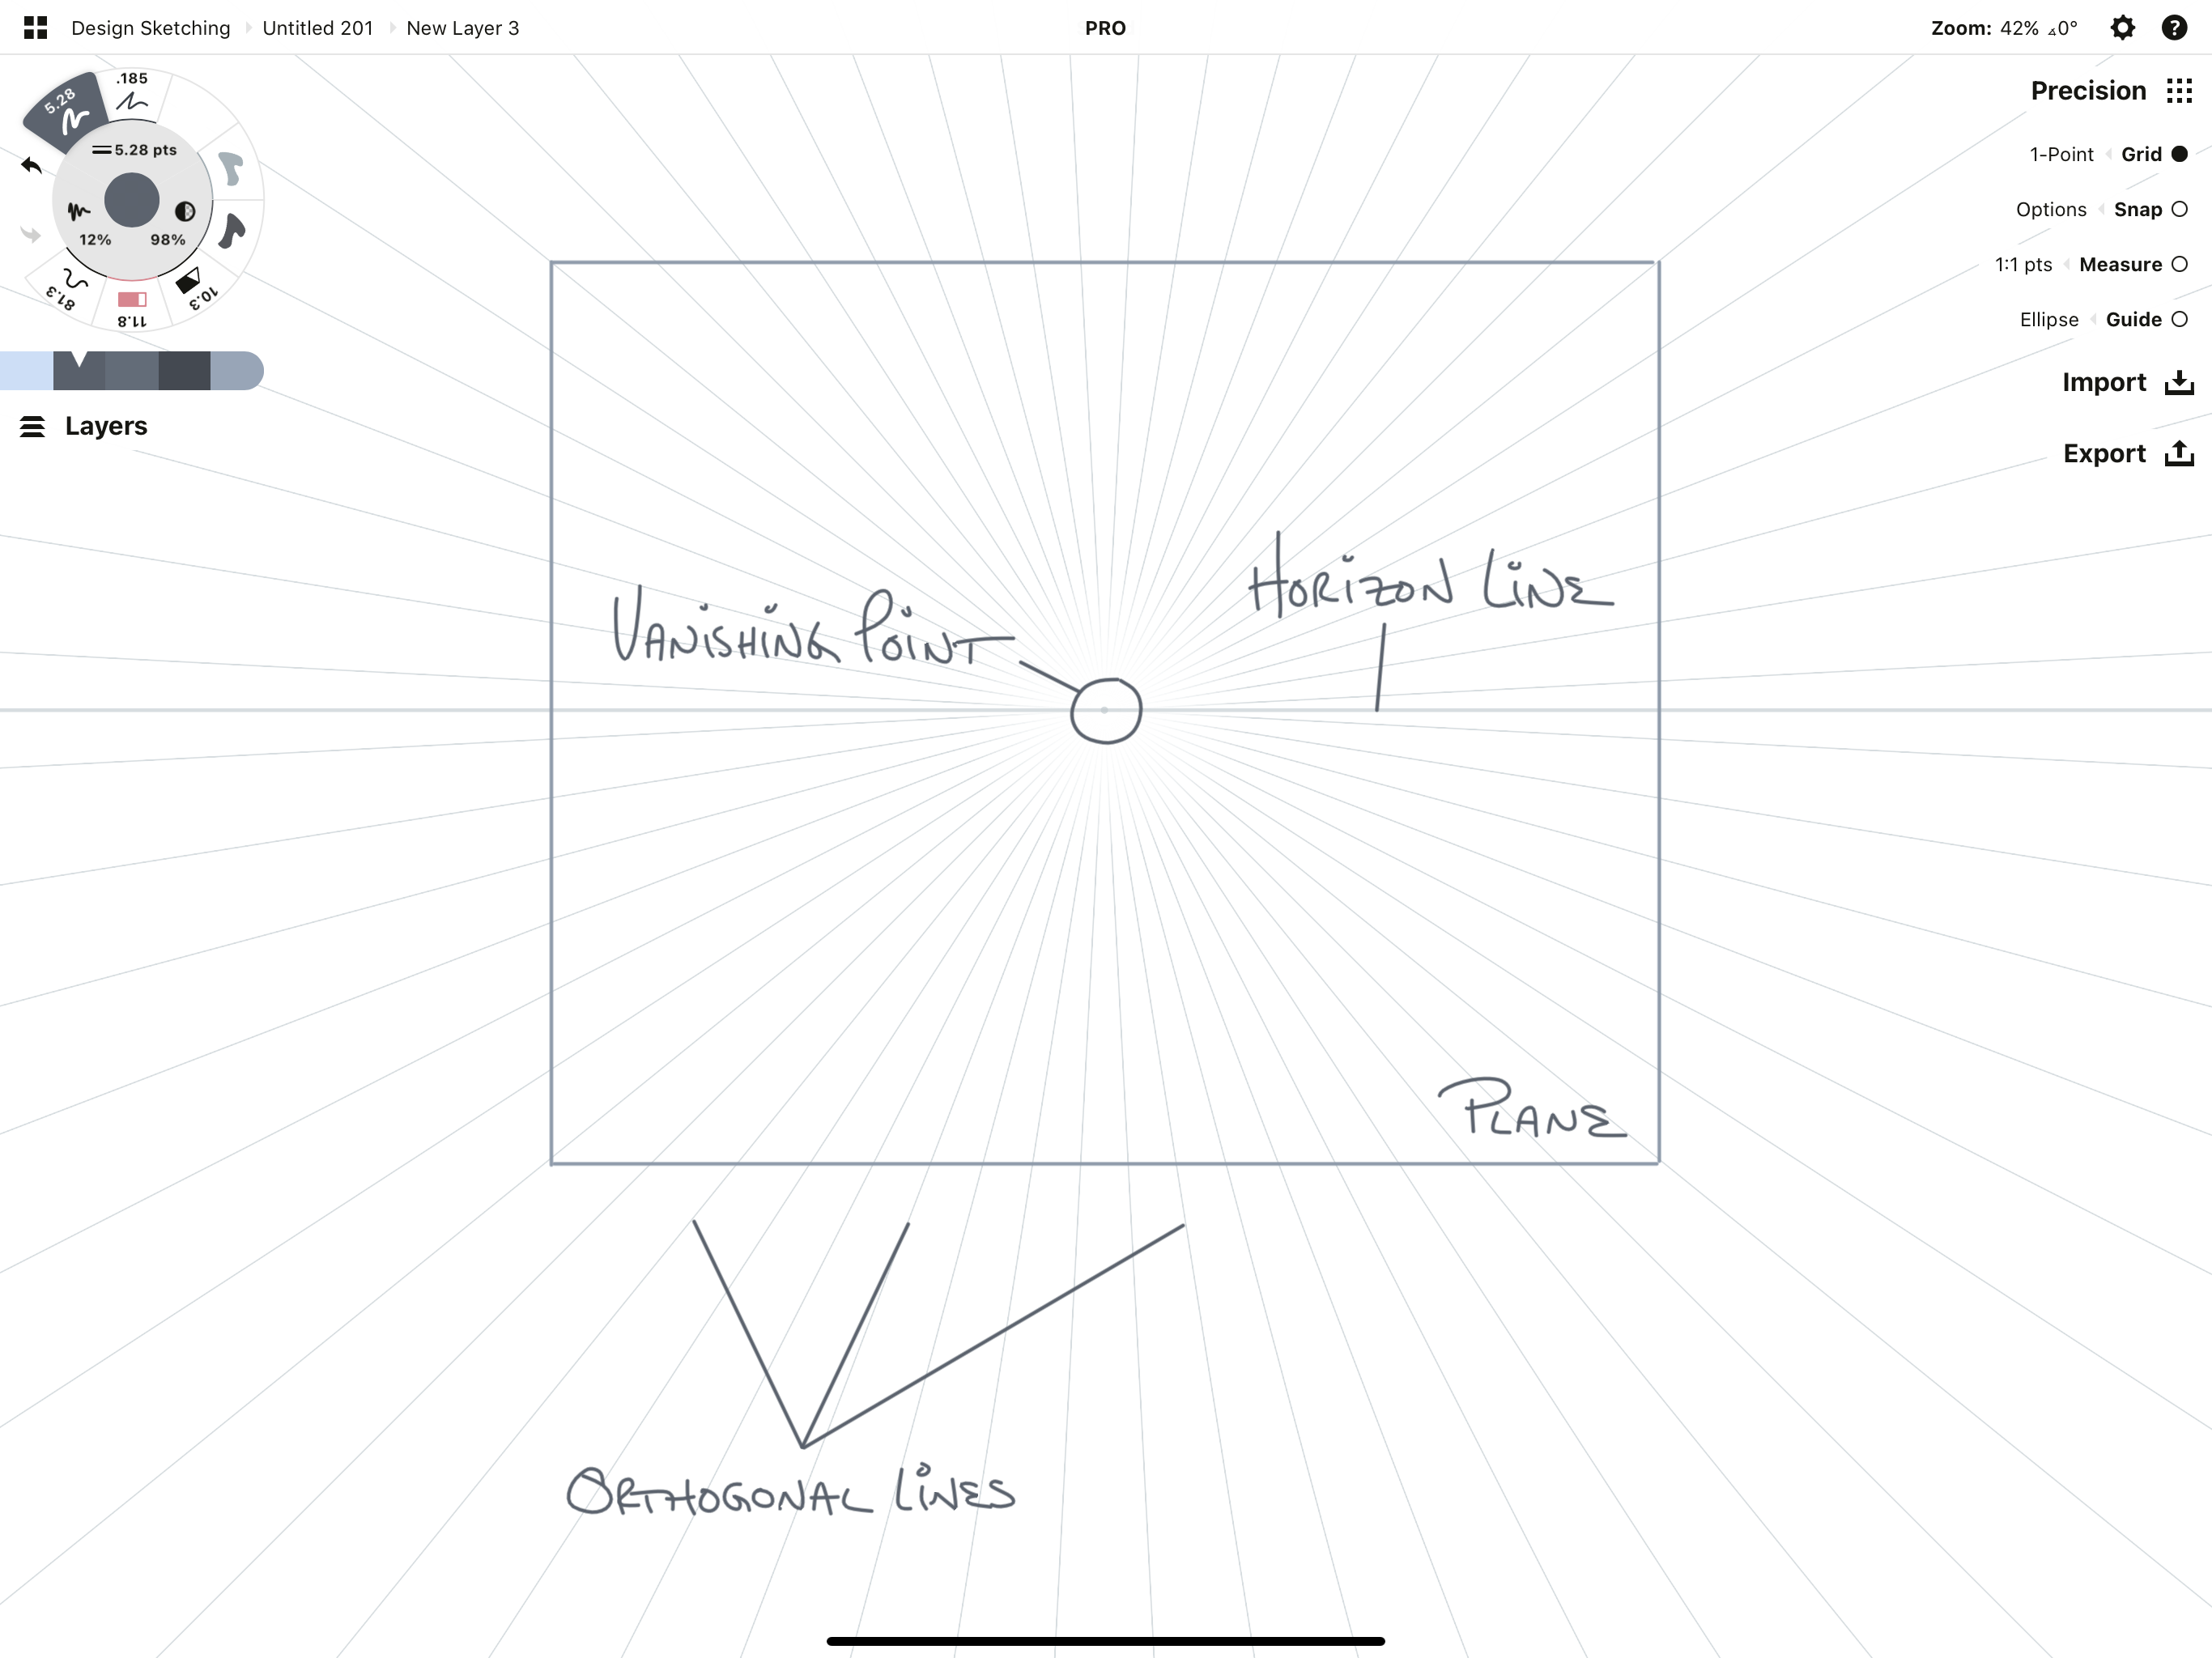
Horizon Line
The horizon line is your horizontal view at eye level. As your eyes can see nearly 180 degrees across, the horizon line mimics this on the page.
A horizon line right in the middle of the canvas assumes you are staring straight across at the scenery. A lower horizon line means you are looking down toward it, a higher horizon line means you are looking upward. An angled horizon line means you have tilted your head or viewpoint in an unusual way, and is a great way to add fresh angles to your illustrations.
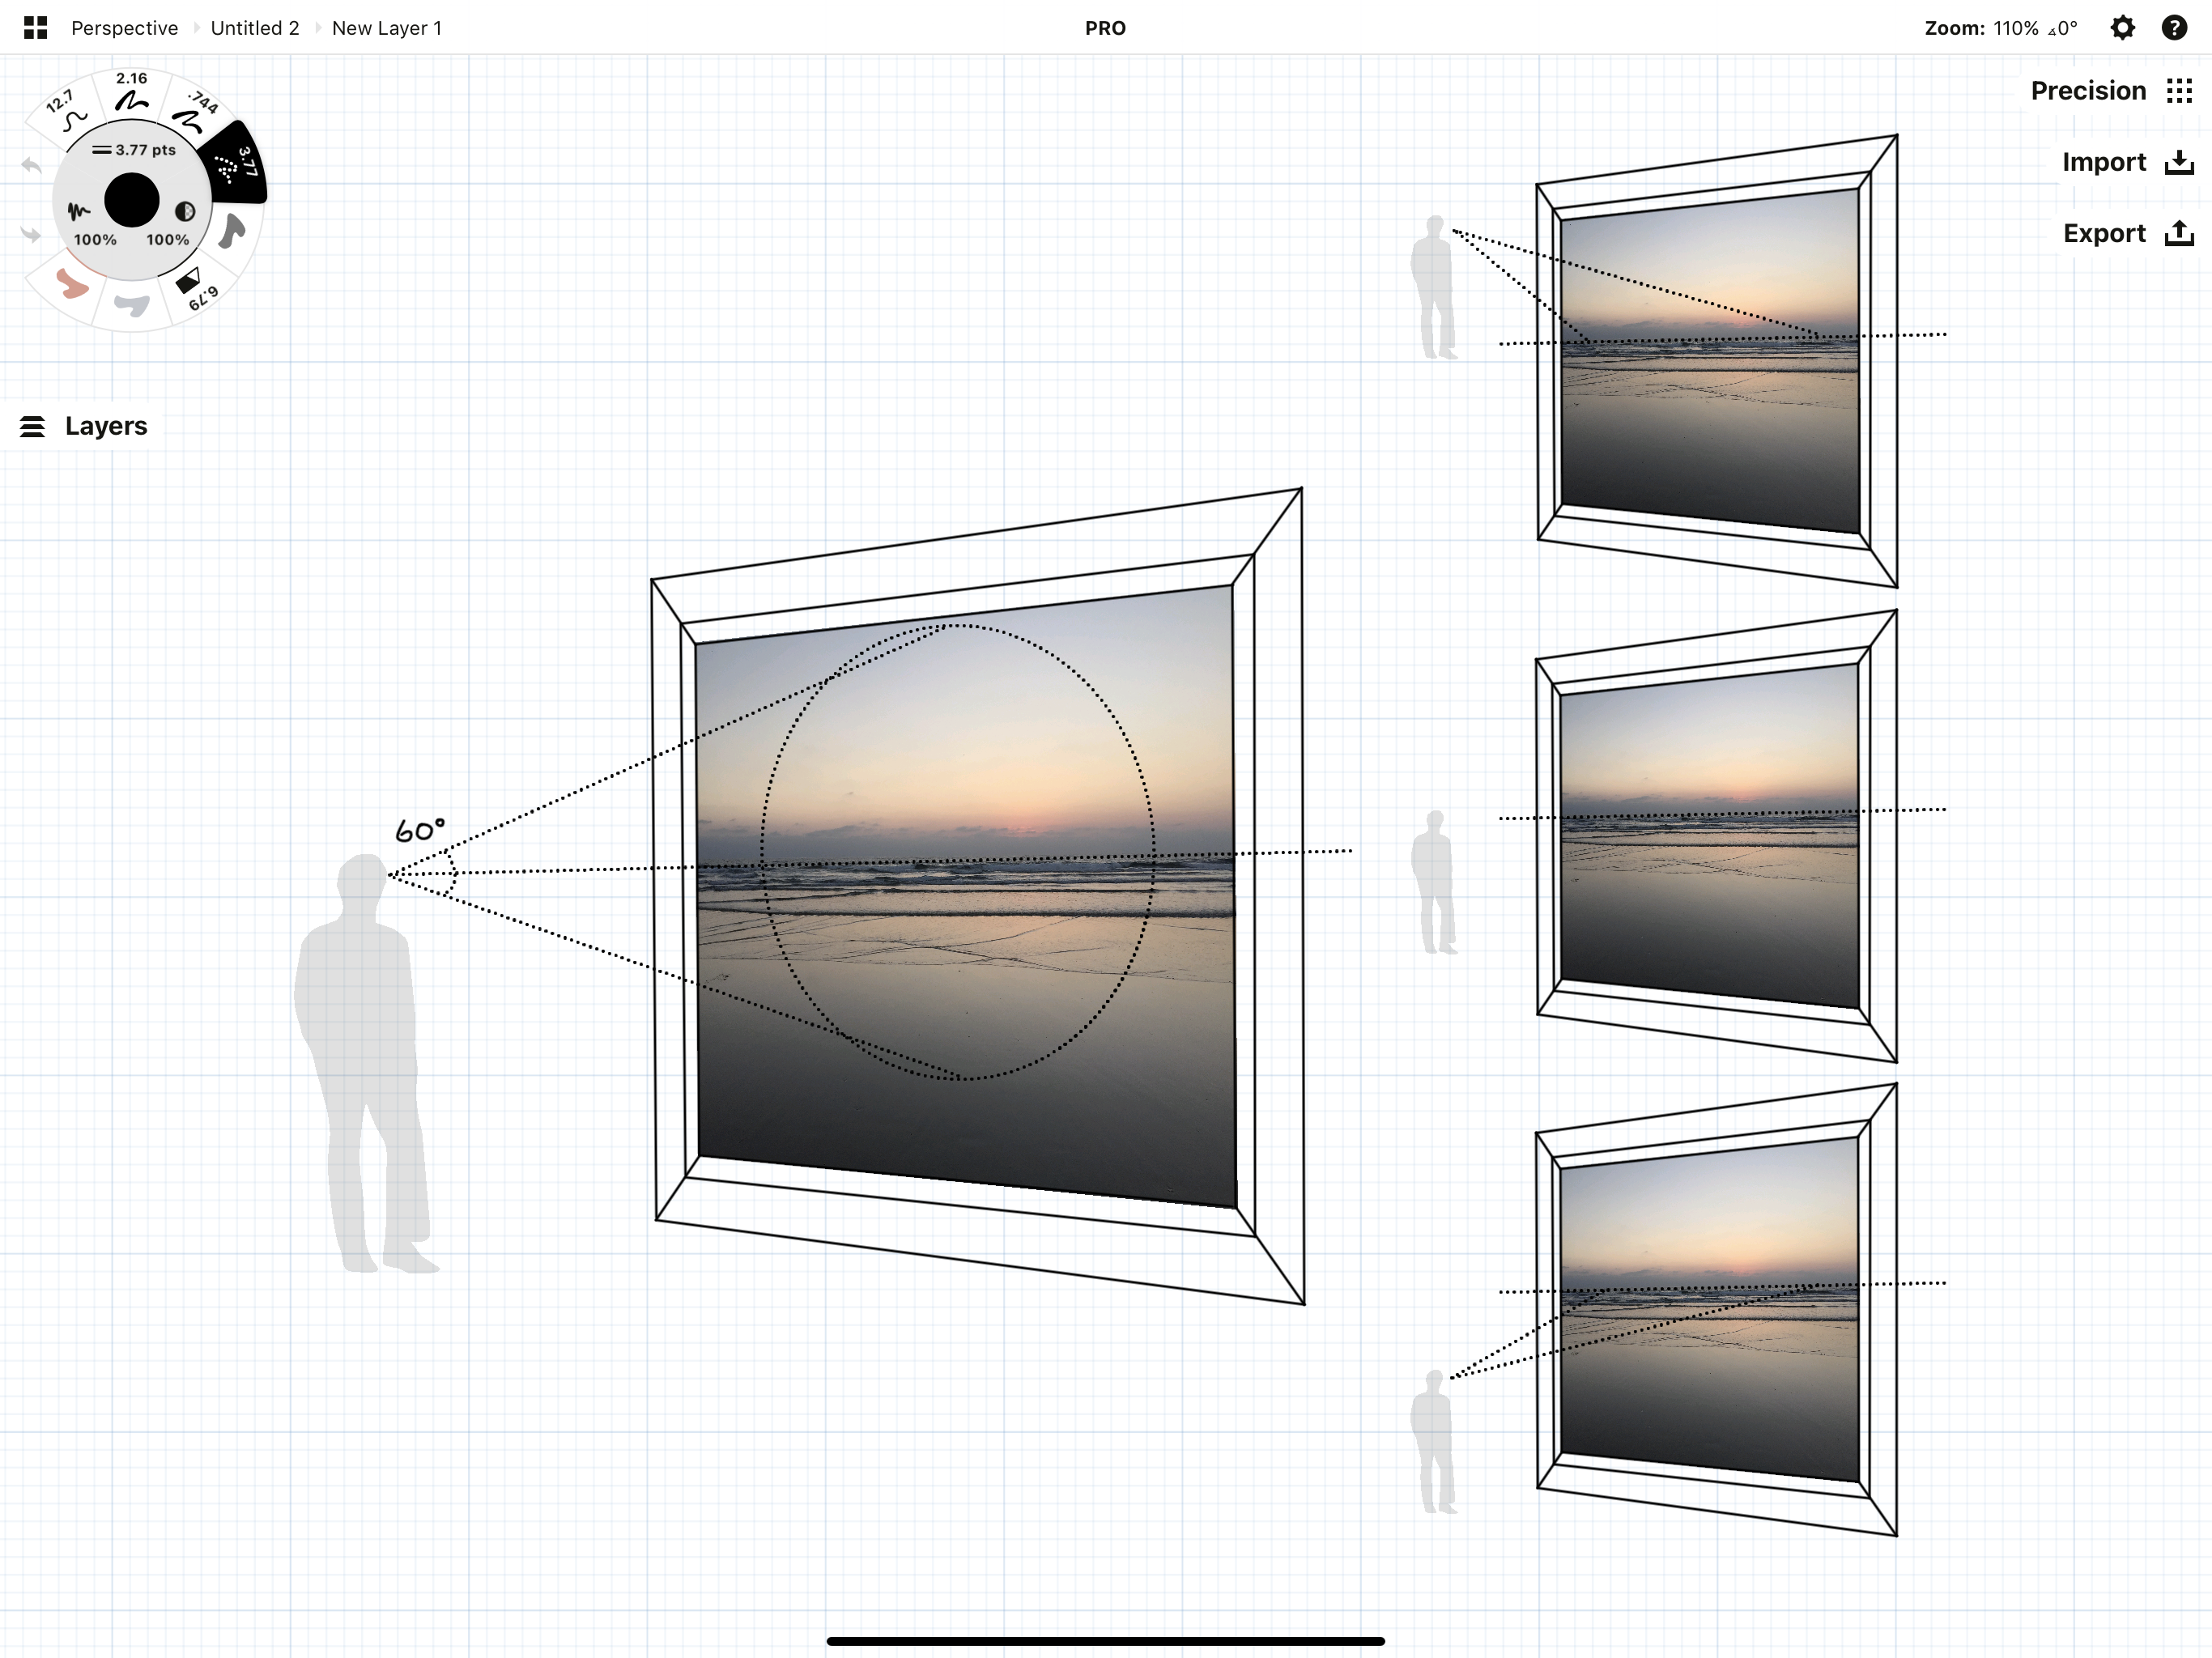
Differing viewpoints of the horizon line. Your eyes use a 60 degree cone of vision to focus in front of you, and with your peripheral vision, you can see nearly 180 degrees across.
Orthogonal Lines
Orthogonal lines or perspective lines are the grid lines that disappear into the horizon, representing the 3-dimensional plane you follow forever into the distance. Each vanishing point (see below) has its own set of orthogonal lines.
Vanishing Point
A vanishing point acts as a focal point for all orthogonal lines heading into the distance.
The number of vanishing points on your horizon line is equivalent to the number of planes you'll view on your grid. One point perspective has just one vanishing point, and as the viewer, you will see only a single, front surface or plane of your object. Two point perspective has two vanishing points that show two planes from your viewpoint. Three point perspective has three vanishing points that reveal three planes of your object.
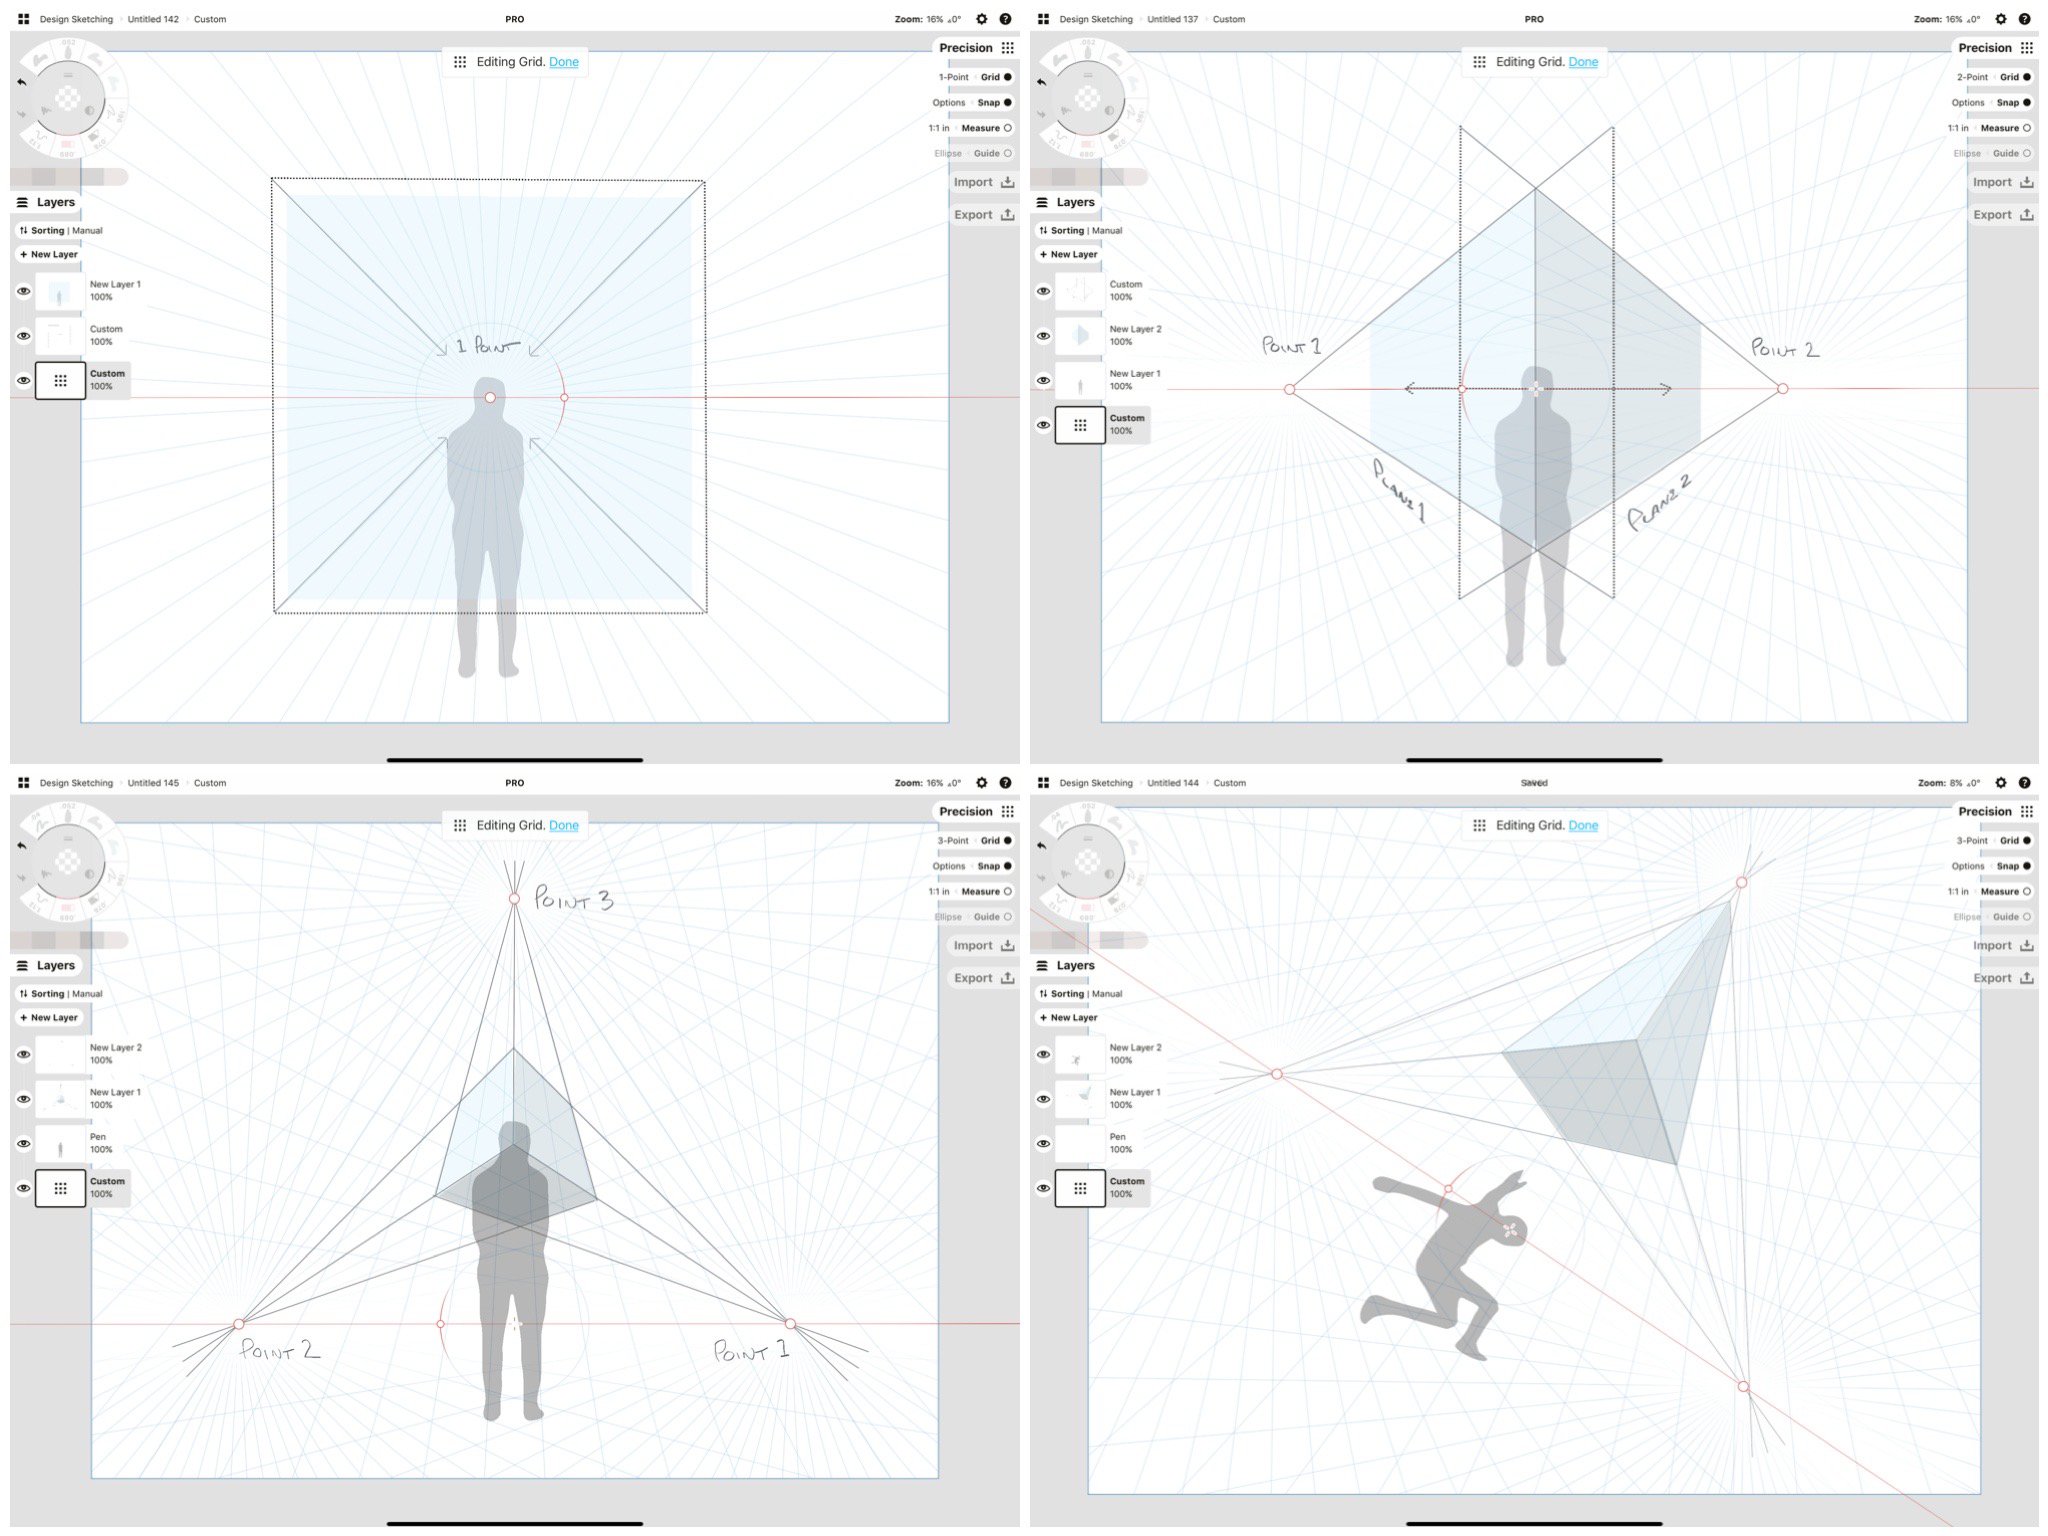
1-point, 2-point and 3-point perspective grids showing their vanishing points and corresponding planes of reference. The fourth image shows how dynamic the image becomes when you angle the horizon line.
Plane
If you were to visualize a plane, it would be completely flat. An area with only one plane would appear as flimsy as a piece of paper.
Two planes could either run parallel or intersect at a line. As you are a single viewer with options to focus on two separate points on the horizon line, these two corresponding planes would intersect with a vertical line where you stand. Imagine two pieces of paper criss-crossing at a full length or edge.
If you added a third dimension to the two mentioned above, it would angle perpendicularly to both the first two planes (think X, Y and Z axis).
Drawing Tip: When you're looking at perspective grids, it's easy to see just the lines. But really these lines represent the full directional plane extending from your eyes to the horizon line. When you're drawing an object, think about drawing each plane of the object, instead - this will help you to visualize your object's volume easier within the grid.
Perspective Sketching Exercises
The following exercises will help you to sketch basic structures with the perspective grids, and align your eye and sketching with the structure enforced by each grid type. With a bit of practice, the grids can become a very good friend for drawing quick buildings or urban landscapes.
If you're a beginner with using digital perspective grids, here is one tip to keep in mind as you get started: it helps to have an idea in mind of what you want to draw first. As in, close your eyes and imagine your scene first.
The grid - and Concepts' Align to Grid drawing guide, specifically - is a constraining tool to help you draw exact structures on your paper, so your stylus may not behave as you expect until you understand the rules for each grid. You'll get to know these rules and how to connect your lines into a proper shape with the following exercises, but at the same time, feel free to visualize your idea with a loose sketch first, without any grid at all. You can always match up your grid to the sketch afterward using the techniques shared below.
1-Point Perspective
A 1-point perspective grid has a horizon line with one vanishing point, representing where you stand and look into the distance at eye level. As you have only one focus point, if you are viewing the object head-on, you will only see the front plane of the object.
This means that with a 1-point perspective grid, your linework will consist of horizontal lines and vertical lines as aligned with your horizon line, and lines extending toward your vanishing point.
Bridges make great examples of 1-point perspective. So do streets, or any object you can see face-on.
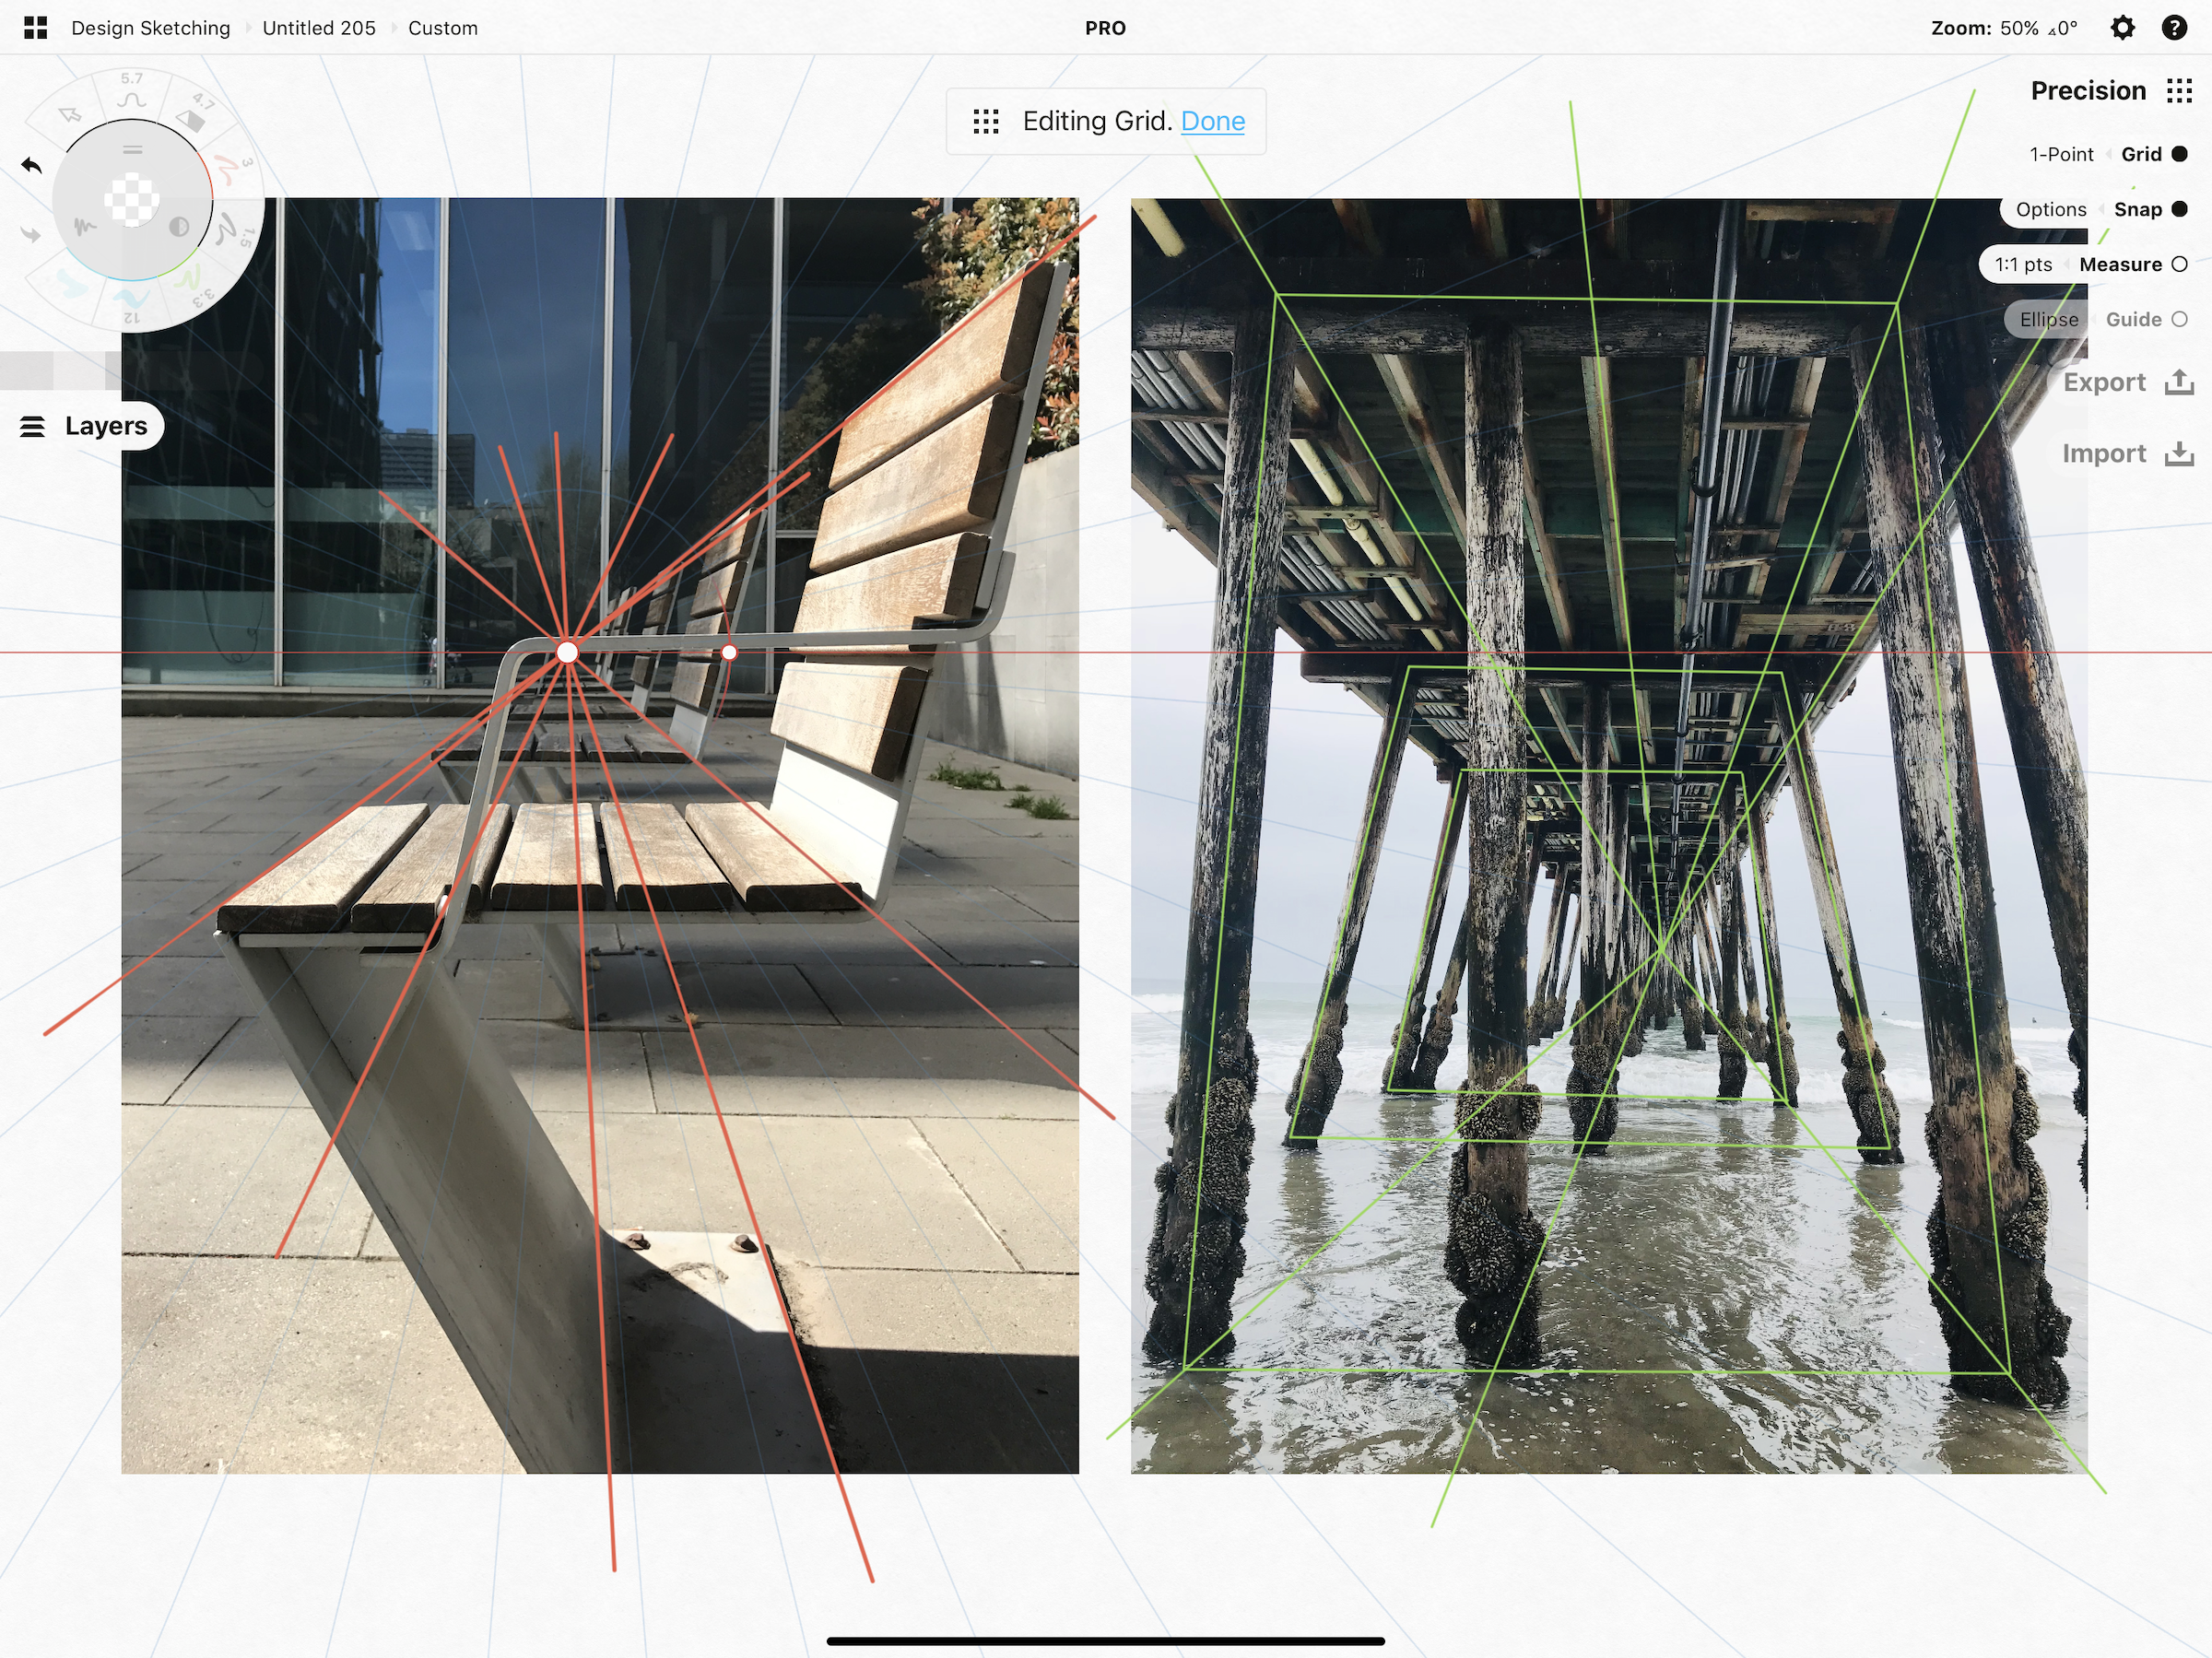
Left image: This set of chairs is in 1-point perspective. Right image: In this is a head-on view of a bridge, each face is its own plane replicated toward the vanishing point at the far end (aka middle) of the photo.
TL;DR for 1-Point Perspective Sketching
1. Set up your grid. A 1-point grid has a horizon line and one vanishing point, with lines extending through the vanishing point.
2. In your mind's eye, visualize your object in relation to the grid.
3. On the grid, draw the front plane of your object.
4. Draw your perspective lines from each major corner on the object toward the vanishing point.
5. Draw the rear boundaries of the same object as they align with the perspective lines.
Exercise 1 - Sketch a Simple Structure
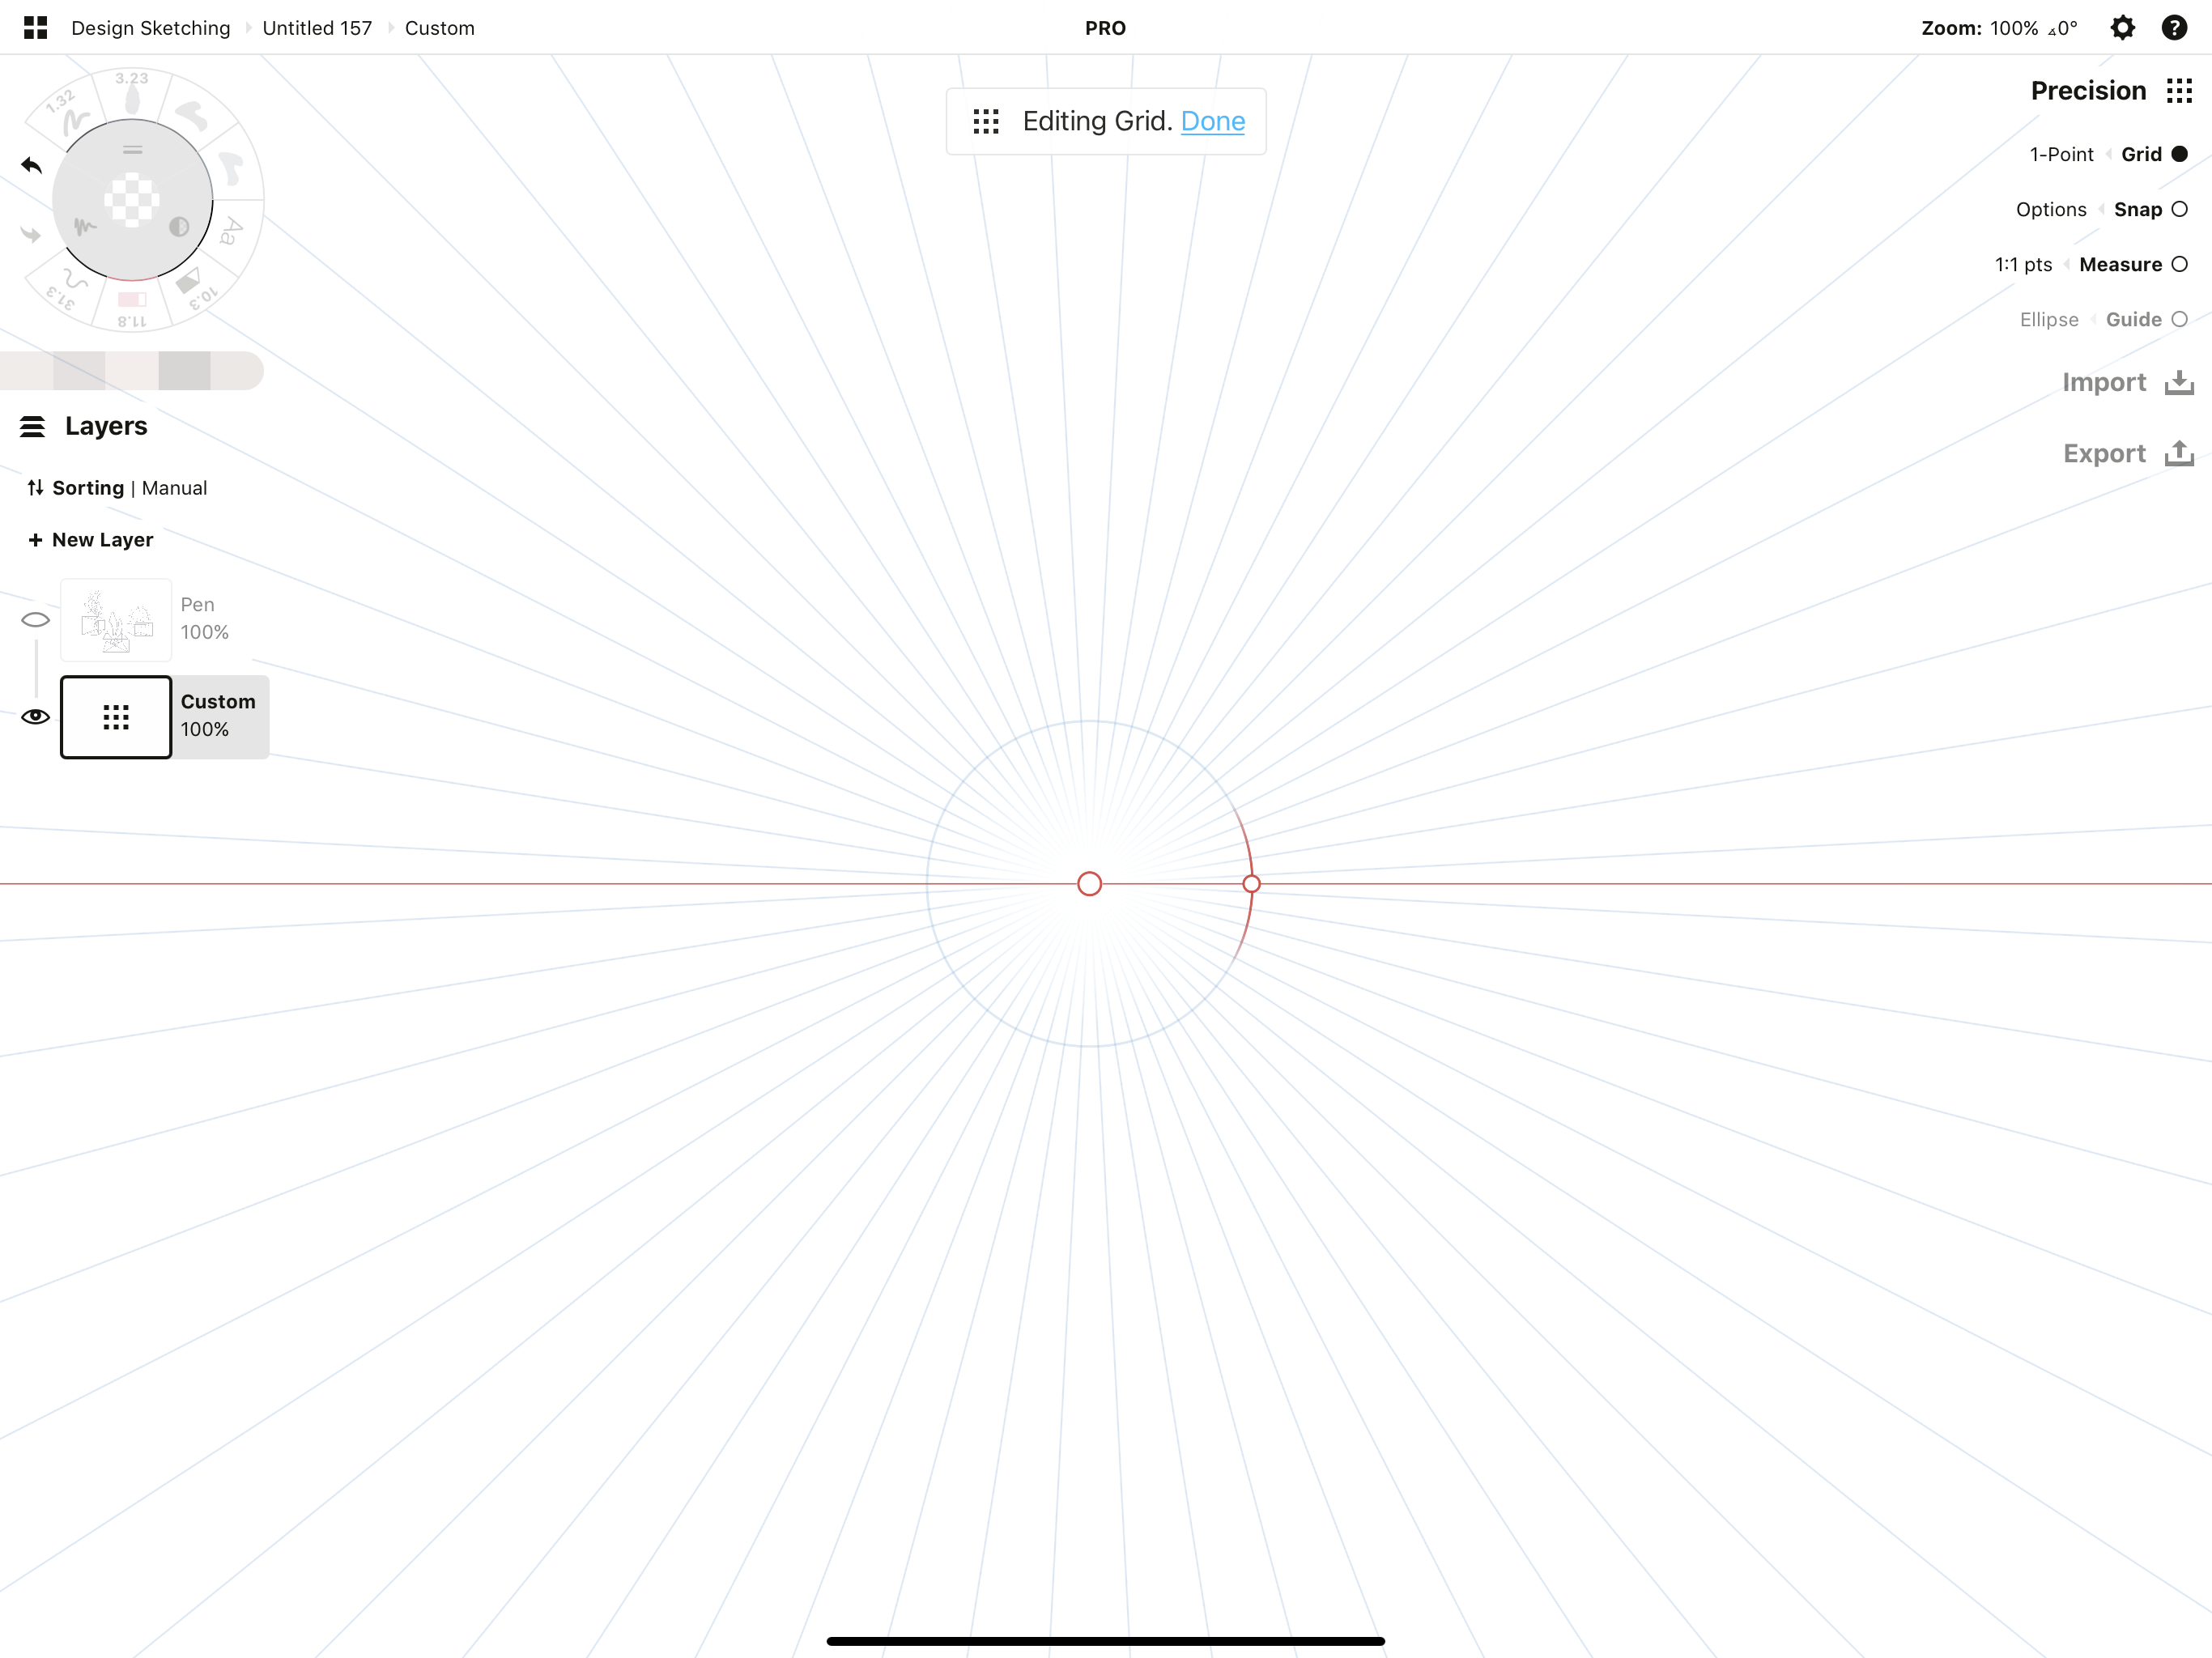
1. In a new drawing, activate the 1-point perspective grid. This grid has a horizon line with one vanishing point. (You may have to zoom in or out to see the full grid interface on the canvas.)
It helps to have a structure in mind before you sketch. Think about your object. Do you want to draw a picture frame, window or door? Or is it the face of a building?
It doesn't have to be as simple as a square or rectangle - everything around you has its own structure and is viewed in perspective, but a rectangle has a surface area that meshes exactly with the grid and helps you to align your thinking to the grid's planes when you first use them.
2. Set a pen to 100% line smoothing or activate Align to Grid in the Precision menu. Sketch a simple rectangle or square. Remember that horizontal and vertical lines are acceptable on a 1-point perspective grid.
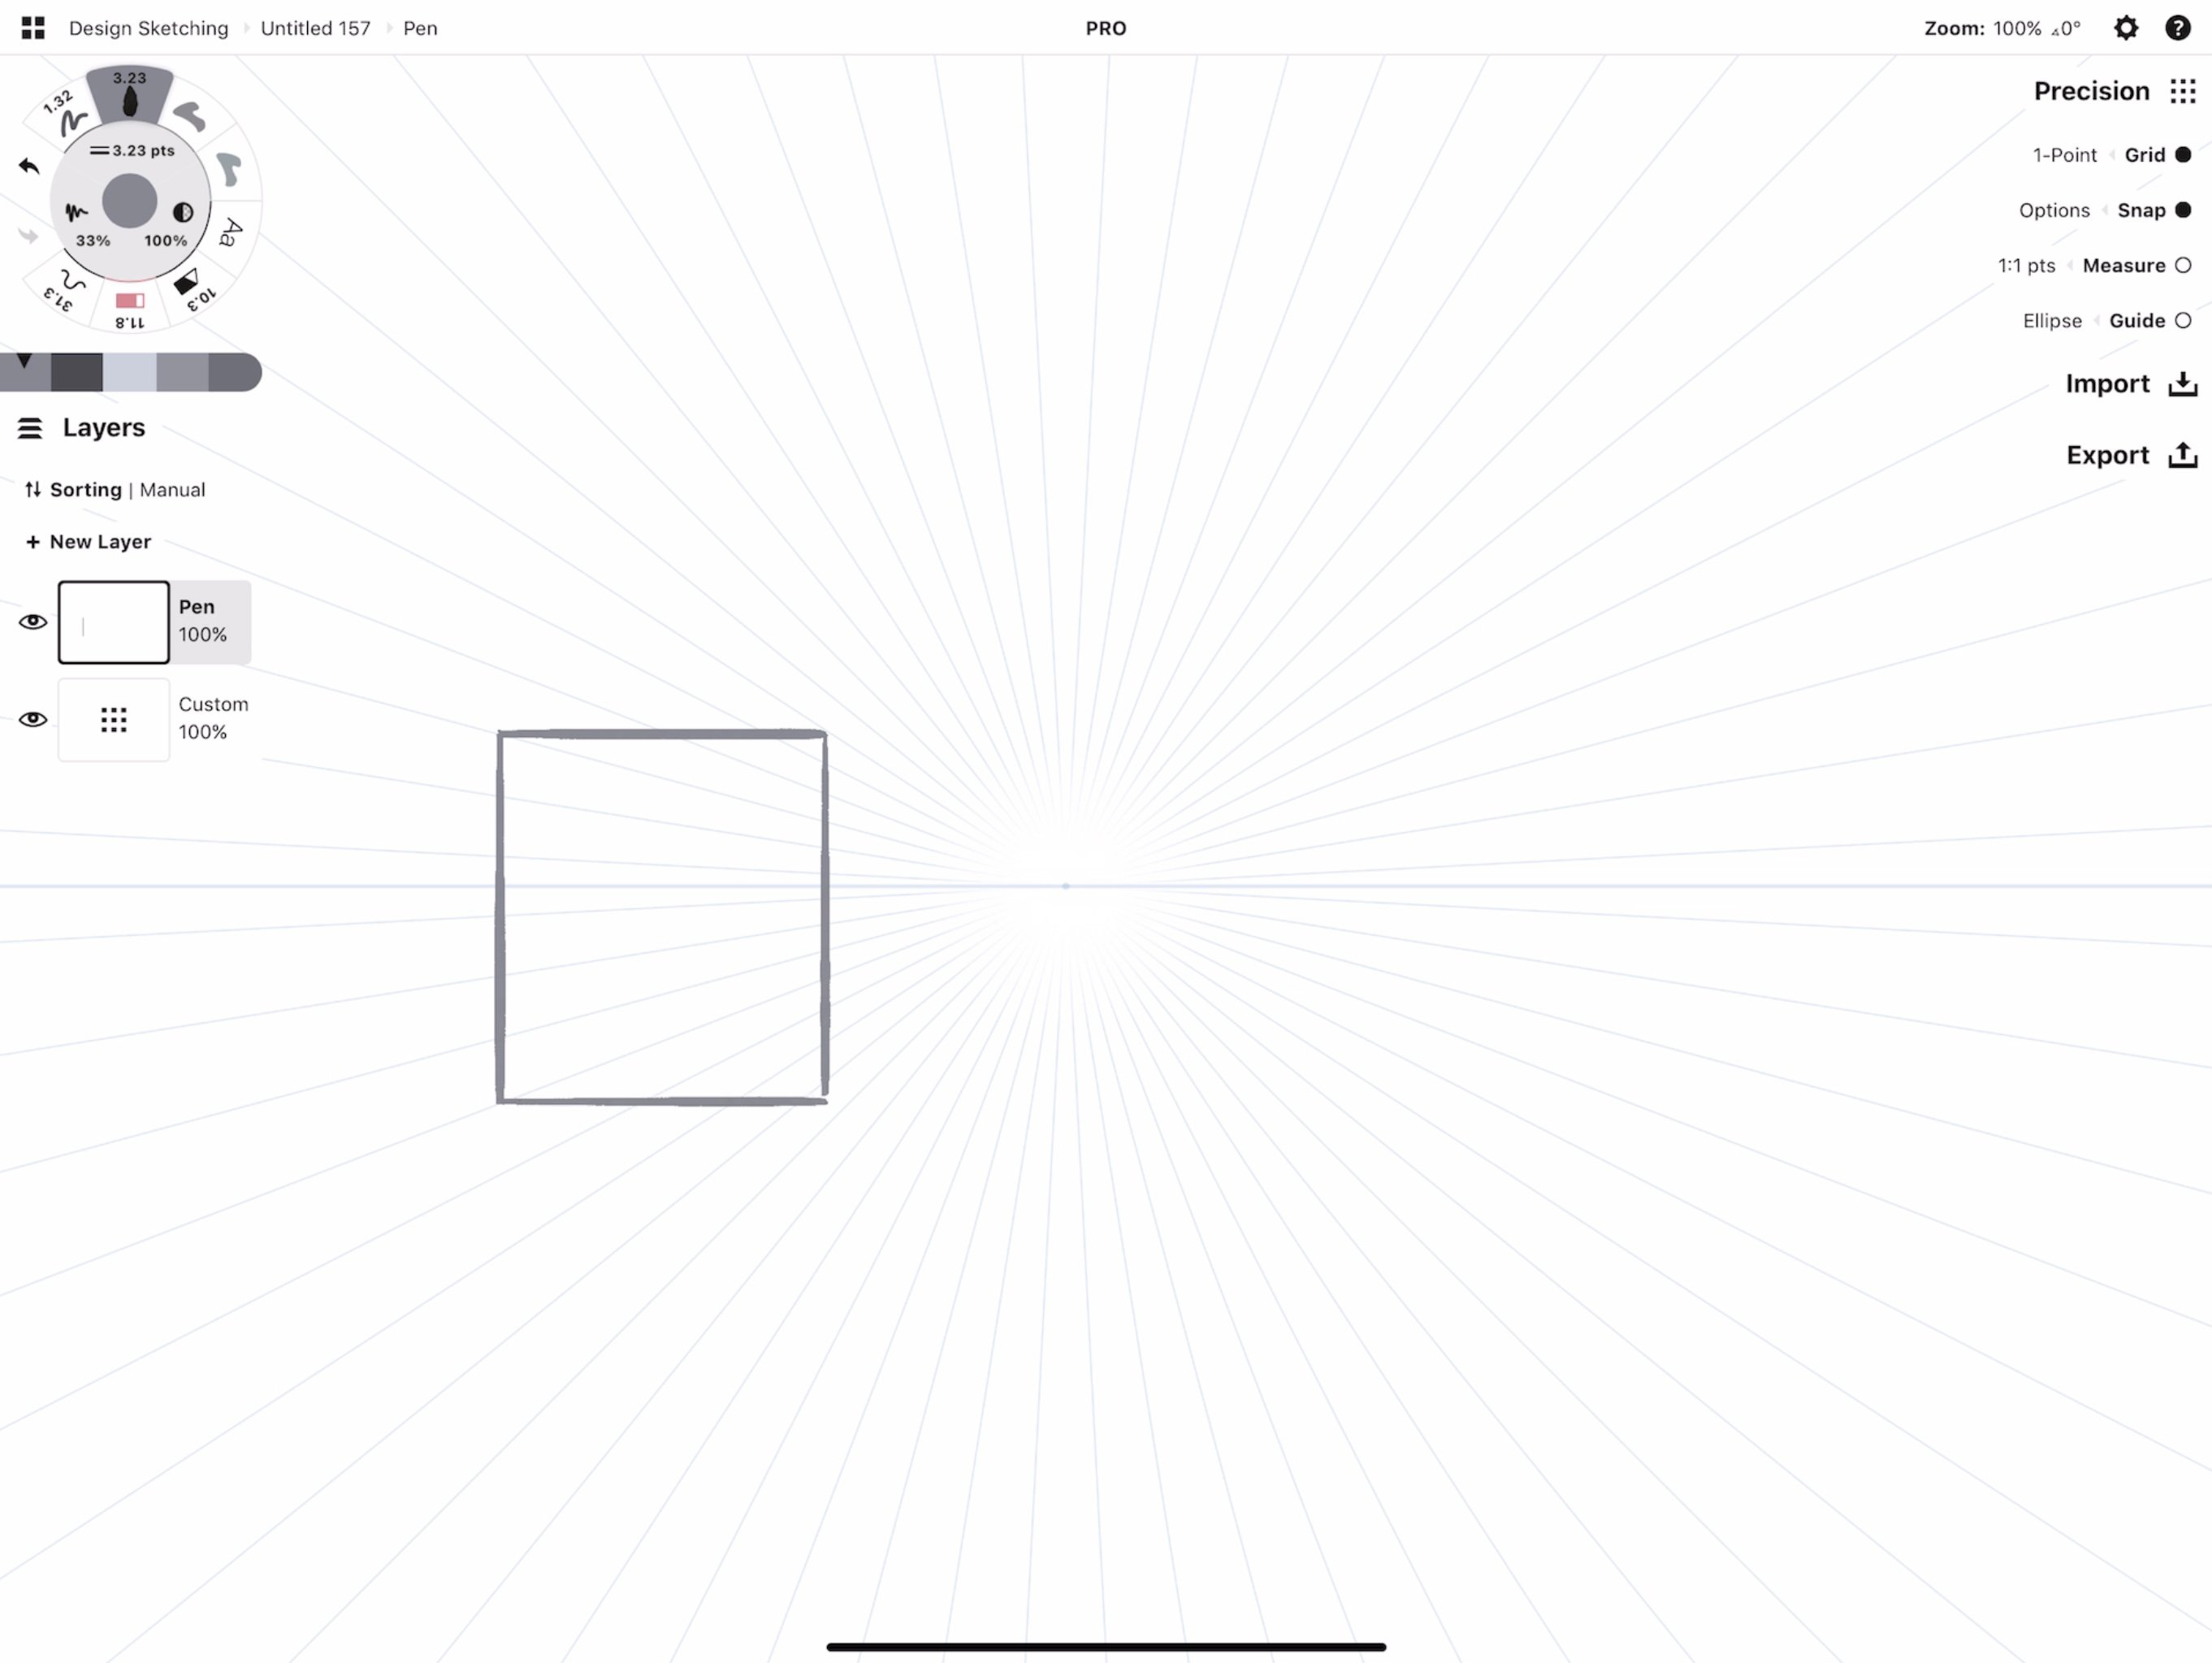
This rectangle is a front-facing plane mimicking your visual plane, and parallel to the plane along the horizon line.
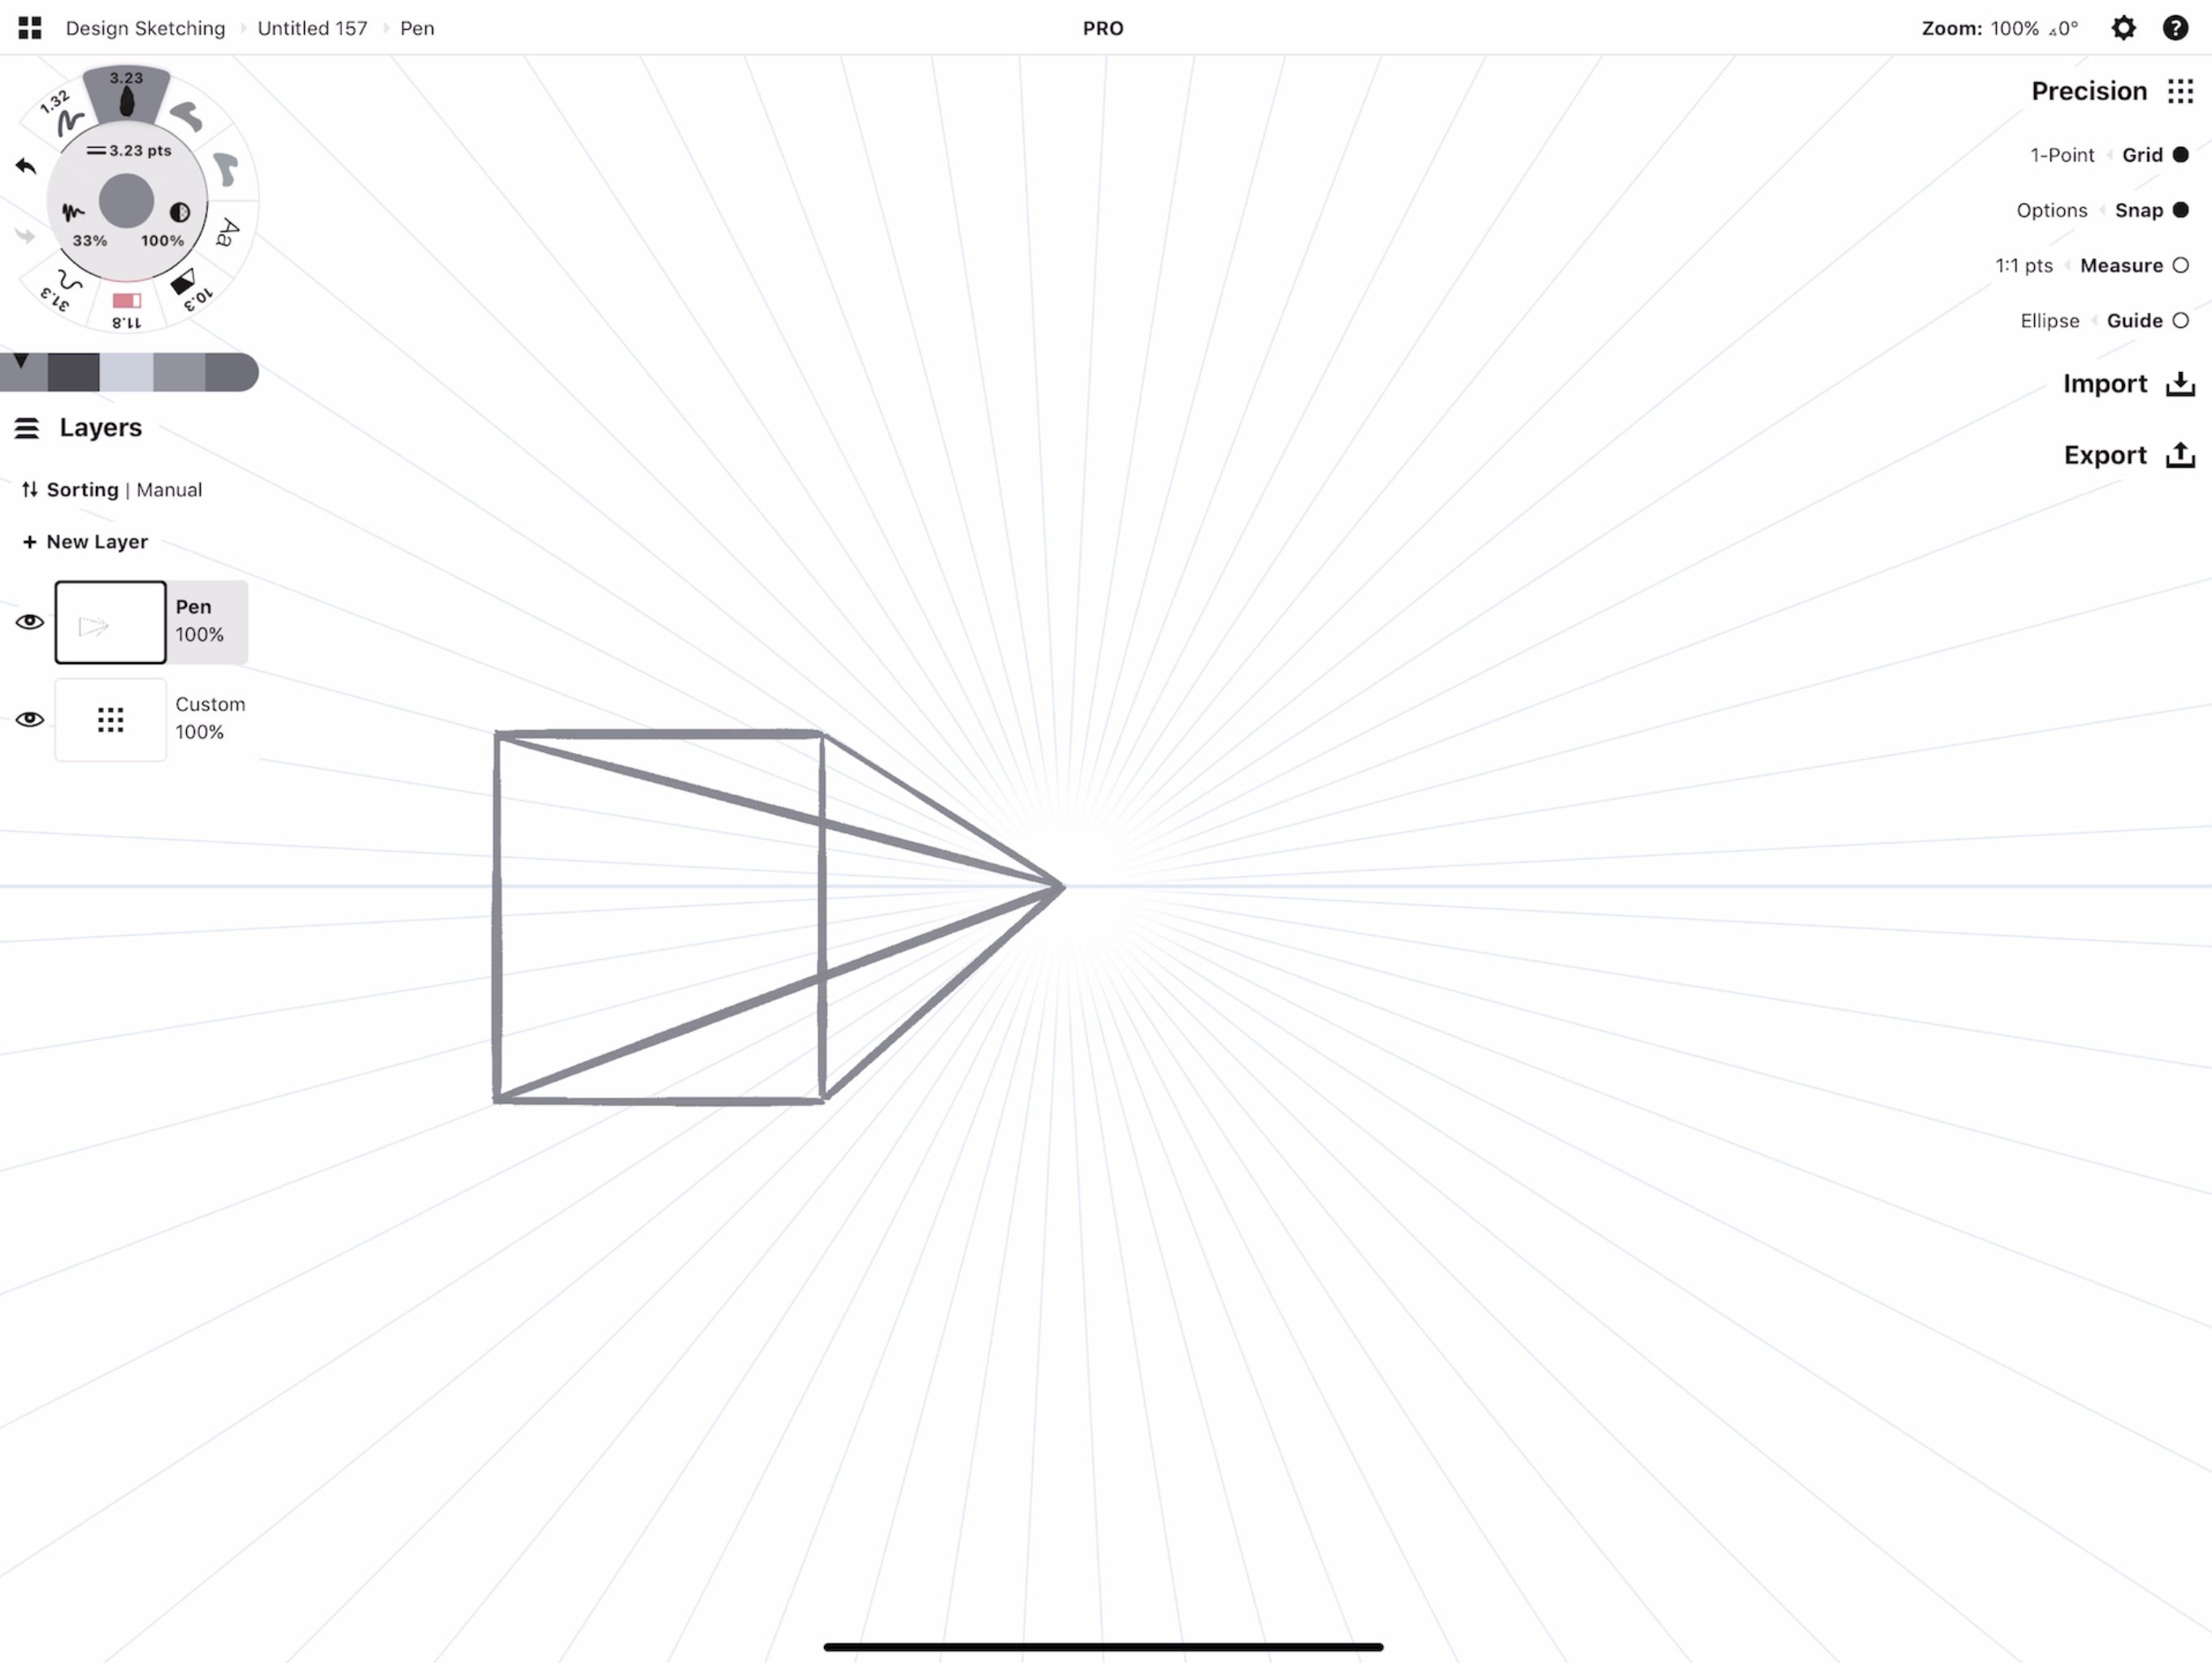
3. Draw an orthogonal line from each corner of your rectangle toward the vanishing point. These show you how, if the plane were to gain thickness, it would extend solidly into the distance forever.
Concepts Drawing Tip: Always start from the outer edges and draw inward on your canvas. Not only does this mimic your own visual path, it's much easier for an app like Concepts to understand which direction you want to go in a wide field of options - if all directions are located in one tiny point, it's much harder to calculate which way you're drawing.
It's very tempting to draw Batman's sigil here.
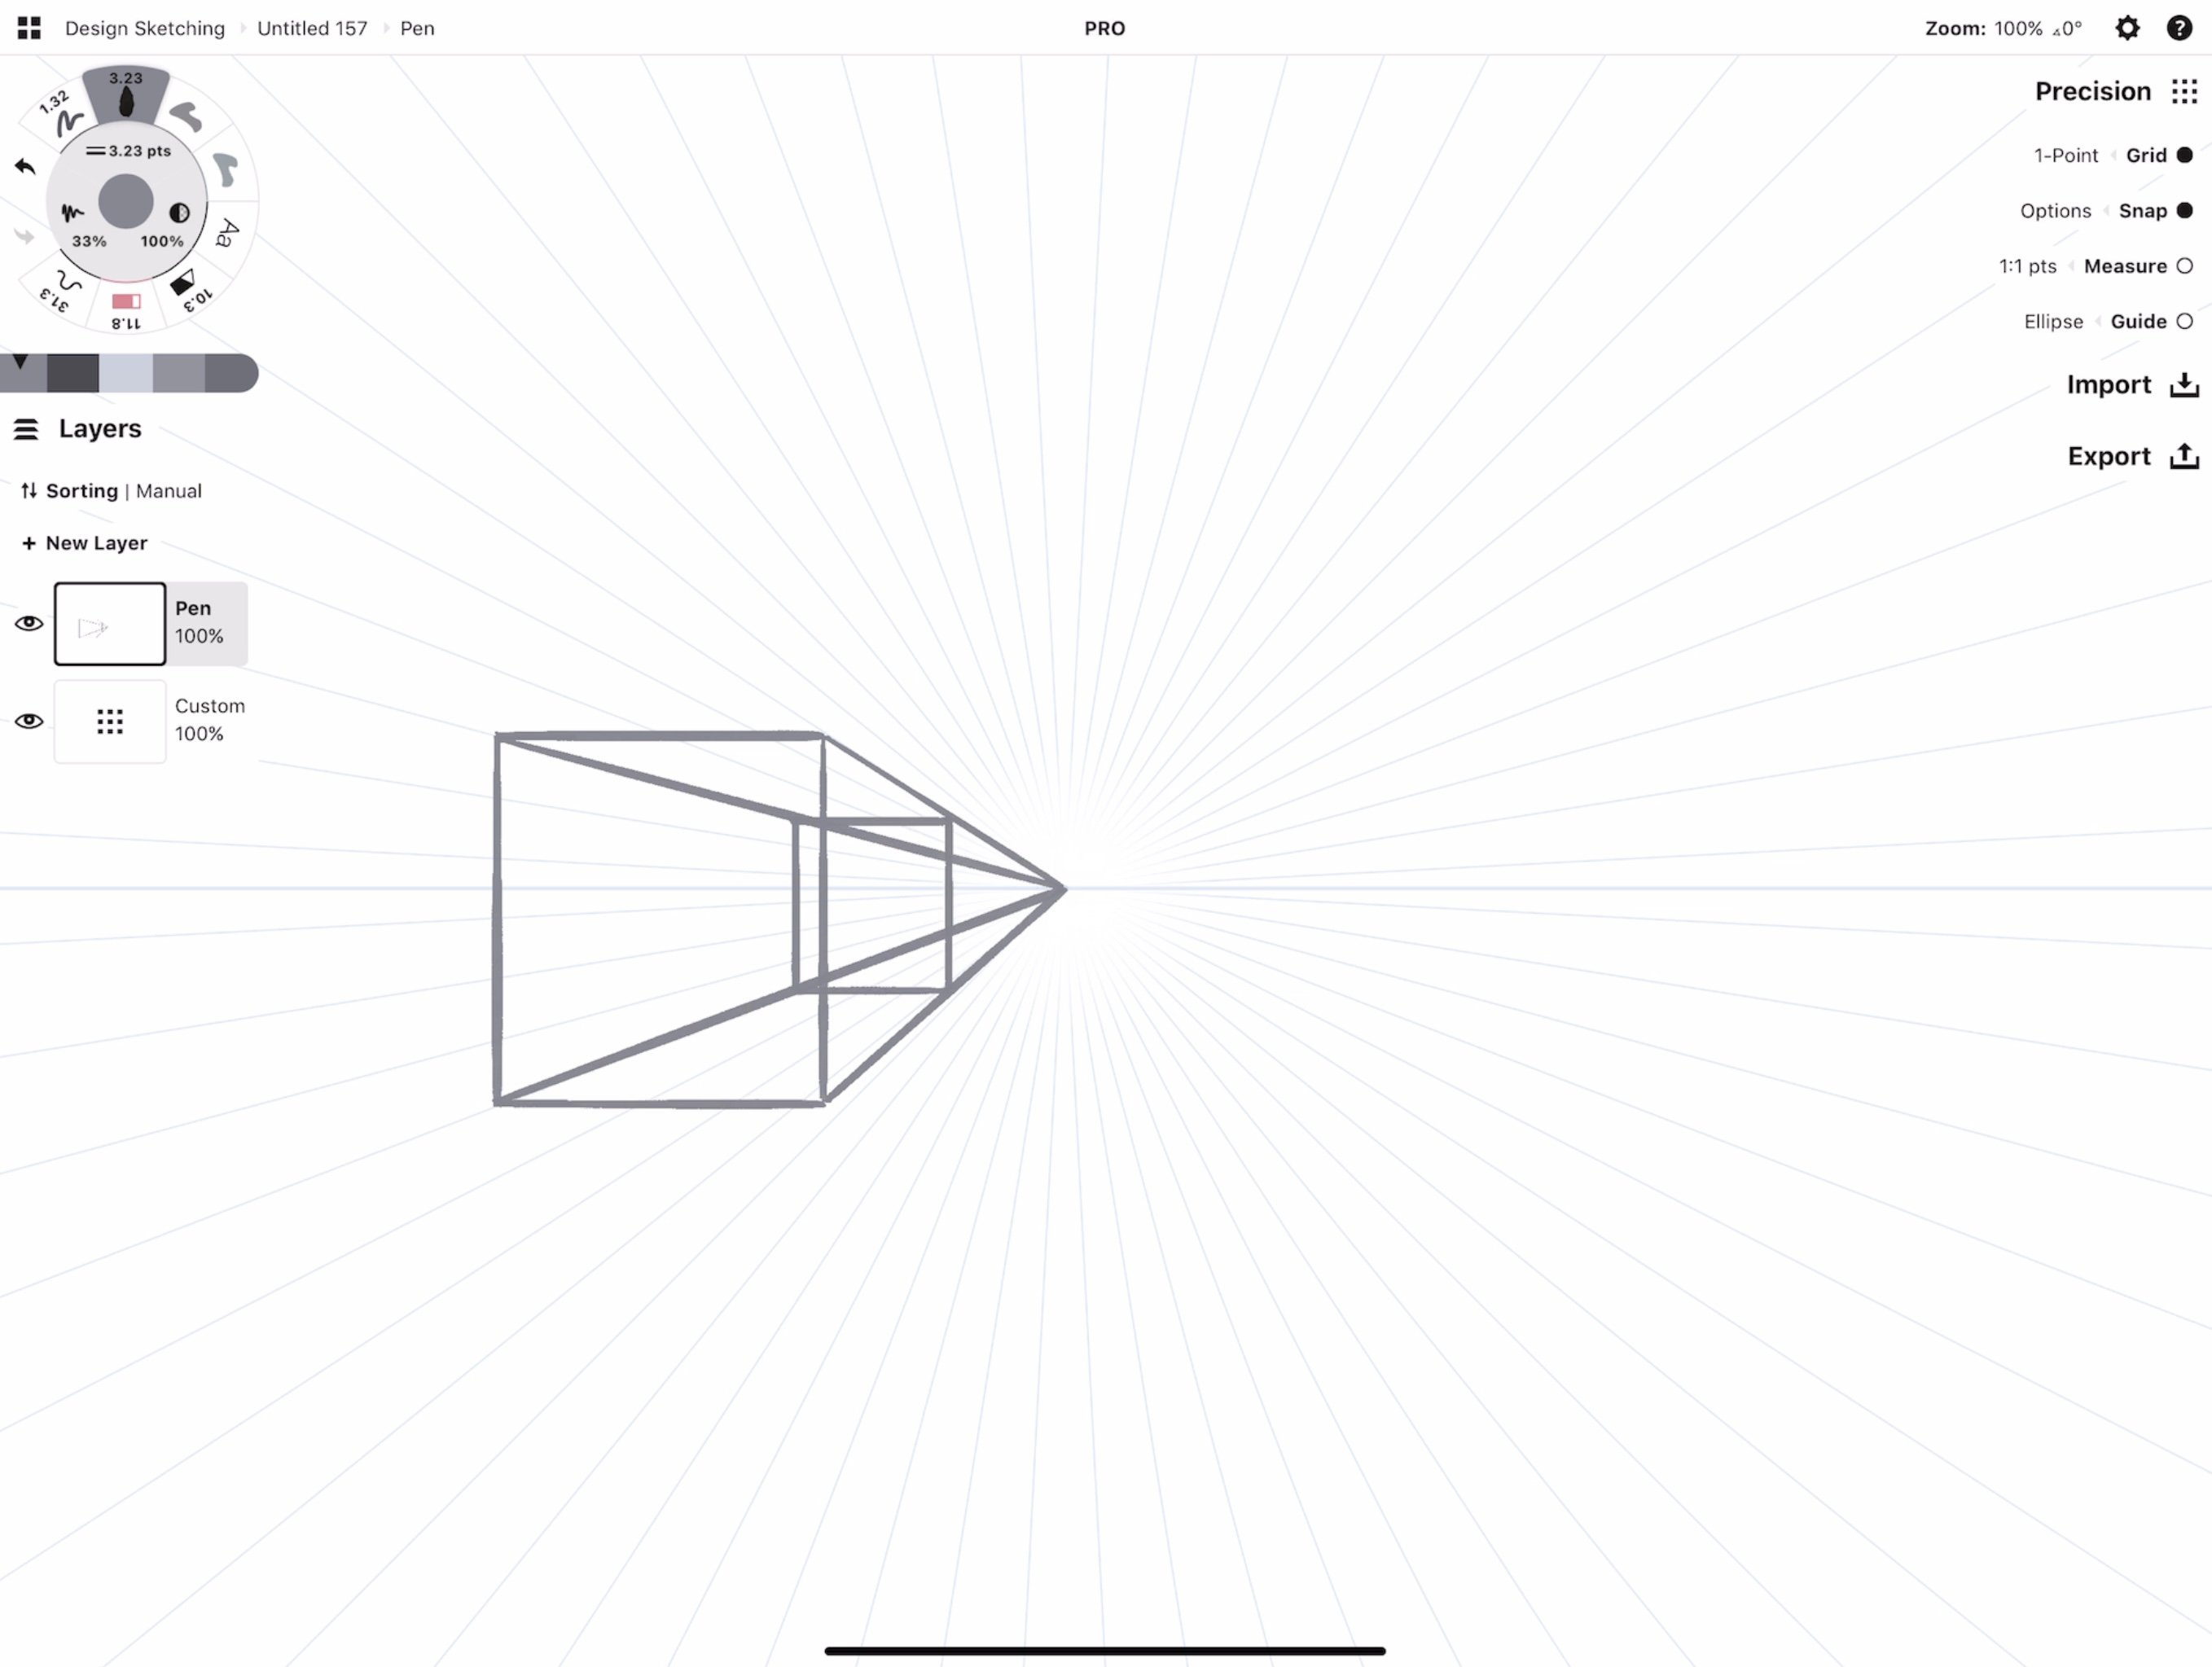
4. Decide your object's dimensions by adding rear boundary lines. Choose a point on the orthogonal lines behind the first rectangle to begin drawing the second rectangle - these will also be horizontal and vertical lines.
You now have a cube-like structure.
5. Erase or slice away the orthogonal lines behind the rear border, and if you like, add a few defining details to your object.
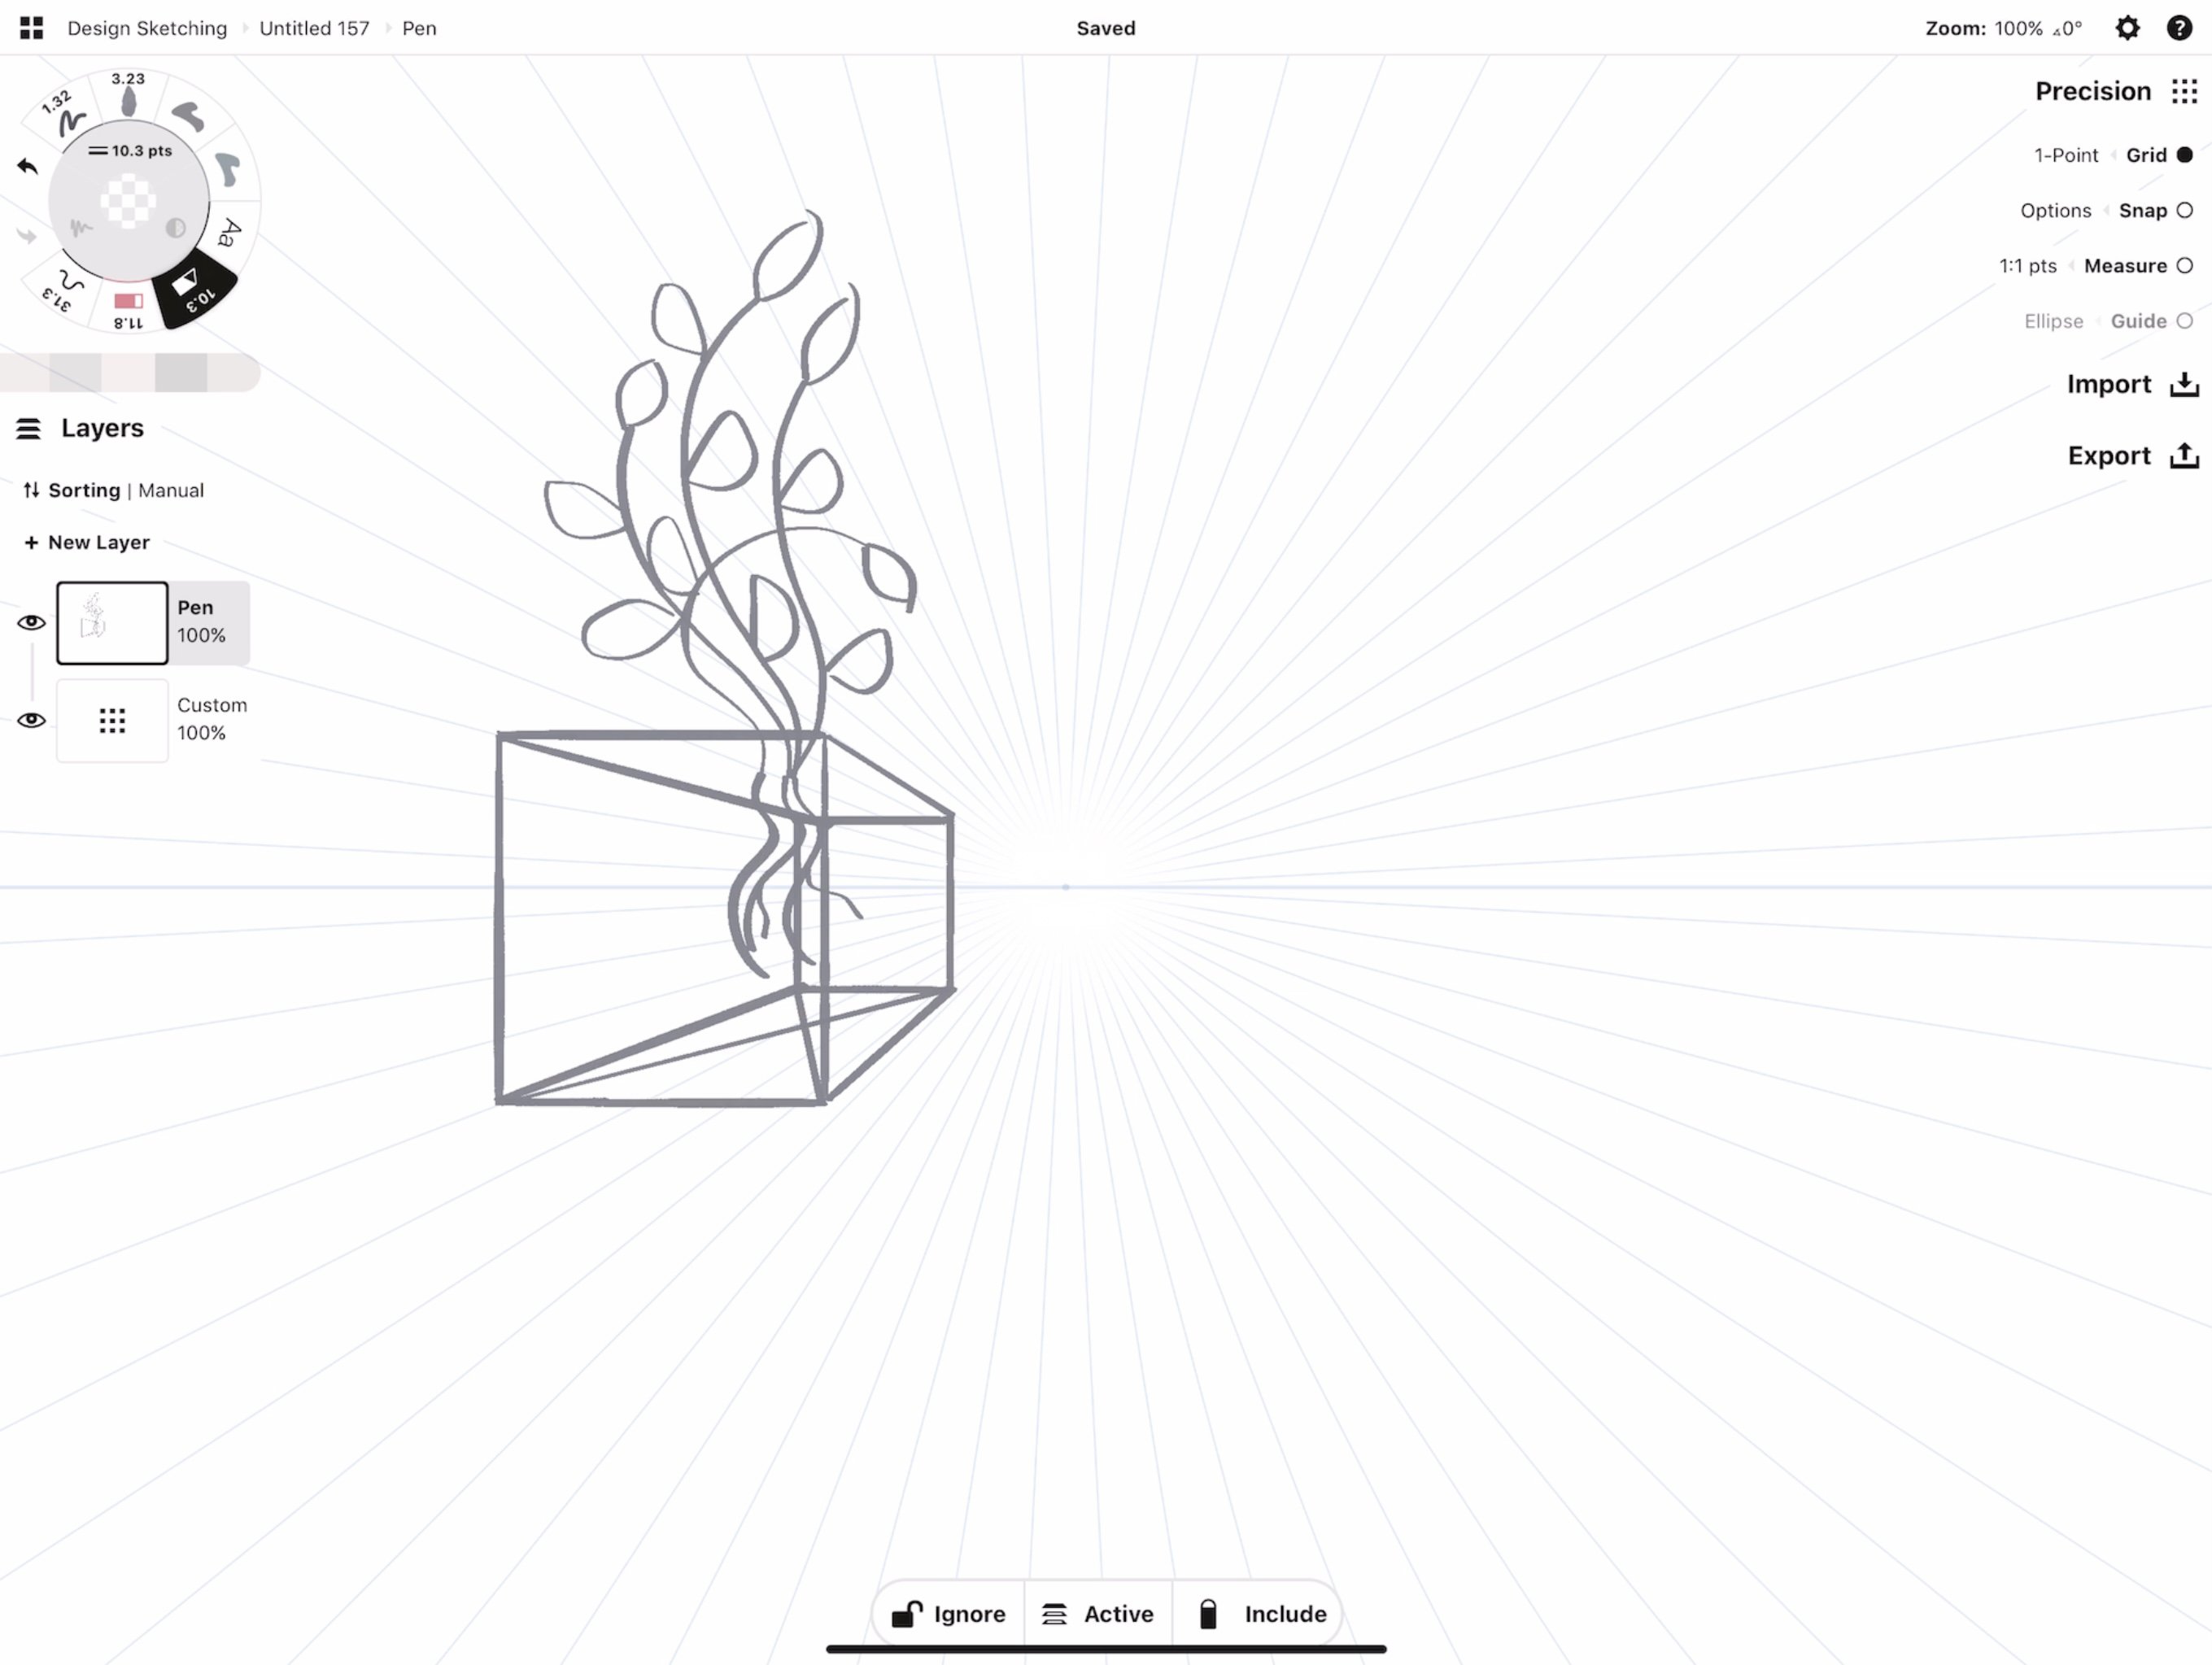
The diagonal lines at the bottom of this box help to determine the center point of the box so the plants can be centered. We'll show you how to do this later in the tutorial.
Extension - Sketch a Figure Study
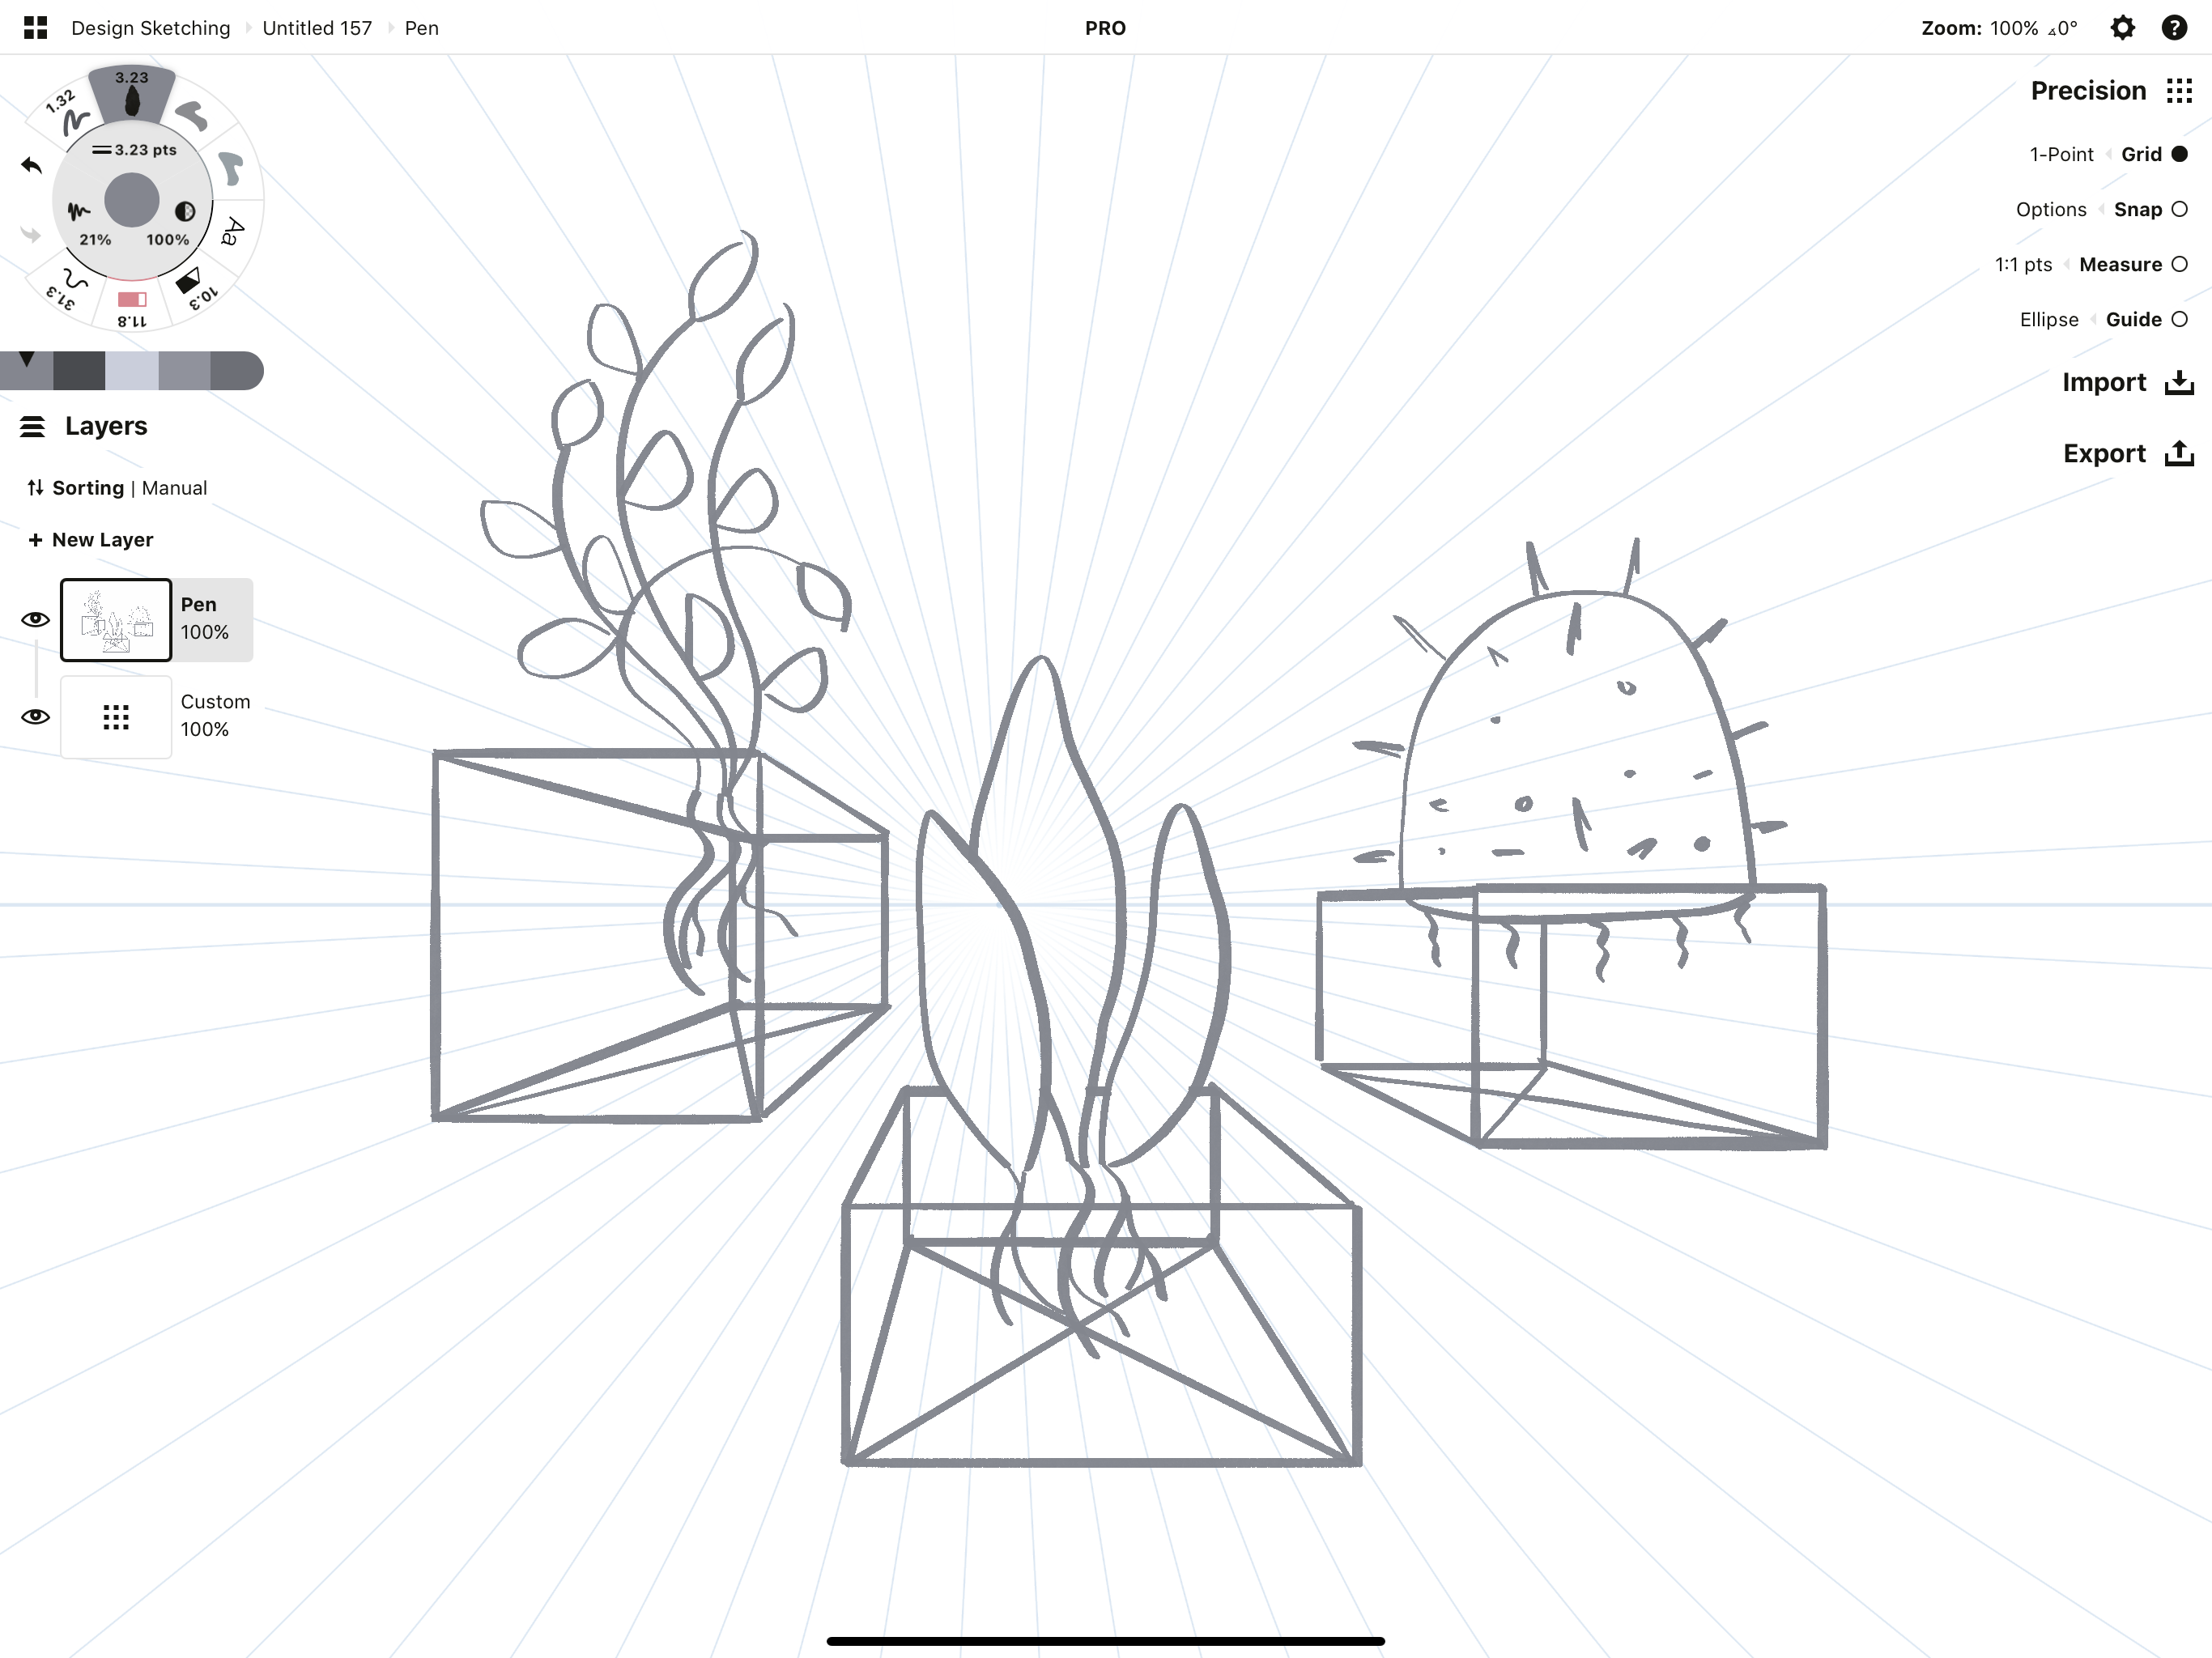
For practice, sketch a few more rectangles on the grid and draw in their corresponding orthogonal lines. If they overlap, you can slice or erase the areas in the background. Complete the structures and draw in details similar to the first object. This will give you a nice figure study you can be proud of.
Exercise 2 - Draw a Plane
Try drawing a plane in 1-point perspective using shading instead of lines. This takes your focus away from the lines of the grid and moves them to the planes of the grid - very helpful for getting your bearings with more complex grids and drawing in multiple perspectives.
1. You can use a marker or the edge of a pencil to simply shade in your plane.
Or you can use the Filled Stroke tool in Concepts which lets you draw with shapes instead of lines (you can read a tutorial on this tool here). If you use Filled Stroke, try activating Align in the Precision menu - this helps you to get a feel for filling in the shape in line with the grid's constraints. It's quick and efficient.
2. Look at the grid and think about your available directions - horizontal, vertical, and angling toward the vanishing point. Choose two orthogonal lines to guide your shading, then block in the plane, always heading toward the vanishing point in the distance.
Try filling a sideways, lower or upper plane.
You can see how immediately, your eye is drawn in toward the center point and you feel as though you could walk along the surface.
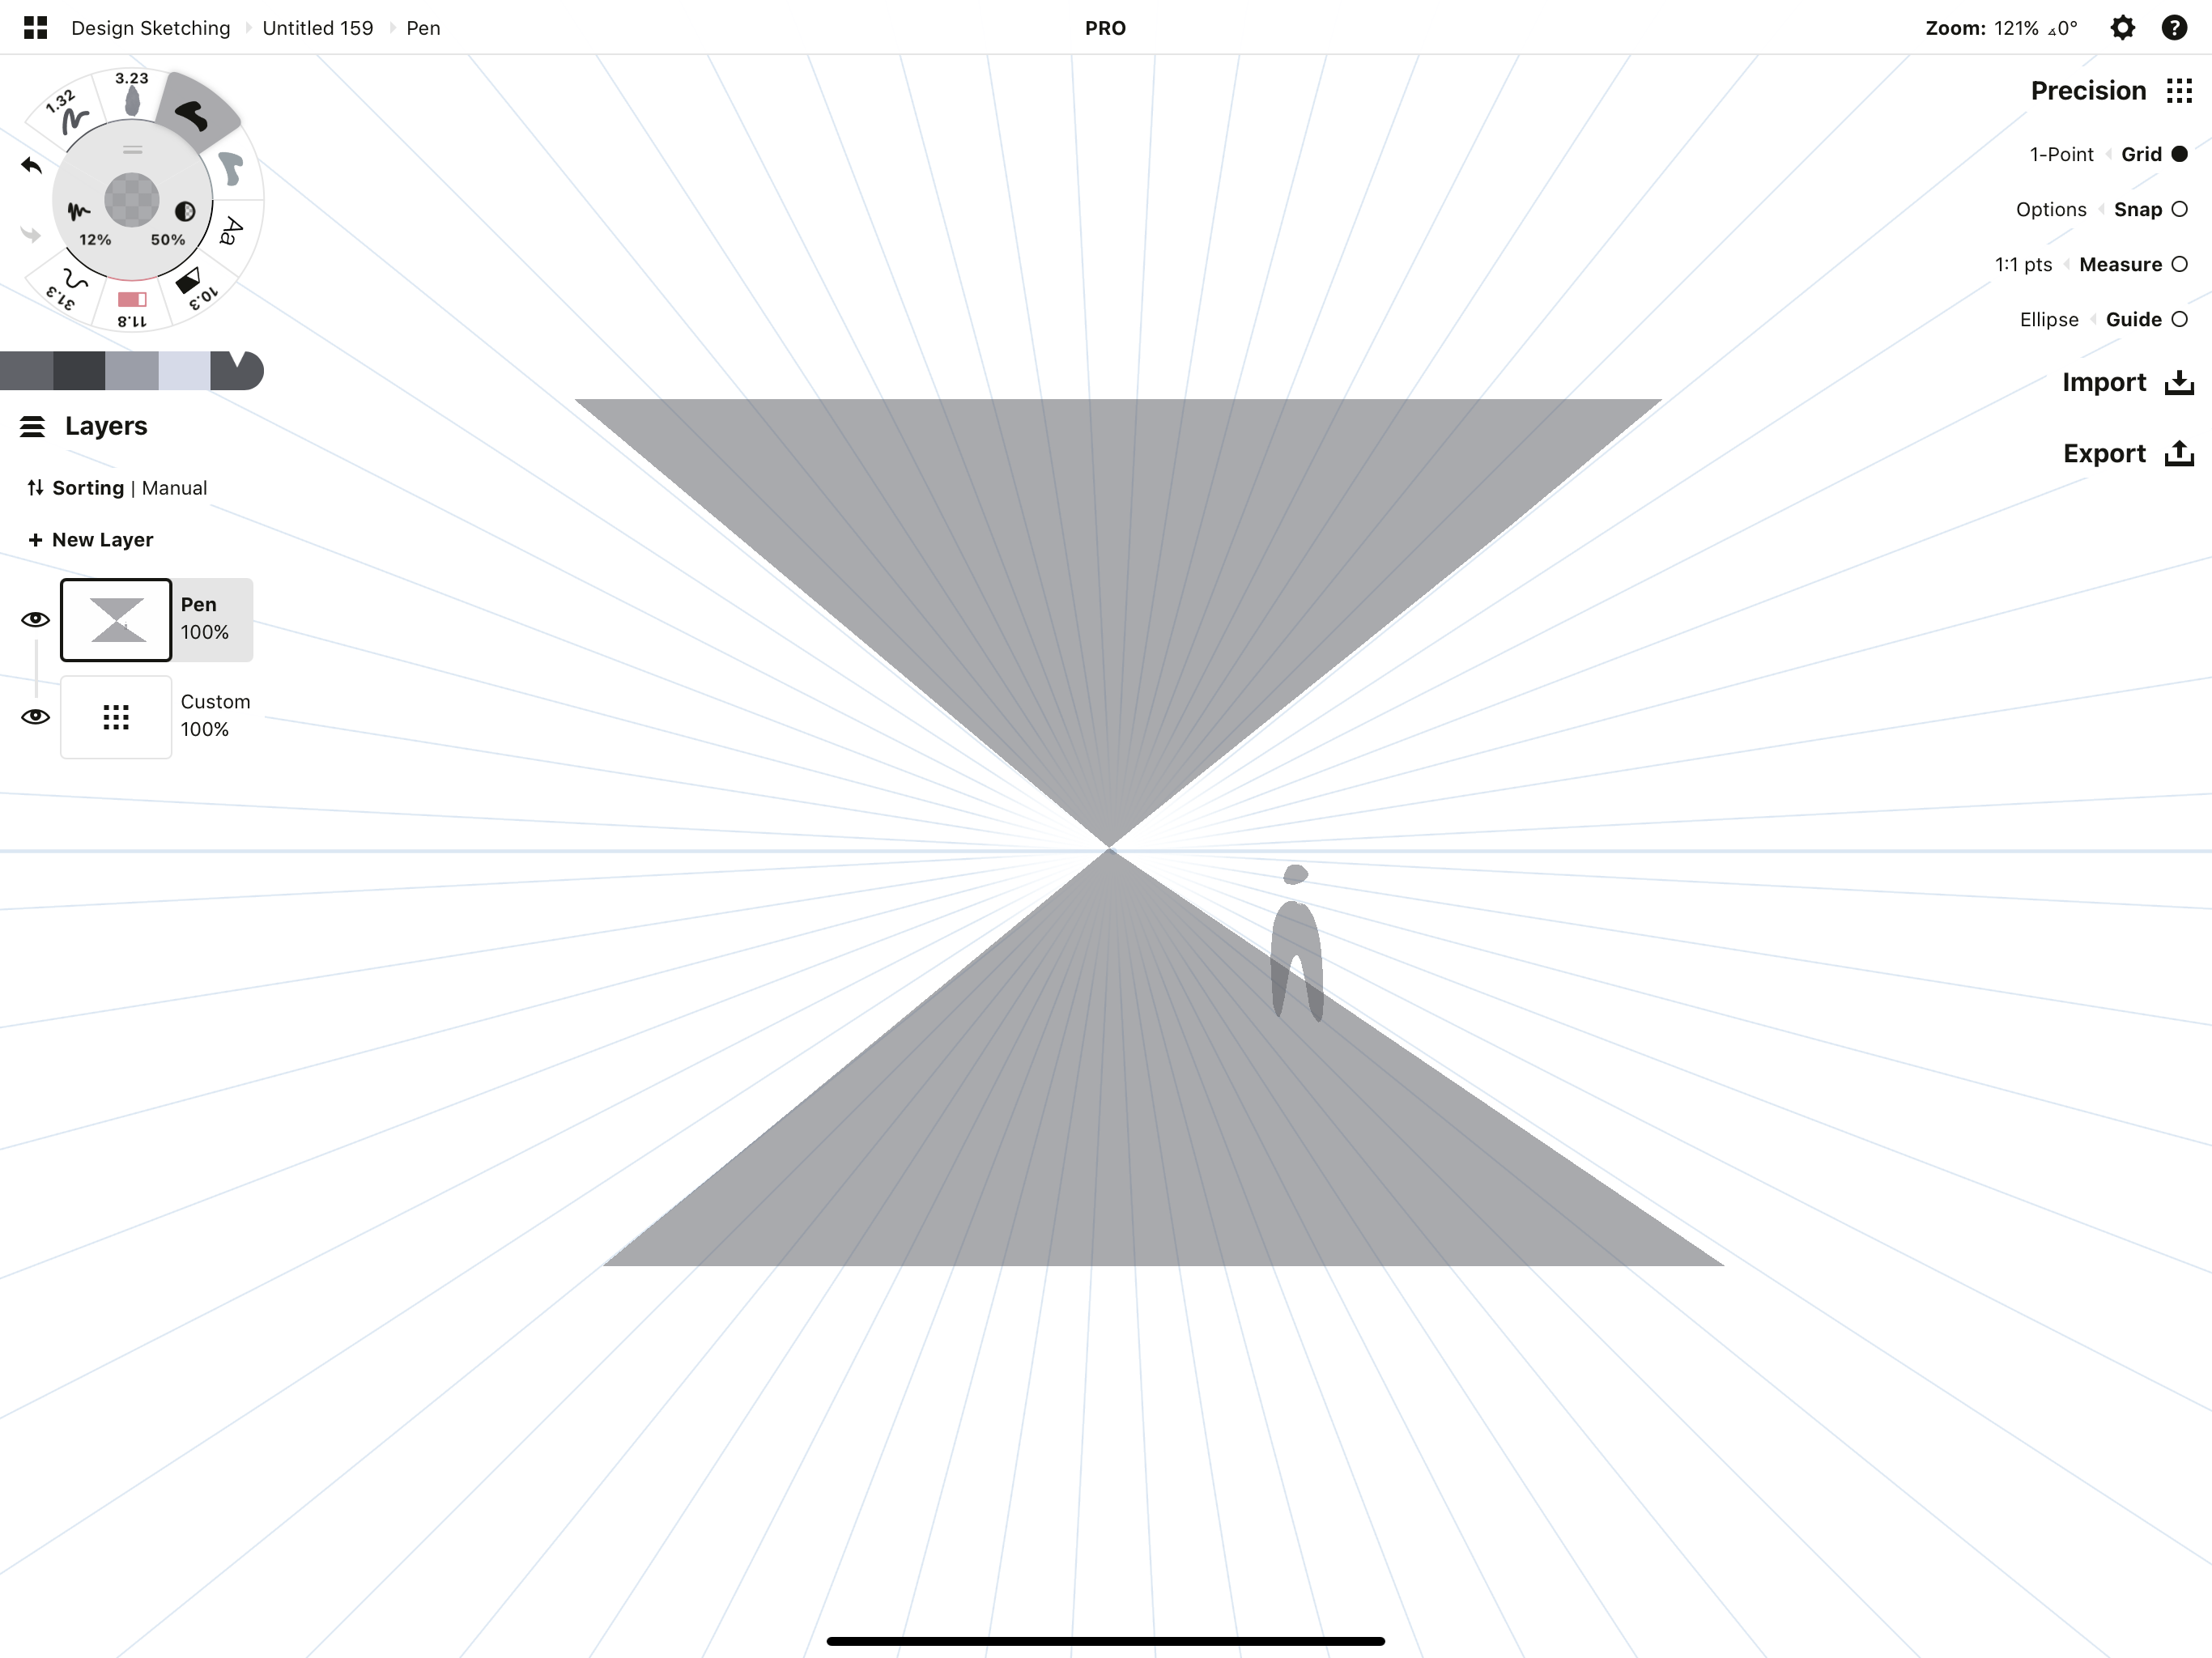
Adding a figure instantly places you in a drawing.
2-Point Perspective
2-point perspective is the most commonly used perspective in design and illustration (mostly because most events happen at eye level on the ground). Interesting enough to share a couple sides to a story, 2-point perspective shows you two planes displaying two different angles of your object or scenery.
With 2-point perspective, the face-on horizontal plane is eliminated. You'll always draw with vertical lines and any orthogonal lines extending back toward two separate vanishing points on the horizon line.
Buildings from an eye-level corner view are a good example of 2-point perspective.
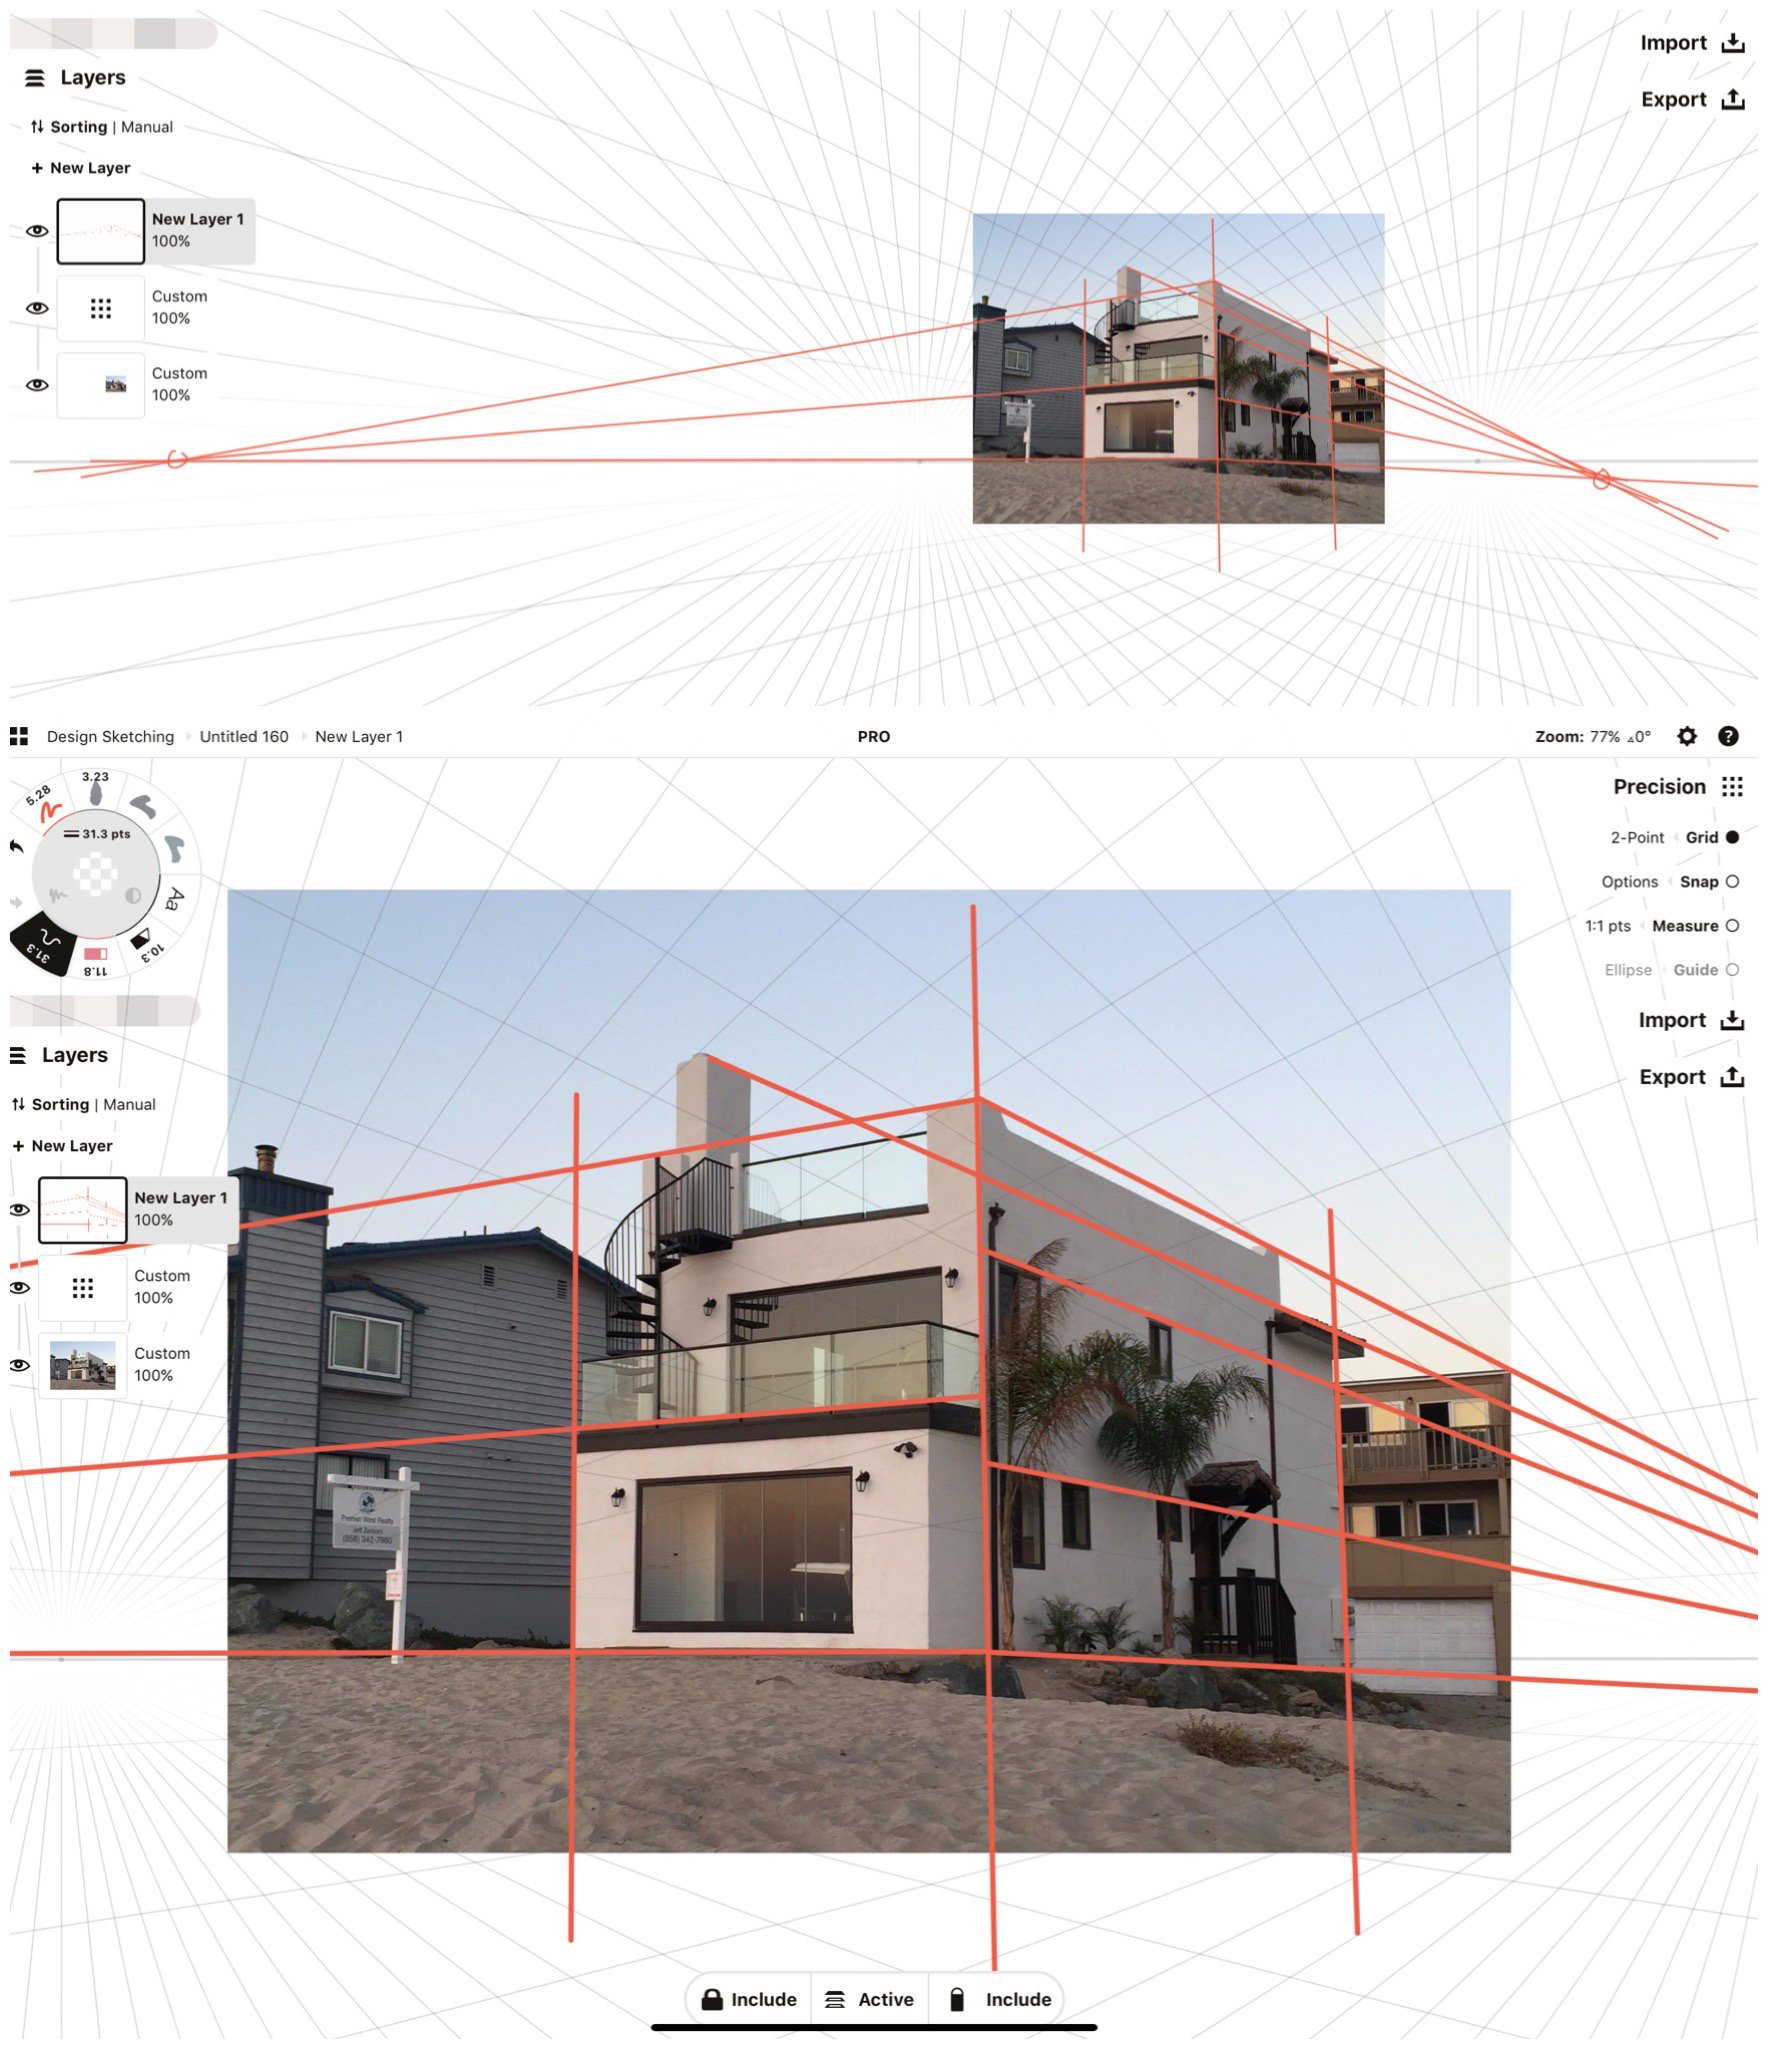
This beach house is nearly exact 2-point perspective. You don't find any horizontal lines except for the horizon line. 2-point perspective uses only vertical lines and perspective lines to show two faces of your object.
TL;DR for 2-Point Perspective Sketching
1. Set up a 2-point perspective grid. This grid has a horizon line and two vanishing points anywhere on the line, with orthogonal lines extending through each point.
2. Draw a vertical line anywhere on the canvas.
3. Draw an orthogonal line from each end of the vertical line to each vanishing point on the grid.
4. Add in the outside edges of your object, and erase any extra linework.
Exercise 1 - Draw an Urban Sketch
1. Set up a 2-point perspective grid on the canvas. This grid has a horizon line with two vanishing points anywhere along the line.
Set your vanishing points fairly distant from each other for a more accurate view (you have quite a wide visual field, naturally), or fairly close to each other for a more distorted view.
2. Draw a vertical line between the two vanishing points. For quick straight lines, use 100% line smoothing or activate Align.
3. Draw an orthogonal line from each point of the vertical line to each vanishing point on the horizon line. You'll see two planes appear.
4. Add the outside edges to your object, and erase the remaining perspective lines.
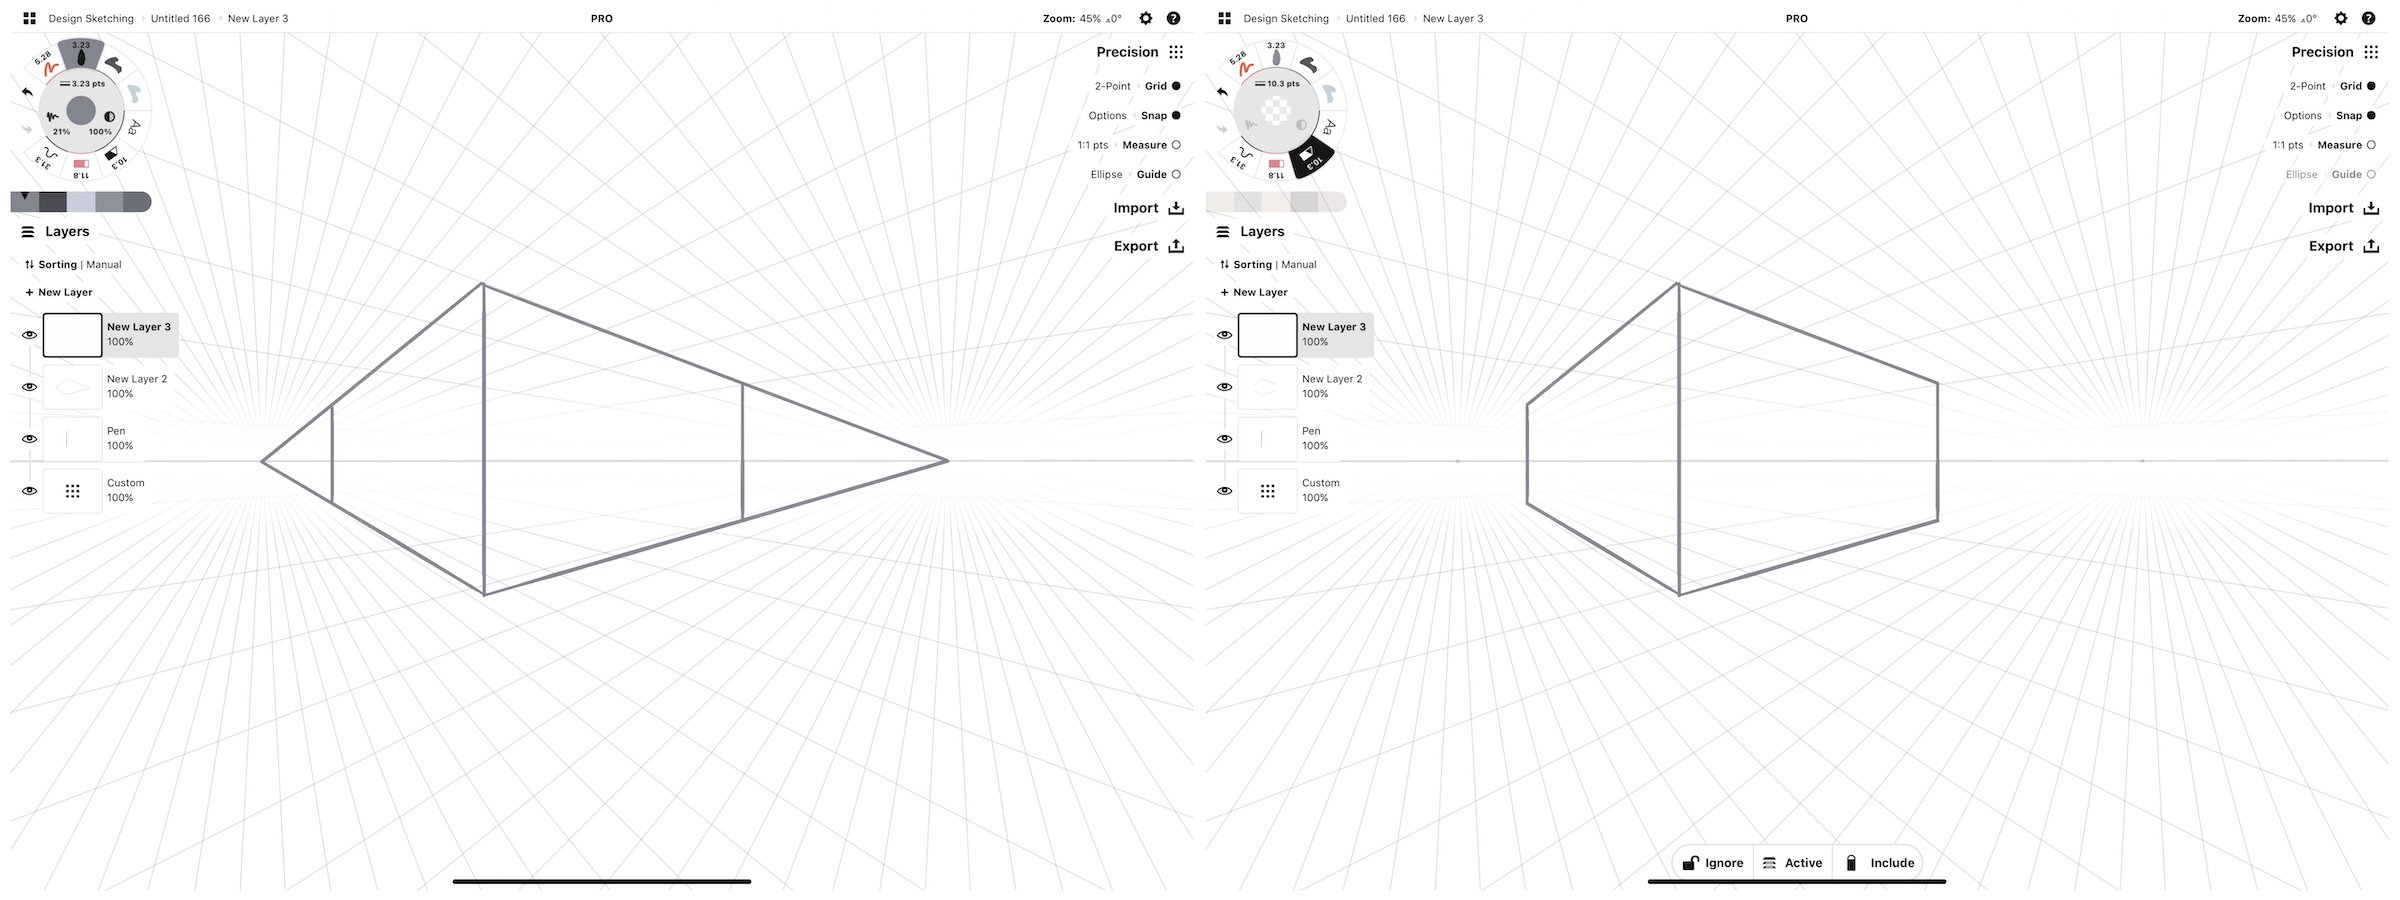
You can leave it as-is for an opaque object or add in rear lines for a transparent object. For an even volume, if you count the number of grid spaces you've drawn from front to back, you'll cover the same amount of spaces parallel in the rear.
Extension - Add Architectural Details
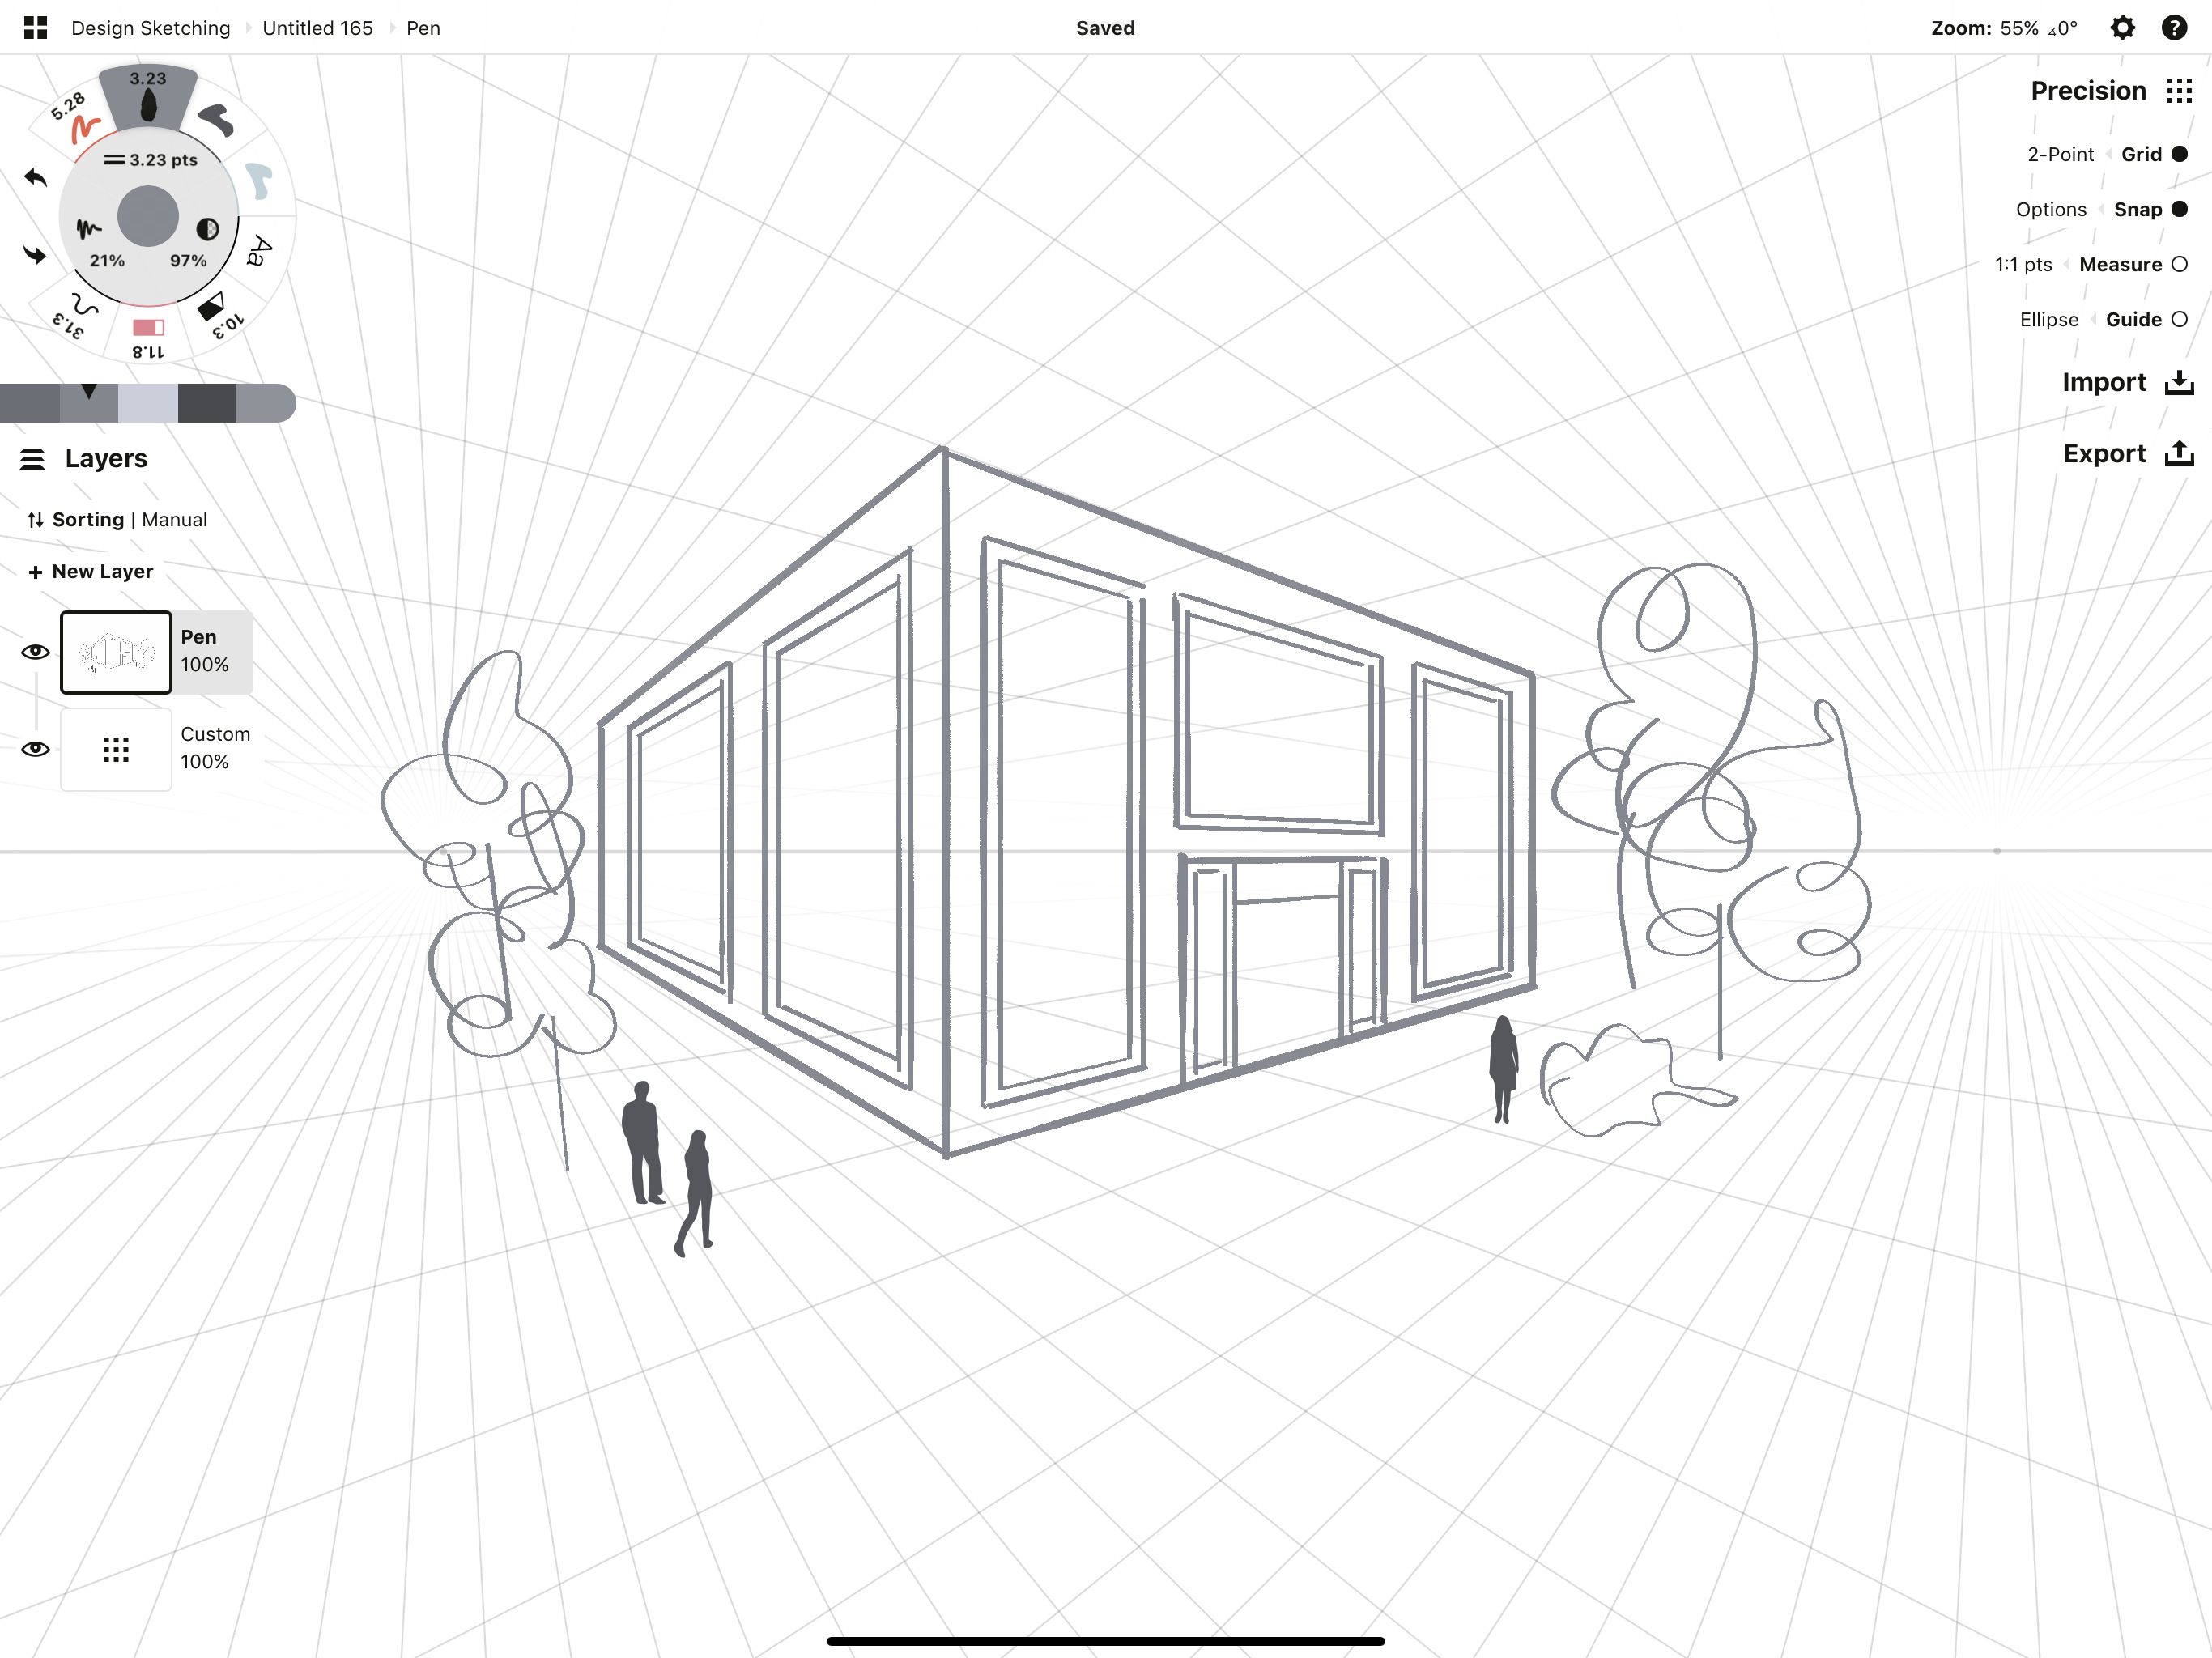
1. Add urban details to your drawing. Draw windows and doors, using the orthogonal lines to draw them at the correct angle.
2. Add some trees and people at the end to show the scale of your building. (Check out the exercise at the end of this tutorial to learn how to draw people in proper relation to your building, too.)
Exercise 2 - Sketch a Complex
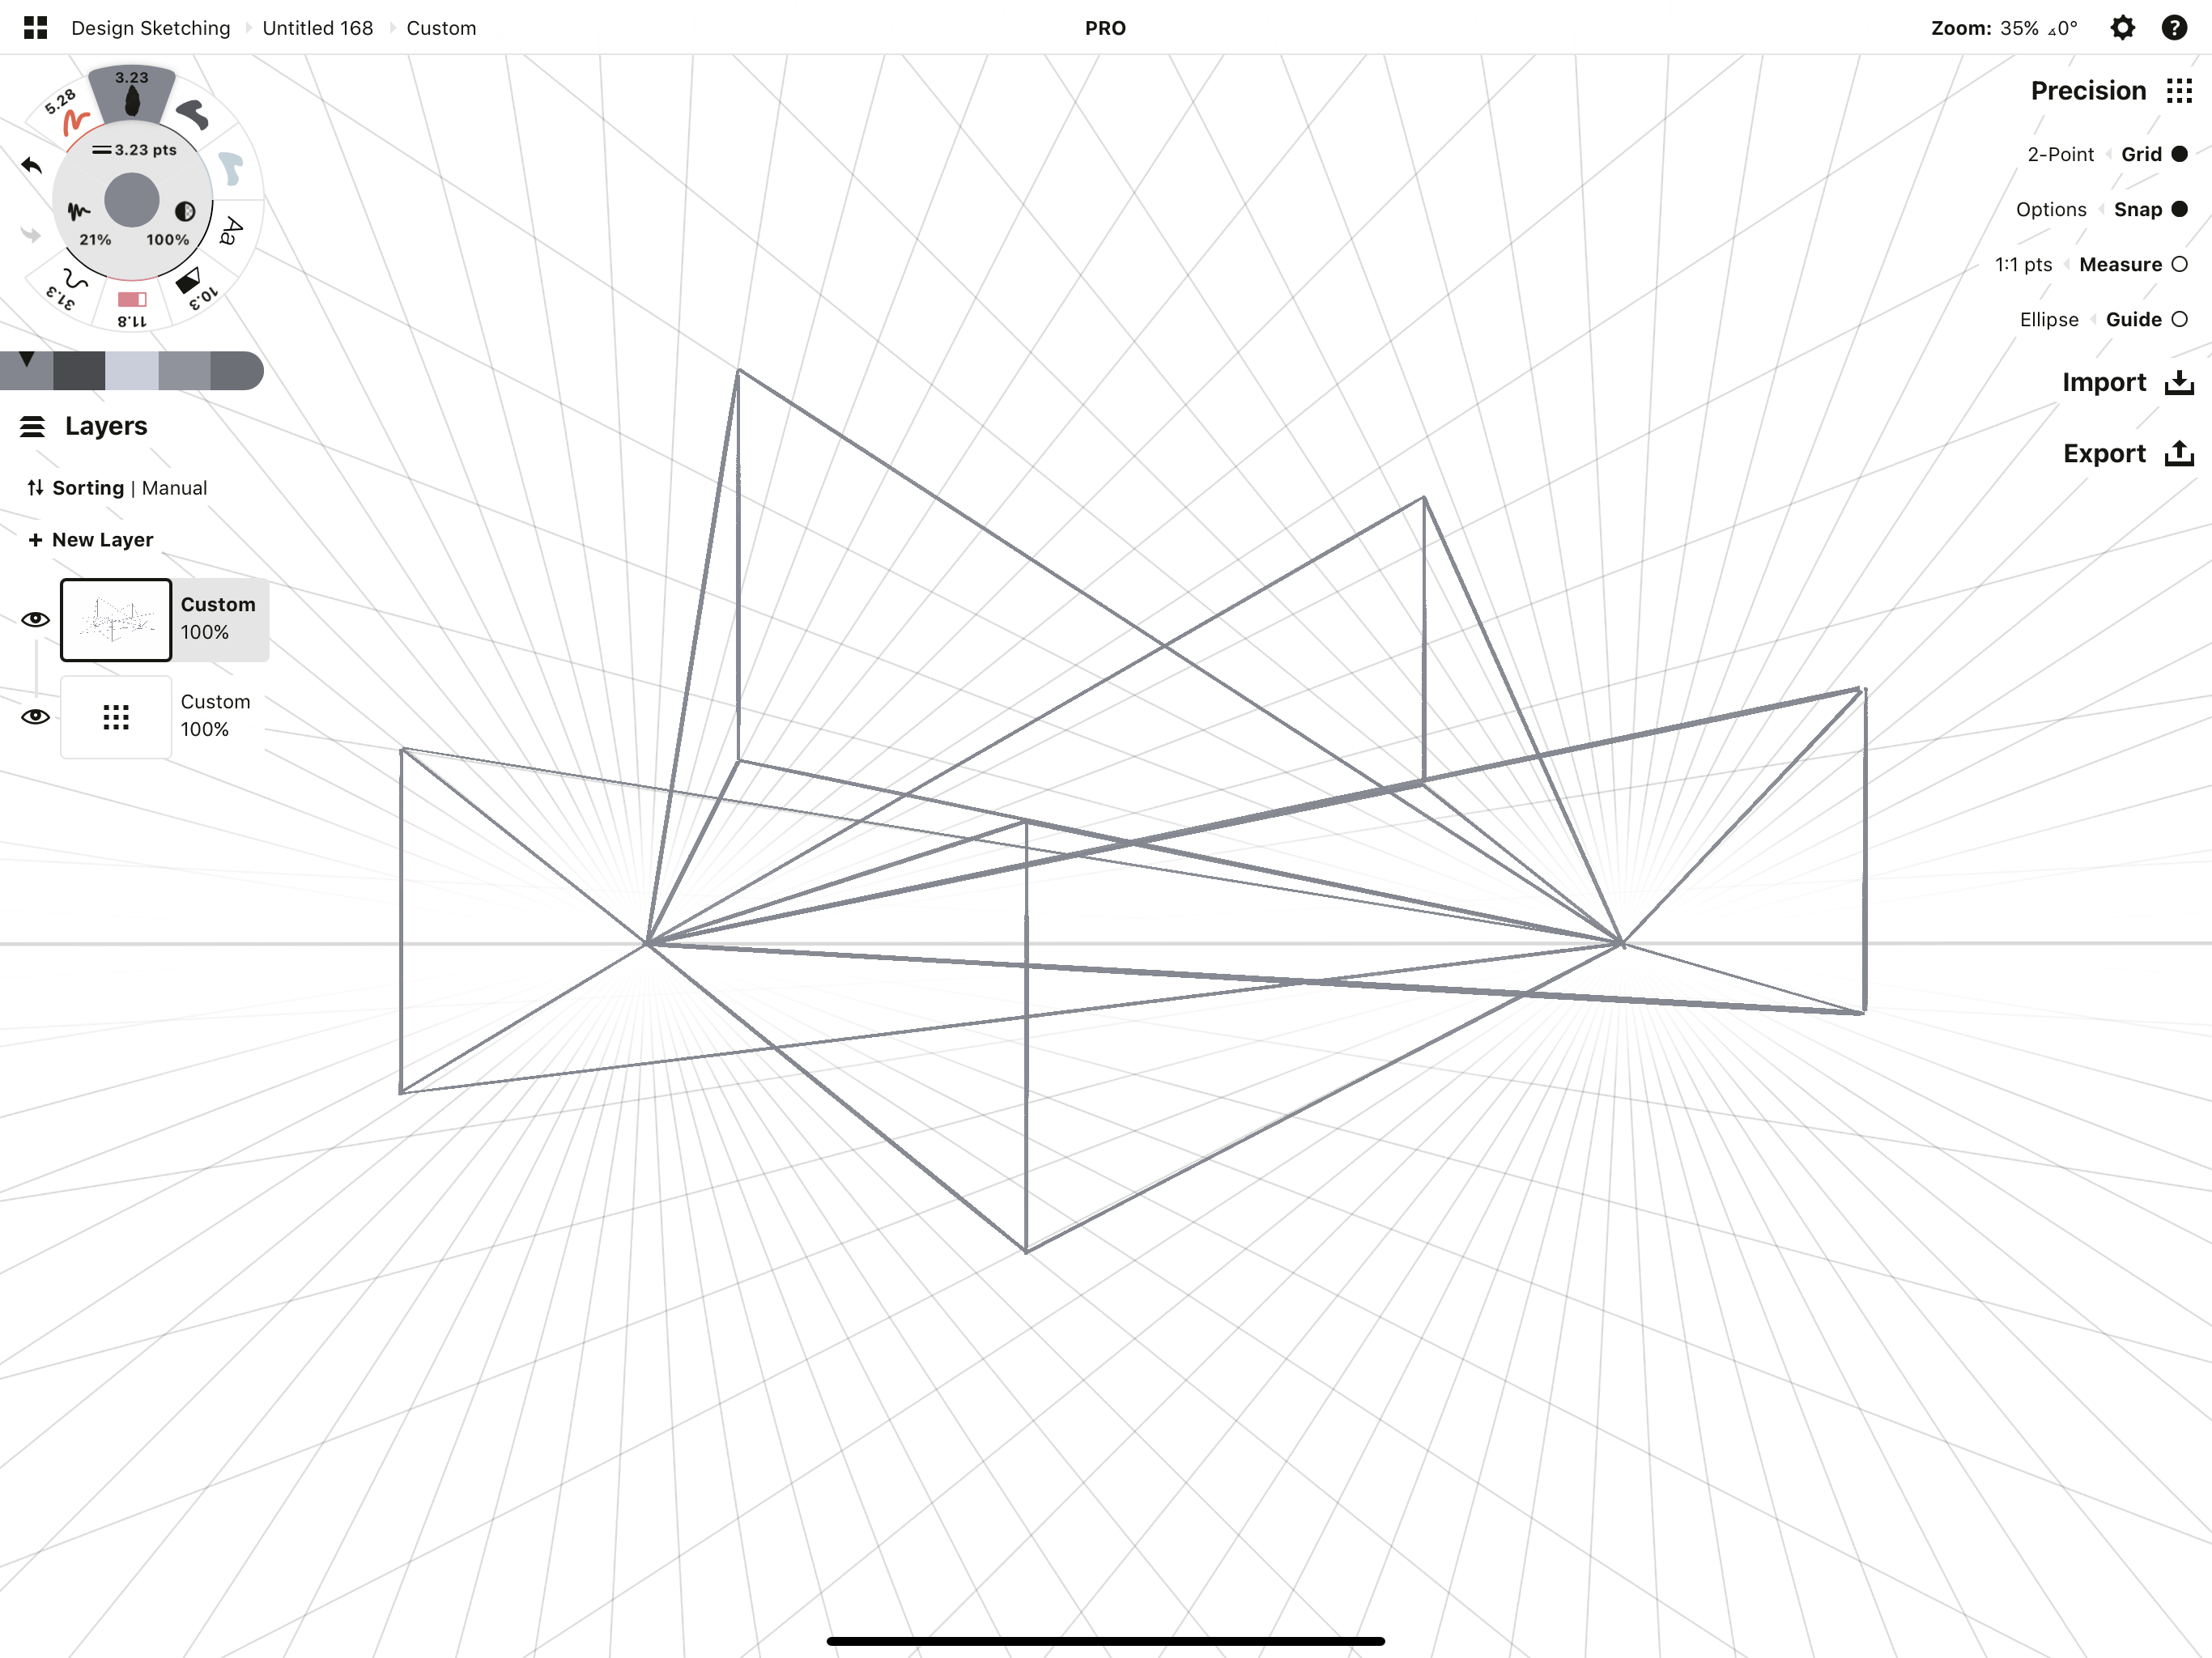
1. As with the 1-point perspective exercise, try drawing several vertical lines on your page. Draw orthogonal lines from each point on each line back toward the vanishing points.
You can create separate structures, or try putting them together into a single building structure. This will help you to get a feel for how they appear from different areas on the canvas, and how a perspective grid can actually help give your drawing a sense of cohesion.
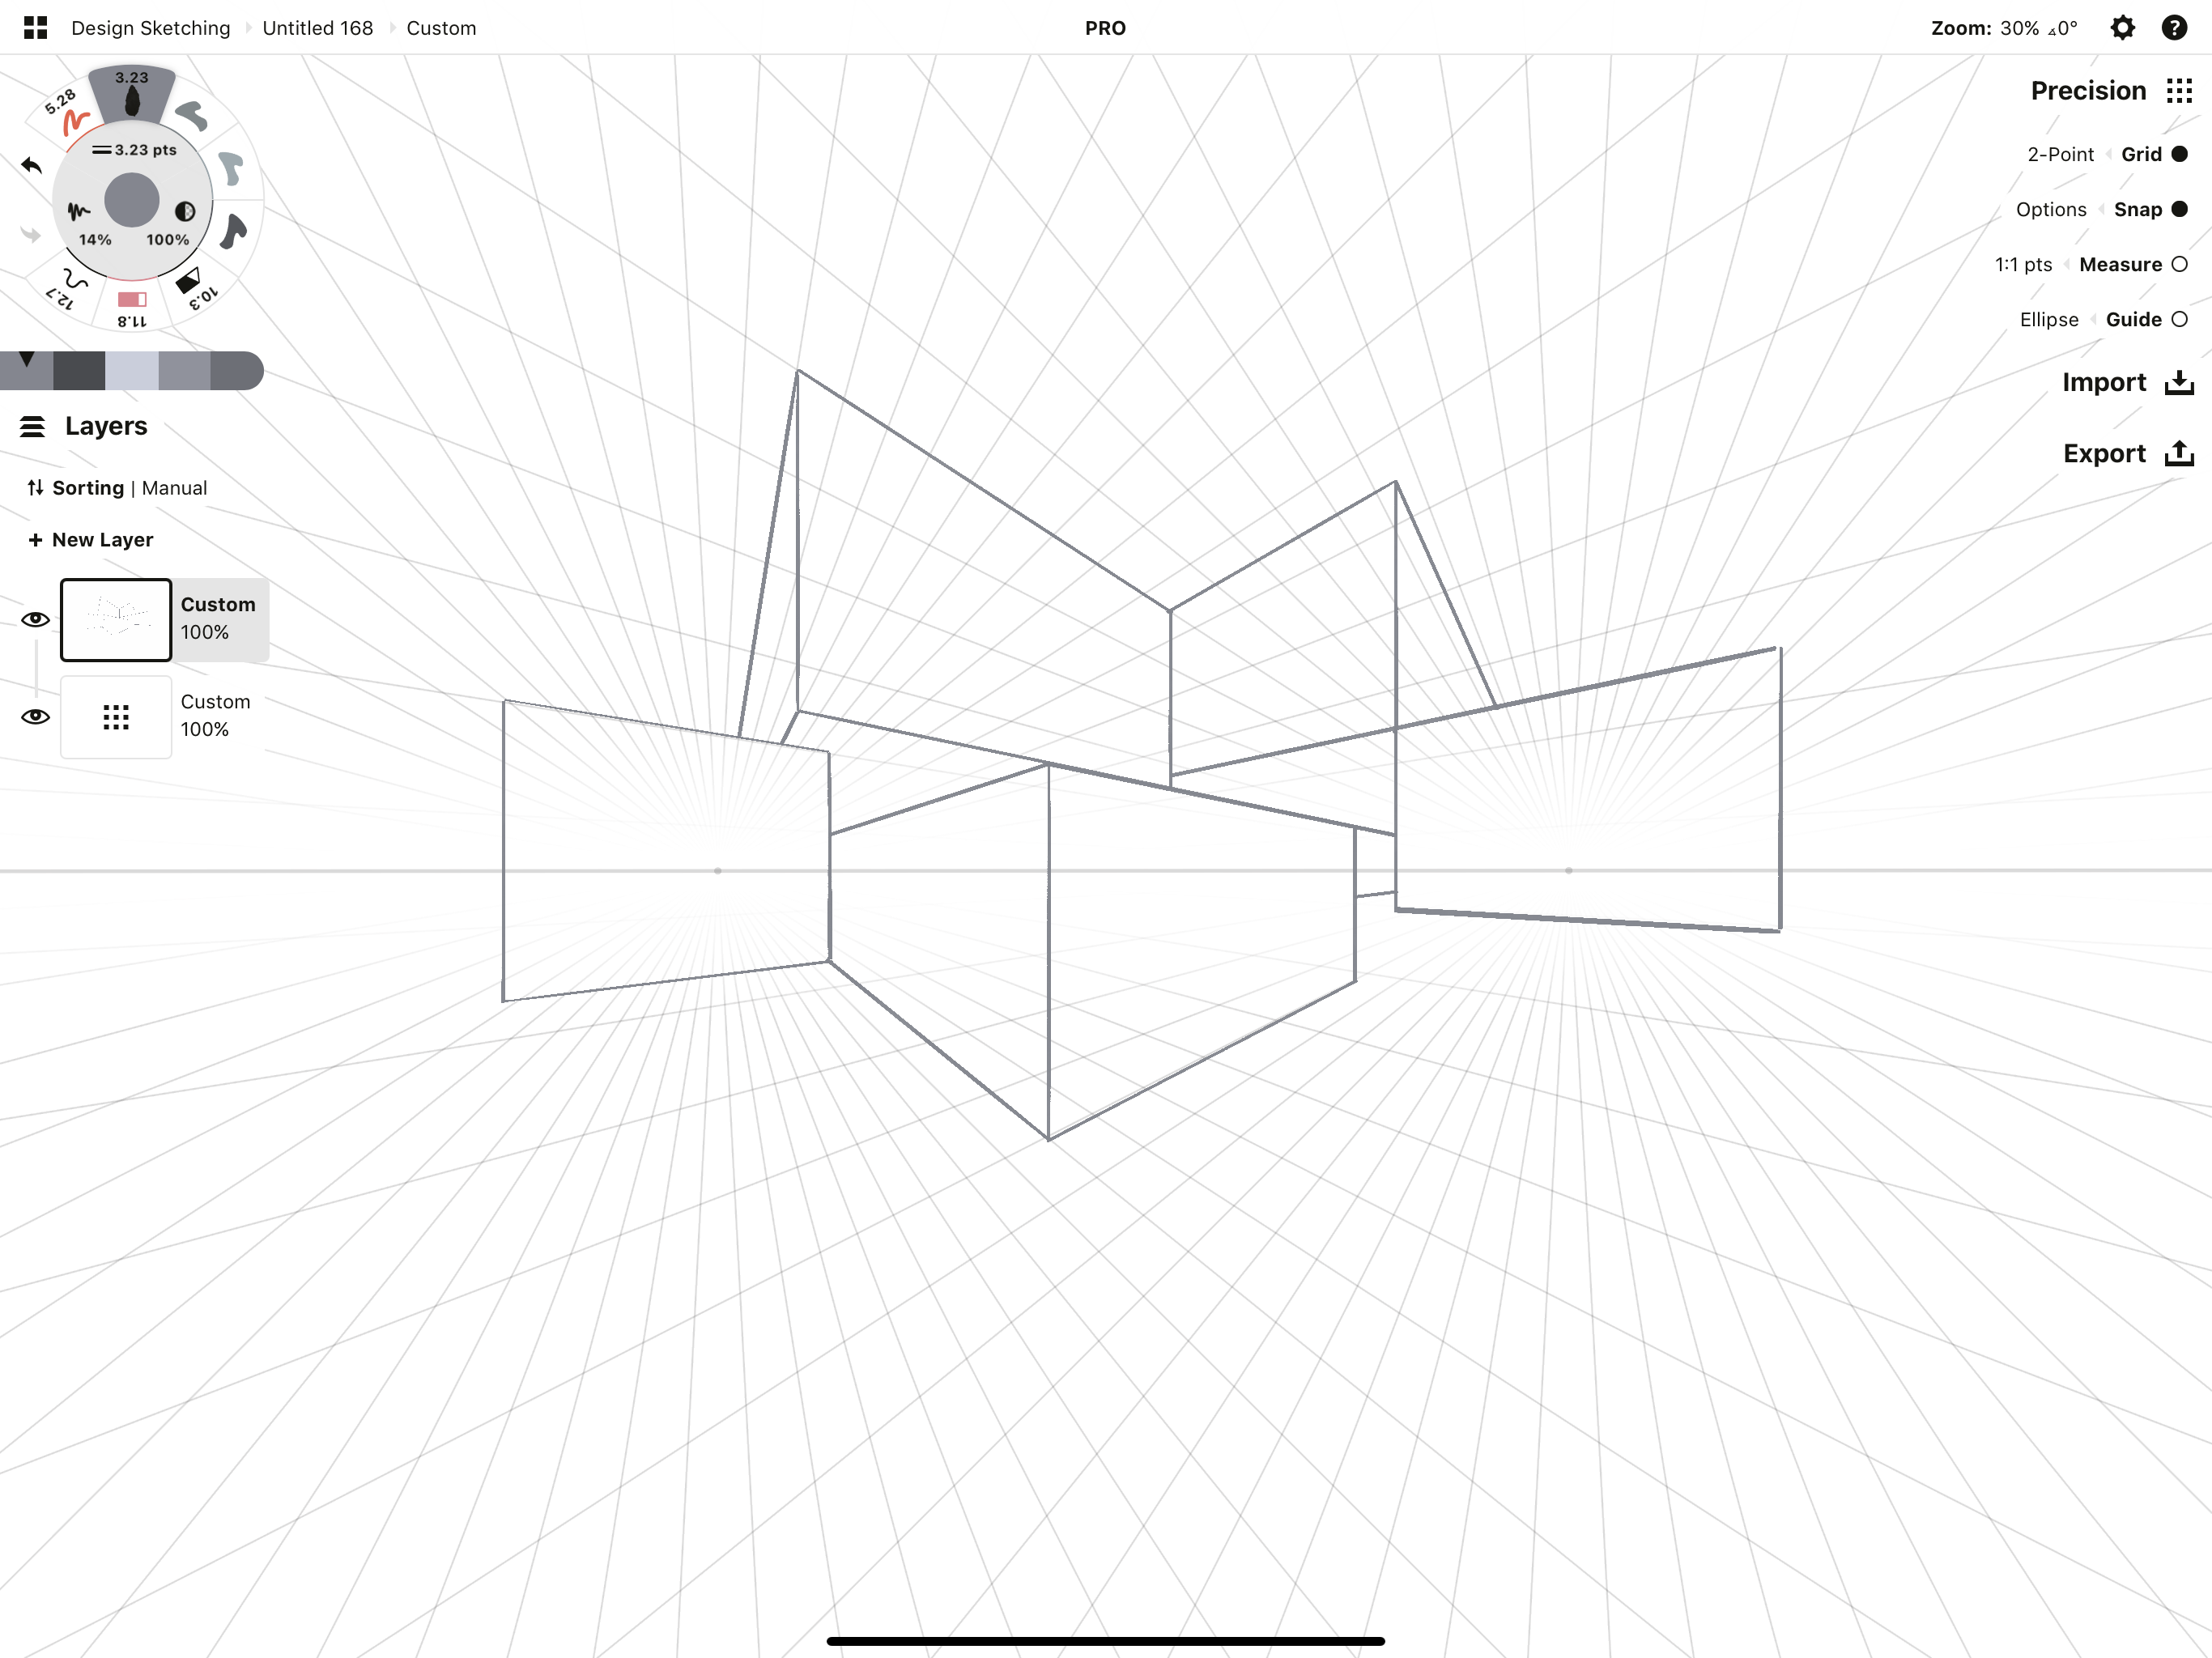
2. When thinking about which lines to keep and which to erase, think first about where your front lines are - these are the vertical lines you drew. Leave them alone, but pick one and trace the orthogonal lines back until they intersect with another set from an alternate line.
Draw a vertical line where they intersect. Do this for each of the objects. Then erase any line work extending behind these intersecting planes.
3. Go ahead and sketch in some simple details if you'd like, and add a simple color fill. Use a light shade for the side closest to the sun, use a medium shade for the side adjacent, and use a dark shade for any shadowed areas.
3-Point Perspective
In addition to the two sides shown with two points, 3-point perspective gives you a special vantage point from up in the air or beneath the ground apart from the horizon line. It relates a third piece or plane of information about the object that you wouldn't have seen with the initial two. This is usually used for action scenes like sky diving or superhero flights that give you an exotic perspective on the world.
With 3-point perspective, you'll only be using points and orthogonal lines that relate back to their corresponding vanishing points.
Here is an example of 3-point perspective from a mountain ridge, sharing a lovely aerial view of the buildings below:
True to life, if you zoom out on the photo, you can draw the third vanishing point about where you might imagine the sun to be overhead.
TL;DR for 3-Point Perspective Sketching
1. Set up your grid. A 3-point perspective grid has two vanishing points on the horizon line, and a third somewhere above or below the horizon line, with orthogonal lines extending through all three points across the canvas.
2. Draw a new point somewhere on the canvas - this is not one of the three vanishing points. If this new point is inside the triangle of vanishing points, you'll be able to see all three planes of your object when it's drawn.
3. Draw orthogonal lines from the new point to each of the vanishing points. This structure is the central frame for your object.
4. Move a little ways up each of the three lines and place a second point. From each point, draw orthogonal lines to each of the vanishing points it hasn't yet touched. You'll see the outer boundaries appear for your object.
5. Erase the excess line work around your object.
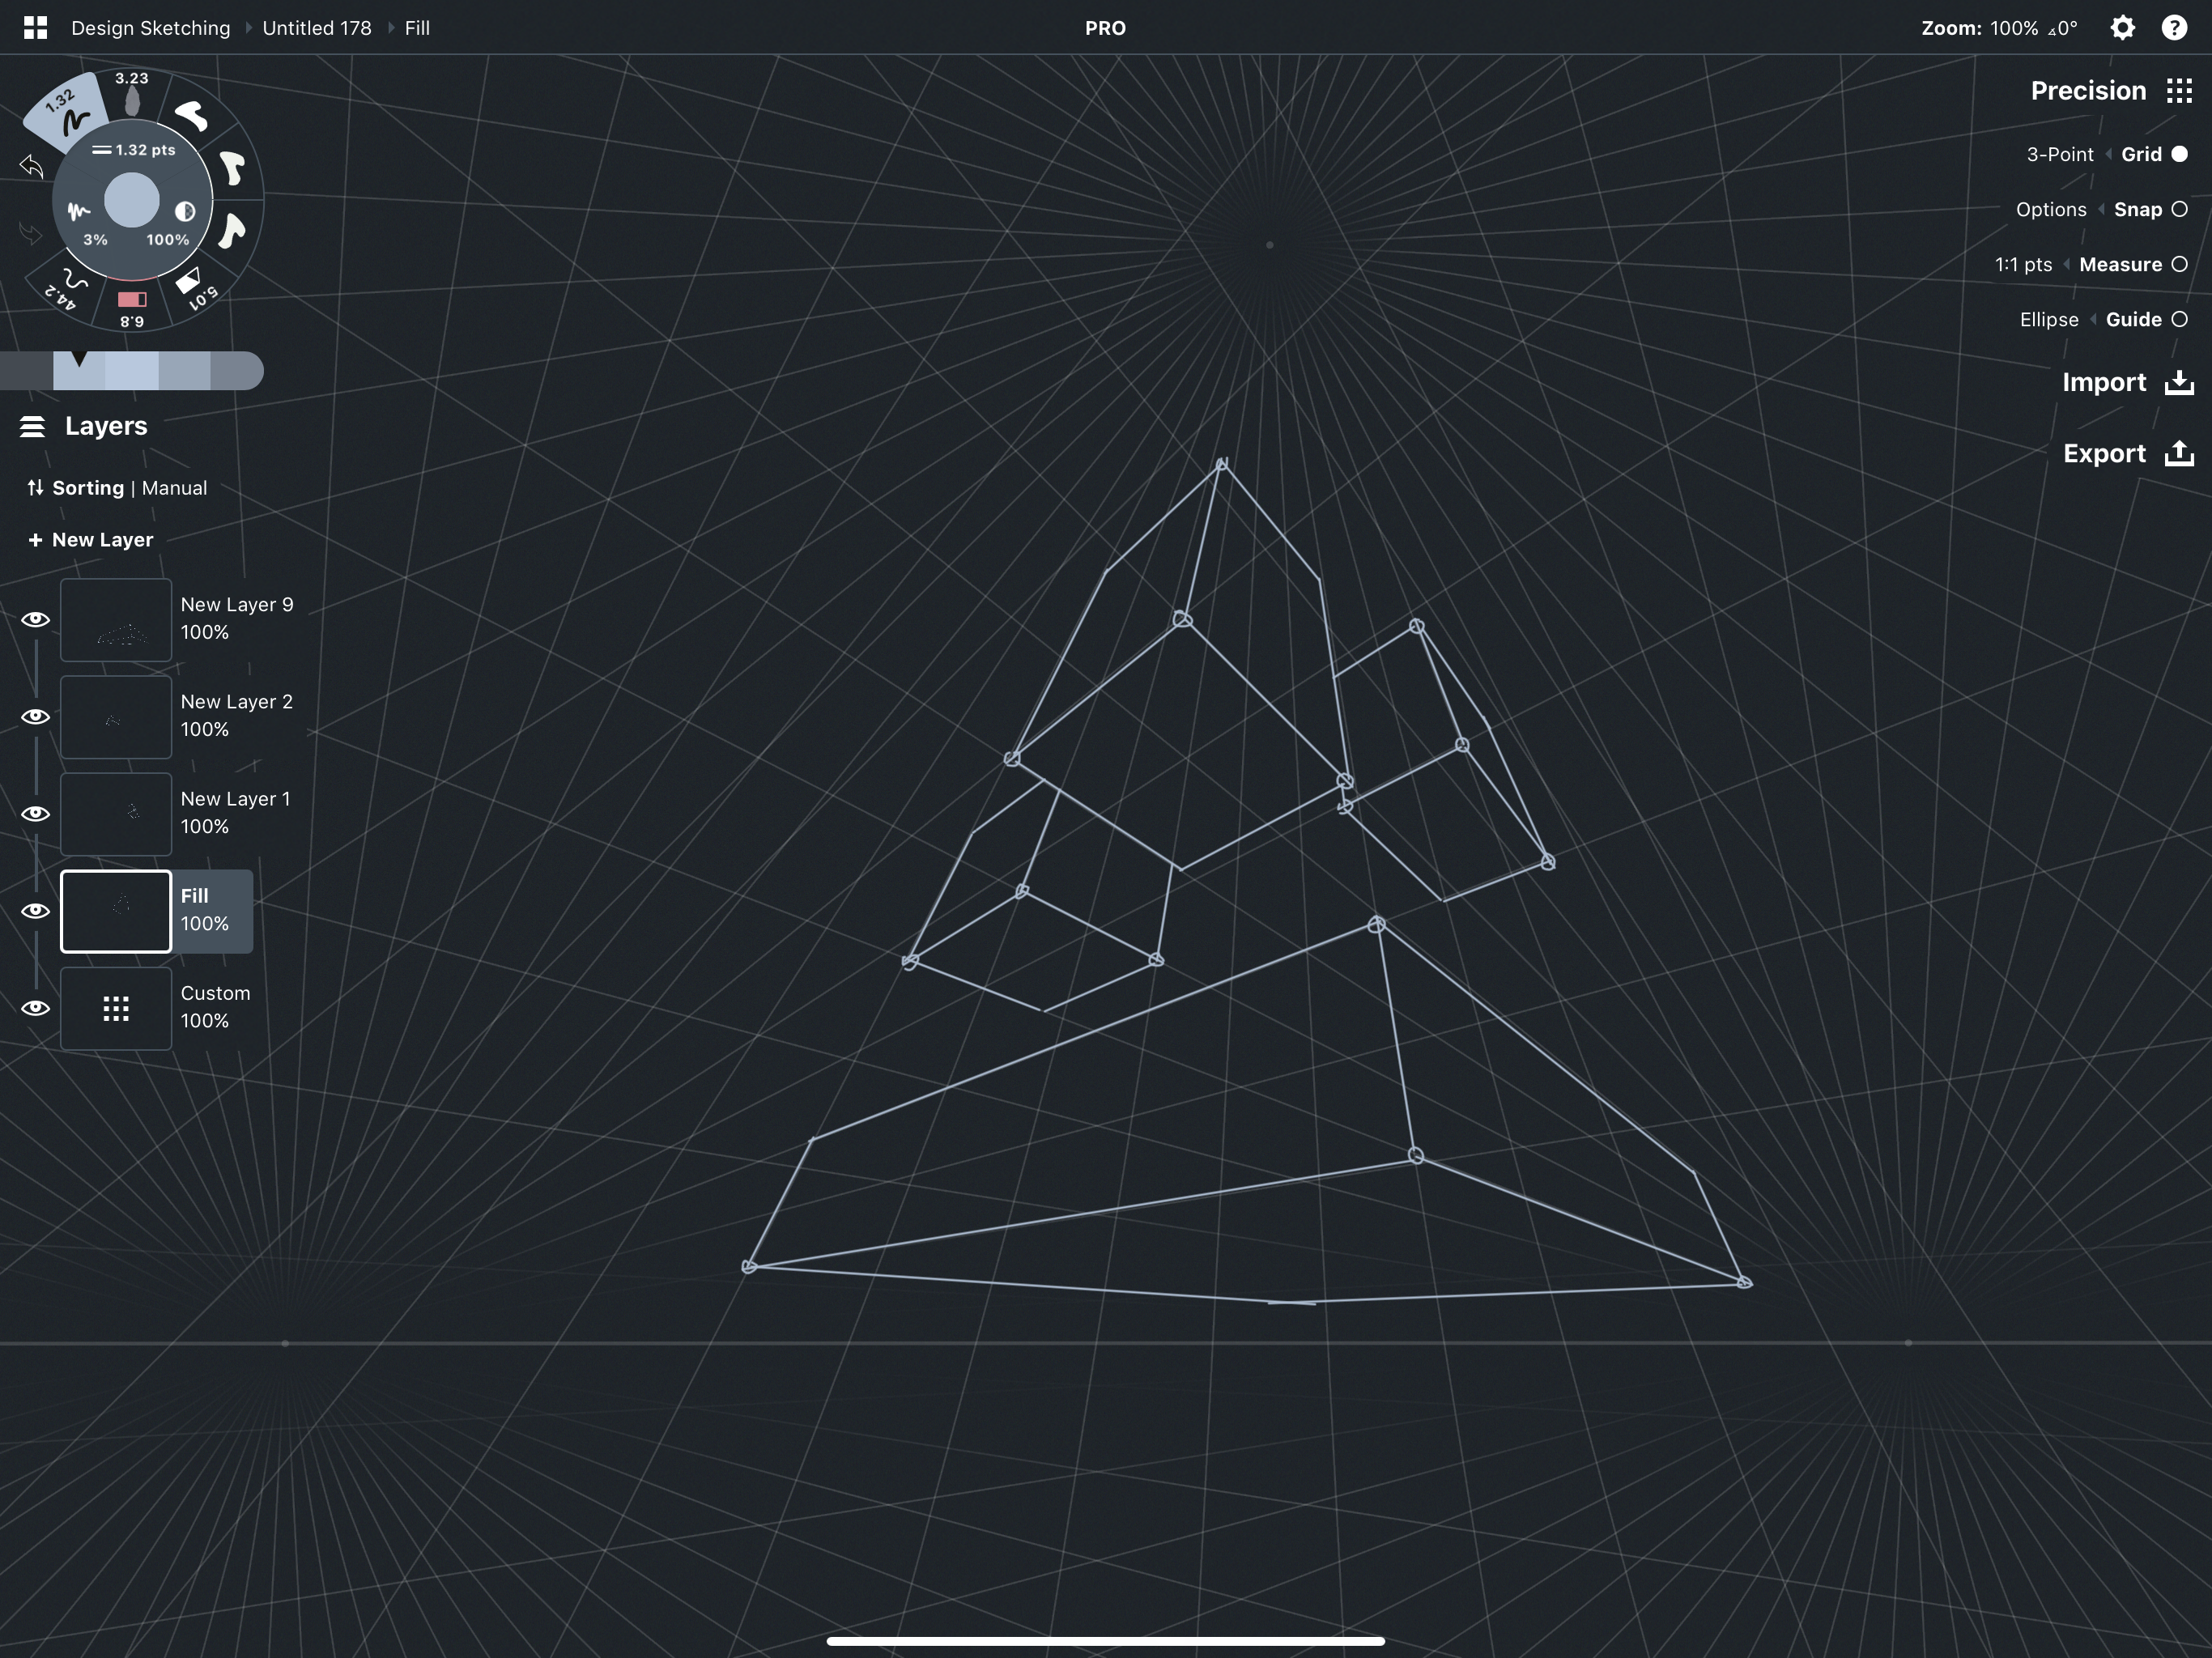
Exercise 1 - Sketch a 3D Cube
1. Activate the 3-point perspective grid and adjust it into position on the canvas. You may have to zoom in or out a little to see all three points. Remember you can edit your grid's positioning at any time in the grid layer.
2. Draw a new point on the canvas. If this point is inside the triangle of vanishing points, you'll be able to see all three planes of the object when you draw it.
3. With 100% line smoothing or Align active, sketch orthogonal lines from this new point to each vanishing point on the grid. This outline is the central structure to your object - each line is an inner boundary to the three intersecting planes you'll uncover as you draw.
4. Move your pencil a little ways down one of the lines and draw a new point. (This is technically the vertex to an alternate three planes - two you can see, one on the rear side of the object.)
Draw orthogonal lines from this point to each of the vanishing points along the lines it isn't already touching. You'll see the outer boundaries of your object begin to appear.
5. Draw two more points on the other two lines, and draw their corresponding orthogonal lines.
6. Erase or slice away the extra line work to extract your object.
Exercise 2 - Sketch a Sci-Fi Scene
1. Draw several more structures like the first one to practice the technique. If you're in Concepts or any digital drawing app, you can use a new layer for each, and hide the previous layers to keep your work uncluttered as you draw.
2. When all objects are completed, try adding a color fill. Use three shades to fill your object for three dimensional coloring - a light version for the space most exposed to sunlight, a medium version for the side adjacent, and the darkest shade for the side furthest from the sun.

Concepts Drawing Tip: Use the Filled Stroke tool with Align enabled for a fast fill on the grid - just trace your shapes.
Concepts Drawing Tip (iOS): Use the Triadic color palette for quick color reference. Find a color on the color wheel, then use this palette to reference lighter and darker shades of the same color. Learn how to use Concepts' color palettes in iOS here.
3. If your third vanishing point was high in the sky and horizon line low to the ground, you'll have created a scene that appears to be above you. Try turning your objects into a futuristic floating city.
If your horizon line was high and the third vanishing point below it, you'll have a top down view. Try turning your sketch into a sky-diving scene and imagine in a landscape at the far end.

Turning Your Rectangle into an Ellipse
Done with squares and rectangles? Let's try creating a cylinder in perspective. With this approach, you can update any structural design you create with cubes. In fact, if you follow the rule that everything comes from a cube, you can naturally trim away at the edges until you find your ideal shape.
For this exercise, you're going to find the center point of each plane, then roughly sketch in your ellipse, carving away extra material until it fits your design.
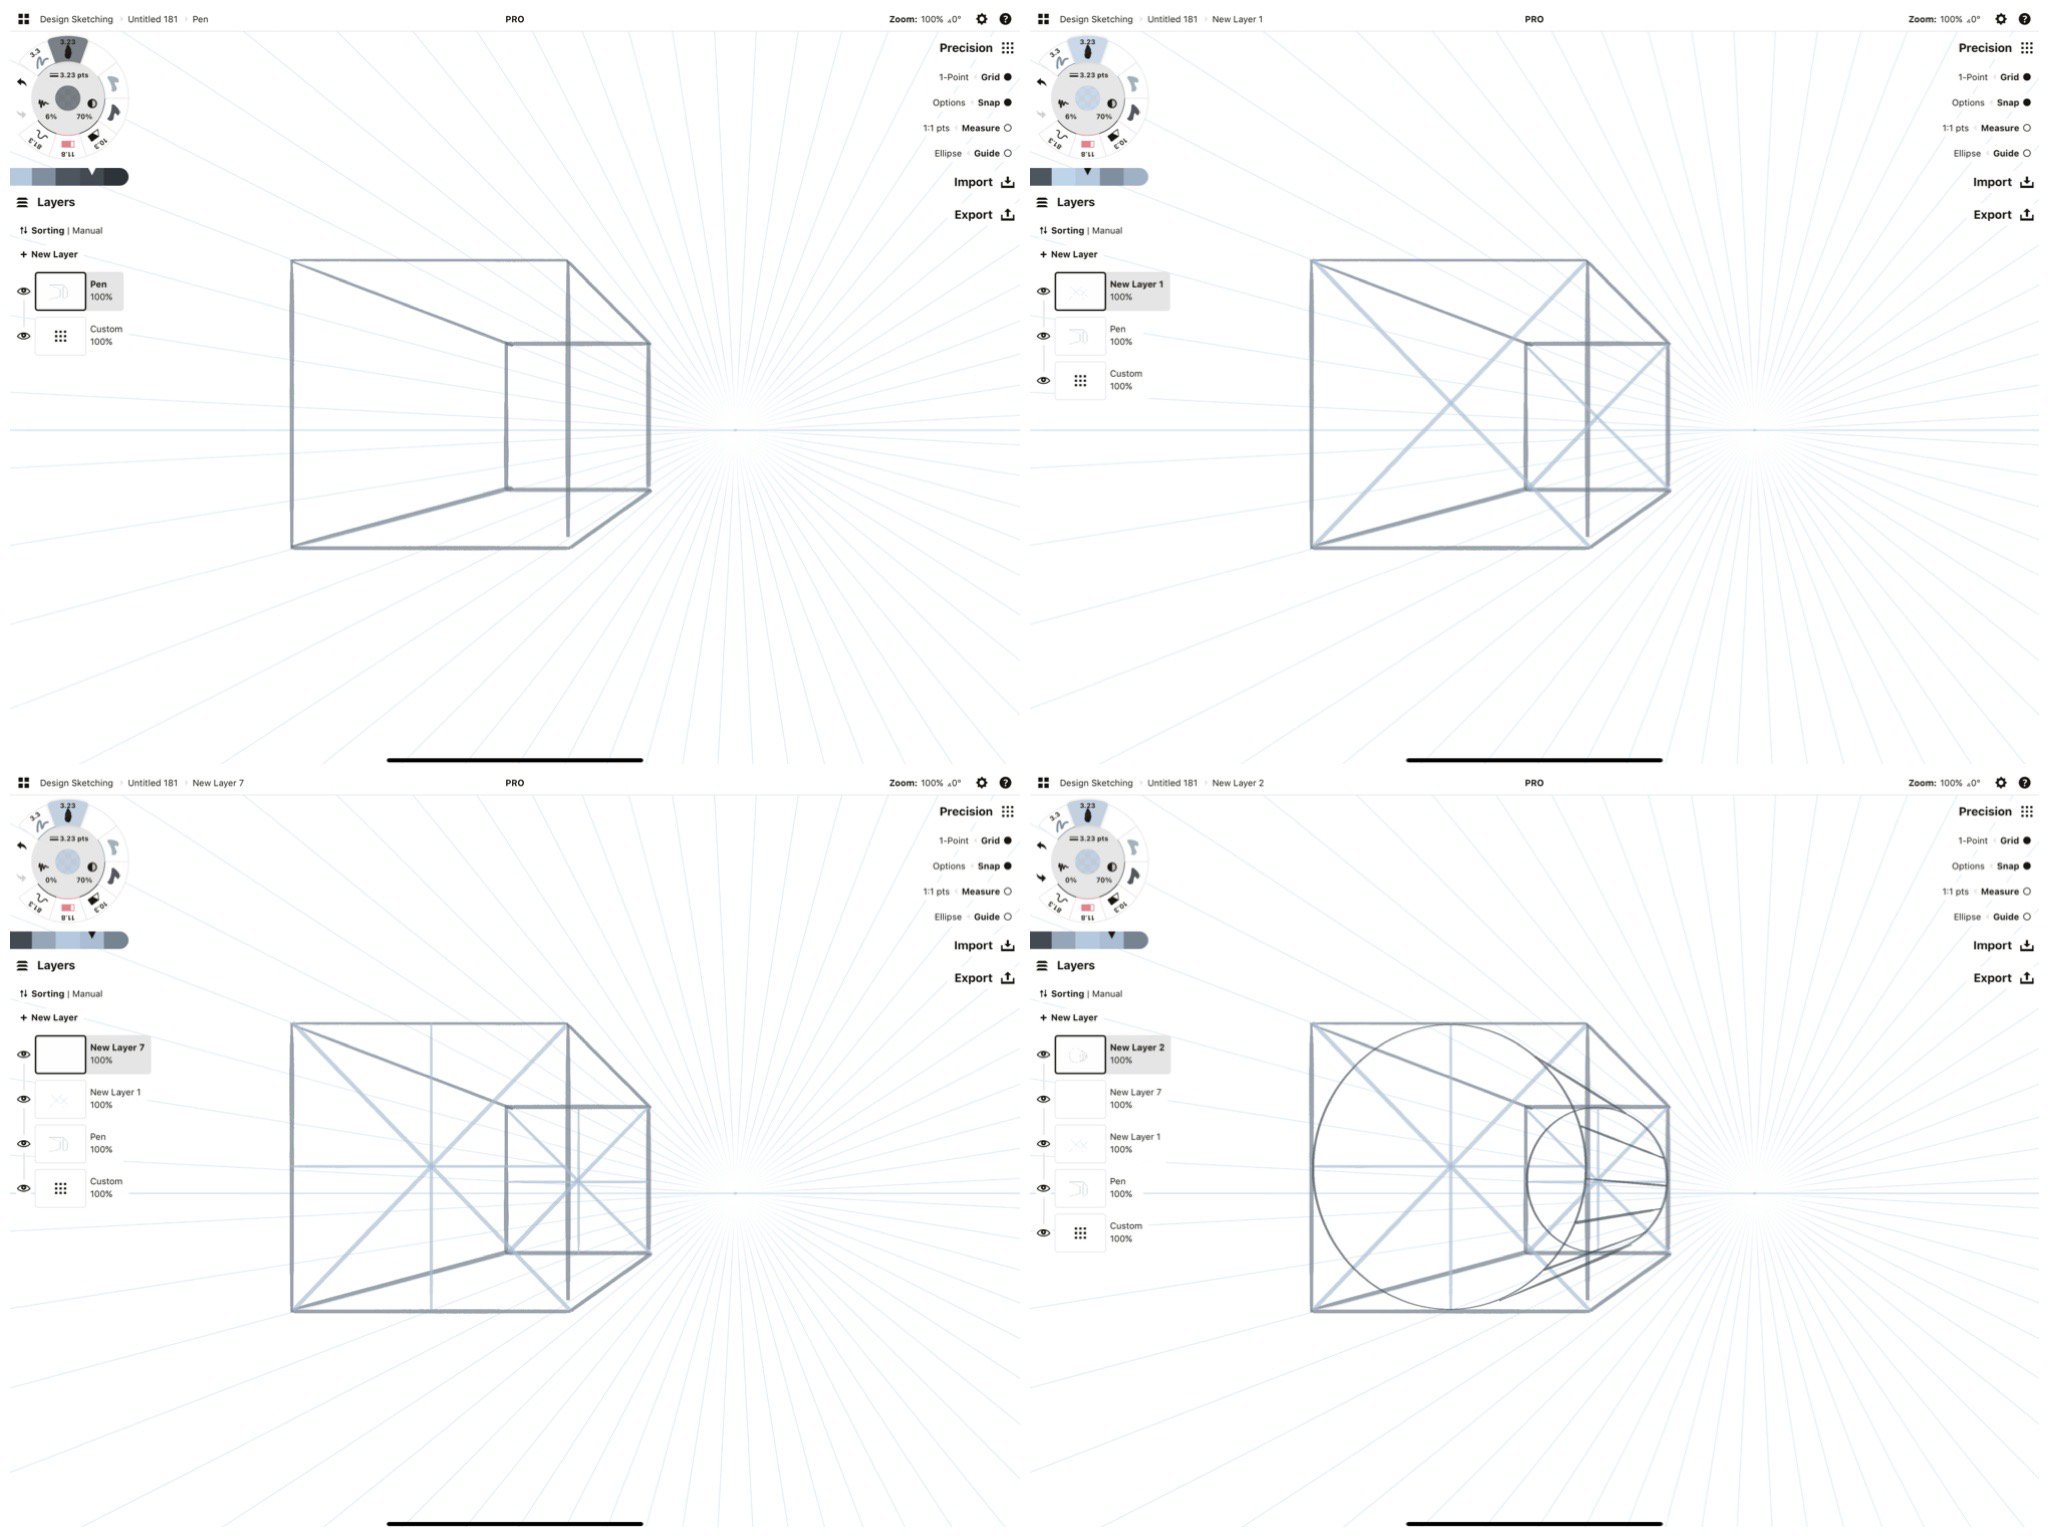
1. Set up a 1-point perspective grid.
2. Draw a cube-like structure, just like you did in the first exercise of this tutorial.
3. Look at the front face of your object. From the corners of the face, draw two diagonal lines to the rear corners. This shows you the plane's center point. Do the same for the rear face.
4. Now draw vertical and horizontal axes through the center points. This creates a set of symmetrical reference points on your structure.
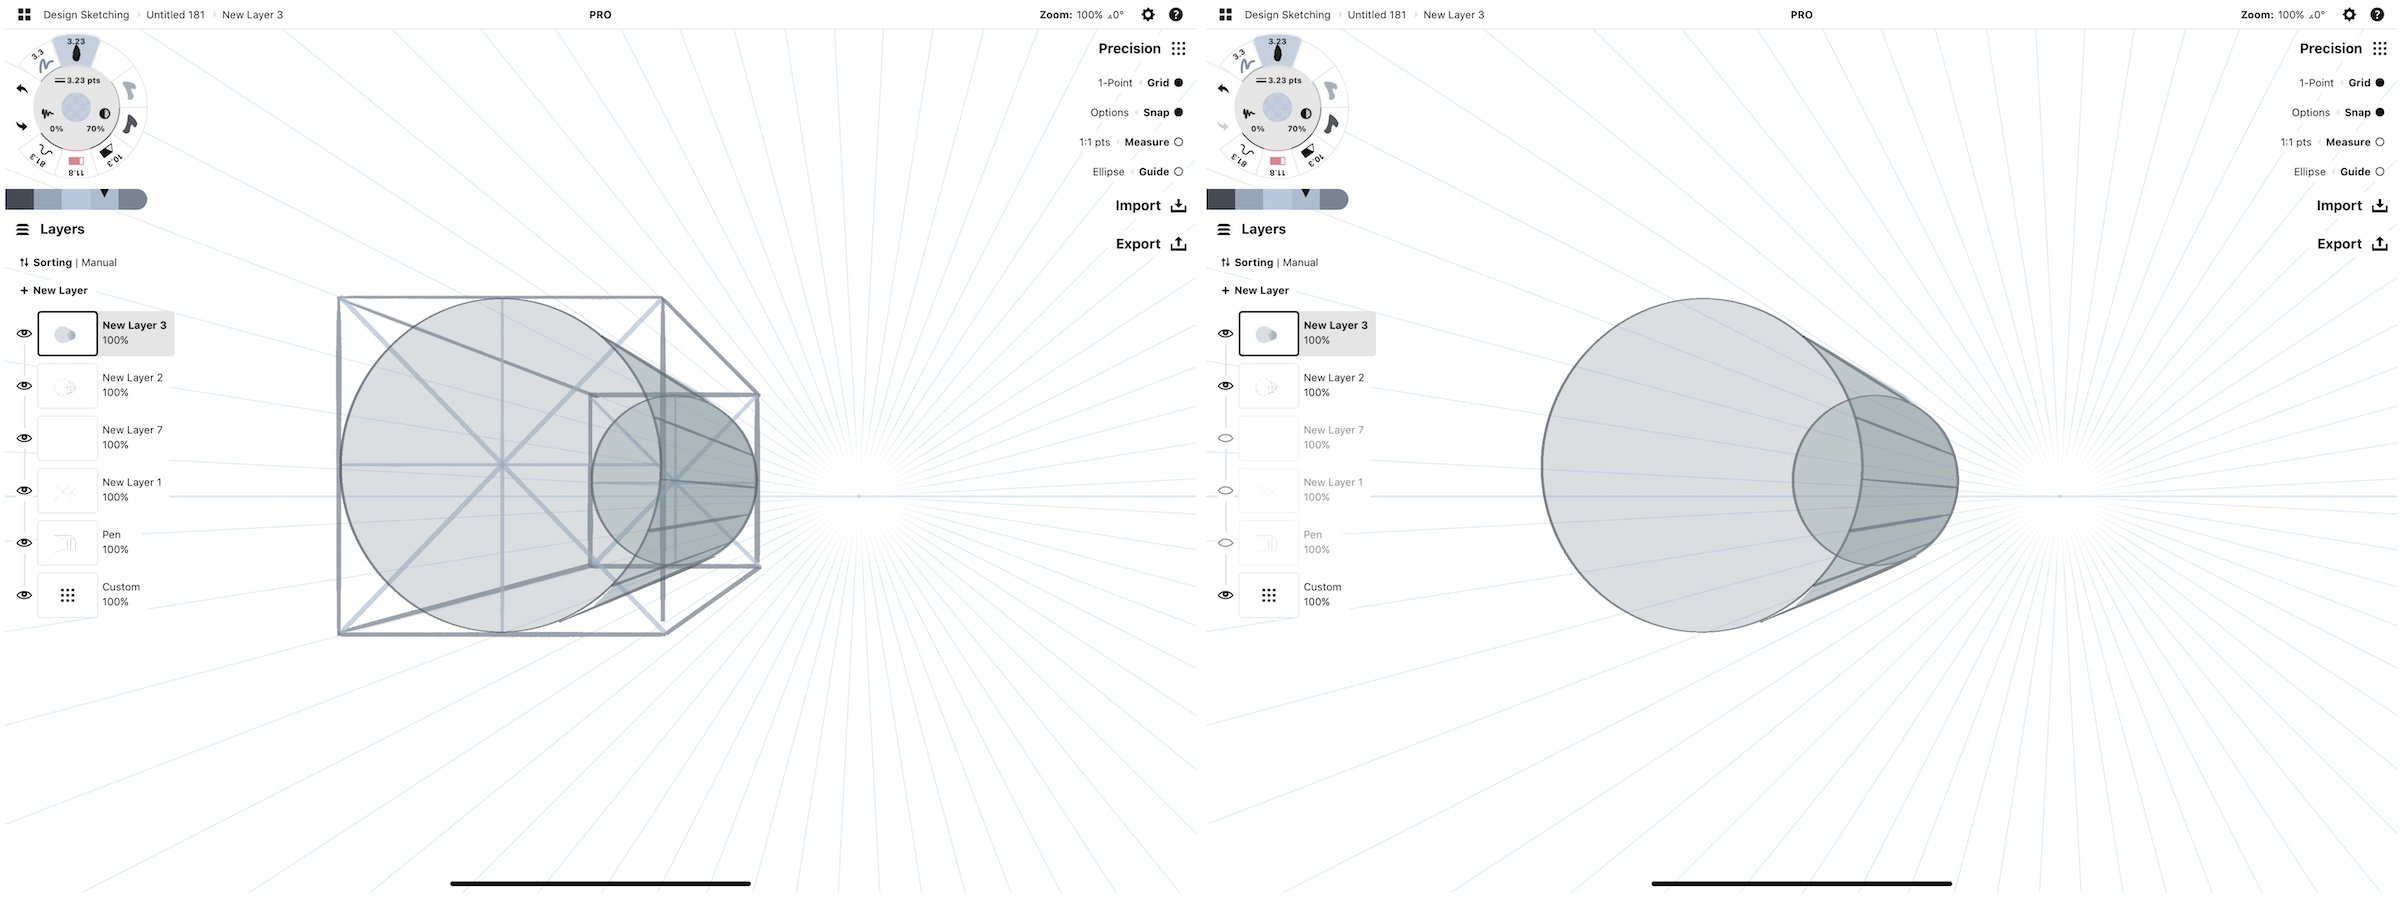
5. Using these touch points as references, sketch the rounded edges of your ellipse into the shape. It's okay to be rough while you sketch - you want to practice aligning your eye between the center points while trimming out a circular shape. It might look warped the first several times you do it, and once you get it right, it will still appear oblong. This is the 2D page reality staring at you. If you step back and look at it 3-dimensionally, you'll see that in perspective, the oblong is properly spherical.
6. Draw orthogonal lines from the edges of the front ellipse to the rear ellipse.
Concepts Drawing Tip: Apply some line smoothing on your ellipse edges to polish up any rough sketching. Alternatively, you can use circles from the Object Library and use the Nudge tool to guide the edges into alignment with your shape, or you can use the Shape Guides to draw an arc or ellipse to round the corners. (The Object Library and Shape Guides are coming soon to Windows & Android platforms.)
7. If you like, you can block in a color.
Drawing People in Perspective
When drawing architectural or urban structures, it's common to add humans, trees or vehicles around the building to aid the illusion of scale and depth in your drawing. It's important to scale these correctly or your entire sketch will appear out of sync, despite your best sketching efforts.
It's actually super simple to scale your people and objects correctly. They follow the same scaling principles as your buildings.
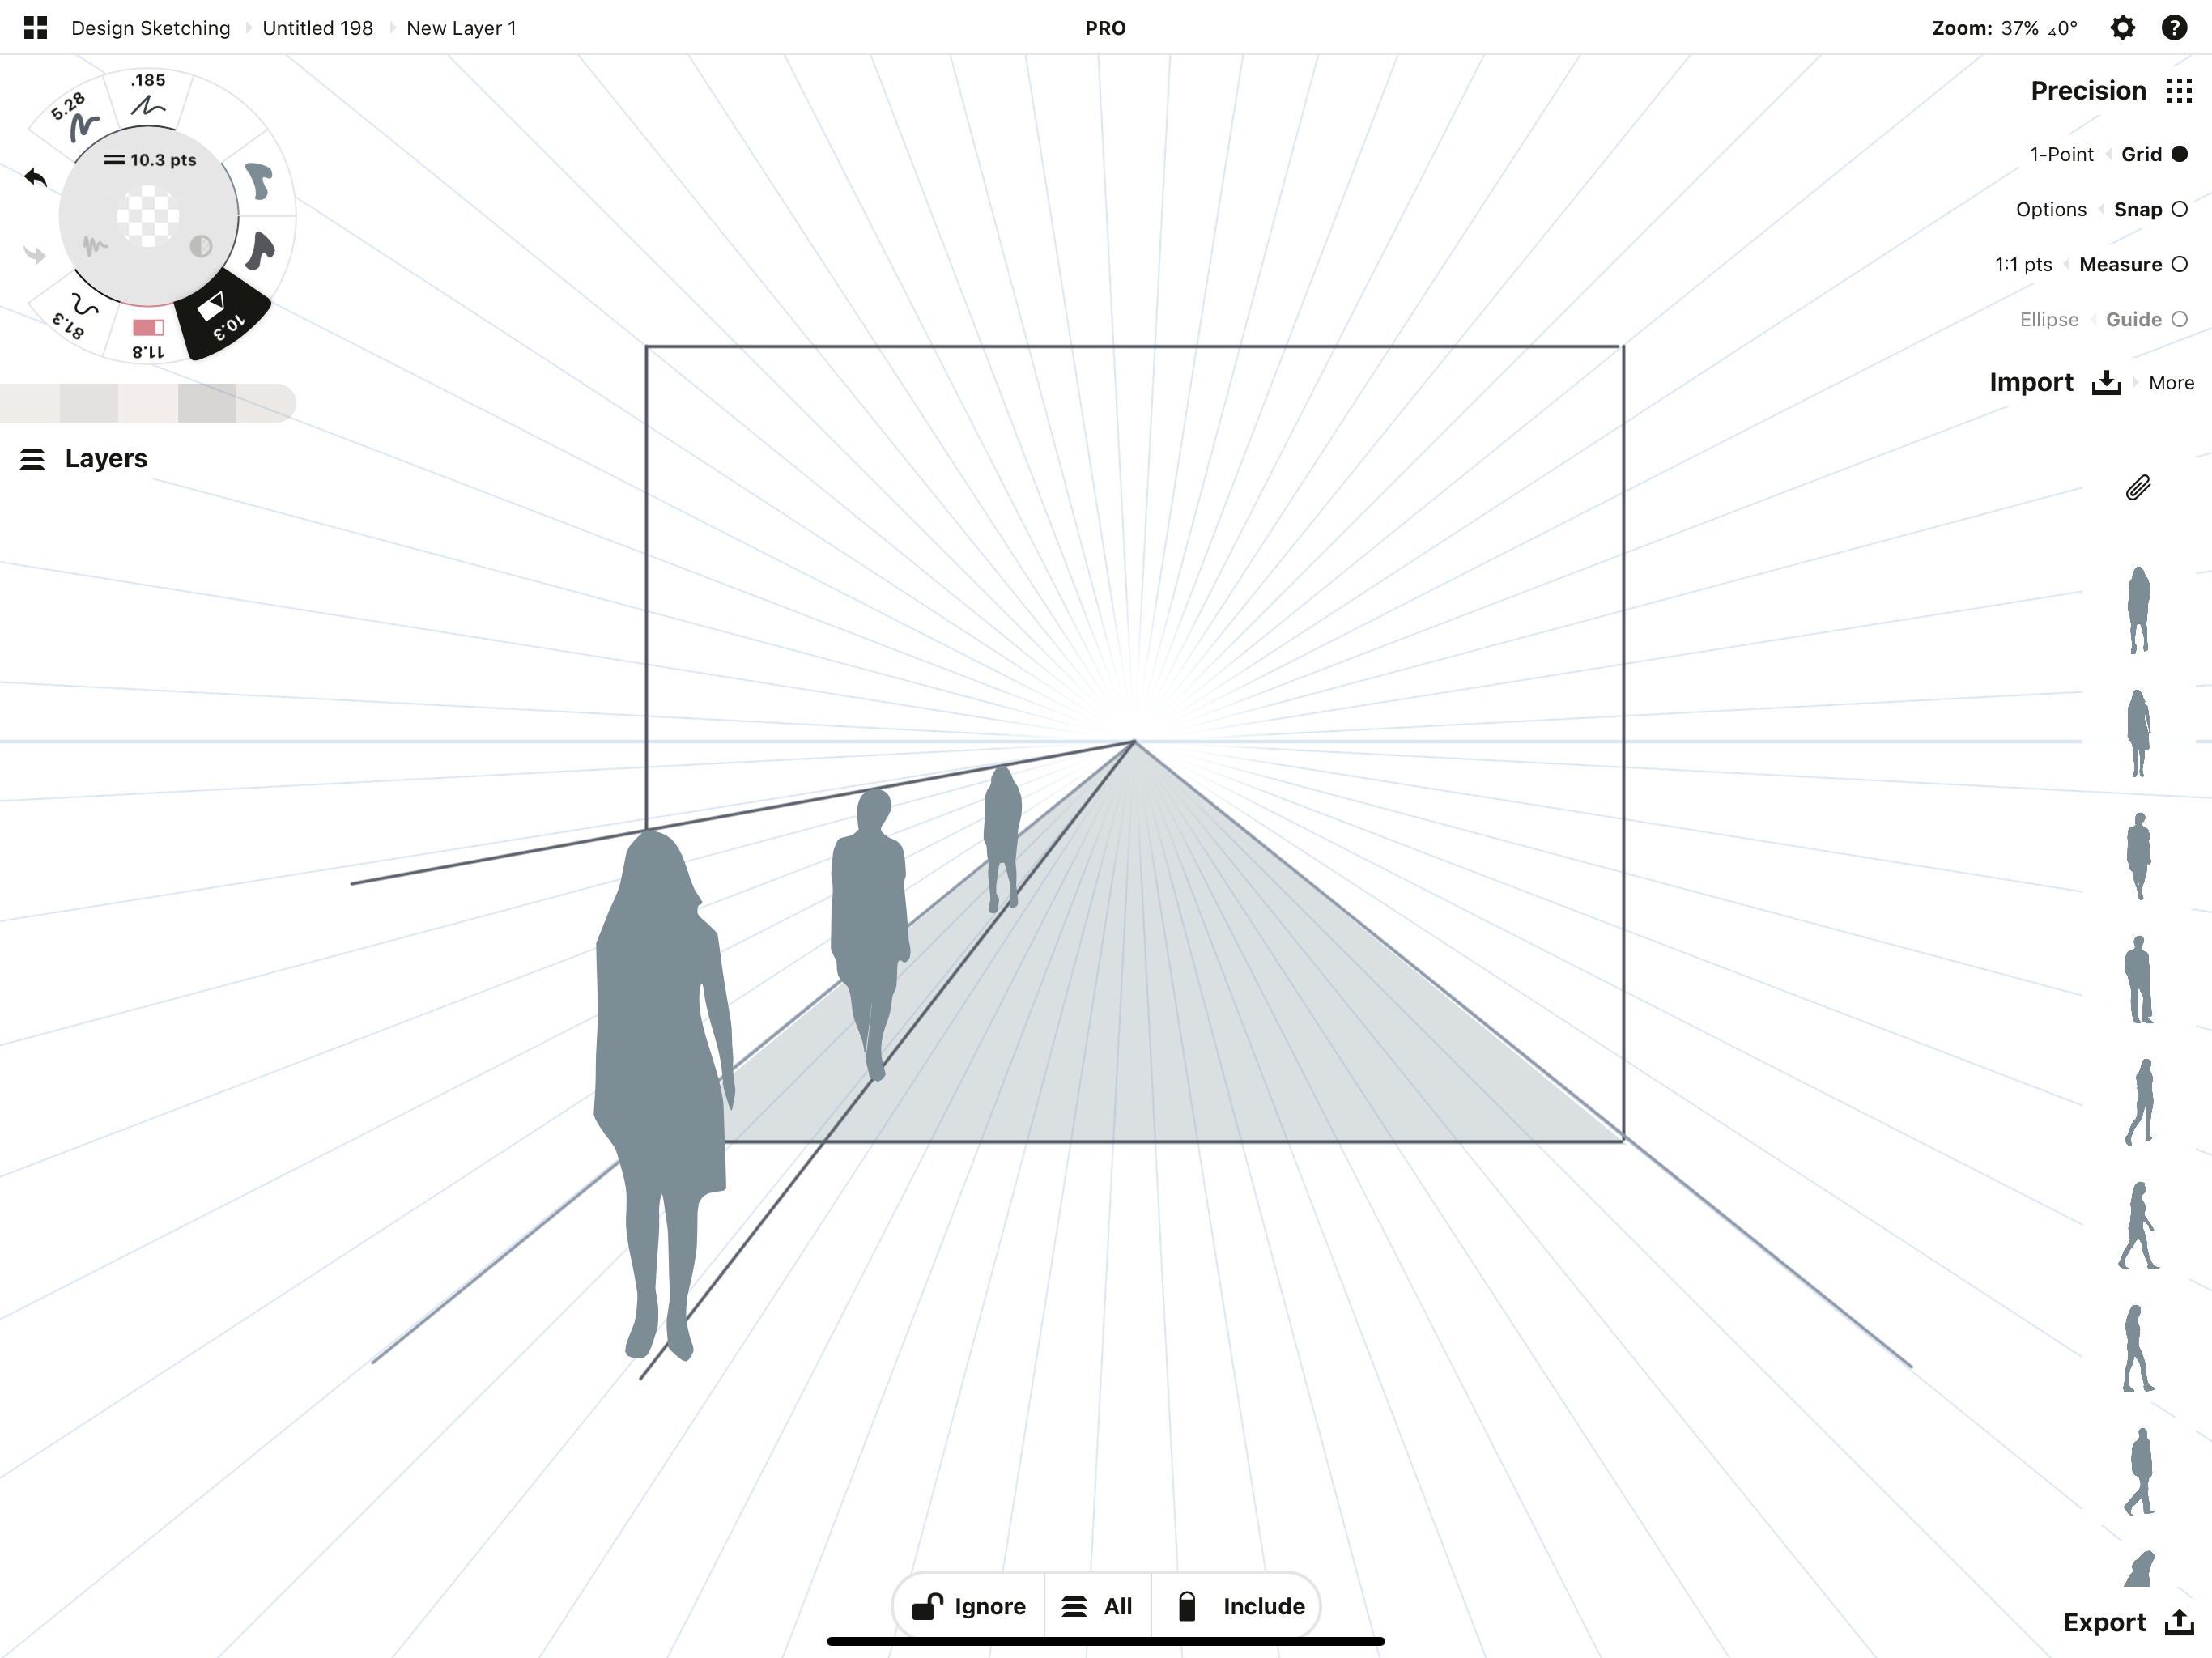
Drawing people in perspective is the same as drawing buildings in perspective. Just align the person's head and feet along their orthogonal lines. (The Object Library pictured above will be coming soon to Windows & Android.)
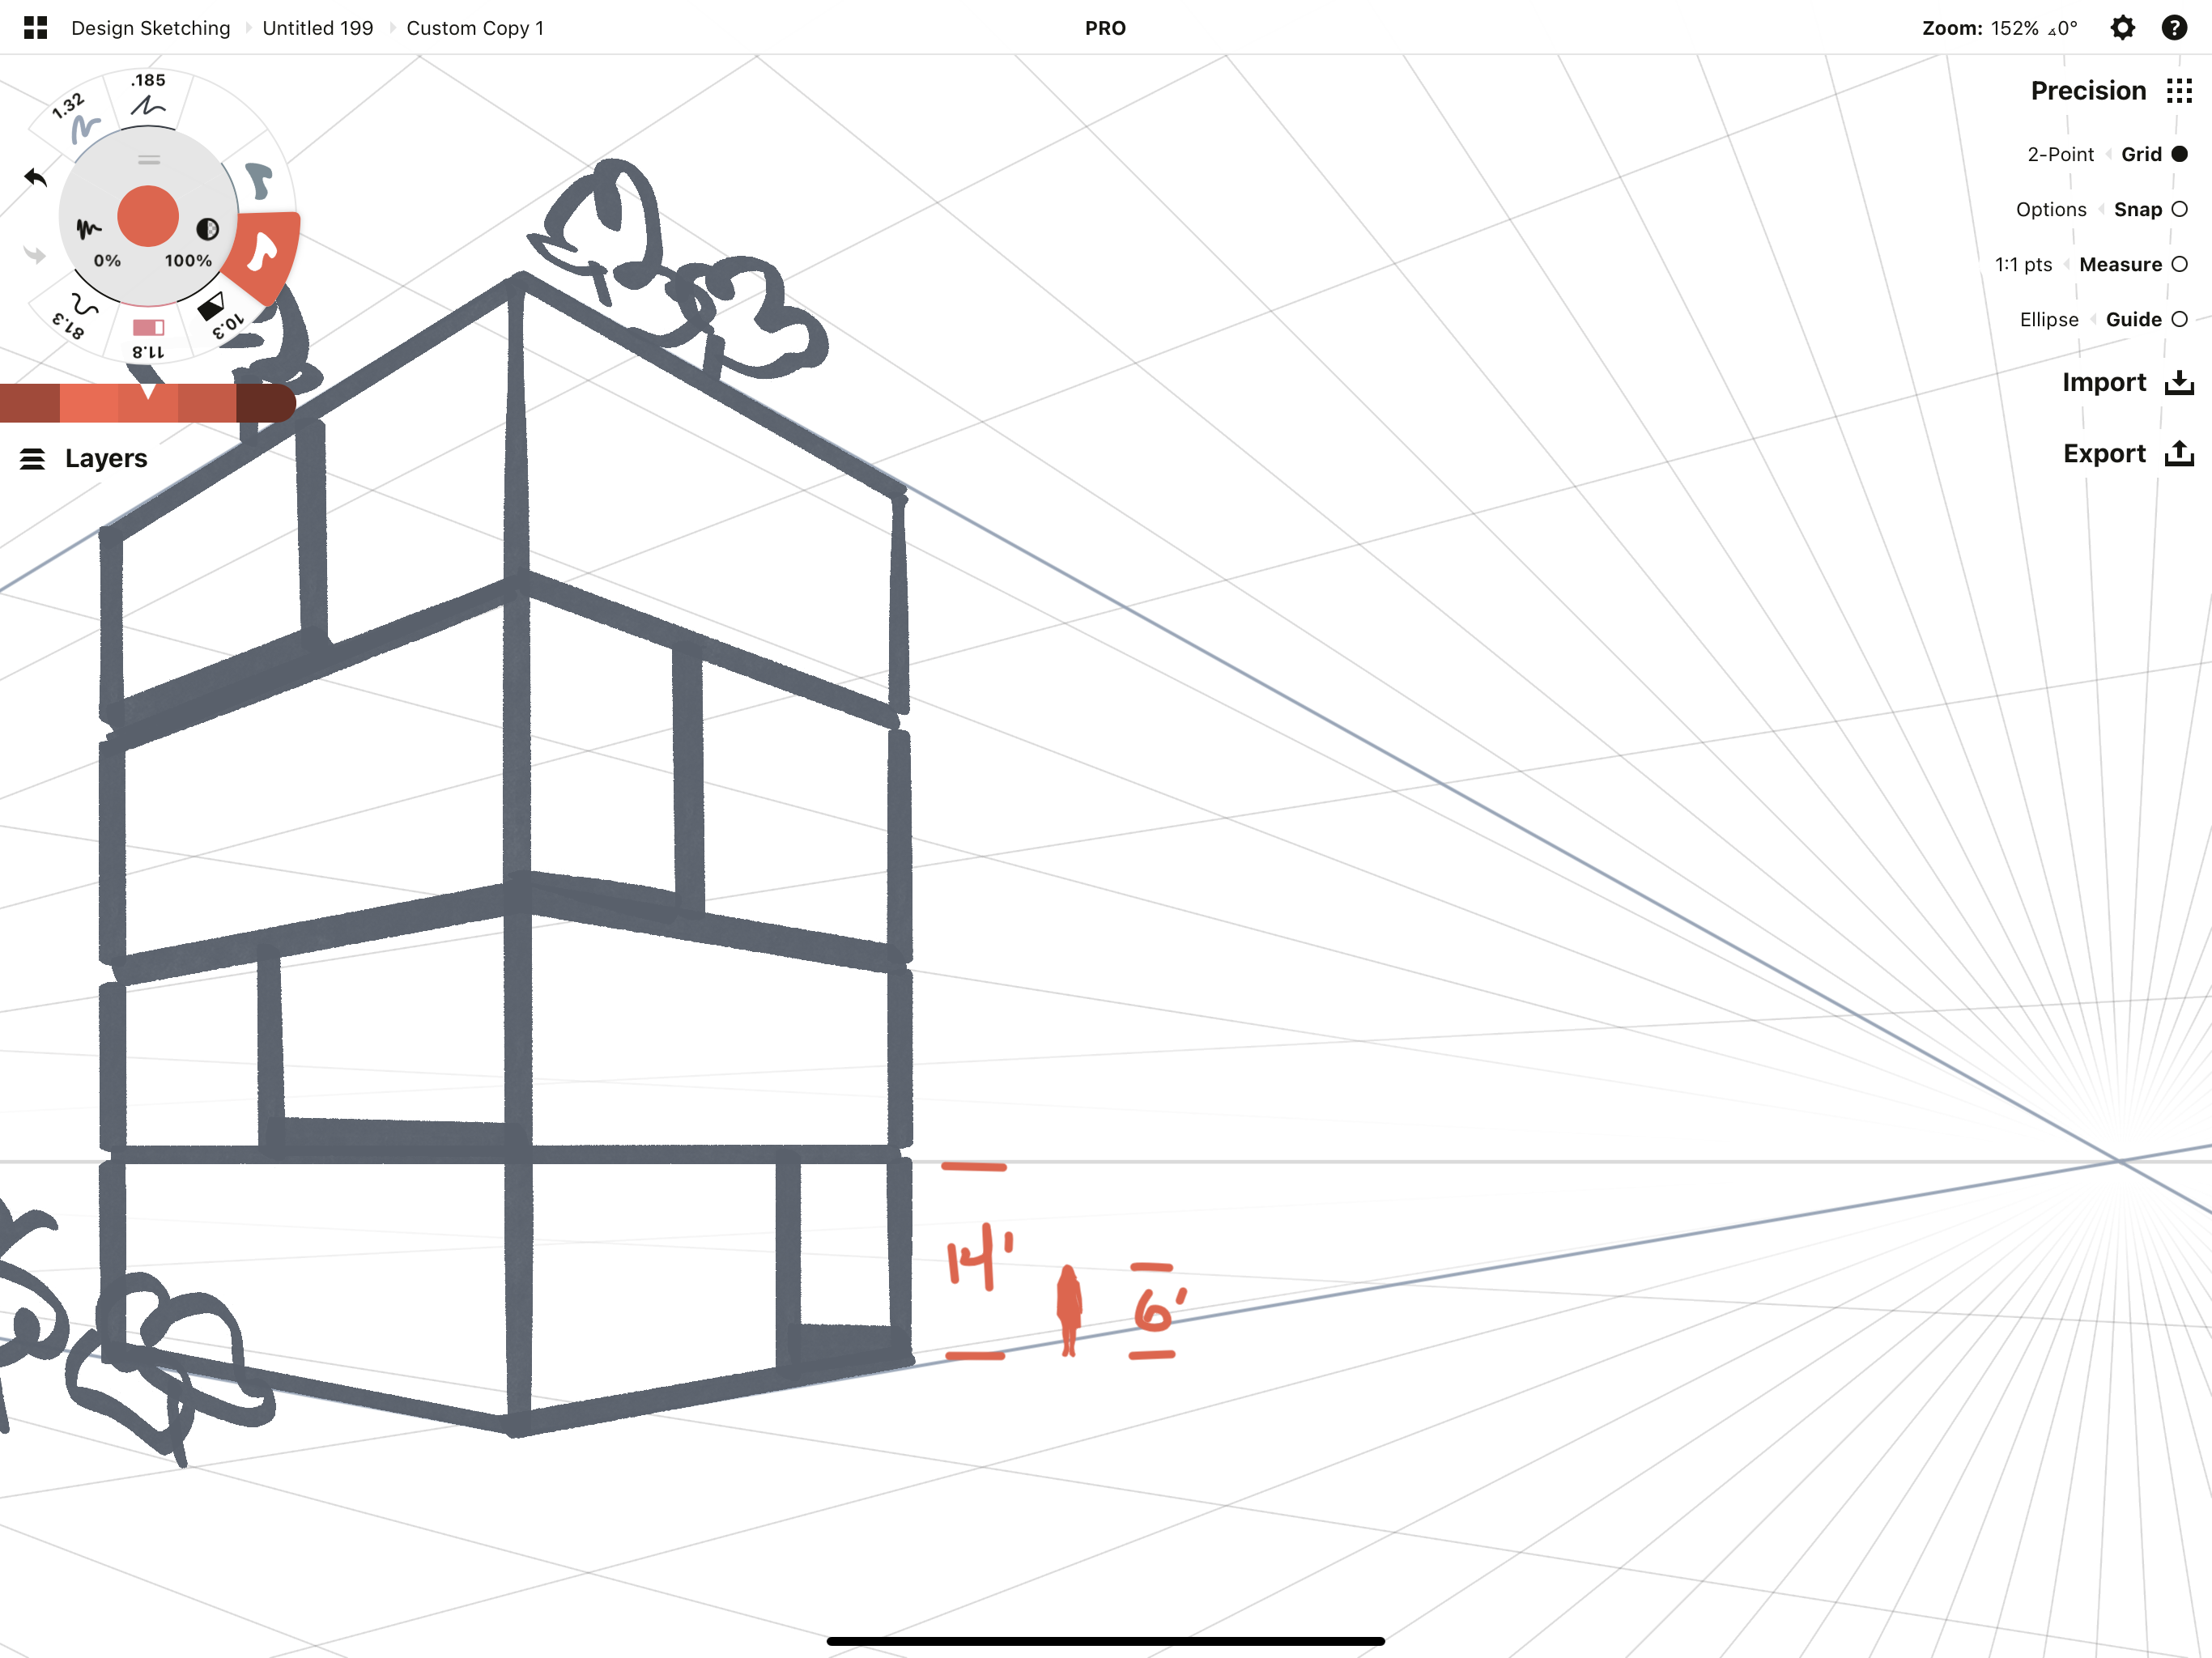
Once you sketch your building, decide the building's overall height, then focus on the first storey of the building.
- A one storey building is on average 14 feet tall (4.62 meters).
- A typical human is between 5 and 6 feet tall (1.5 meters and 1.8 meters).
- For vehicles, a sedan is just under 5 feet tall (1.5 meters). A van is 7.5 feet tall (2.3 meters).
- A smaller tree will be about 15 feet tall (4.6 meters). Taller trees such as maples can grow between 30 and 150 feet tall (9 meters and 46 meters).
As this exercise focuses on people, a human at 6 feet (1.8 meters) will be slightly shorter than half the first building storey.
1. Measure (casually is fine) your building storey, then measure out a human's height beside the building (just under half).
2. Draw an orthogonal line from the human's feet to the vanishing point, and another from the head to the vanishing point.
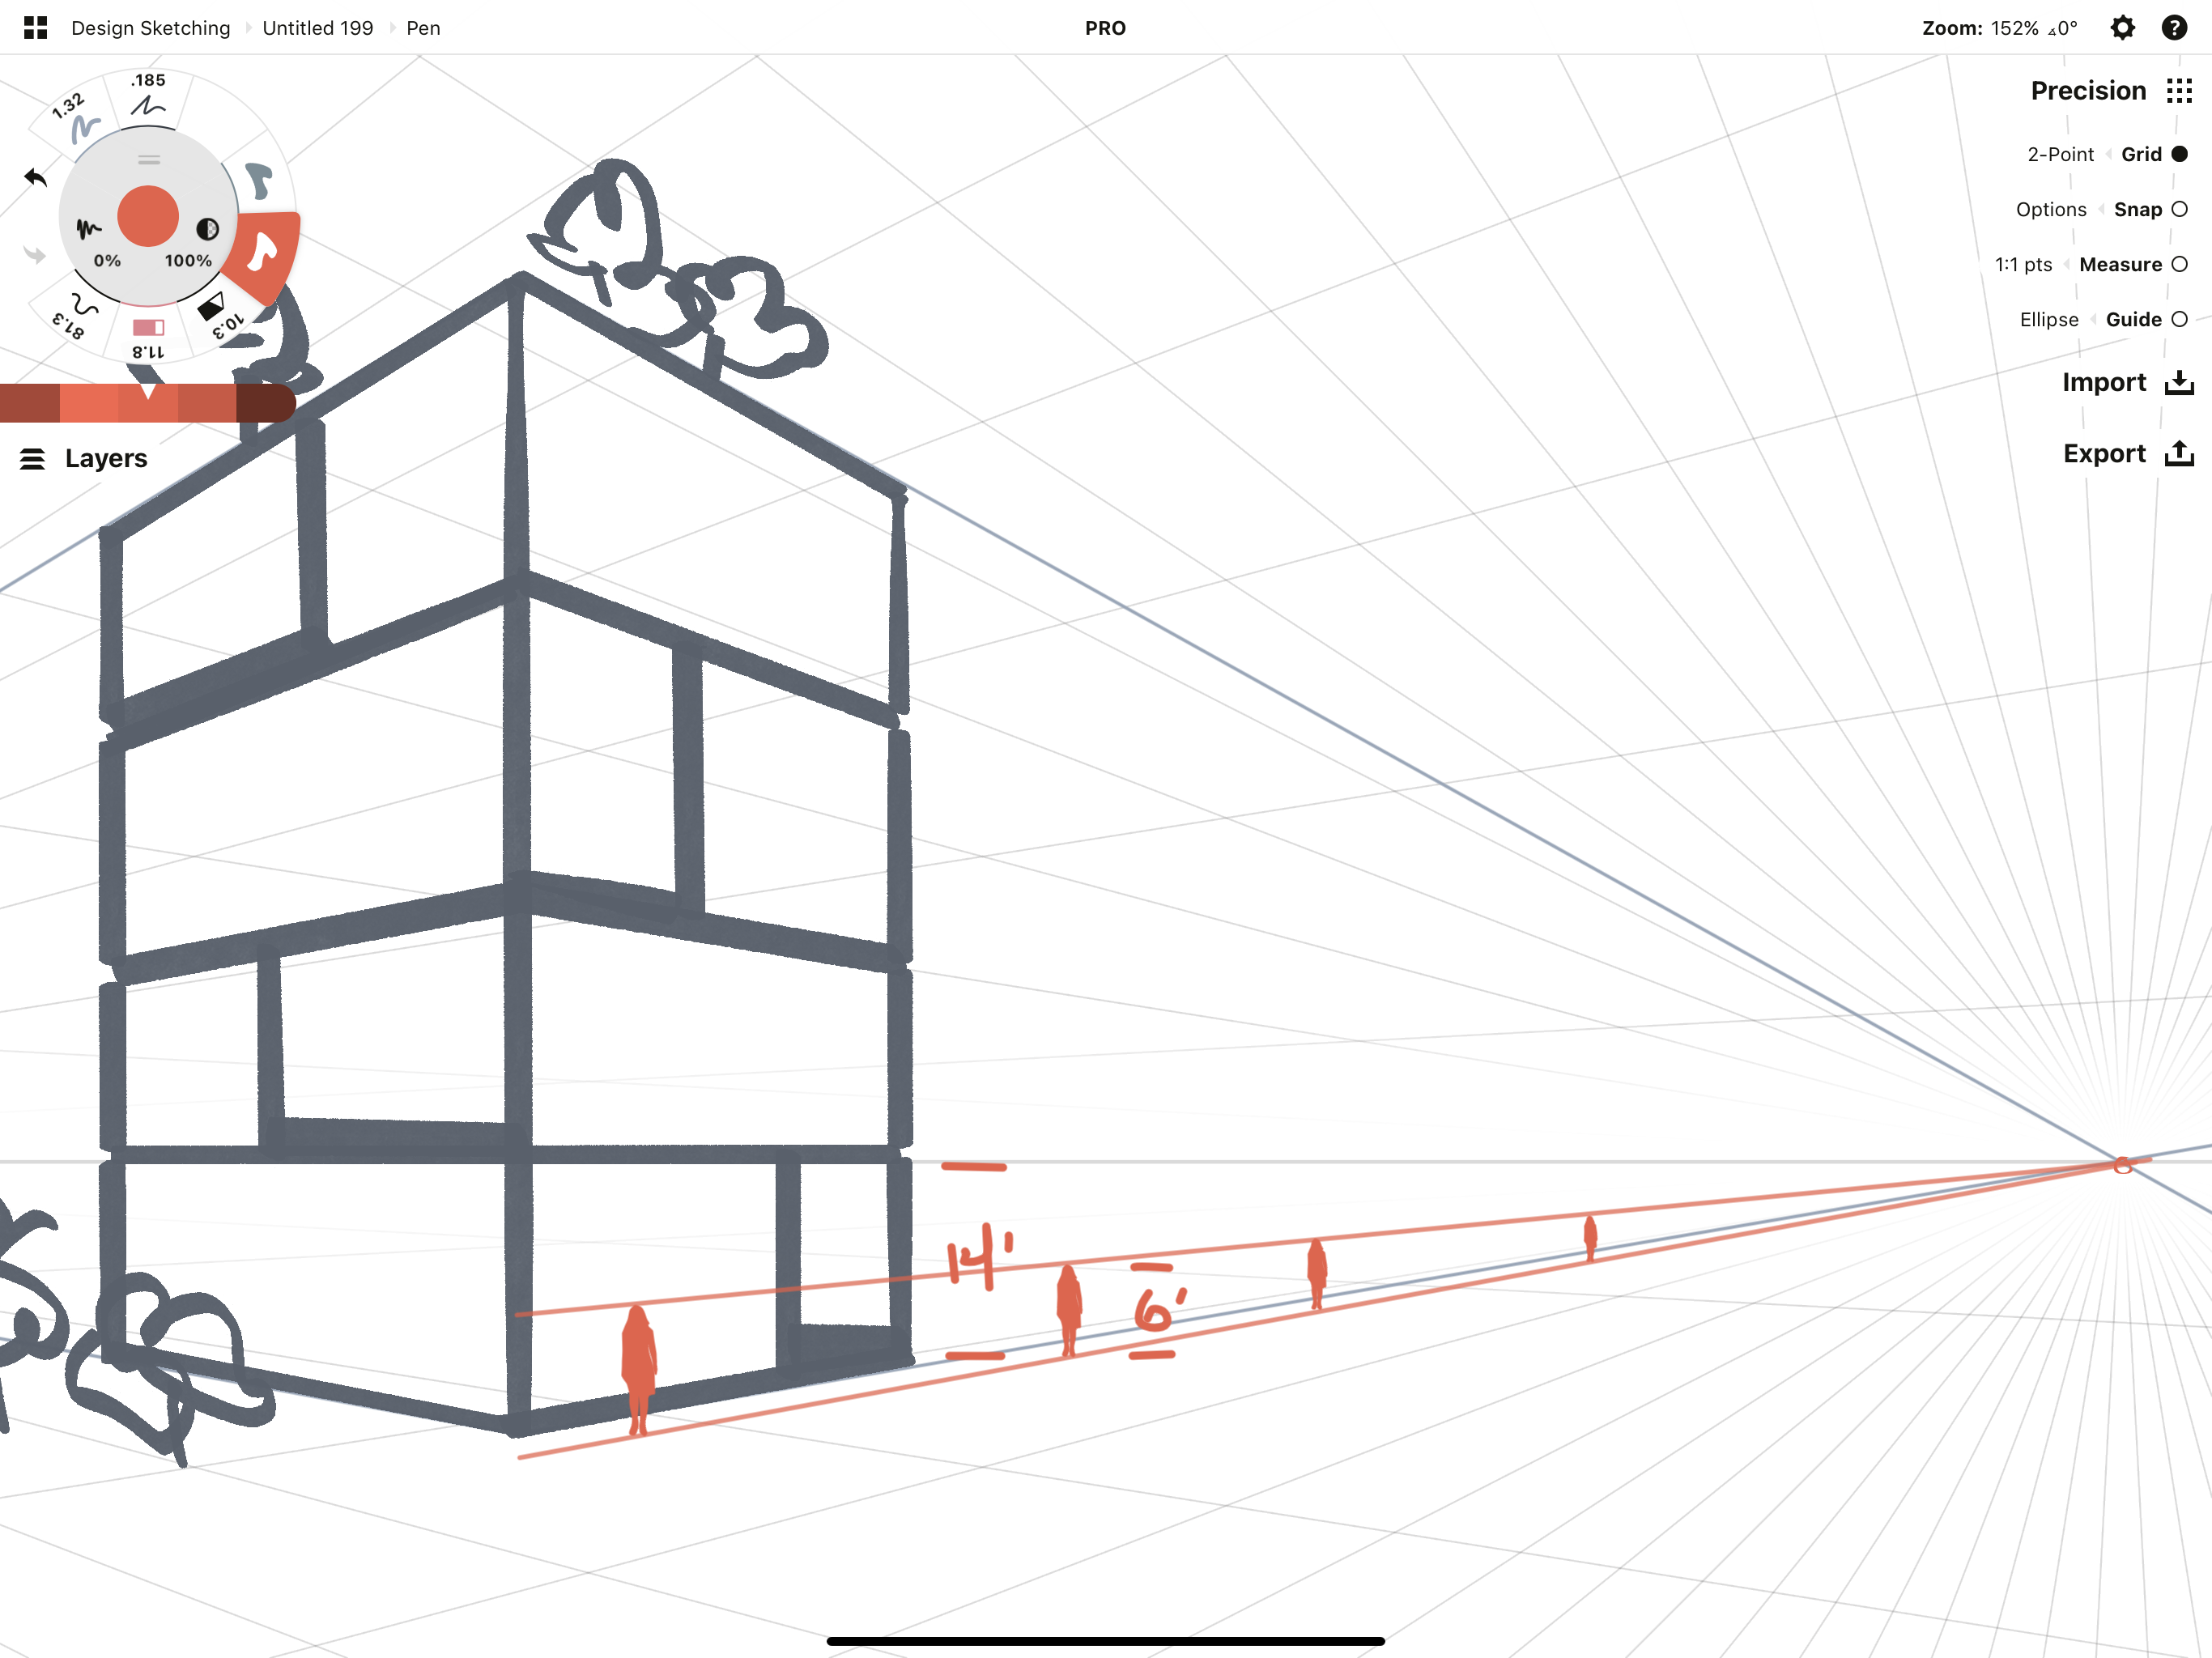
3. Anywhere you draw your human between these two lines is a win. Just make sure the feet always touch the bottom line and the head always touches the upper line.
Align a Photo or Sketch to Perspective
If you're not sure how to draw a sketch in perspective, or if you want to use a photo as a reference study, you can very quickly map out a perspective alignment with this exercise.
It's also a great way to get a feel for how far apart vanishing points might be spaced when aligning to a real-world landscape vs an object sketch vs an imaginary scene.
You can do this with any sketch or photo, and with any perspective grid.
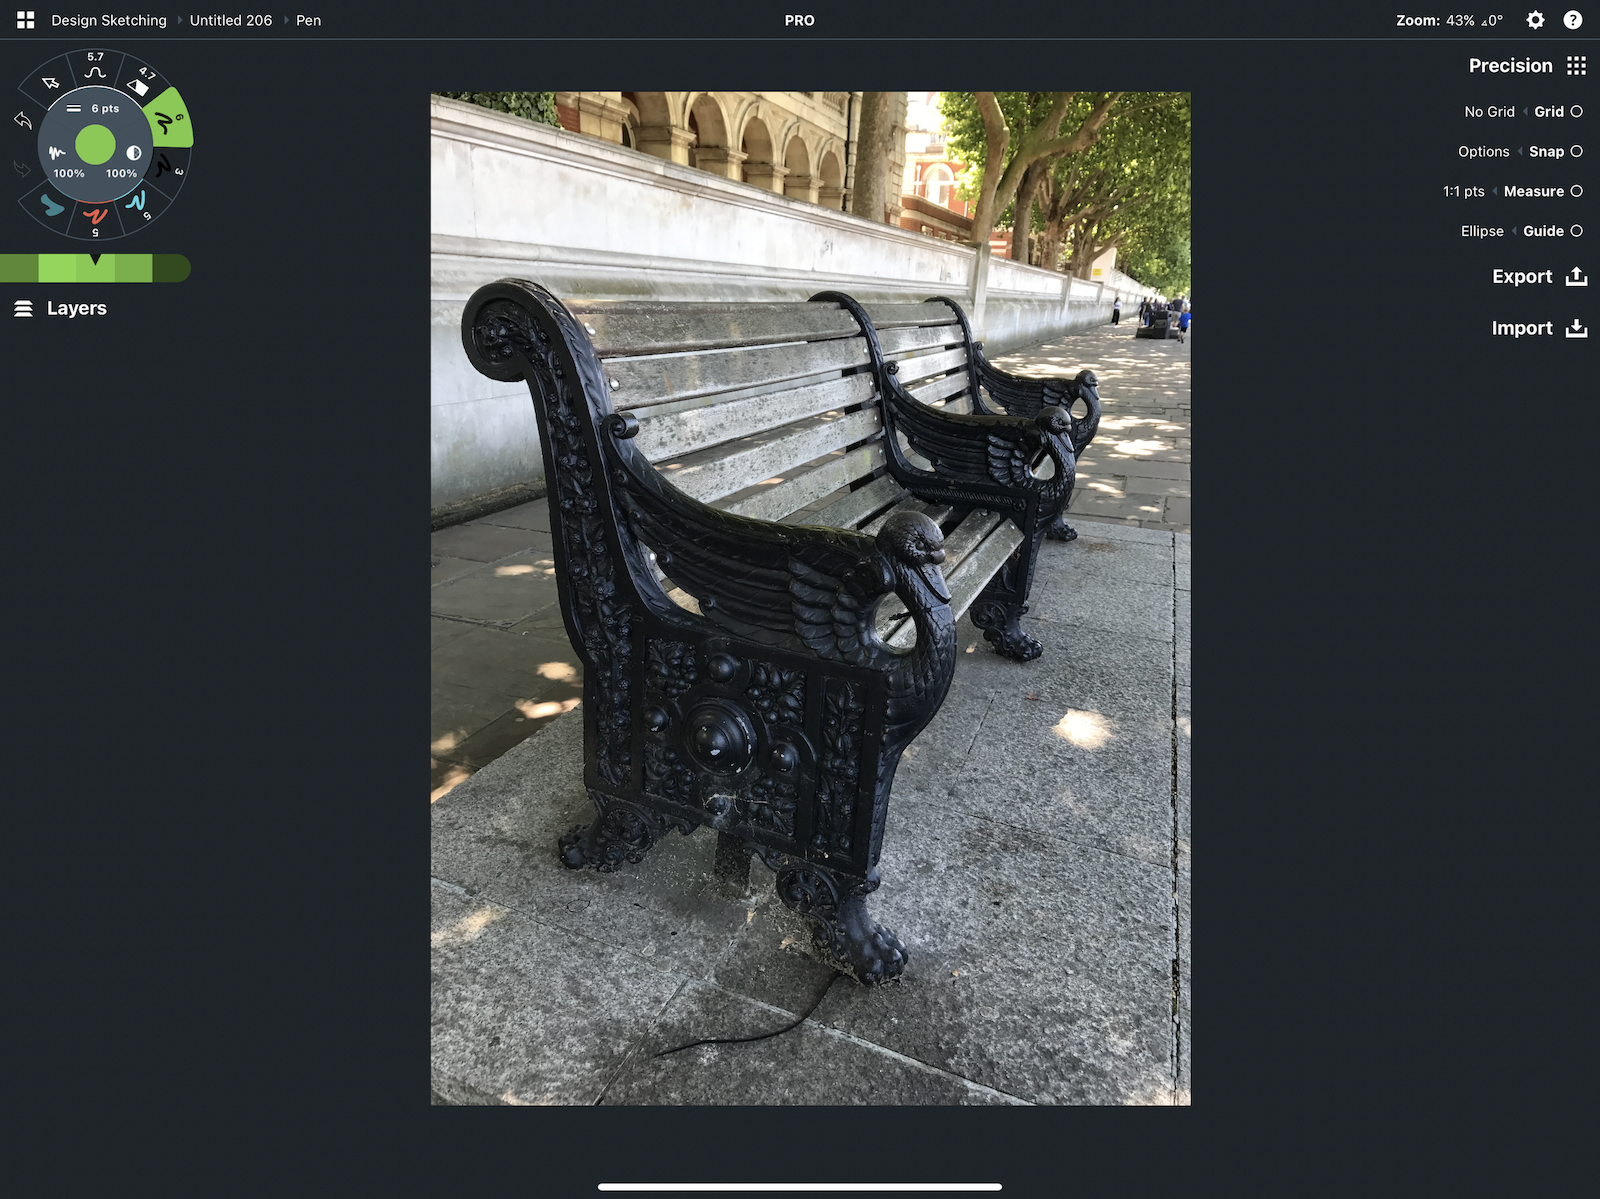
1. Sketch a quick rectangle representing the main object you want to draw, look through your photos, or take a walk and snap a photo.
While you'll always spot a horizon line in nature, perspective grids tend to work best for outlining man-made structures. See if you can photograph a house, street or even a simple object near you.
2. Import the photo onto your canvas.
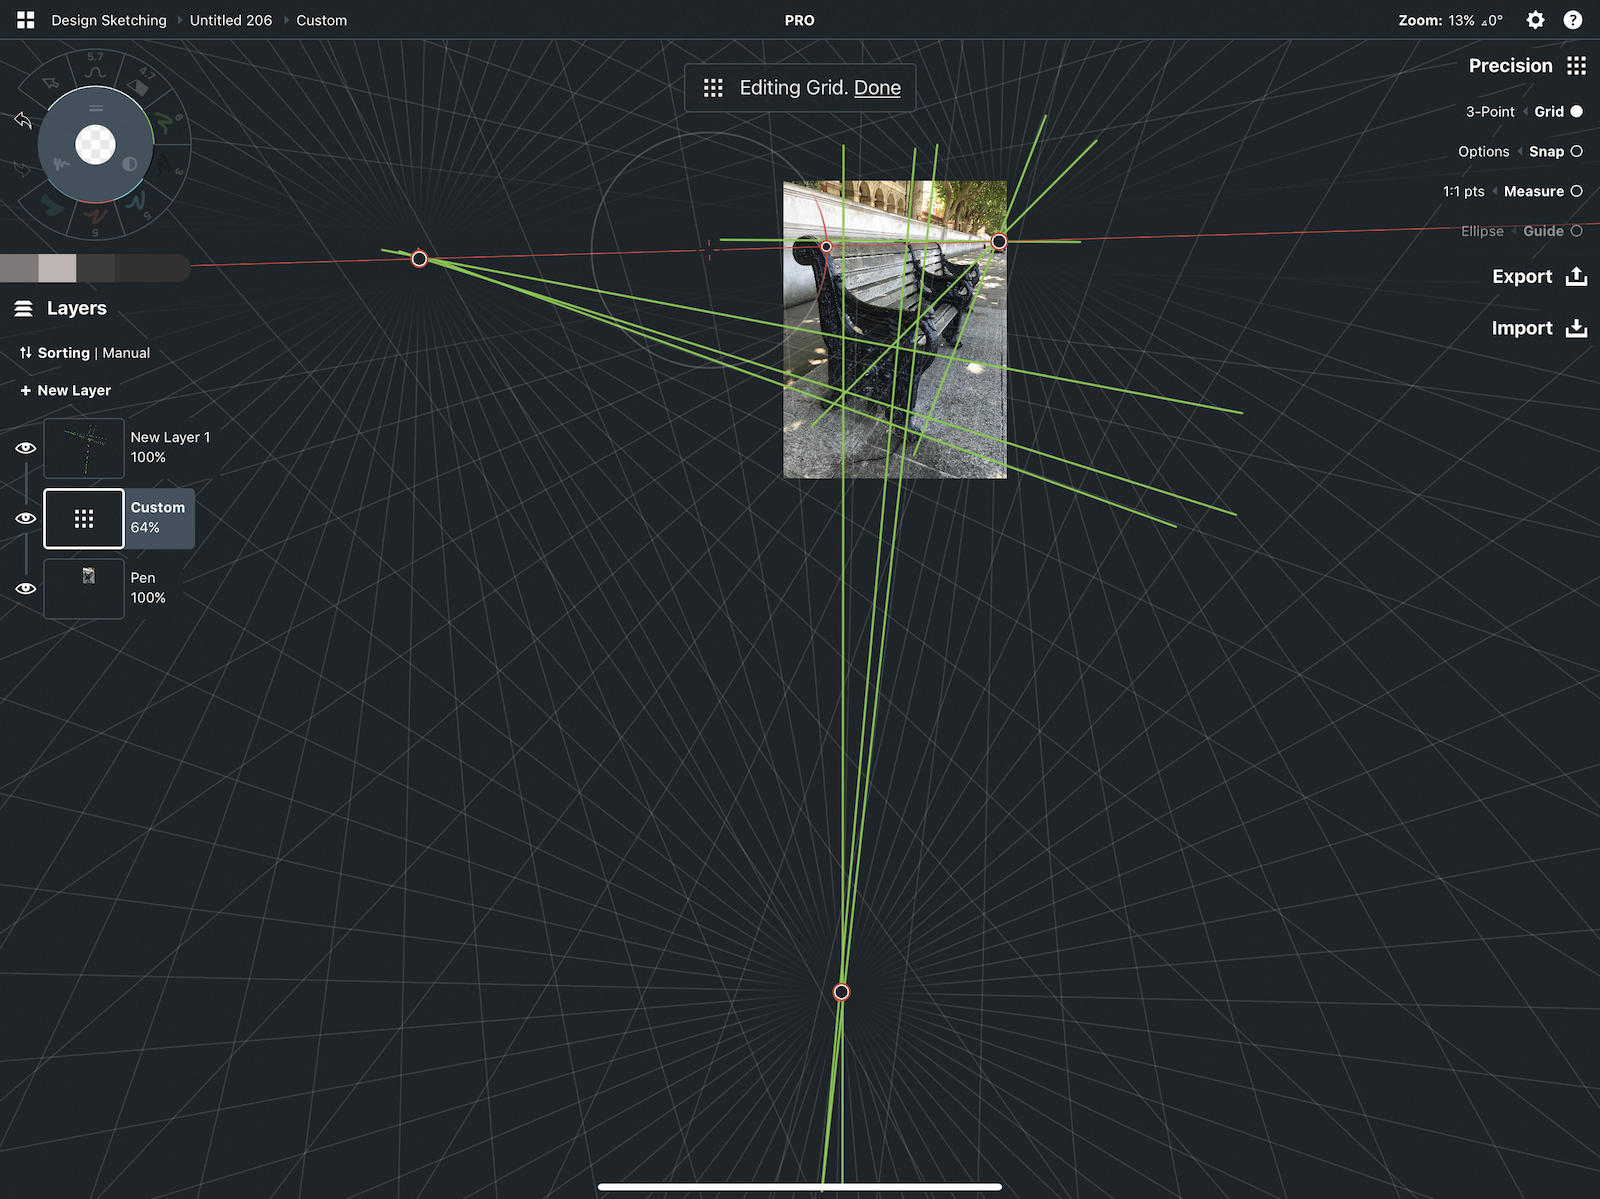
3. Look at your image's main structural elements. With your pen set to 100% line smoothing, draw straight lines from the front corners of your object to the back corners, then continue drawing the lines as far back as they'll go until they intersect at a central point or nexus.
It might not be in the photo at all, but somewhere far beyond it. That's just fine, extend the lines to wherever they appear to line up. They may even intersect at a few different areas on the page. This means they have more than one vanishing point.
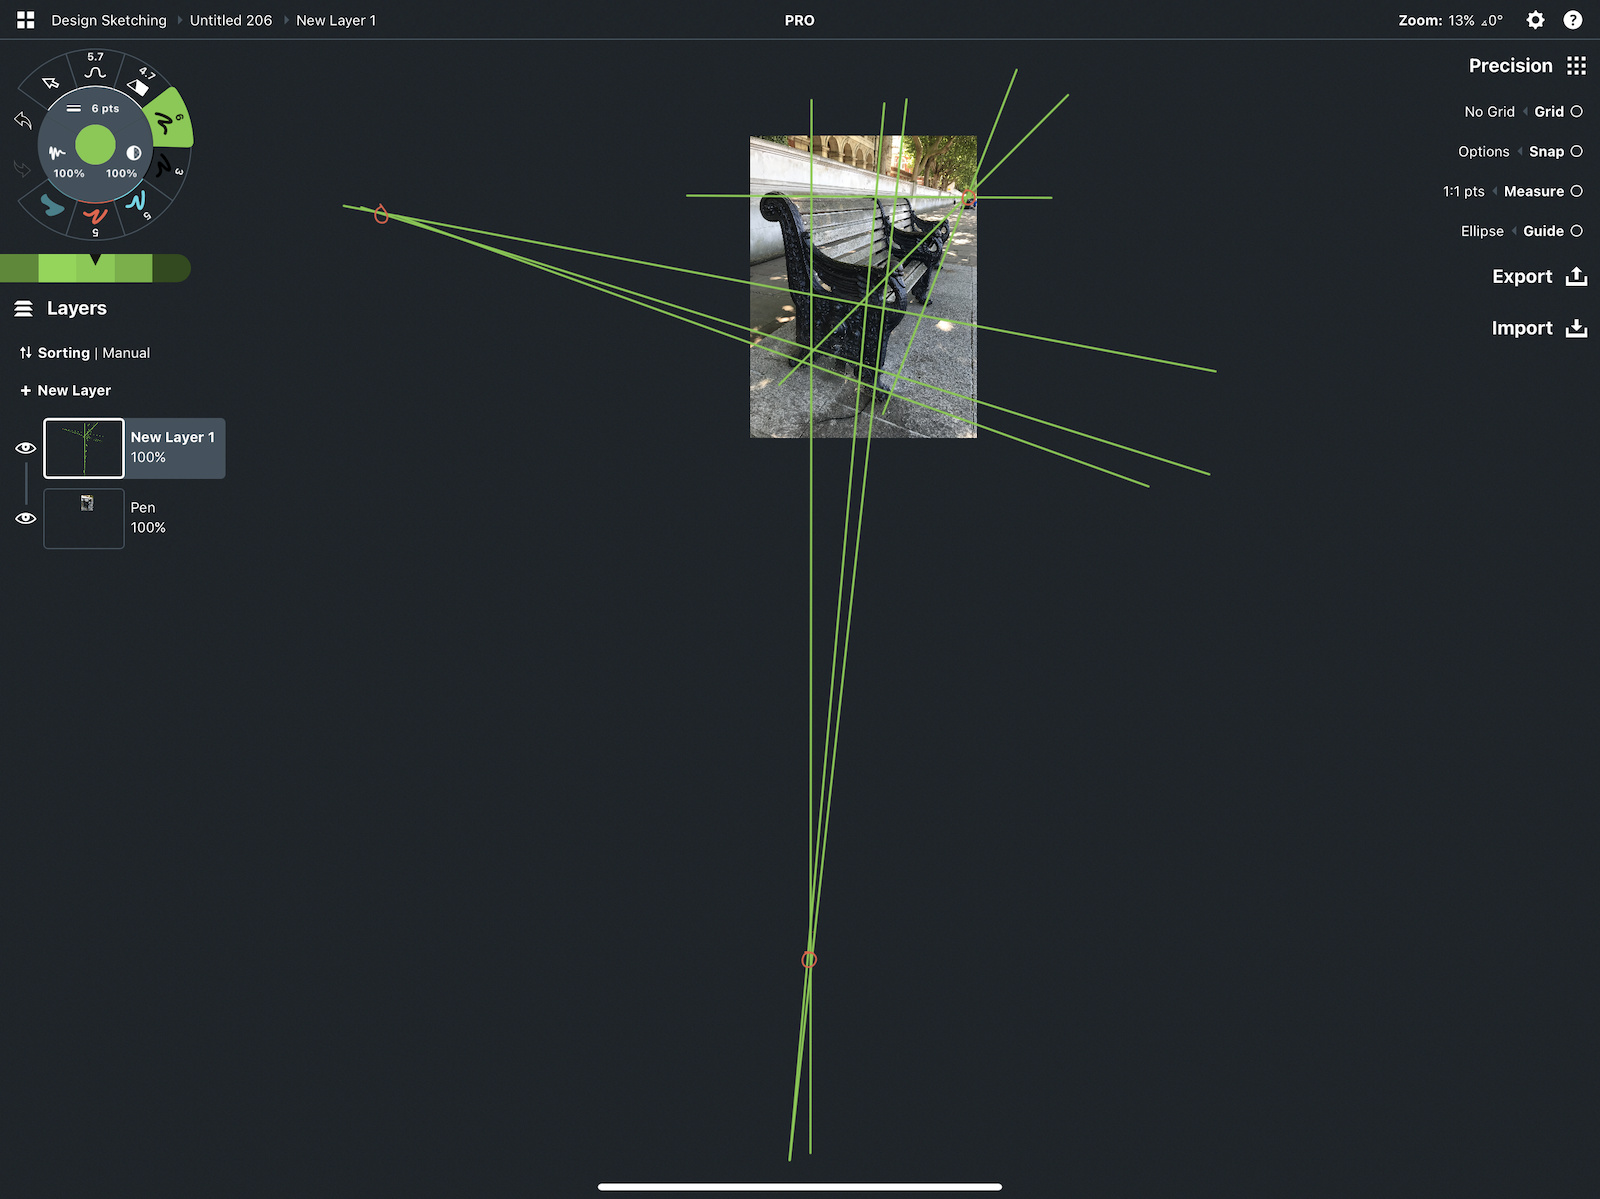
4. From here, see how many clear vanishing points you end up with, and choose your corresponding perspective grid. Line up the grid's horizon line with the horizon in the image, then adjust your vanishing points to match the points you've discovered.
It helps to drag+drop the grid layer above your image layer, so you can see the grid above the photo.
5. You now have a working perspective grid to help you draw scenes or objects that are similar to your starting photo or sketch. From here, you can activate Align and sketch your structure using the grid guide.
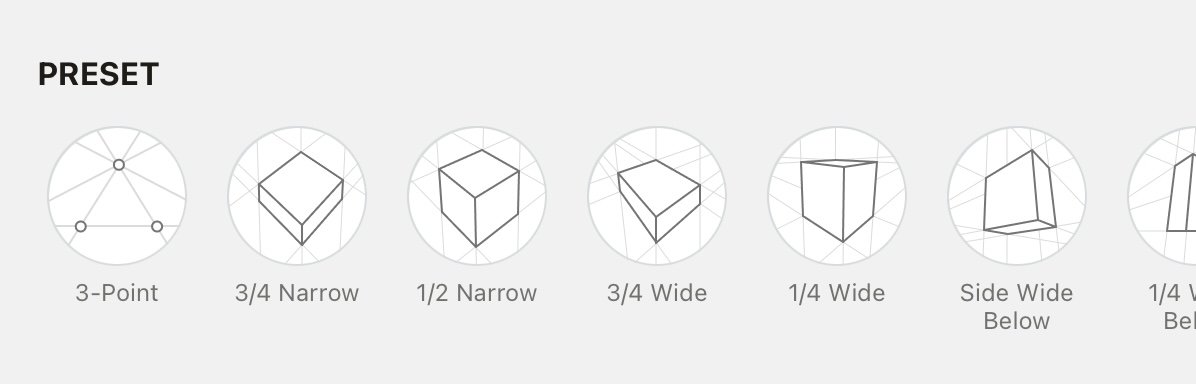
Concepts also has several Grid Presets that allow you to take a similar approach to start sketching without using a photo first. You can check these out in the Grid Editor - head to the Grid menu > choose your grid > tap Edit Grid. The Presets will be at the top of the menu. Tap one to select it and start drawing.
Extension - Wireframing an Object Structure
1. With your pen still set to 100% line smoothing, outline the major structural shape of the object in your photo.
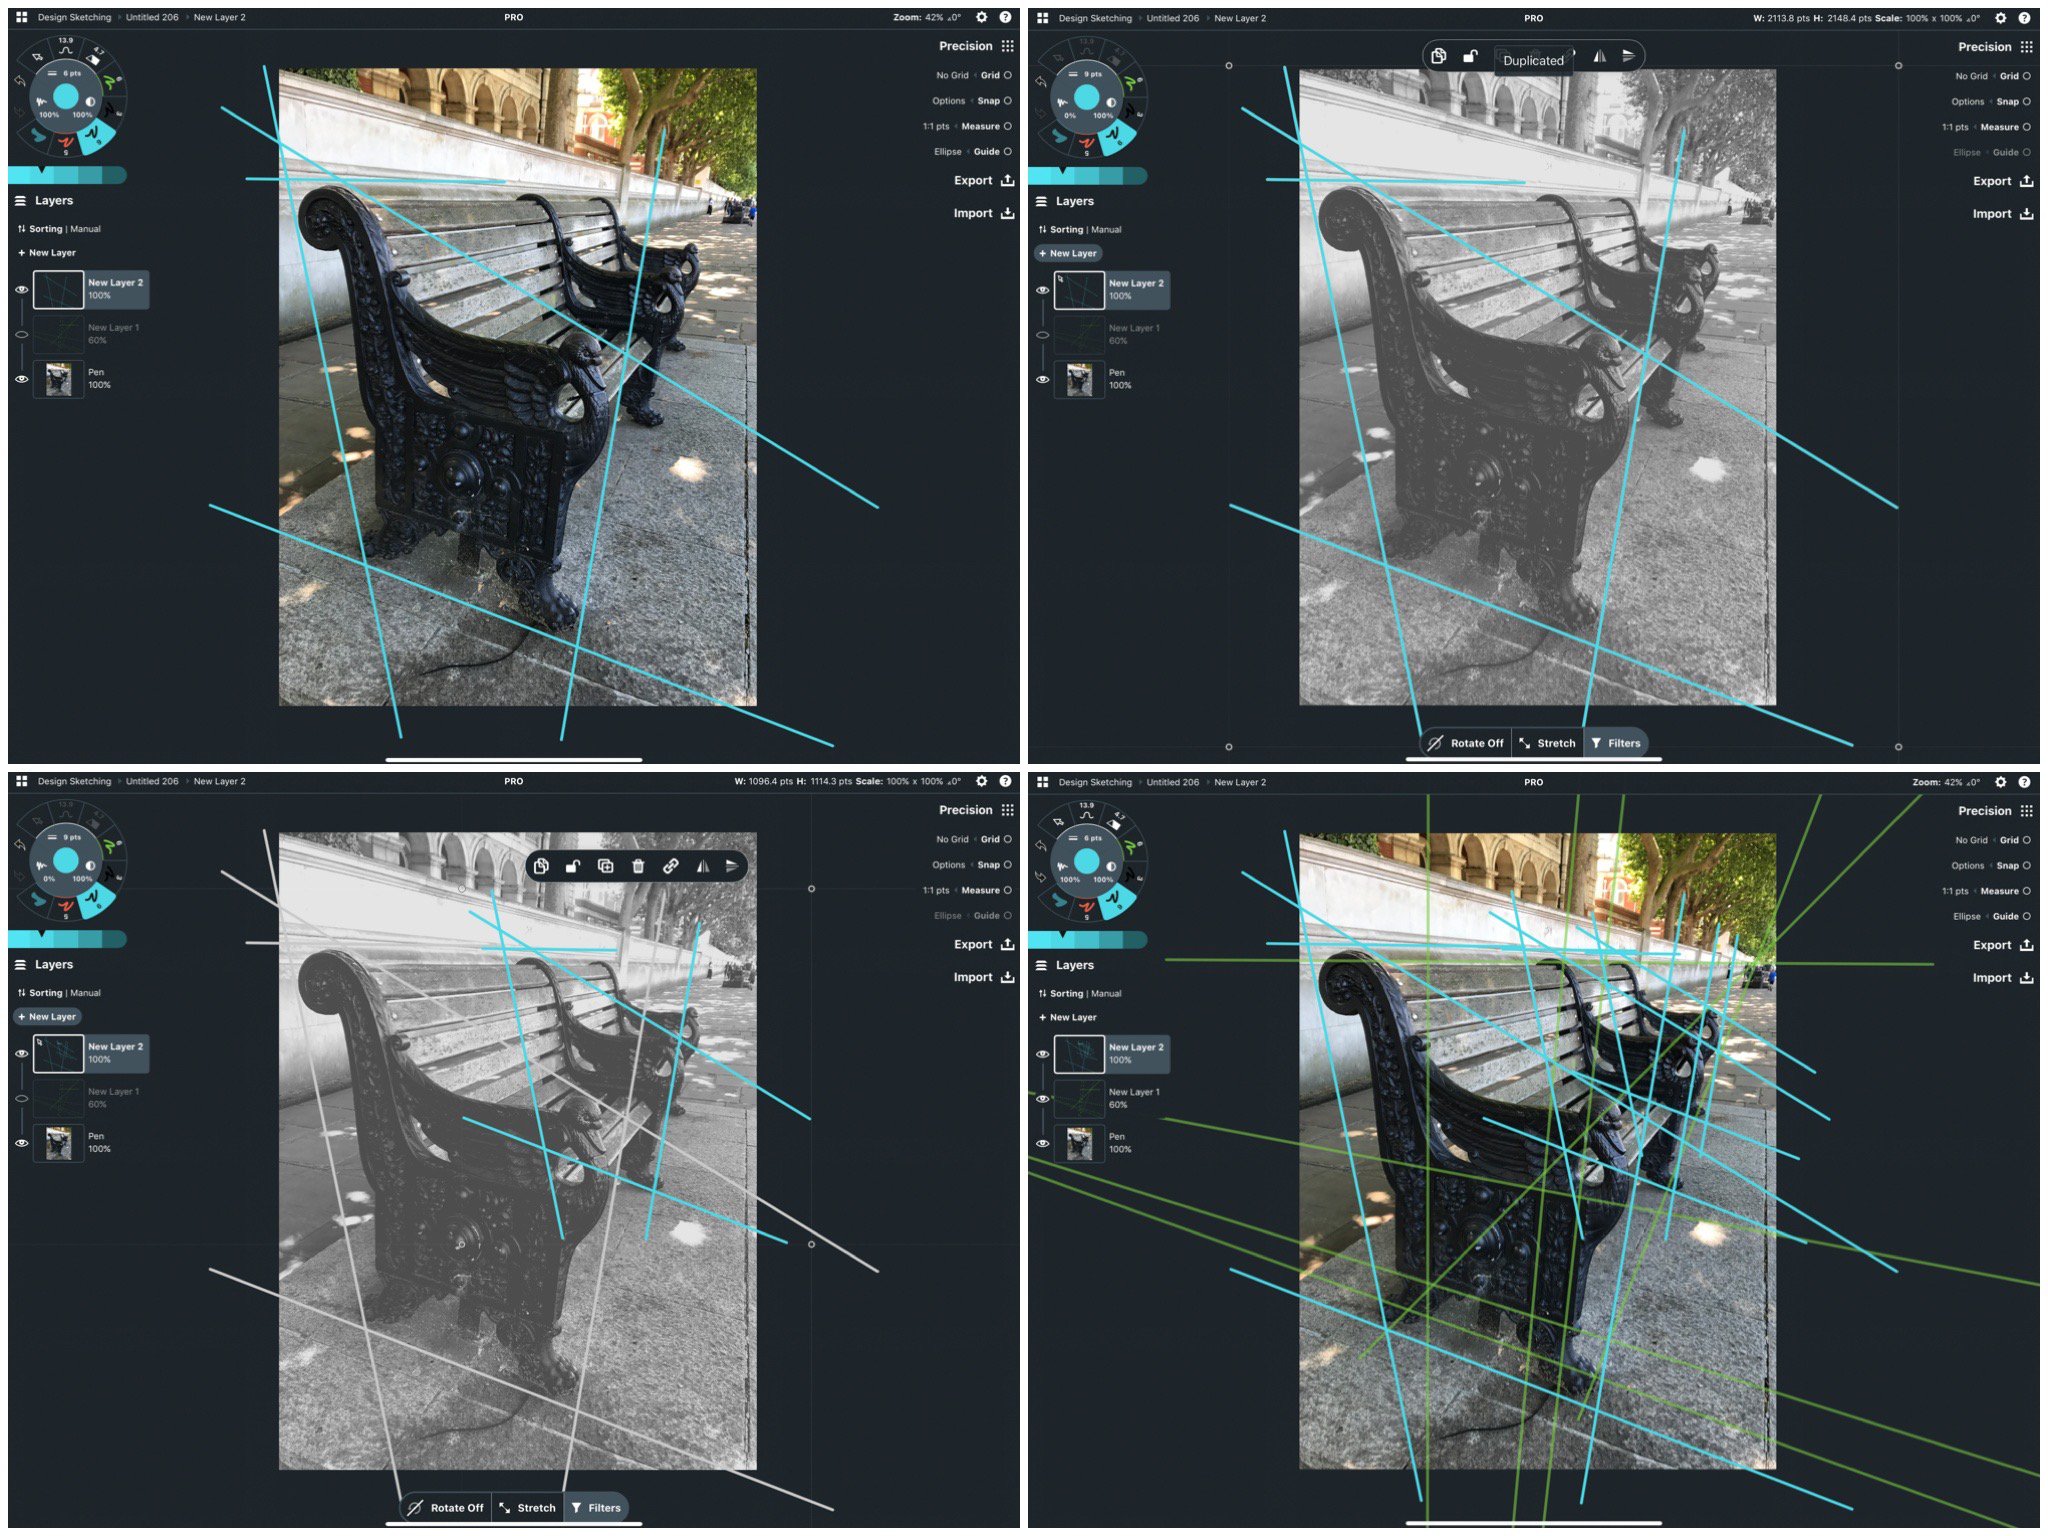
1. Outline the major structural face. 2. Select and duplicate the shape. 3. Scale it down to match the rear shapes, using the orthogonal lines to help line up your positioning.
2. If you'd like, hide the photo layer or move the photo off to the side, and sketch in some quick details to your object. This is a great way to get a feel for drawing an object in perspective.
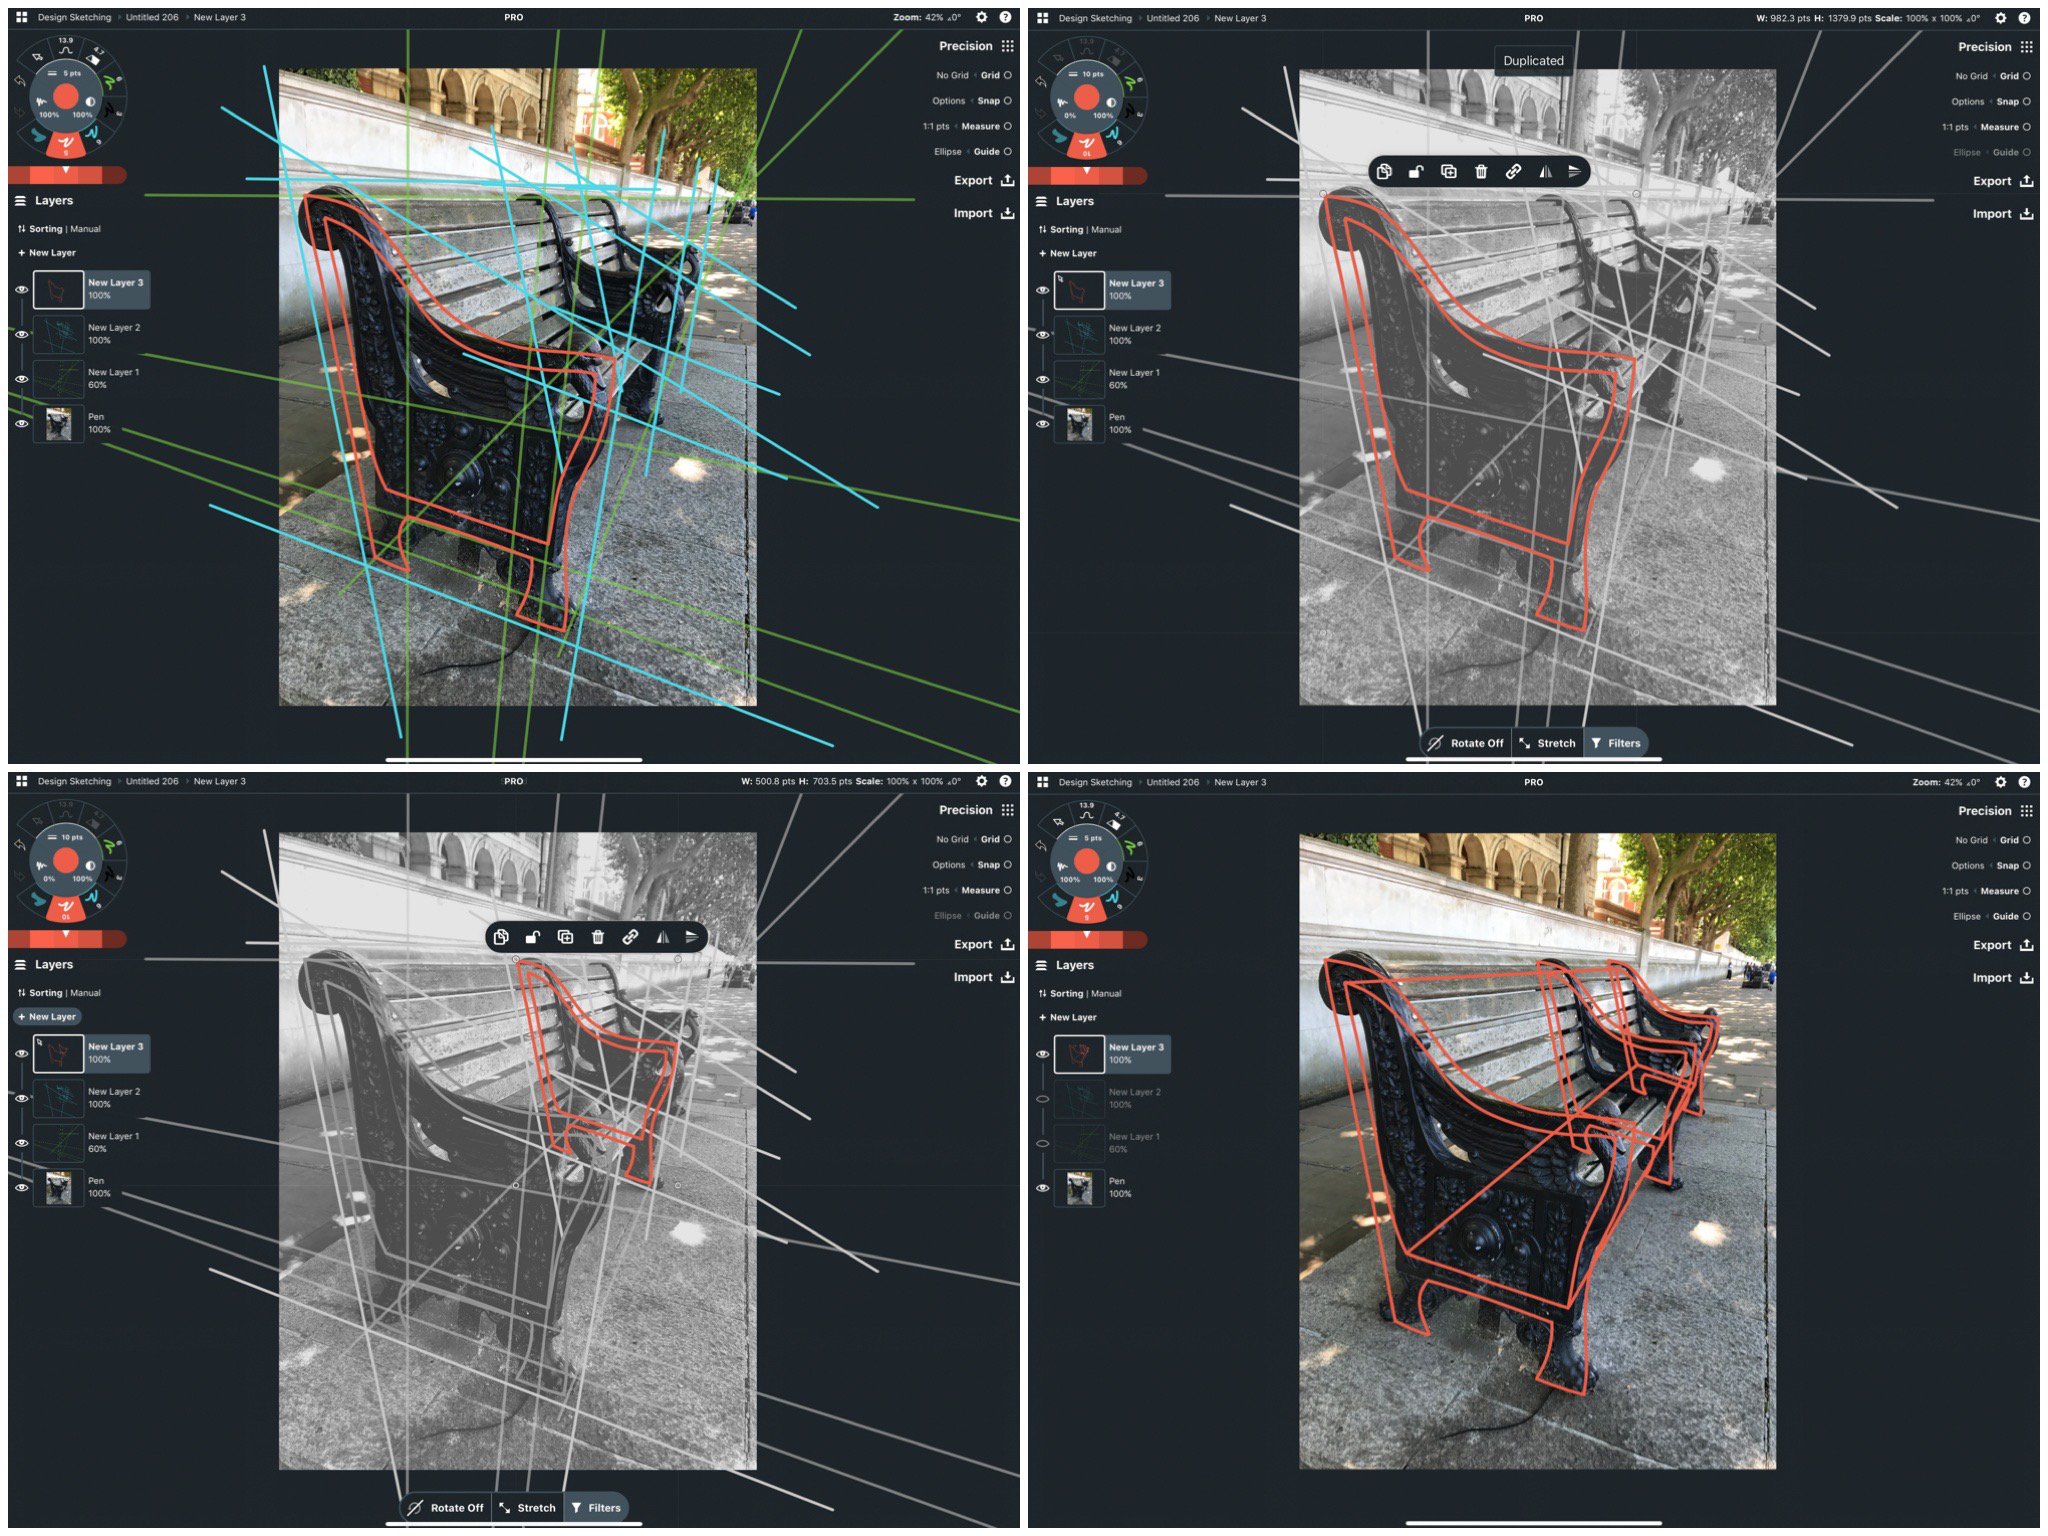
Using the same technique as above, draw your structure, then duplicate it and position it into the main structural shapes. Use the orthogonal lines to connect the sides of your object.
Way to stick with a giant set of sketching exercises! We hope you learned something useful and that you'll be more comfortable sketching in perspective.
If you have any questions about working with the perspective grids, or comments and feedback on the tutorial, please tap Help > Ask Us Anything in-app and send us a message. We'll be happy to chat. Good luck with your sketching!
By Erica Christensen
If you'd like more practice sketching in perspective, check out our Learn to Draw: Basics of Perspective video tutorial.

Recommended
How to Set Up a Perspective Grid - Learn how to set up and edit your perspective grids in Concepts.
How to Edit Your Grid - Learn how to set up and customize grids in Concepts.
3 Ways to Draw a Straight Line - Three ways to draw a straight line in Concepts and when to sketch it.