Concepts is an infinite, flexible creative tool for all your good ideas. Available on iOS, Windows and Android.
Creating a Project Template
Instead of changing tools every time you change direction, save yourself some valuable sketching time by creating a template for your project.
A flexible sketching tool is helpful for all kinds of projects - jotting down notes, sketching a quick idea or plan, or taking a moment to do a character study on the train. The versatility is great, but when you’re entering a client meeting or responding to a project in motion, you want to jump in without worrying about your layout or tools. Save yourself some valuable time by creating a template for your project.
Creating a New Template
Creating a template is as simple as sitting down to sketch. As you begin a new project, follow these steps to create a template you can use for your specific project type.
1. Create a new drawing.
2. Set up your favorite tools, colors, canvas settings and preferences.
3. Exit to the Gallery and label the drawing “Template”.
4. Duplicate the template when you’re ready to start a new drawing.
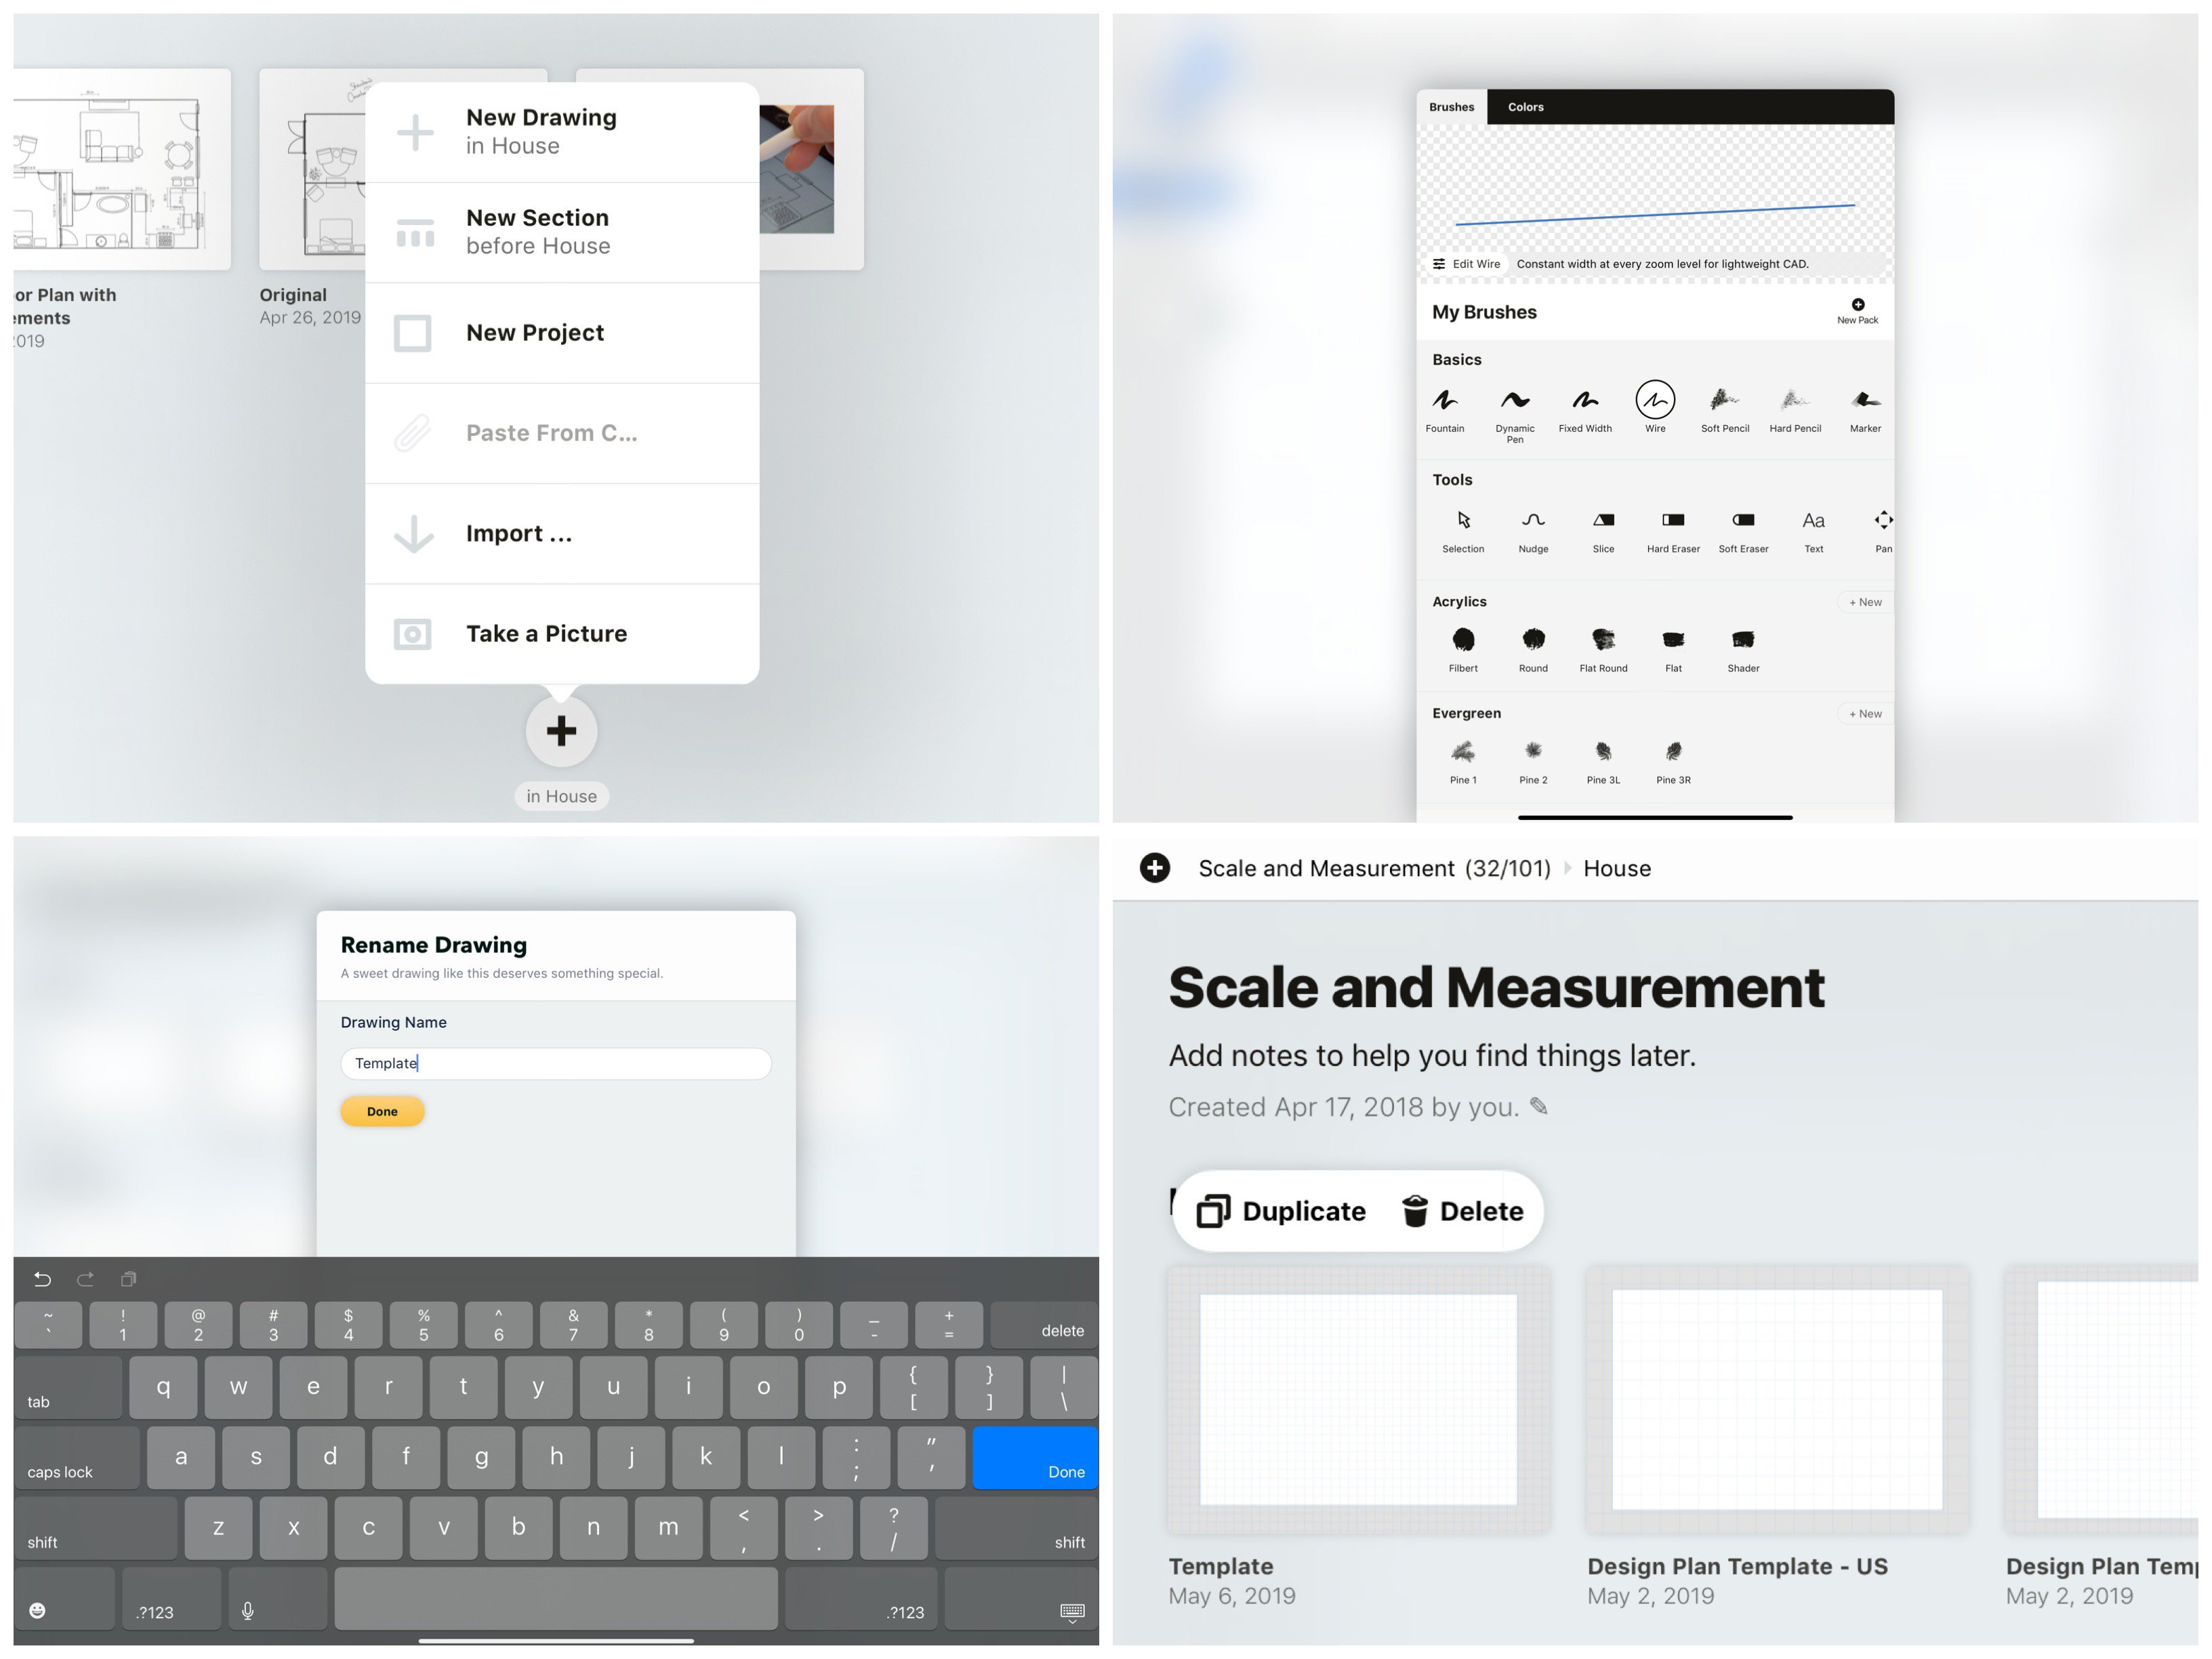
Left to right, top to bottom: 1) Create a new drawing. 2) Set up your tools and layout. 3) Exit to the Gallery and rename your drawing "Template". 4) Duplicate the template for each new drawing.
A few notes on how Concepts approaches drawings:
Once you set up your tools and preferences inside a drawing, Concepts remembers them as part of the drawing’s saved data. Every time you re-enter the drawing, the tools, presets and settings will still be there for you to continue working with.
Concepts also remembers your last-used tools and applies them to the next new drawing you create. So whichever drawing you opened last, it will take those settings and apply them to the new drawing.
In fact, this is one way to shortcut back to your favorite tools - just open a drawing with the desired settings, exit again, and create a new drawing. The settings will transfer.
To save the most time, though, take a moment and set up a template for each project you make. It will always be available at the top of your project, where and when you need it.
Making a Template from a Previous Drawing
Do you already have a set of tools or layout you like in another drawing? Great, you’ve saved yourself some setup time. You can create a template from the drawing like this:
1. Duplicate your preferred drawing.
2. Enter the duplicated drawing, and double-tap on any eraser tool. An overlay will appear with Quick Clear options. Clear your canvas.
3. Exit to the Gallery and rename your blank drawing “Template”.
4. Duplicate the template when you’re ready to start a new drawing.
Left to right, top to bottom: 1) Create a new drawing. 2) Set up your tools and layout. 3) Exit to Gallery and rename your drawing as “Template”. 4) Duplicate the template for each new drawing.
If you want to move the template into another project, tap+hold+drag it to either edge of the screen and switch projects. If you have too many projects to navigate easily, tap+hold+drag the drawing, open up your Project Breadcrumbs, and drop the drawing into the new project.
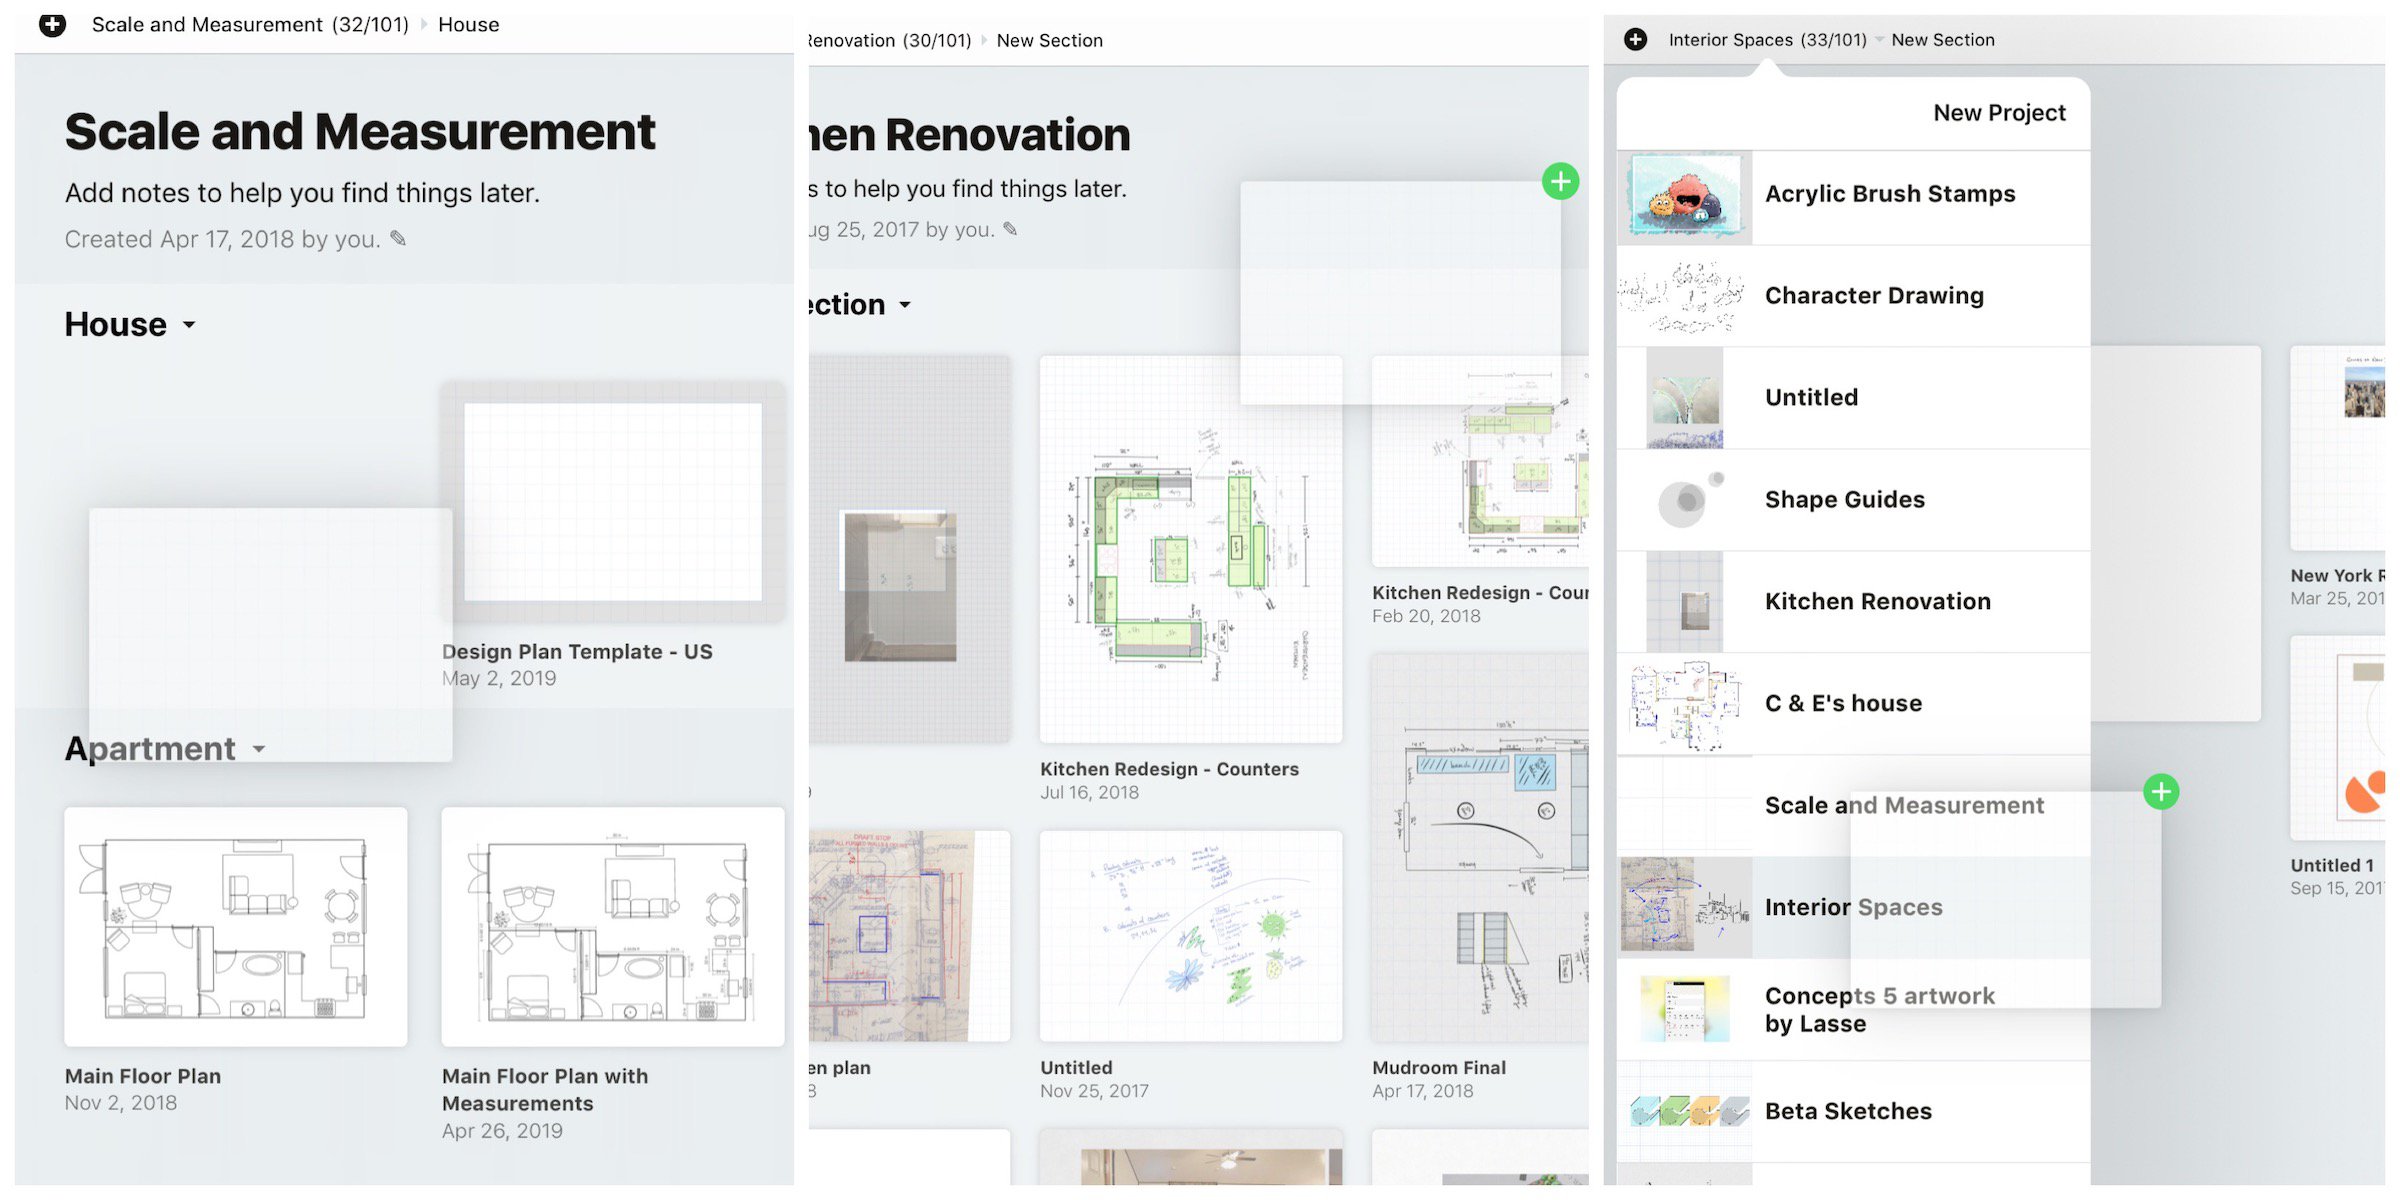
Left to right: 1) Tap+hold+drag your drawing. 2) Drag it to the edge of the screen to switch projects, or 3) Tap+hold+drag the drawing, open the Project Breadcrumbs, and drop it into the new project.
Questions to Ask When Setting Up a Template
Concepts is all about creative flexibility, so the app makes it easy to customize your menus, tools, colors and canvas. Everything can be moved, changed, adjusted, set or preset at any time. We have a tutorial on this here.
The number one thing you need to consider is how you want your final drawing to appear. When you open a new drawing, ask yourself these questions:
- Is my project a sketch? What is my favorite sketching tool - a pencil or a pen? Which brush widths and opacities do I use most when drawing?
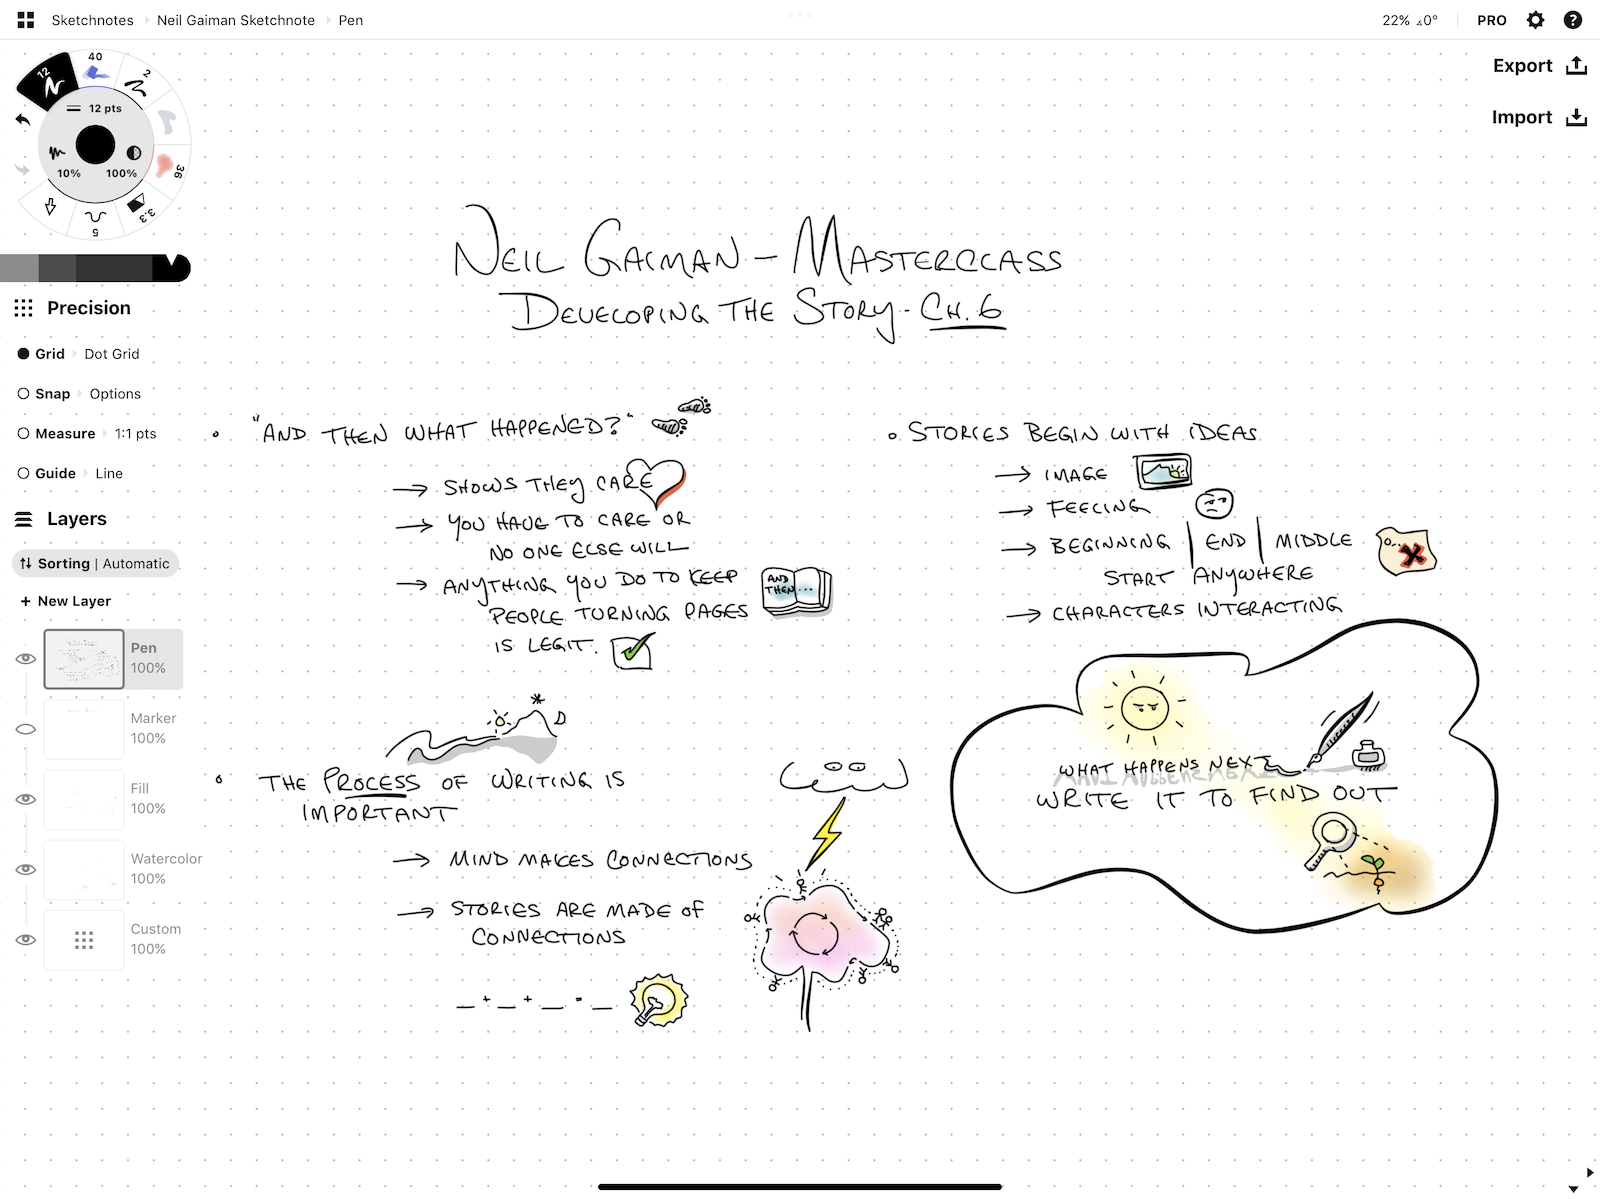
- Is my project a sketchnote? Which pens do I prefer to write with? What is my favorite way to highlight main ideas, with a bold brush tip or a marker?
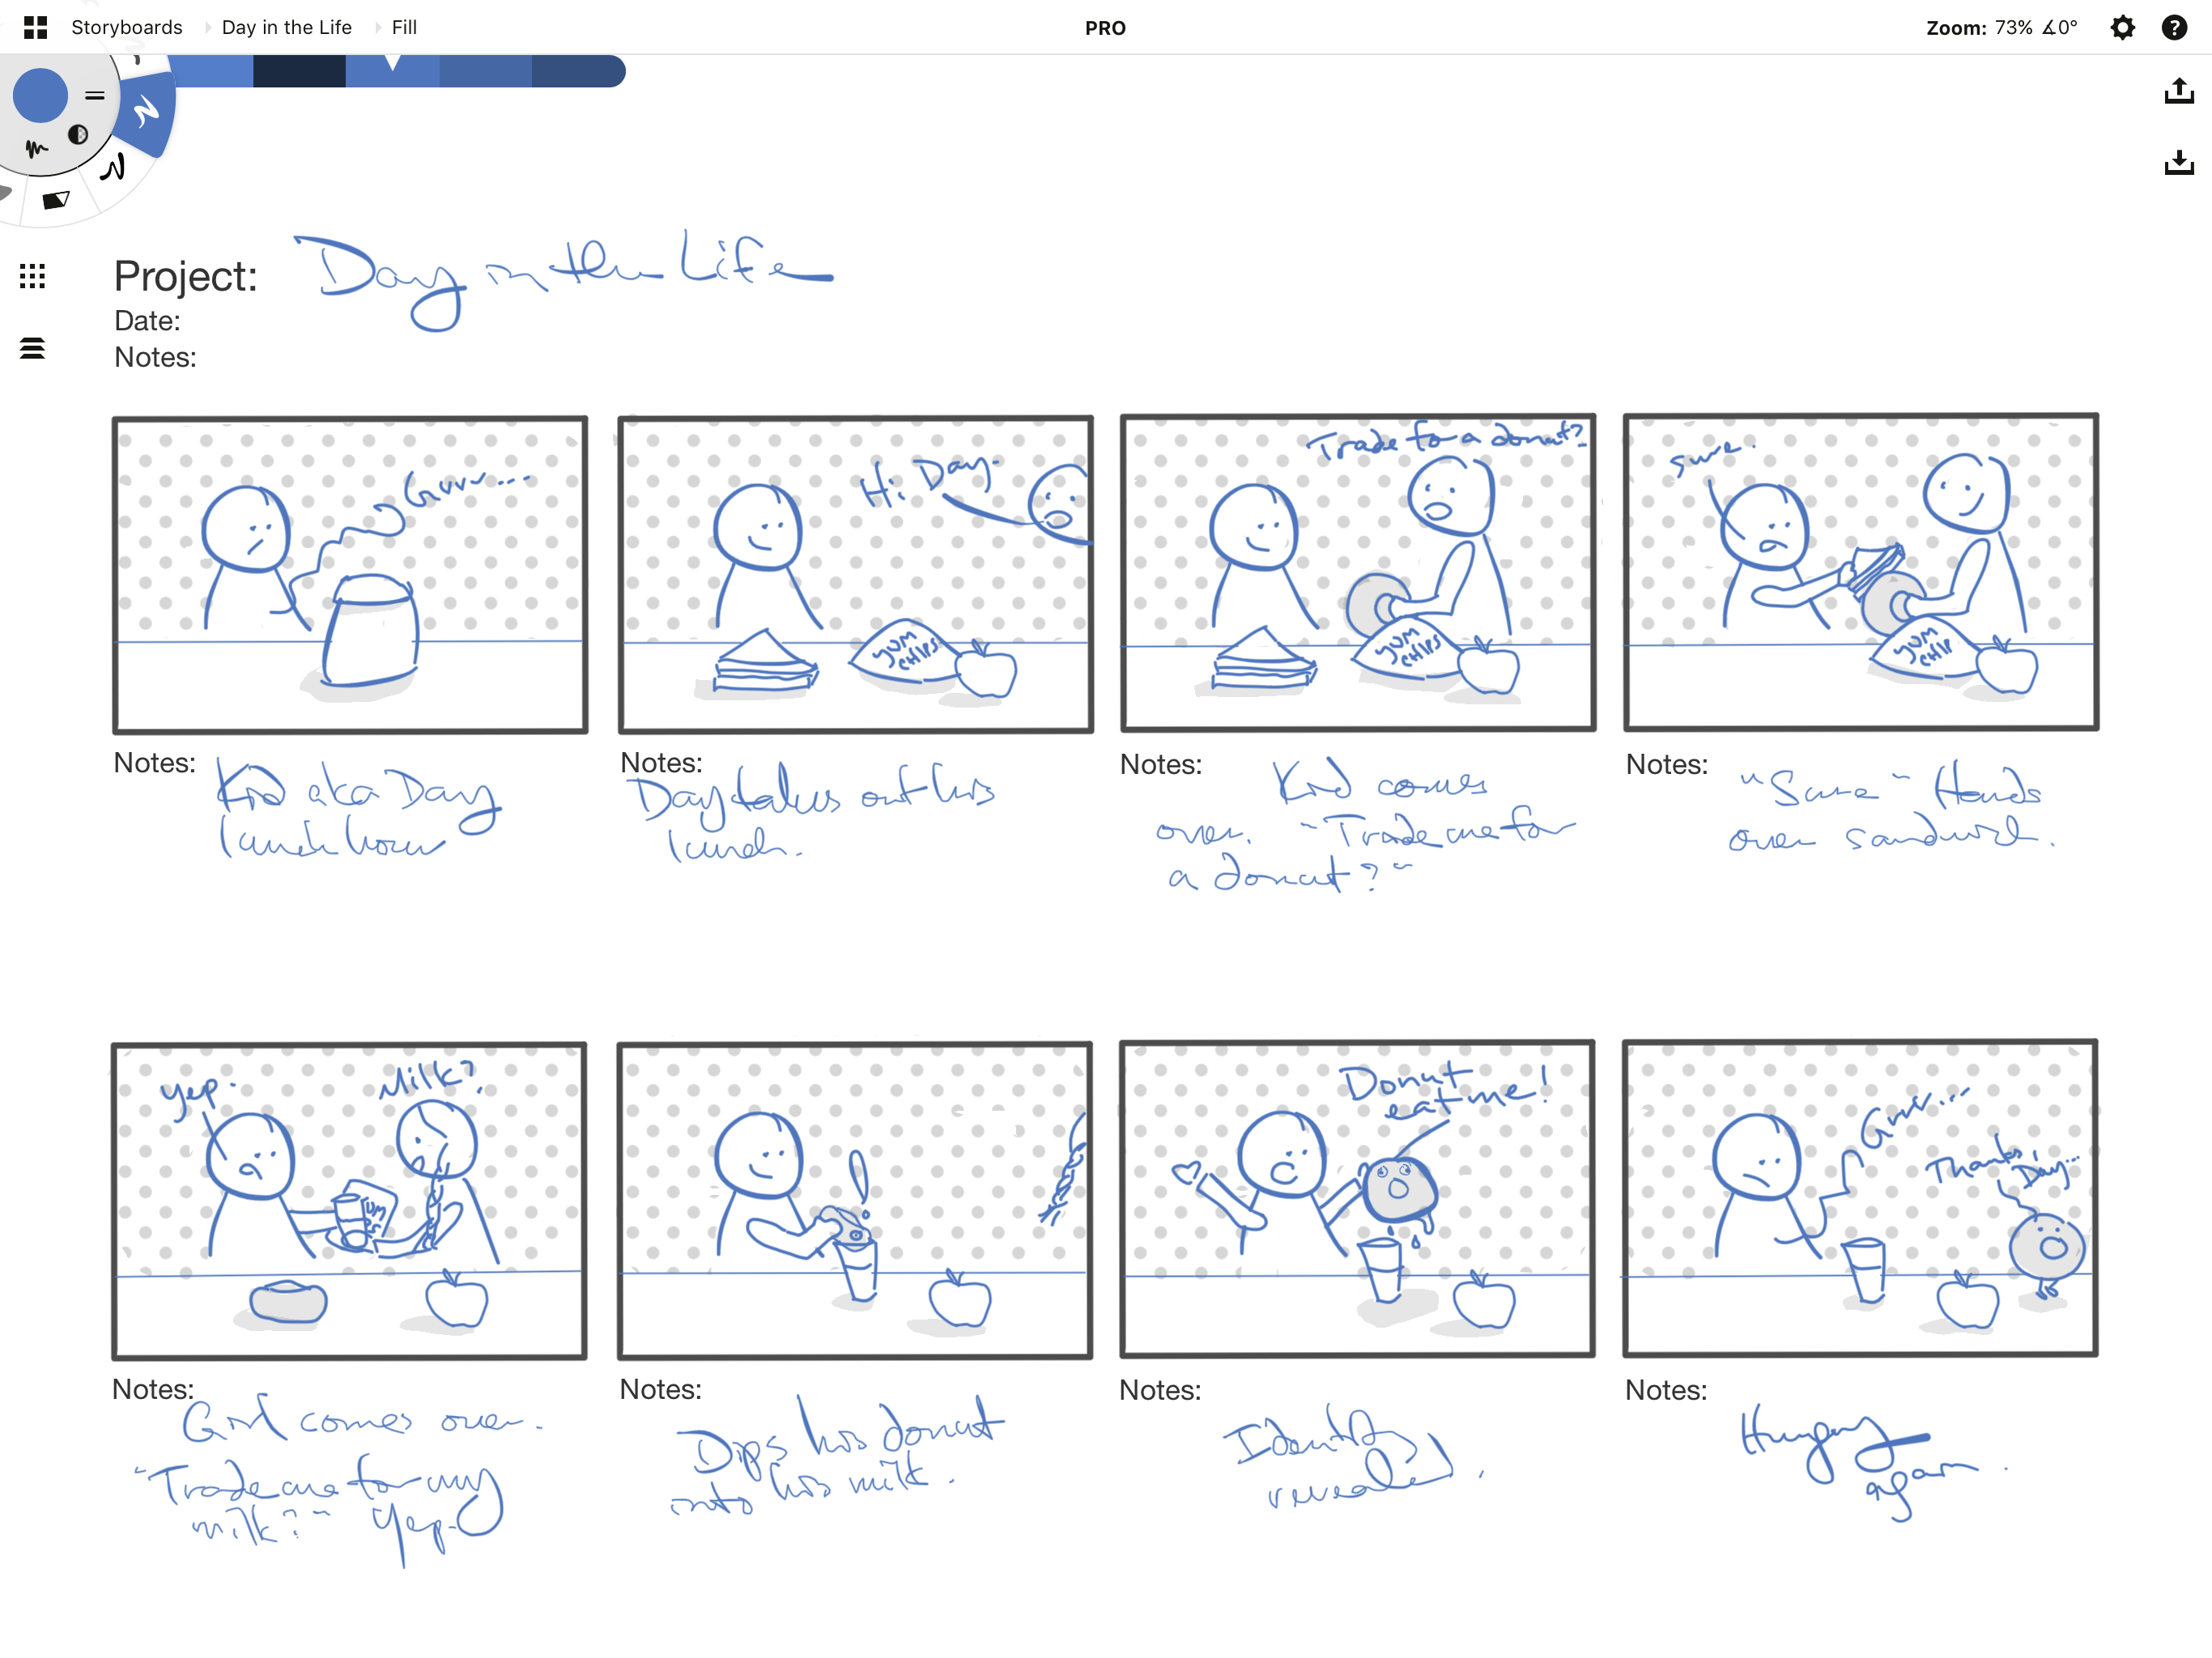
- Is my project a storyboard? How many frames do I need for the scene? Which pens do I prefer for sketching figures vs. writing notes? Do I want to print my storyboard later?
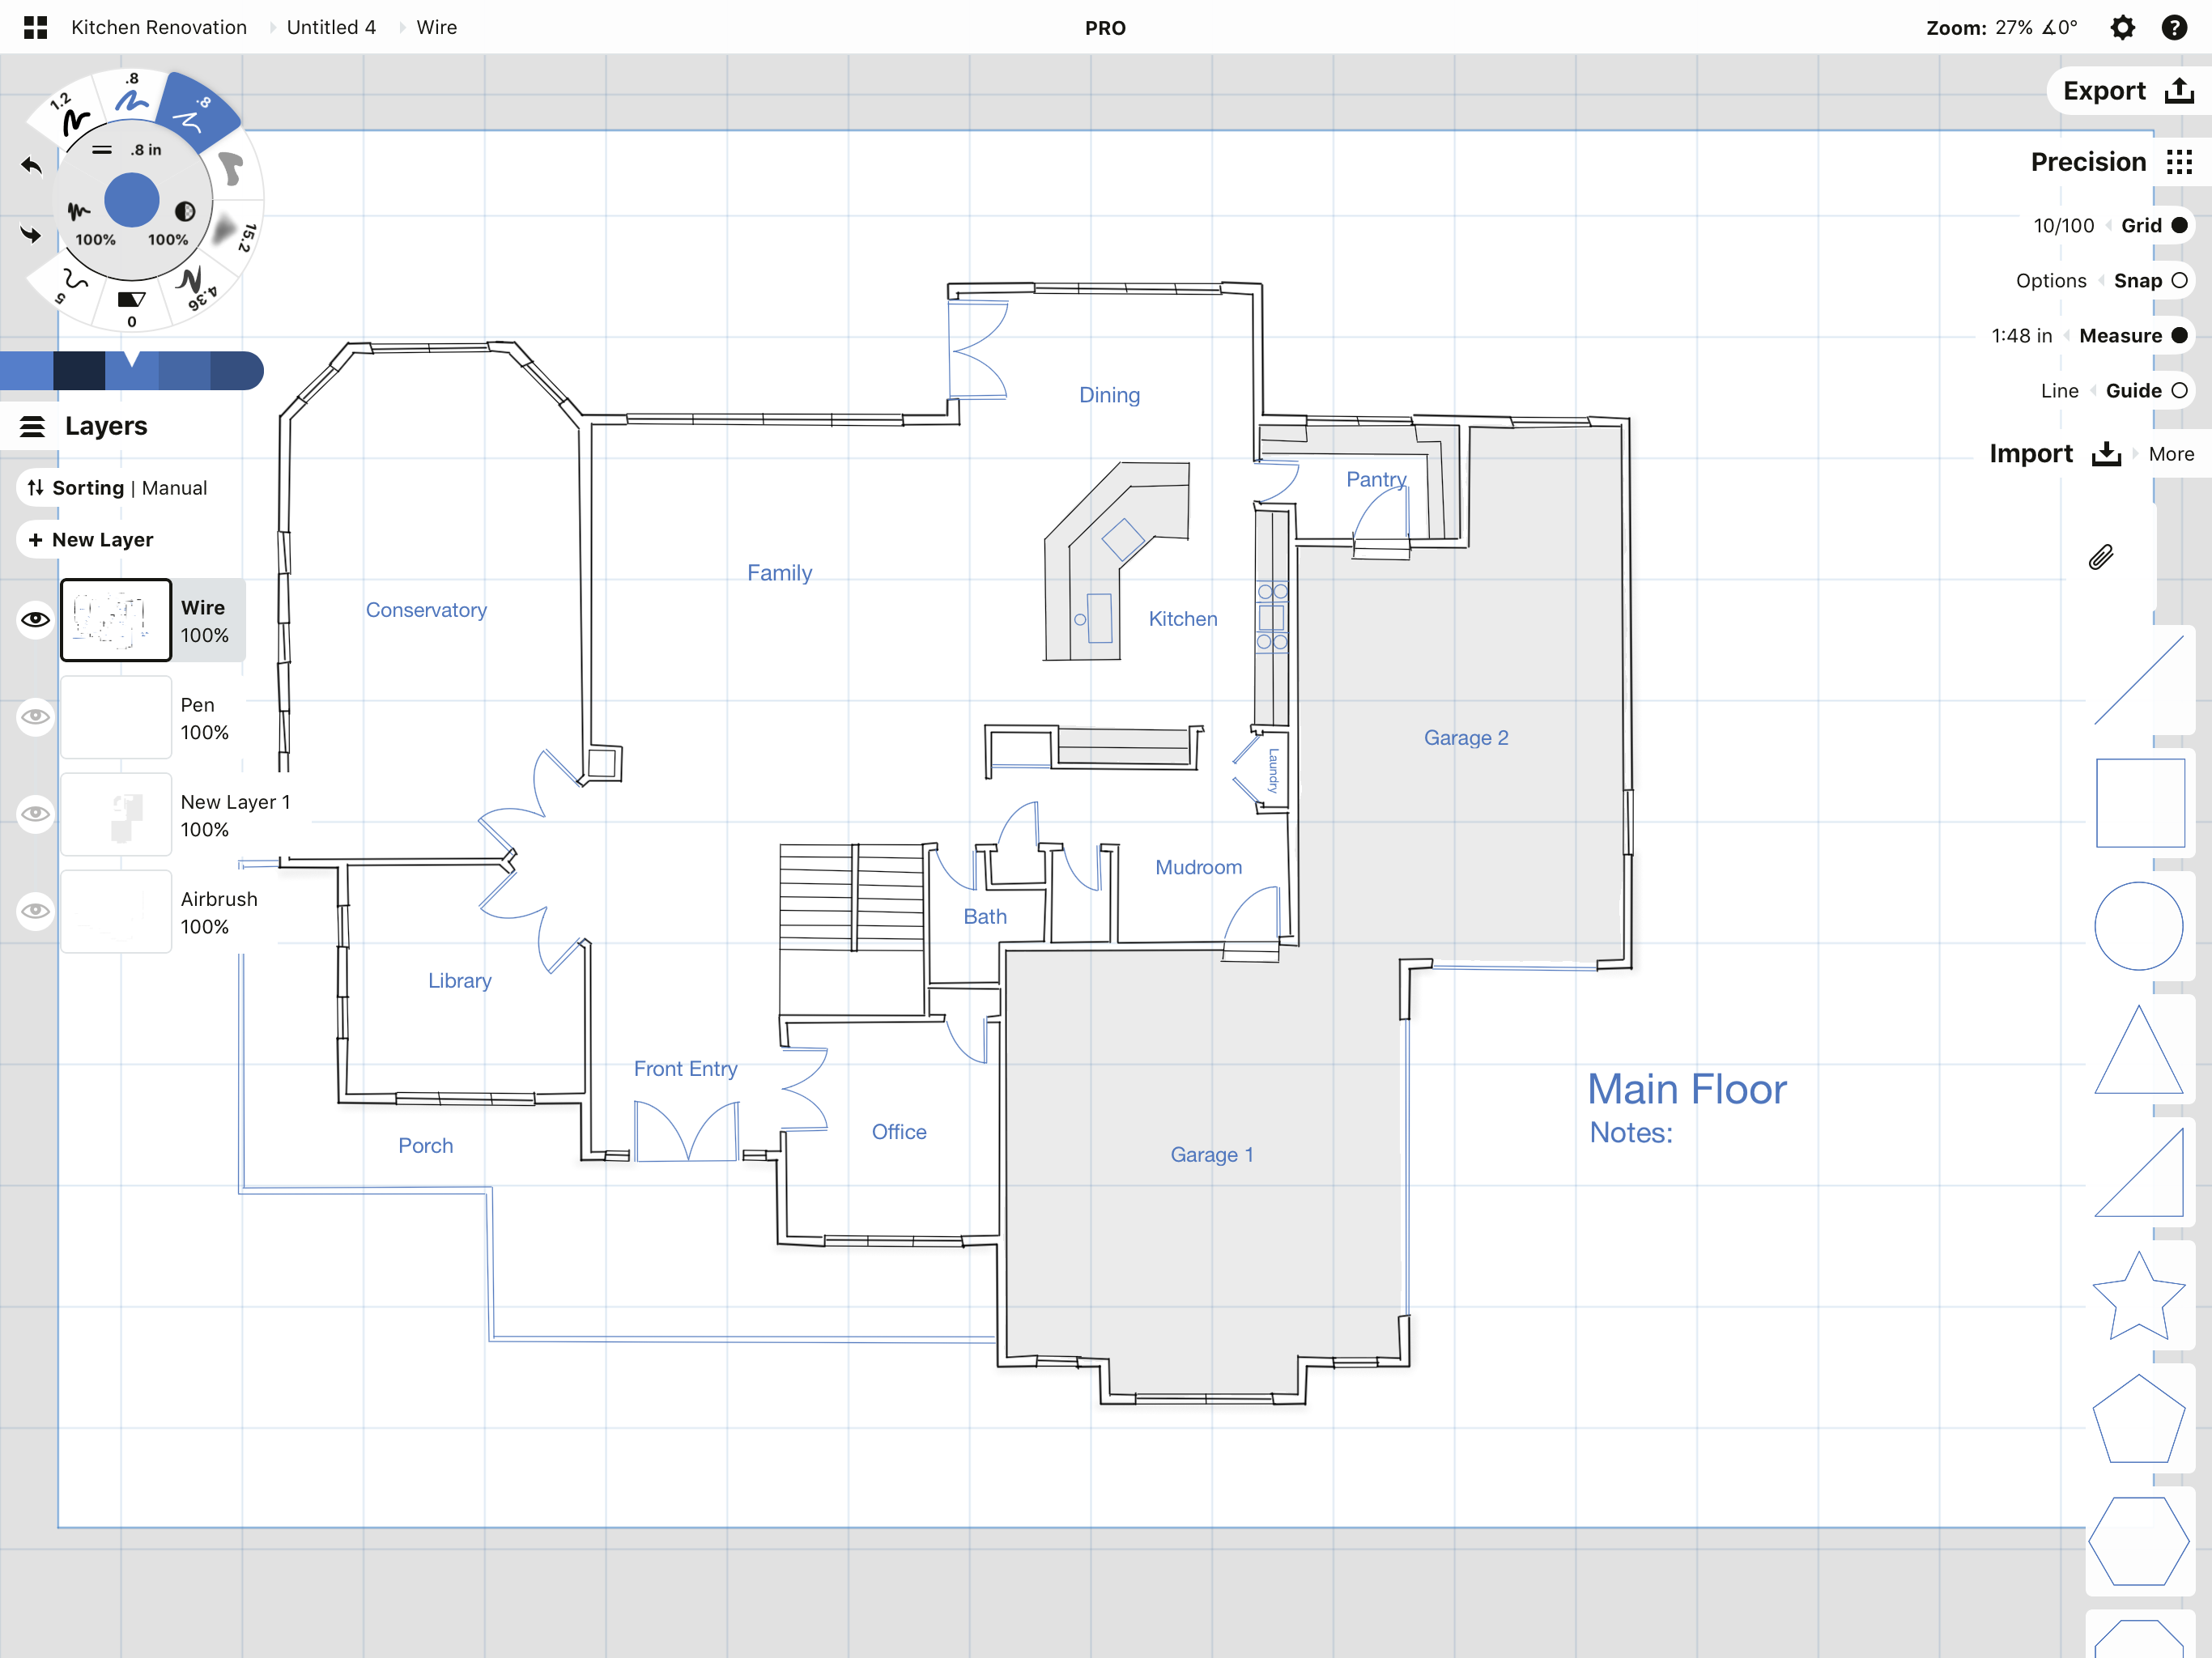
- Is my project a design plan? What scale do I need to display my plan correctly on the canvas? Will I need to use precision guides or measurement? Do I want a set of pens preset for straight lines (with 100% line smoothing applied), and others for writing notes?
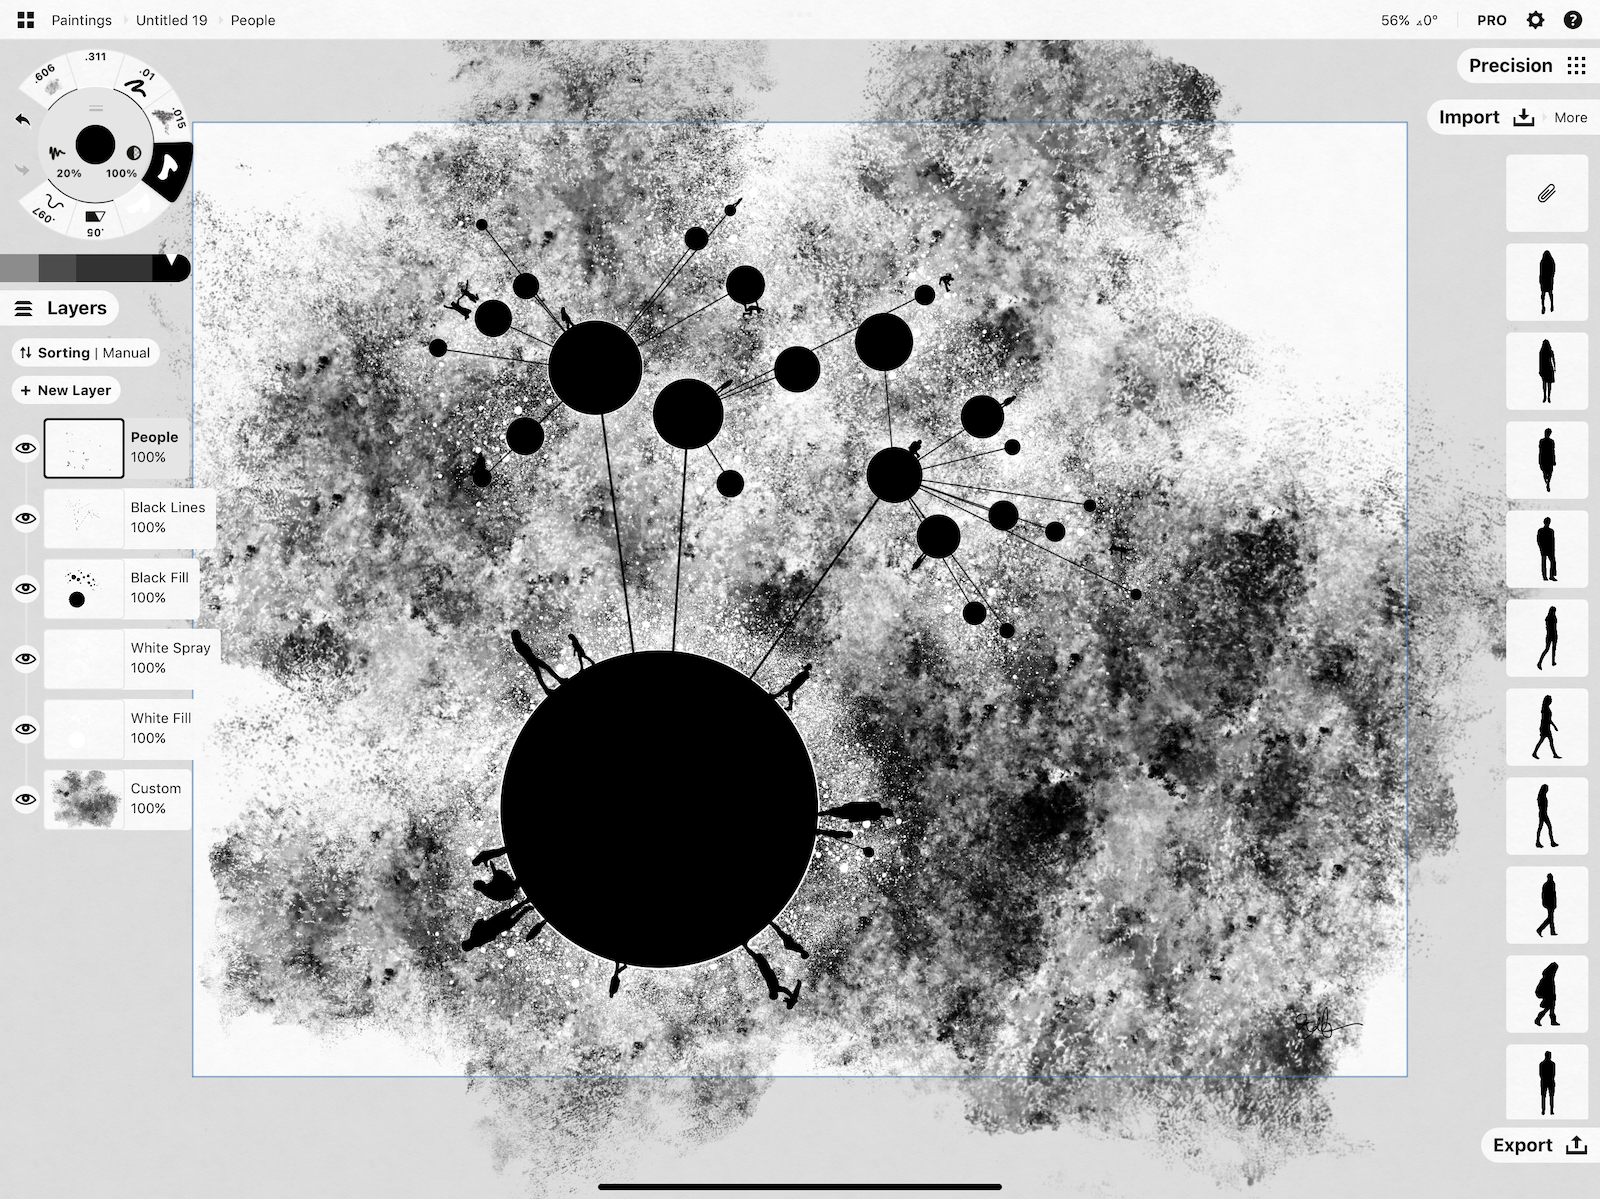
- Is my project an illustration? What are my print size requirements? Which paper background do I prefer? Am I looking for smooth or textured brushes to sketch, ink and fill?
Some people might have an idea of what their final will be like and can set up their preferences at the start. For others, it takes a practice sketch to know which tools will serve them best. Whichever way you approach it, that’s okay. You can create a template out of any drawing at any time.
And if you don’t get it right the first time? Not a problem. Adjust as you go, duplicate and clear the drawing once you’re ready, and use the new template.
Example Templates
Below are five example templates you can create in your gallery to help you get started - the Sketching Template, Note Taking Template, Storyboarding Template, Design Plan Template, and Mixed Media Template. Pick one or try them all - setting up these drawings will give you an idea of how you can customize your tools, backgrounds and project settings, and you’re welcome to tweak settings to fit your own projects and style.
Sketching Template
This sketching template gives you a couple of pencils for outlining and shading, a couple inking pens, a fill for quick organic shapes, the Slice tool for editing lines, the Soft Eraser for smudging stroke edges, and the Nudge tool for poking lines into place. The template is great for any ideation sketches or gesture drawing, and the drawing below was created with these tools. Set up the template according to the specifications below.
Remember that by tap+hold+dragging on the outer ring of the tool wheel, you can set up your canvas for right and left handed interfaces.
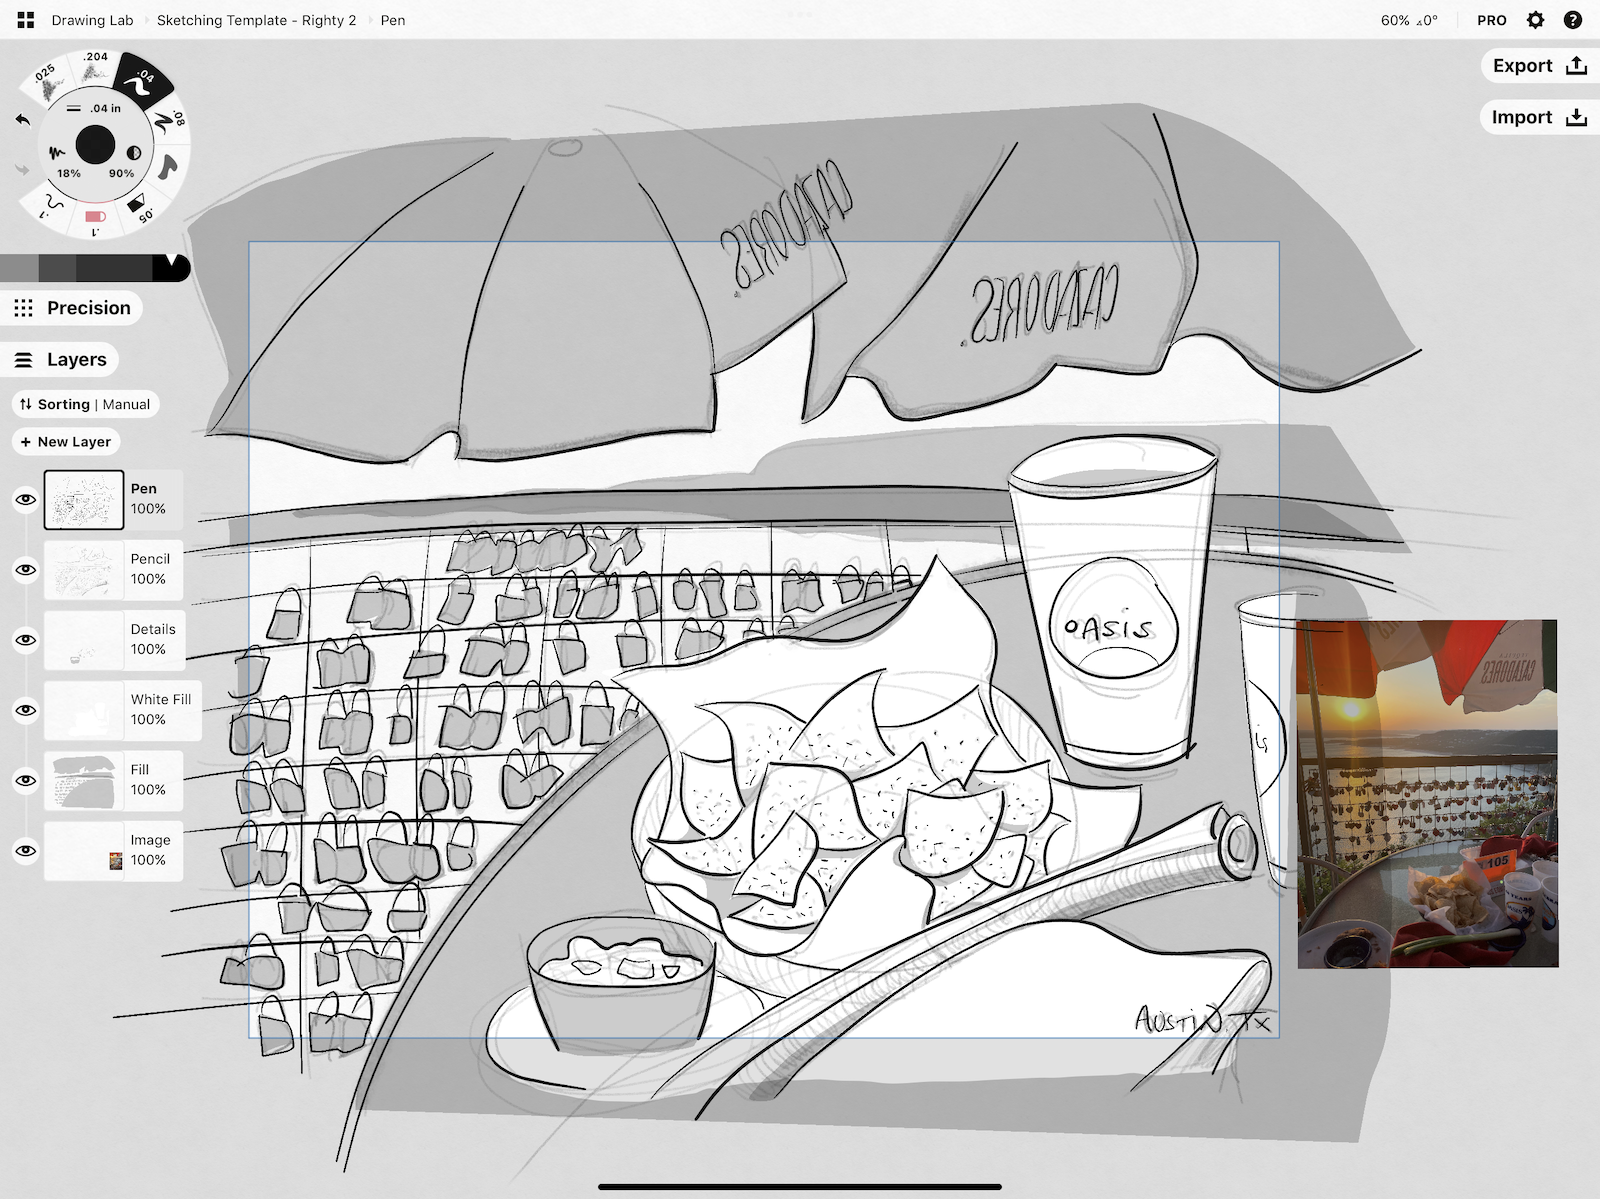
This sketching template can be set up with the free version of Concepts.
Sketching Template Specs
Tools - Tap your active tool or double-tap any tool to open the Brushes menu and set a brush to your tool wheel.
- Soft Pencil - Pressure-sensitive, tilt it for shading, feels like a real pencil.
- Hard Pencil - A harder technical pencil, it has a great edge and finer texture.
- Dynamic Pen - This pen is pressure-sensitive with tapered ends. It inks beautifully.
- Fountain Pen - This pen is velocity-sensitive with tapered ends. It widens with speed.
- Filled Stroke - This tool fills the positive space between your start and end points. Use it to create quick organic shapes instead of lines.
- Slice - A destructive eraser, it edits your lines and slices them into independent segments. Make it bigger to erase your line work.
- Soft Eraser - A soft-edged masking tool for blending and smudging your pencil edges.
- Nudge - Useful for poking your lines into place. Make it bigger for gentler curves, smaller for tighter curves. Touch outside the line and shove it over, touch the line itself and drag it where you want it to go.
Settings - Tap the gear icon in the status bar to open the Settings menu and adjust your workspace, stylus settings and gestures. Tap the Layers menu to toggle Manual vs Automatic modes.
- Settings > Artboard - Artboard is 8.5 x 11 inch paper size. You can export and print your sketch on a standard printer.
- Settings > Gestures - Two-finger tap-to-undo is default.
- Layers - Layers are manually sorted like standard sketching apps.
Note Taking Template
This note taking template is set up with a few pens in different widths, a marker, fill and watercolor brush for highlights, a Slice tool for erasing, the Selection tool to help you quickly reorganize blocks of copy, and Automatic layering that sorts by tool type. Choose from a variety of backgrounds, and feel free to try different grids or lined paper for alignment. Set up the template according to the specifications below.
This template setup works with the free version of Concepts.
Note Taking Template Specs
Tools - Tap your active tool or double-tap any tool to open the Brushes menu and set a brush to your tool wheel.
- Fountain Pen - This pen is velocity-sensitive with tapered ends. Set to a thicker width for bold titles.
- Marker - Feels like an actual marker. As layering is automatic, it will draw beneath your pen for you for clear highlighting.
- Pen - Set to a thinner width, the ink is realistic and flows fast.
- Filled Stroke - Choose your favorite color. This tool fills the positive space between your start and end points. Use it to create quick organic shapes instead of lines.
- Watercolor - This brush blends colors on the same layer, or stacks on different layers. Use it to paint sketches or highlight notes.
- Slice - A destructive eraser, it edits your lines and slices them into independent segments. Presets are a variety of sizes, choose one that is big enough to easily erase your text.
- Nudge - Useful for poking your lines into place. Make it bigger for gentler curves, smaller for tighter curves. Touch outside the line and shove it over, touch the line itself and drag it where you want it to go.
- Selection Tool - Activate this tool for one-finger lassoing. This lets you easily move blocks of notes around the canvas if they grow too close together.
Settings - Tap the gear icon in the status bar to open the Settings menu and adjust your workspace, stylus settings and gestures. Tap the Layers menu to toggle Manual vs Automatic modes.
- Settings > Grid - Grid is active for alignment reference. Choose dot, square, or lined paper to suit your mood.
- Settings > Size - The canvas is set to Infinite so you can write as far as you need to go. Choose an artboard when you're finished to define the boundaries and export (Settings > Artboard).
- Settings > Background - Choose a traditional White paper, or think about Dark Print for when the lights are dimmed (write with lighter pens).
- Settings > Gestures - Selection is set to Lasso when you tap+hold the screen for easy selection of notes - just tap+hold+drag your finger around your notes to move, resize, re-color or delete your text.
- Layers - Layers sort Automatically by tool, with the Pen at the top.
Storyboarding Template
The tools and layout in this template scale to large sizes and remain crystal clear for viewing, edits and printing, or you can zoom in for details. Export the entire canvas to view the bigger picture of your story, or use an artboard to export and print single frames. Set up the template according to the specifications below.
This template works with the Essentials or Subscription versions of Concepts. It uses the Memphis Patterns brush pack but you can substitute a second Fill tool.
Storyboard Template Specs
Tools - Tap your active tool or double-tap any tool to open the Brushes menu and set a brush to your tool wheel.
- Fixed Width - Create even storyboard outlines with this pen. Try using Snap to Grid to make a fast storyboard panel, then duplicate as many as you need.
- Fountain Pen - A velocity-sensitive pen with tapered ends, great for inking.
- Pen - Choose a thinner width for jotting notes.
- Slice - A destructive vector eraser - make it larger to erase notes and sketching.
- Fill - Fill your shapes with a solid fill of varying opacities and create quick shadows.
- Memphis Pattern Dot Fill - Color backgrounds and characters with a classic dot fill.
- Selection Tool - Select and move elements around the canvas.
- Text Tool - Tap the canvas and use the keyboard to enter text.
Settings - Tap the gear icon in the status bar to open the Settings menu and adjust your workspace, stylus settings and gestures.
- Settings > Size - The canvas is set to Infinite for your notes, sketching and exploration.
- Settings > Gestures - Set up your default Selection tool to Lasso. With this tool, you can select a storyboard panel and duplicate it to create more boards for your story.
- Settings > Gestures - Canvas rotation is set to off to keep artboards from turning. You can turn it back on in the same place.
Design Plan Template
This template features a few fixed width and wire pens with thicker and thinner presets, with 100% smoothing applied for instant straight lines. Files made with this template are exportable to other vector programs for further work. Note that the airbrush is a textured brush and will appear as a simple straight line in other programs - if you’d like, trade it out for another fixed width or wire pen. Set up the template according to the specifications below.
The settings in this template work with the Essentials or a Subscription.
Design Plan - Imperial Template Specs
This template is set to Imperial units and scale - the scale is 1/4 in : 1 ft, the artboard and tools use imperial units.
Tools - Tap your active tool or double-tap any tool to open the Brushes menu and set a brush to your tool wheel.
- Fixed Width Pen 1 - A black evenly-lined pen set to 100% smoothing. Fixed Width pens transfer well to other vector apps.
- Fixed Width Pen 2 - A blue evenly-lined pen set to 100% smoothing.
- Wire - A blue wire tool set to 100% smoothing. Wire also transfers well between vector apps.
- Fill - A black fill at 10% opacity. Fills the positive space between your start and end points. Use it with the shape guides or objects for perfect shapes.
- Airbrush - A finely-grained, realistic airbrush. Here it's set to a narrow, 20% opacity black with 100% smoothing for instant line shadows.
- Fountain Pen - A velocity-sensitive pen in black for jotting down notes and measurements.
- Slice - A destructive editor for dividing lines into segments. Here it is set to 0 pts for zero disruption to your line measurements. If you want to erase with it, just up the size.
- Nudge - Use this tool to move lines over with a nudge. If you touch a line end with the tip of your stylus, you can move the whole end over - smoothed lines will remain smoothed or straight.
Settings - Tap the gear icon in the status bar to open the Settings menu and adjust your workspace, stylus settings and gestures.
- Settings > Artboard - 24” x 36” artboard set for ARCH C plan size.
- Settings > Scale - Scale is set to 1/4 in = 1 ft
- Settings > Drawing Units - Units are displayed in feet / inches.
- Settings > Grid - Grid is 10/100. Turn it off in the Precision menu. Change the type in Settings > Grid.
- Settings > Gestures - Two-finger canvas rotation is turned off in Settings so the plan stays level.
- Precision > Measure - Measure is on. Combine this with the Line Guide for quick custom measurement input. Find a tutorial here.
- Imports > Objects - Objects are open to the Basic Shapes library for drag&drop onto the canvas. Objects’ line style in the library will match whichever tool is currently active.
- Layers - Layers are set to manual so you can draw with the same pen type in multiple layers.
Design Plan - Metric Template Specs
This template is identical to the one above except it's built with metric standards - the scale is 1:50, the artboard and tools use metric units.
Tools - Tap your active tool or double-tap any tool to open the Brushes menu and set a brush to your tool wheel.
- Fixed Width Pen 1 - A black evenly-lined pen set to 100% smoothing. Fixed Width pens transfer well to other vector apps.
- Fixed Width Pen 2 - A blue evenly-lined pen set to 100% smoothing.
- Wire - A blue wire tool set to 100% smoothing. Wire also transfers well between vector apps.
- Fill - A black fill at 10% opacity. Fills the positive space between your start and end points. Use it with the shape guides or objects for perfect shapes.
- Airbrush - A finely-grained, realistic airbrush. Here it's set to a narrow, 20% opacity black with 100% smoothing for instant line shadows.
- Fountain Pen - A velocity-sensitive pen in black for jotting down notes and measurements.
- Slice - A destructive editor for dividing lines into segments. Here it is set to 0 pts for zero disruption to your line measurements. If you want to erase with it, just up the size.
- Nudge - Use this tool to move lines over with a nudge. If you touch a line end with the tip of your stylus, you can move the whole end over - smoothed lines will remain smoothed or straight.
Settings - Tap the gear icon in the status bar to open the Settings menu and adjust your workspace, stylus settings and gestures.
- Settings > Artboard - 457 x 610 mm artboard set for ARCH C plan size. Change this under Settings > Artboard.
- Settings > Scale - Scale is set to 1:50; Drawing Units are displayed in metric.
- Settings > Grid - Grid is 10/100. Turn it off in the Precision menu. Change the type in Settings > Grid.
- Settings > Gestures - Two-finger canvas rotation is turned off in Settings so your plan stays level.
- Precision > Measure - Measure is on. Combine this with the Line Guide for quick, custom measurement input. Find a tutorial here.
- Imports > Objects - Objects are open to the Basic Shapes library for drag&drop onto the canvas. Objects’ line style in the library will match whichever tool is currently active.
- Layers - Layers are set to manual so you can draw with the same pen type in multiple layers.
Mixed Media Template
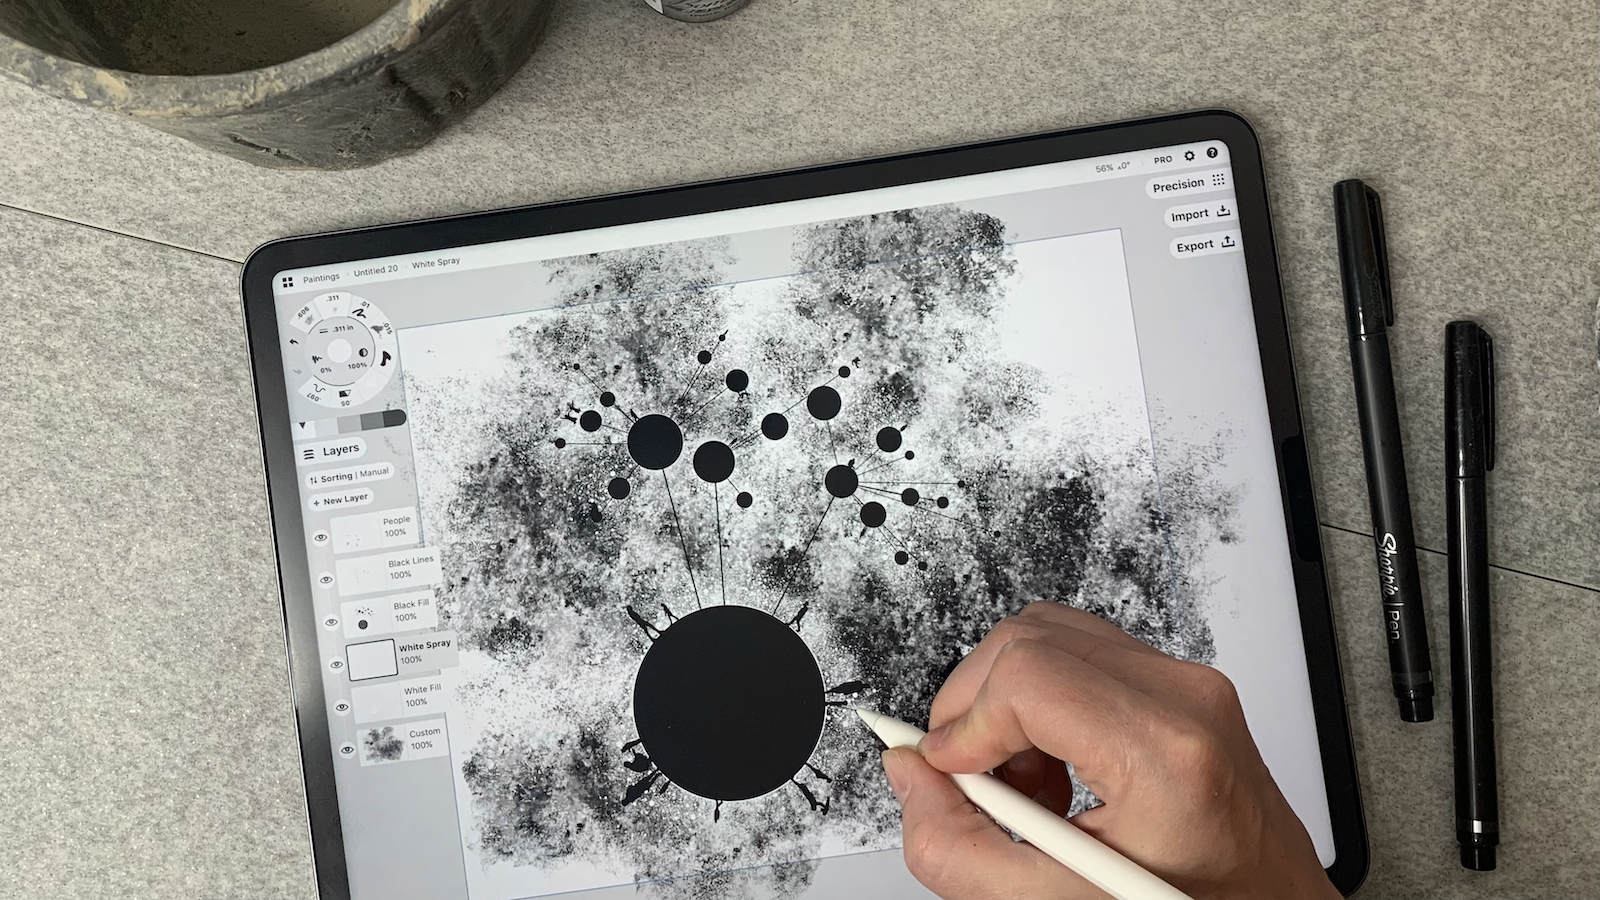
This template gives you a graphic mixed media illustration setup. It includes a pencil for initial sketching, a fixed width pen for line work, two contrasting fill tools for solid shapes, and a sponge dab brush and spatter brush for texture. Use the Slice and Nudge tools for trimming and shaping lines and fills. The painting below was created with these tools. Set up the template according to the specifications below.
The settings in this template do require a subscription unless you want to purchase brush packs separately. With a subscription, you have open access to all tools and brushes in app.
Mixed Media Template Specs
Tools - Tap your active tool or double-tap any tool to open the Brushes menu and set a brush to your tool wheel.
- Sponge Dab - A texture-rich brush beautiful for backgrounds. Try various colors and opacities on different types of backgrounds to experiment with saturations.
- Spatter - A paint brush that makes spatter detailing simple.
- Fixed Width Pen - This pen maintains the same width from end to end of your linework.
- Soft Pencil - Sketch your ideas with this pencil that feels entirely natural.
- Filled Stroke (Black) - Draw organic shapes or use with the Object Library for pre-filled shapes.
- Filled Stroke (White) - Draw organic shapes or use with the Object Library for pre-filled shapes. Duplicate shapes, change their color, and layer them beneath or above your original shapes for quick highlights.
- Slice - Use this destructive eraser tool to trim your fills and line work.
- Nudge - Try using Nudge at large sizes to make gentle bends in your lines and shapes, or at small sizes to make more acute adjustments.
Settings - Tap the gear icon in the status bar to open the Settings menu and adjust your workspace, stylus settings and gestures.
- 11” x 14” artboard for printable, framable art size. Change the size under Settings > Artboard. The nice thing about drawing with a vector app is you can select and scale your entire drawing upward to a larger size if your initial resolution was too small. Learn how to do that with our Exports tutorial here.
- Paper background is Lightweight for a soft texture. Switch to Heavyweight for a heavier texture, or other color or style in Settings > Paper Type.
Is there a template you’d like help setting up? Chat with us at support@concepts.app or go to Help > Ask Us Anything in the app. We’ll be happy to help. Good luck with your projects!
By Erica Christensen
Recommended
Working with Your Infinite Canvas - Explore your ideas, sketch everywhere, and export just what you need on Concepts' infinite canvas.
The Slice Tool: Divide and Conquer Your Ideas - Learn how to use Slice to edit, trim and erase your sketch.
Modeling Concept Designs on the iPad Pro in Shapr3D and Concepts (Part 2) - In Part 2 of our Shapr3D and Concepts Skillbuilder series, Lasse Pekkala shares how to render a 3D model in Concepts.