Concepts is an infinite, flexible creative tool for all your good ideas. Available on iOS, Windows and Android.
Create Your Own Geometric Illusions
Designer Mike Dearborn shares the creative process behind his mind-bending geometric illusions.
Hi, my name is Mike Dearborn. I grew up in rural Pennsylvania and have a strong background in machining, mainly in tool and die work and mold rework. I’ve dabbled in CNCs a little but mostly worked in very close tolerance surface grinding applications. It requires a lot of focus, attention to detail, reading blueprints, and lots of trigonometry for doing angles, radii, and formwork. That’s actually why I started looking for a CAD type program on the App Store and how I ultimately fell in love with Concepts.
I now co-own and co-operate a successful family business with my wife. We’re an award-winning event design company with feature articles in many local and national wedding blogs and magazines. It involves designing and setting up weddings from the ground up. My wife is a creative genius and professional florist, and I try to keep up.
What we do is as wide and varied as the imagination of the brides we work for. Whether that entails me becoming a lumberjack to fell a tree on our acreage and turn it into stumps for a rustic setting, hanging a floating cake stand, or building a custom arbor for Barbara to decorate for the happy couple to be married under, then so be it. You can peruse our work here or follow us on Instagram.
What is your creative process like? What inspires you to create and what do you like to create?
I’m borderline obsessed with DIY stuff. I love to be creative on my own terms and I’ve built a couple decks, two coffee tables and a bookshelf recently, and learned framing, trim, crown molding and drywall. I have future plans for a joiners hammer, and an LED upgrade to my chopsaw for an electrical project.
For inspiration I read articles in Dwell, follow the tiny house movement, watch renovations on the DIY channel, and admire posts by building and landscaping architects. I like the Bauhaus movement, Craftsman and Prairie-style houses, Frank Lloyd Wright and Frederick Olmsted. I’m passionate about classical architecture, too, I love studying the aspects of column work the Classical Greeks built — even the names for the parts are cool, things like entablature, volutes, architrave, etc.
My wife and I share a love for art. She’s passionate about Edward Hopper, and she sat down on a bench in front of Monet’s Water Lilies at the Carnegie museum in Pittsburgh with the grin of a Cheshire Cat. Seeing da Vinci’s Ginevra de Benci at the National Gallery of Art in Washington up close and personal was life-changing, I can hardly describe it. It literally had its own aura — it glowed. It seemed that he had somehow melted ivory and used it to paint. It’s the only work of his in existence in the U.S. and if anyone has the chance, I highly recommend seeing it.
If you want to know how my creative juices get flowing though, well, it’s usually after we get done with a big event. The next day we’ve usually barely slept from the night before. So I use that day to relax a little, pick up Concepts and doodle some. Then it’s off to Pinterest. If you type in anything art or architecture related you’ll find a million examples there. For example, if one wants to research the Divine Mean or the Fibonacci sequence, you’ll find it there.
From there, depending on what I’m researching, I go to YouTube and look for tutorials. When it comes to art I love it, but have to start from scratch trying to learn it. That’s why Concepts helps so much. You can learn to draw anything!
I have an iPad Pro 12.9" with the Apple Pencil. I bought the 12.9” specifically to use Concepts. The larger screen is amazing for using it side by side with YouTube drawing tutorials. I had no artistic ability to speak of… if I can learn art utilizing this app, anyone can. I use it to practice drawing, and we use it for floor plans in our wedding industry and mock ups for clients.
You’ve been making these amazing 3-dimensional illusions, can you walk us through how you make one?
Sure, I’d love to! This project started when I was doing a study in tessellations by M. C. Escher. I found some easy instructions about illusion art on Pinterest and started tinkering with it in Concepts. Don’t be intimidated by this exercise, once we get going it’s much easier than you might think. Especially with Concepts!
Here’s how it works.
Hexagonal Pattern
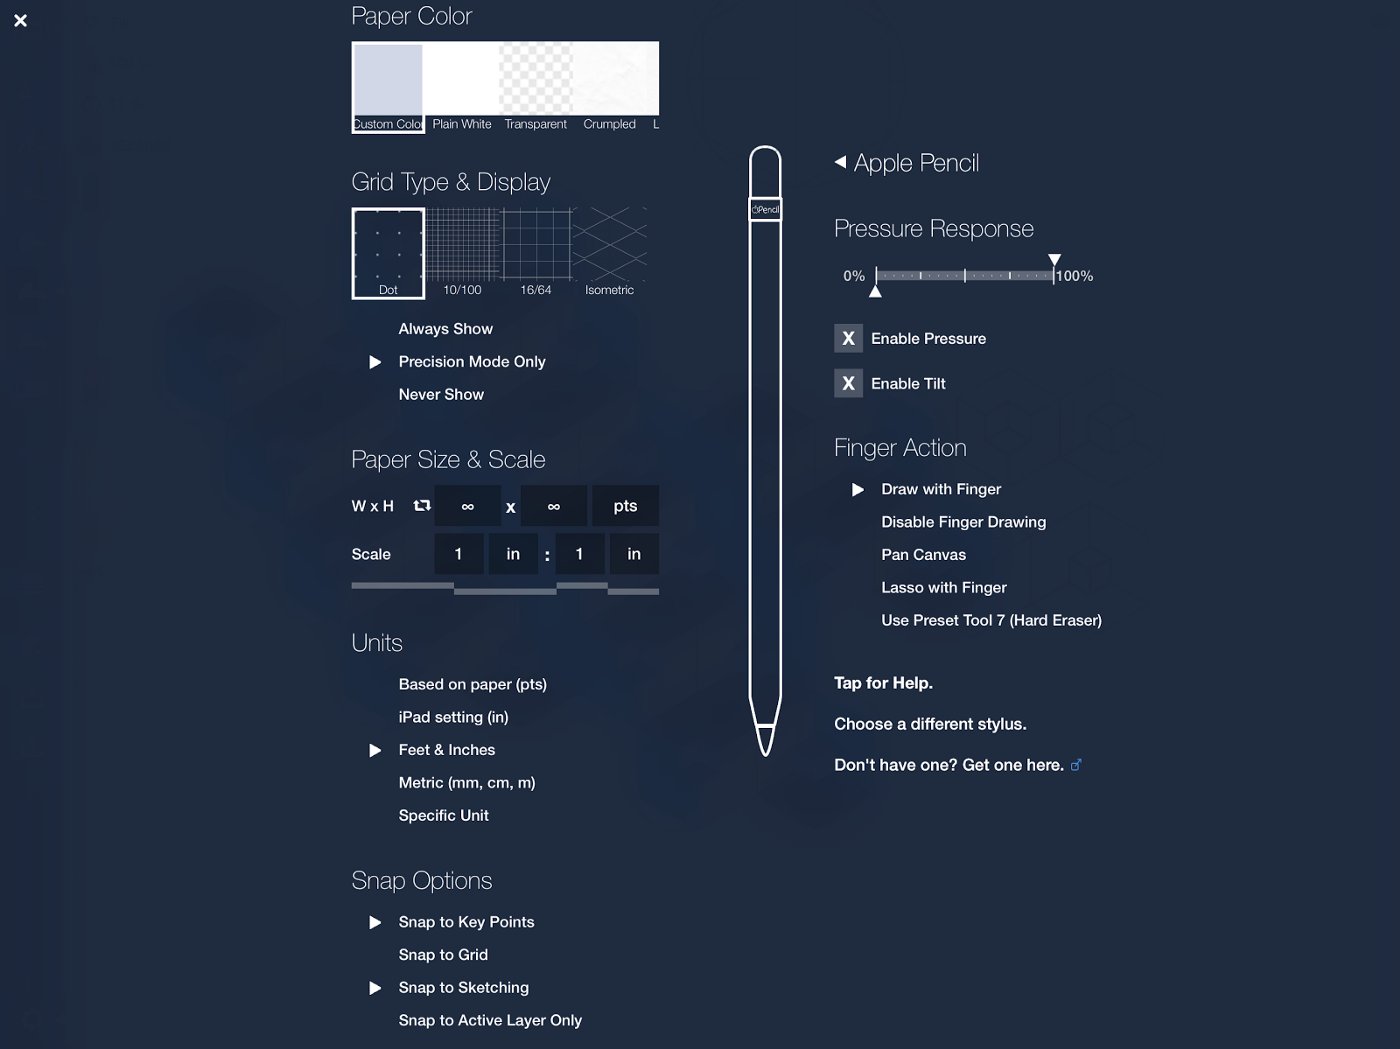
Before beginning, remember to keep Precision Mode highlighted in the tool bar, and turn Snap on.

Also in the Settings page, set Units to feet and inches, and set Snap Options with ‘Snap to Key Points’ and ‘Snap to Sketching.’
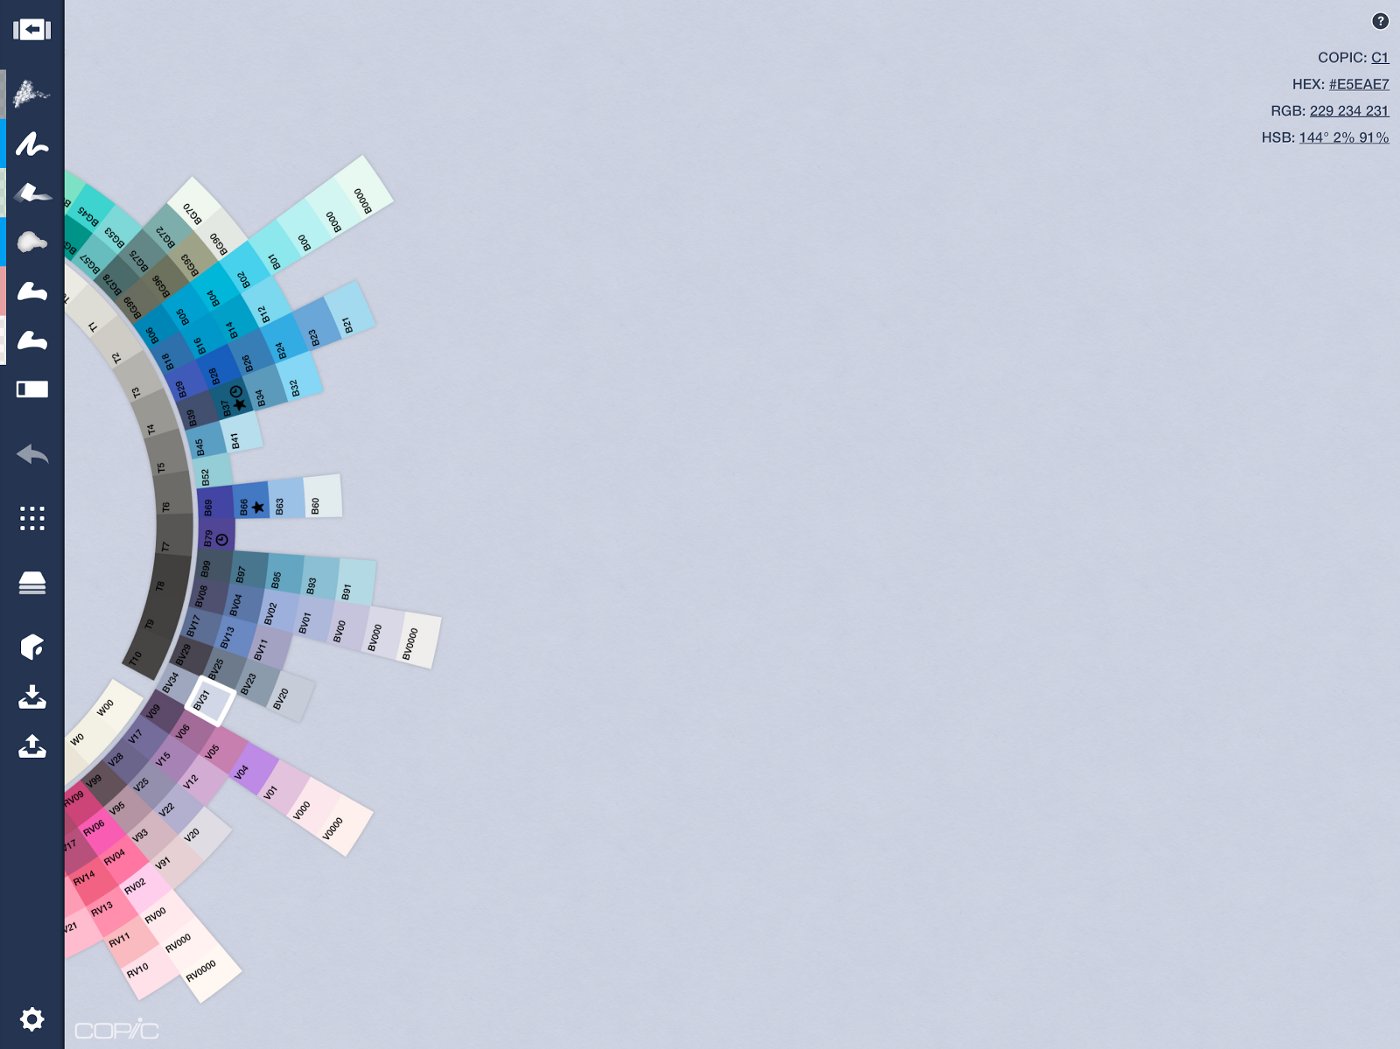
1. Let’s start simply. Select a neutral background. I prefer a light, calm color. I chose BV31 on the Copic color wheel, but you can choose what you’d like.
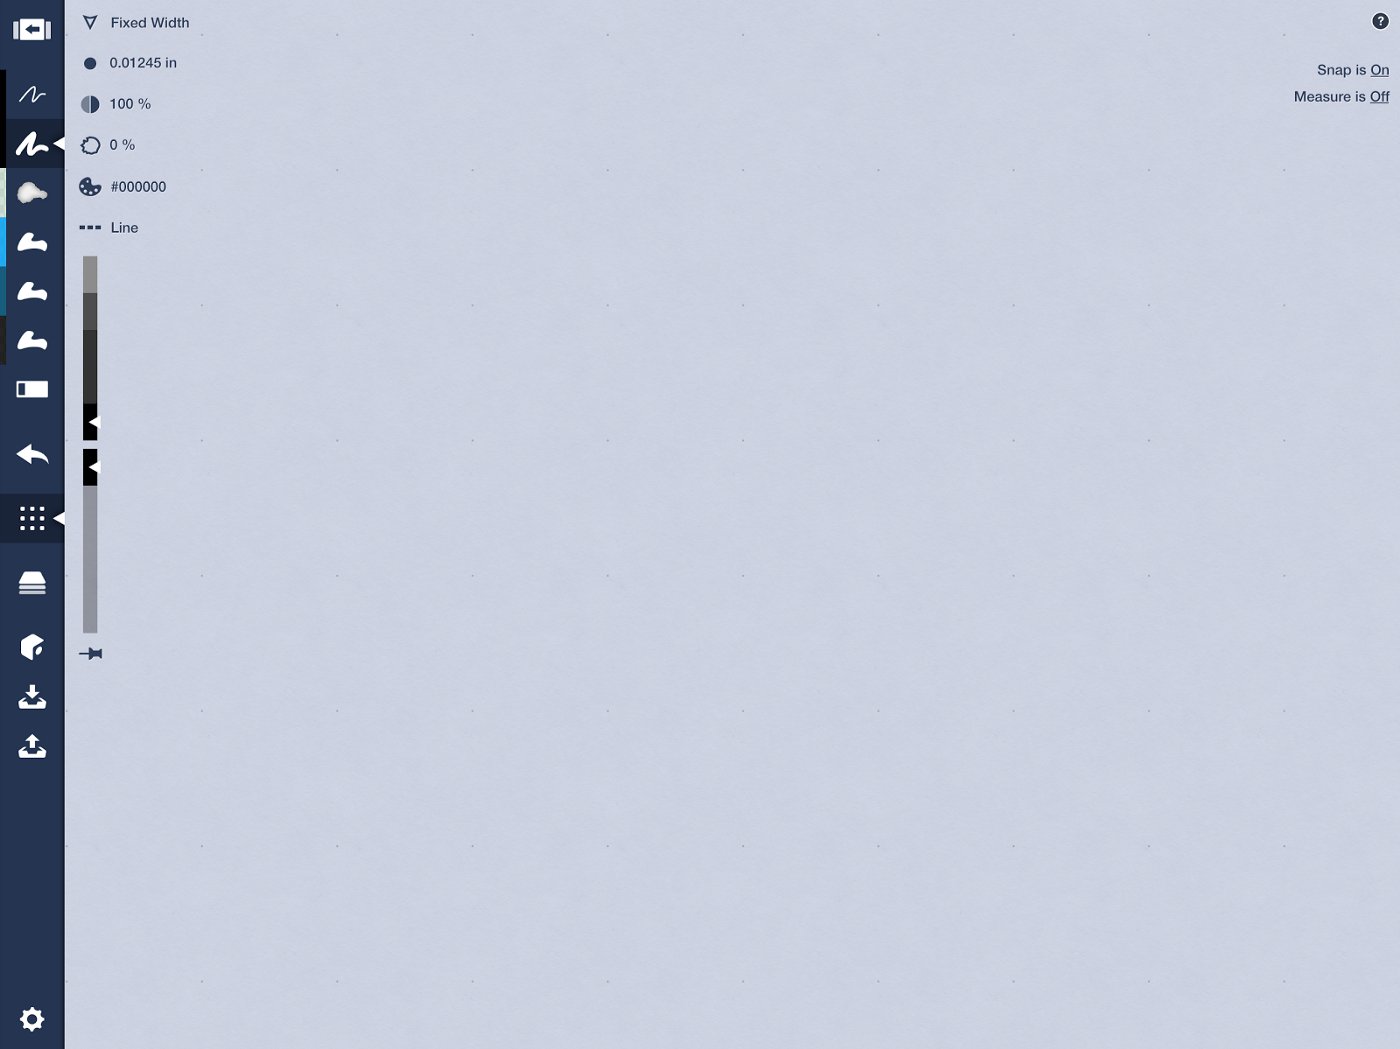
In our tool selection, let’s set Wire, Fixed Width, and three Fill tools with a dark, medium and light color scheme. Have the Fixed Width set to about .012 inches with 100% opacity.
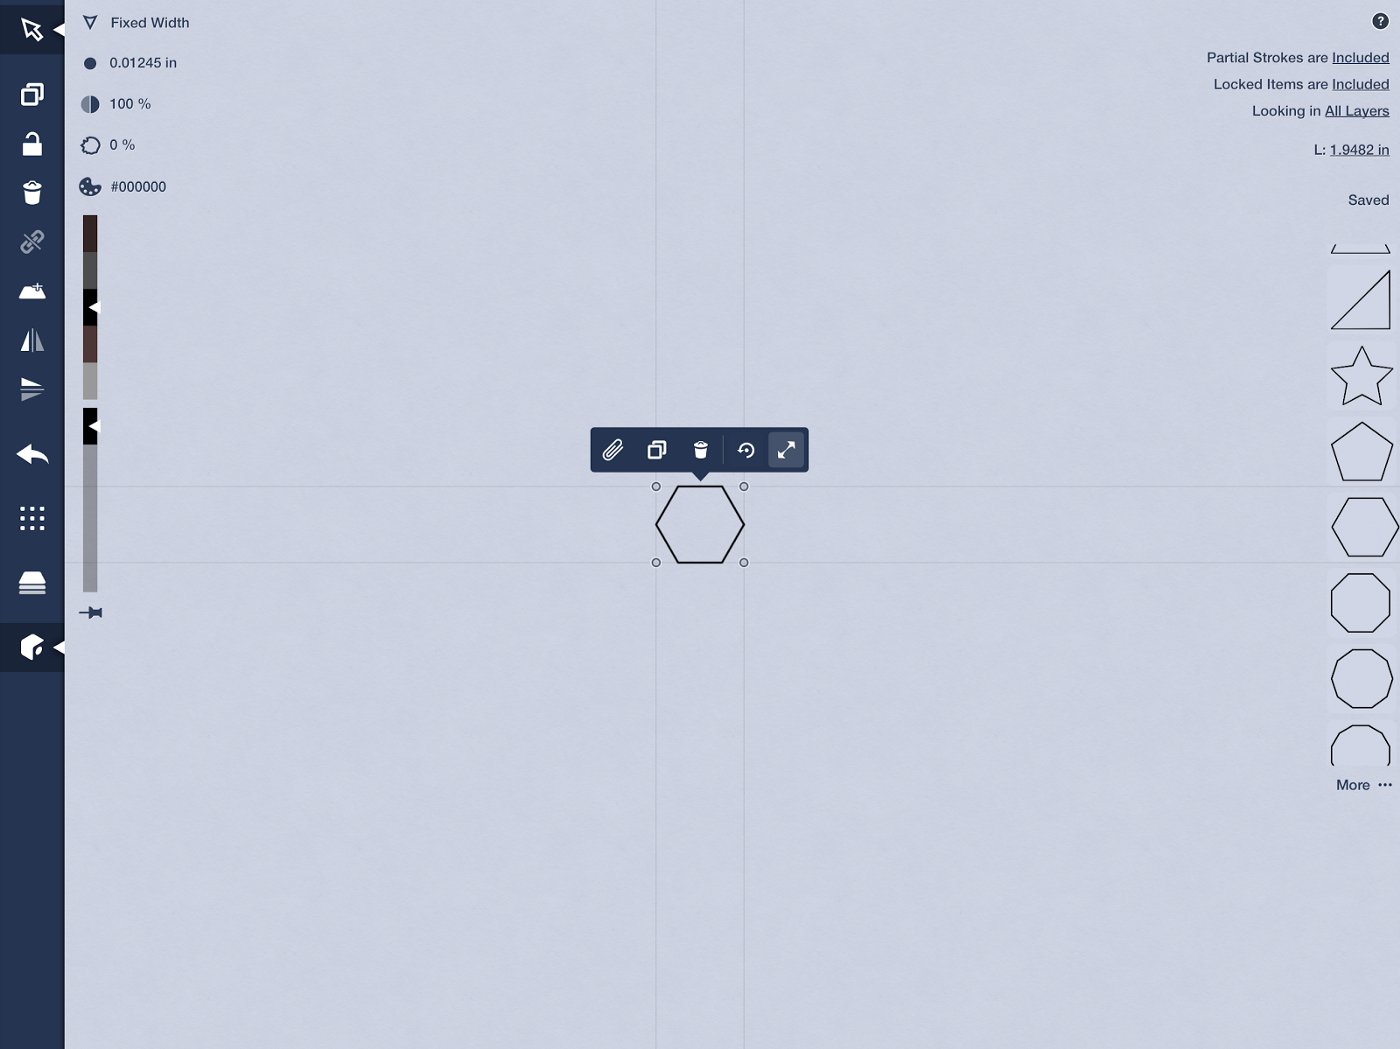
2. Now, let’s open our Object Library and select a hexagon. (The basic shapes in the Object Library come with the Pro upgrade.) Or you can use the Line and Ellipse shape guides to create your own hexagon.
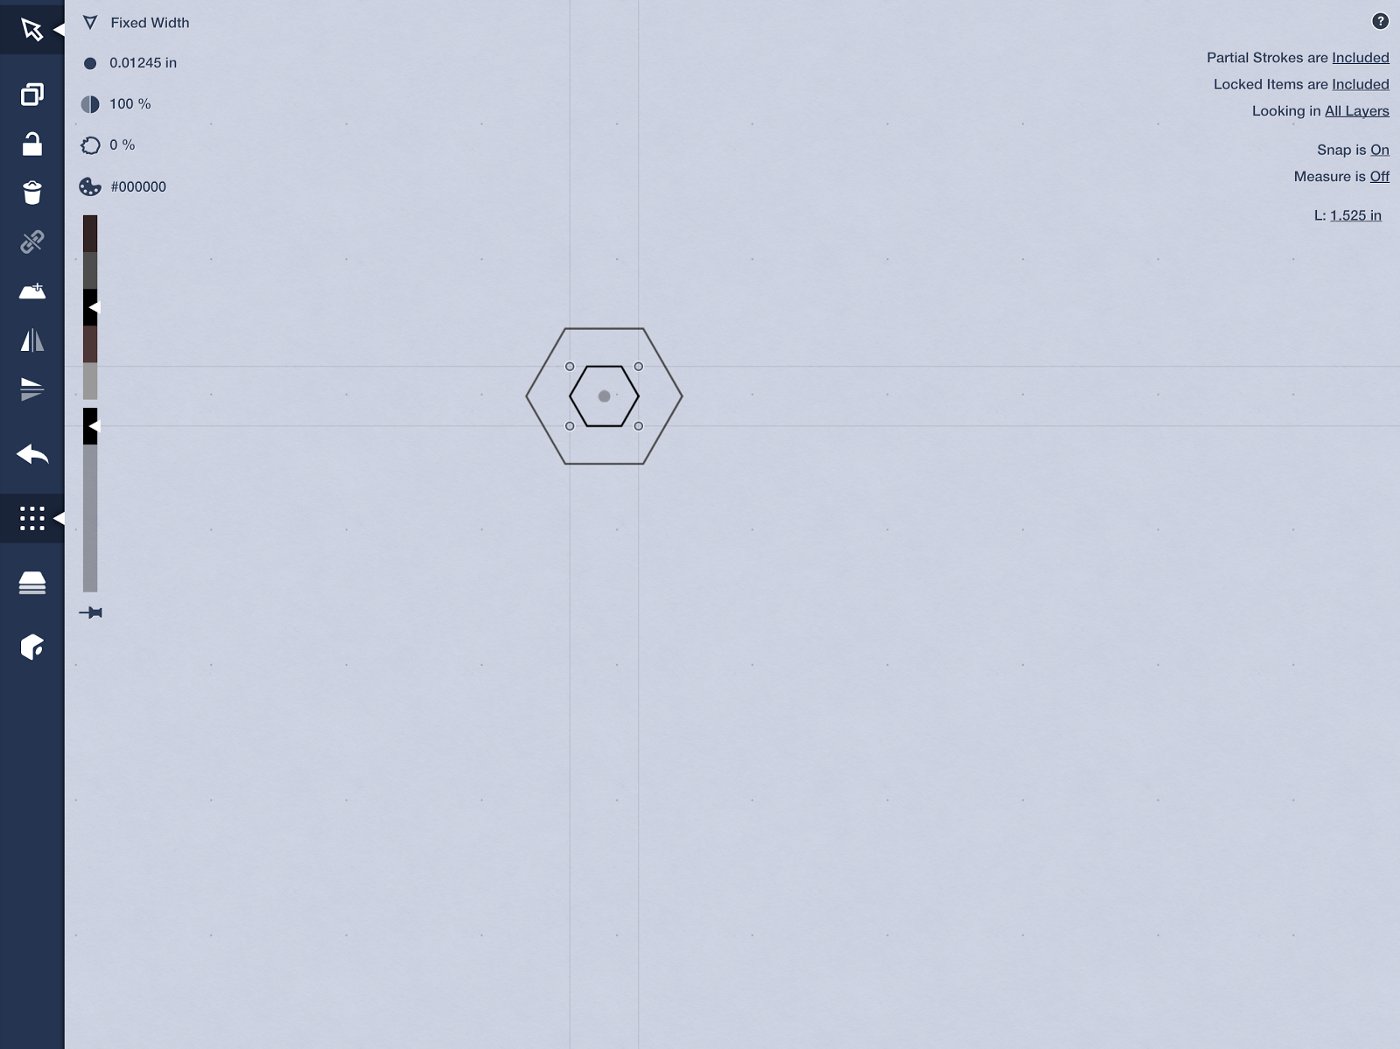
3. Now that we have a hexagon, let’s select and enlarge it. Then duplicate it and place a smaller hexagon in the center of the larger hexagon.
4. Now, let’s add some lines to make our illusions. Add three lines as seen here.
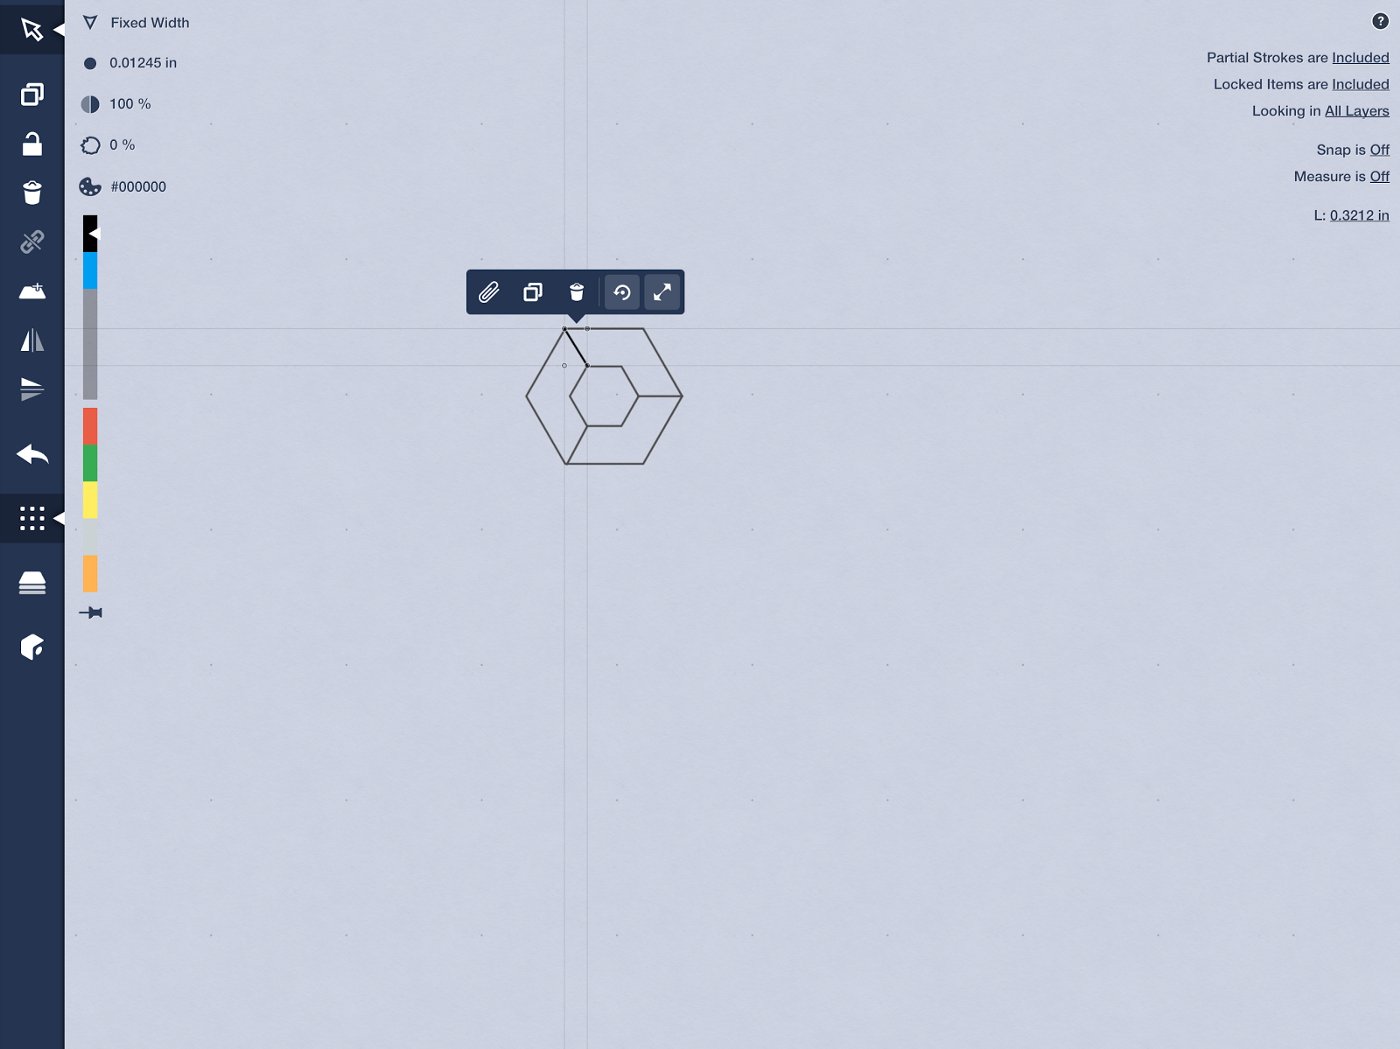
Note: If Snap doesn’t place the line to the points you want, shut it off and get the line as close as you can to the points. Then turn it back on.
5. Next, add three more lines inside the smaller hexagon like so.
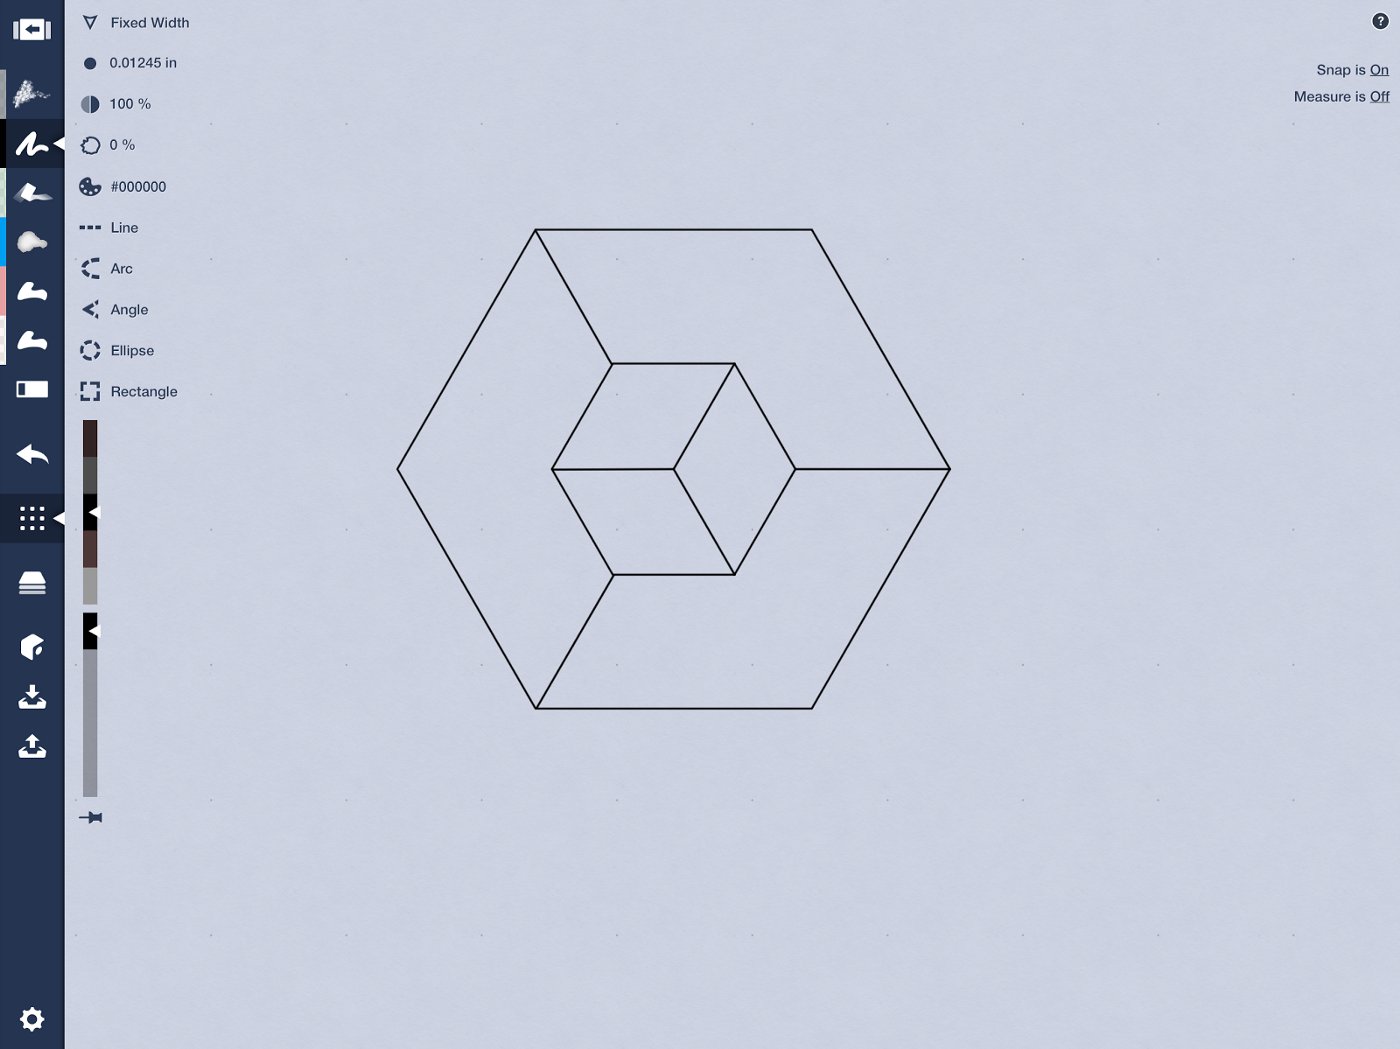
We now have the basis for an illusion cube!
6. Select the entire object and group it together.

Turn it so the point is up.
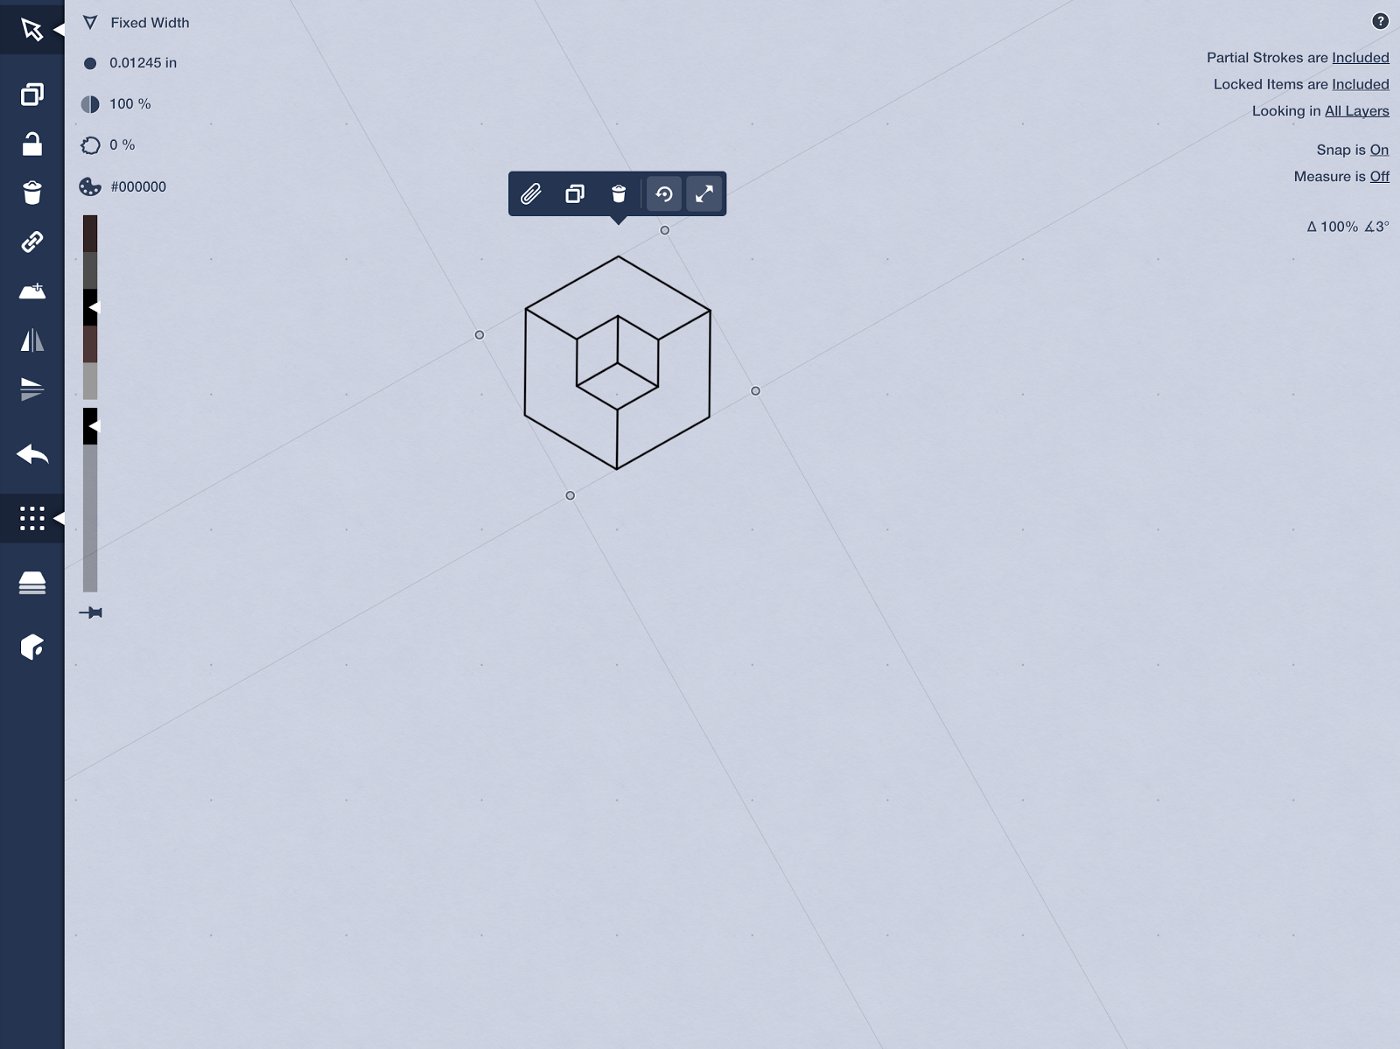
Pro tip: If you purchased the Make Your Own Objects pack, select the cube once it’s grouped together and save it in an object pack. I saved all the components into my own pack for future projects.
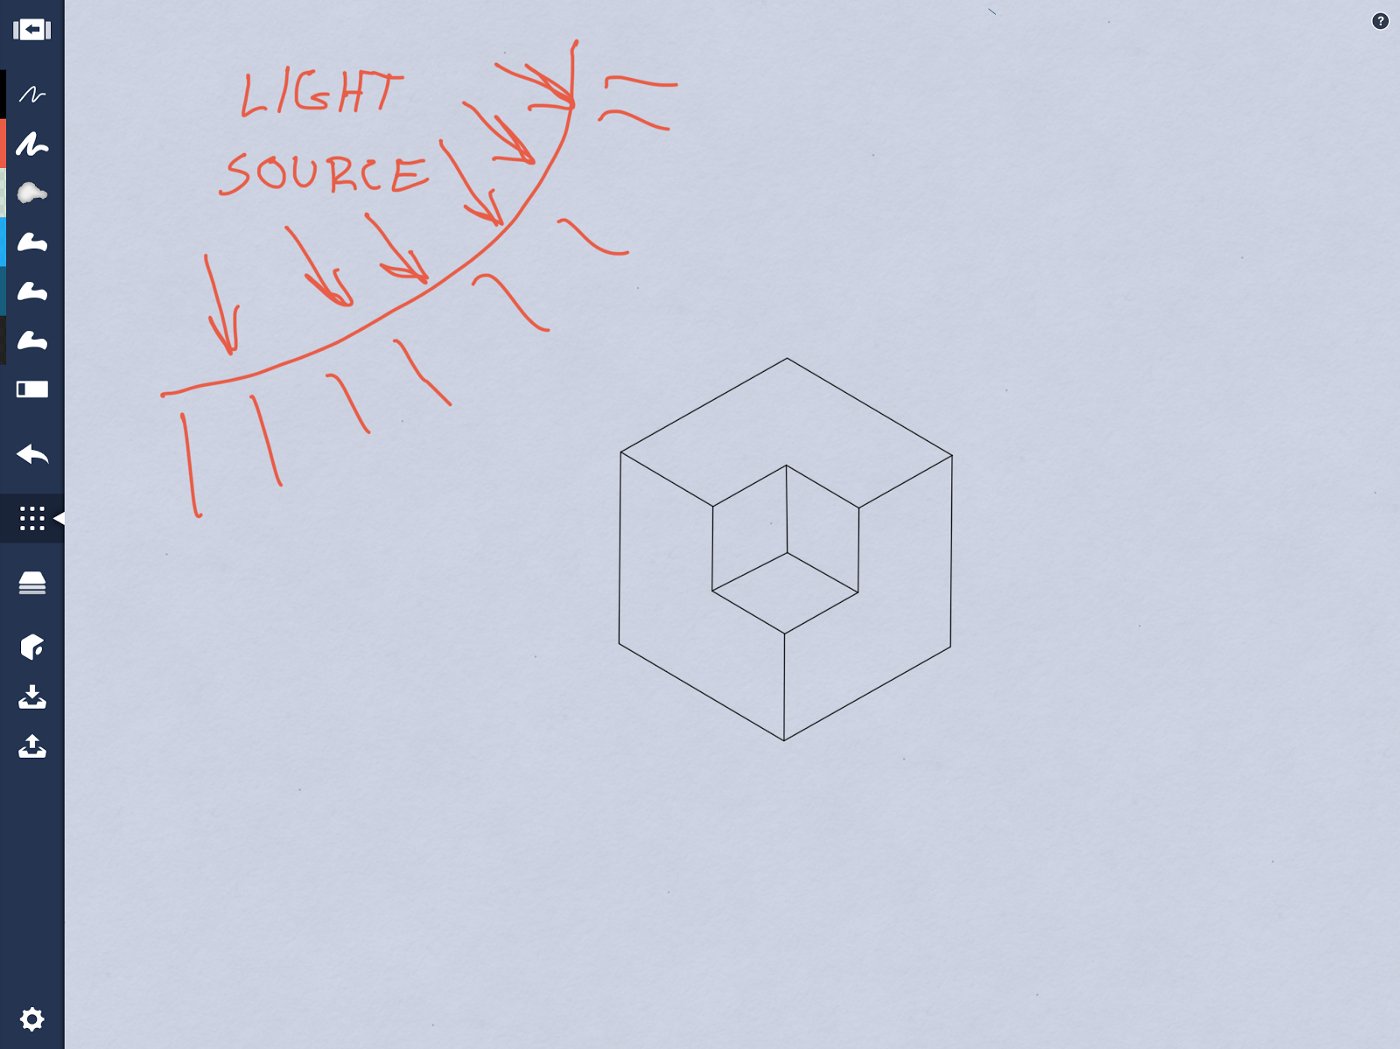
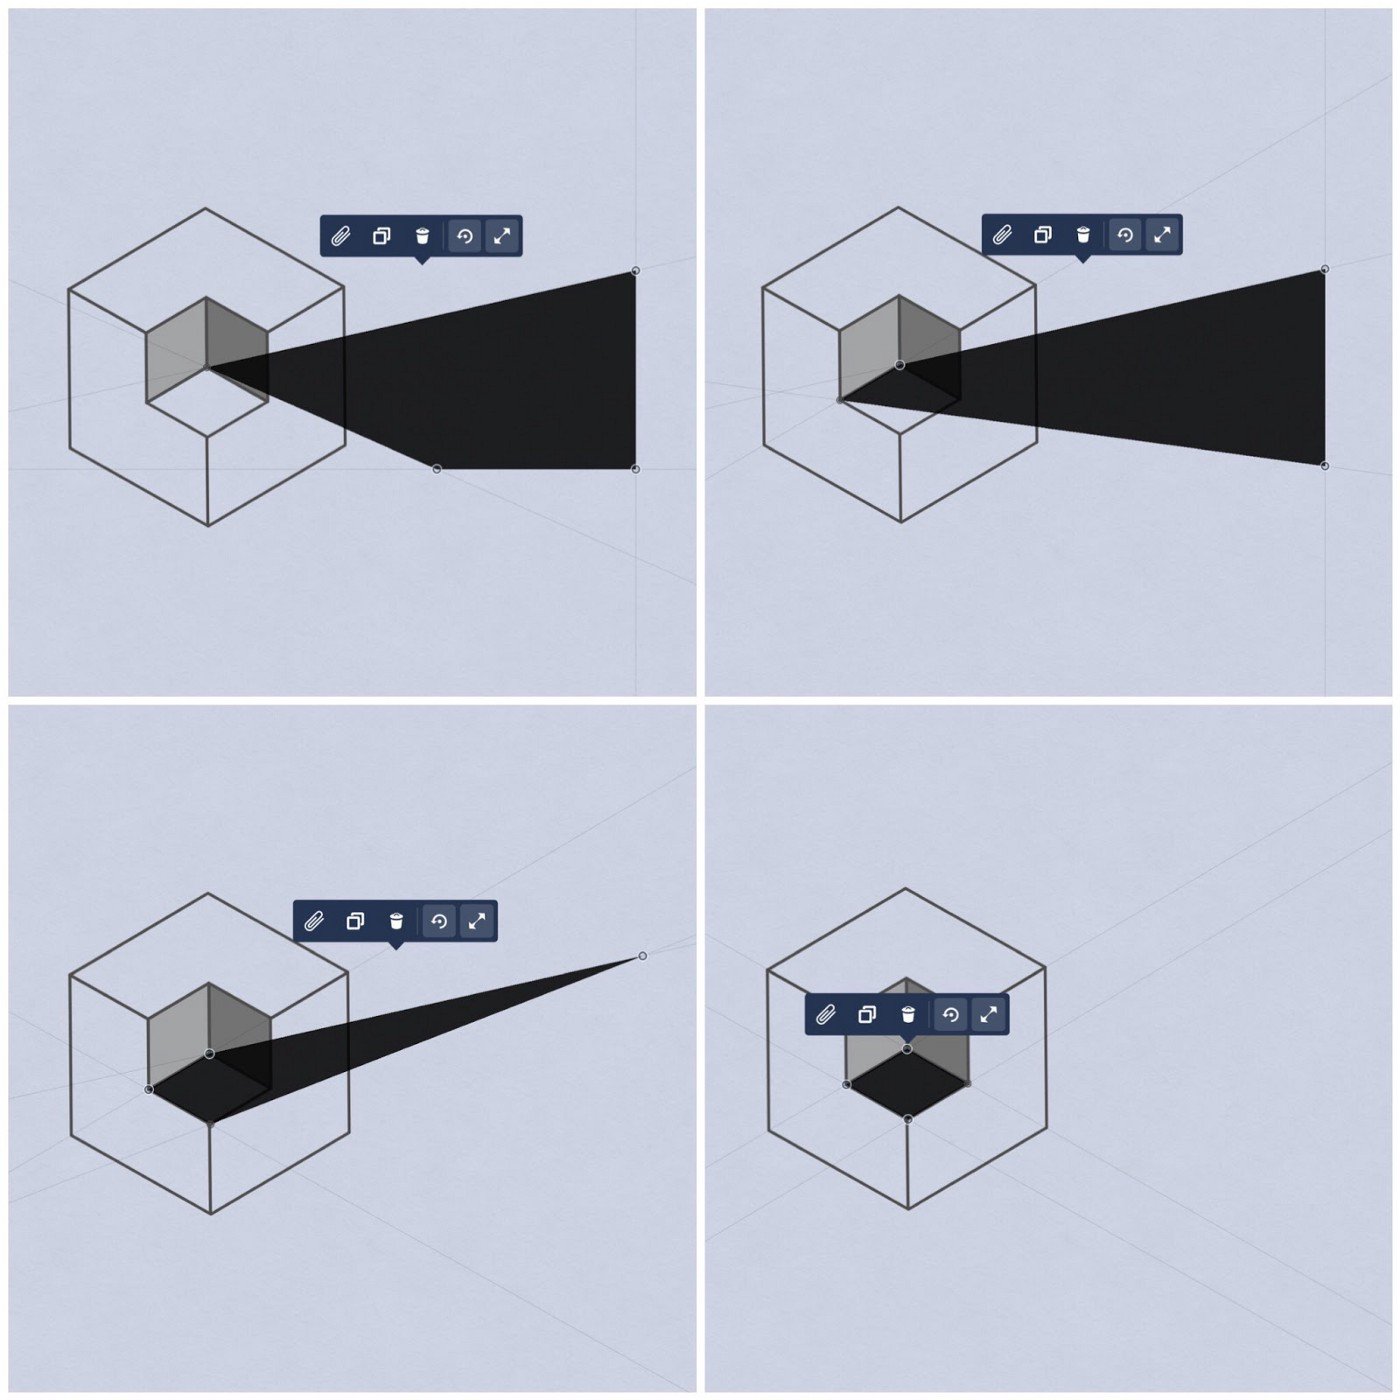
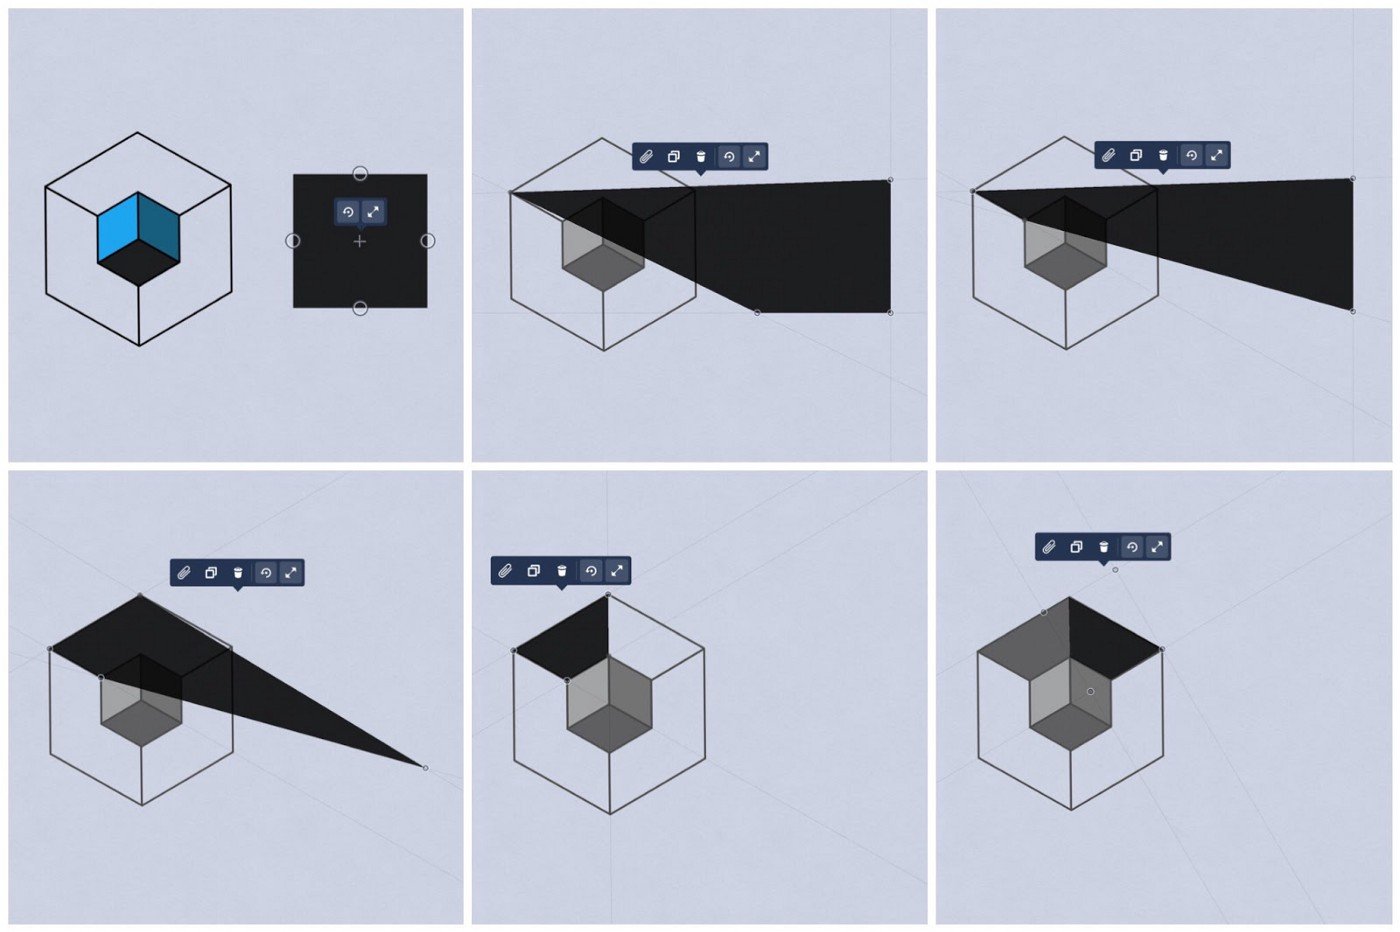
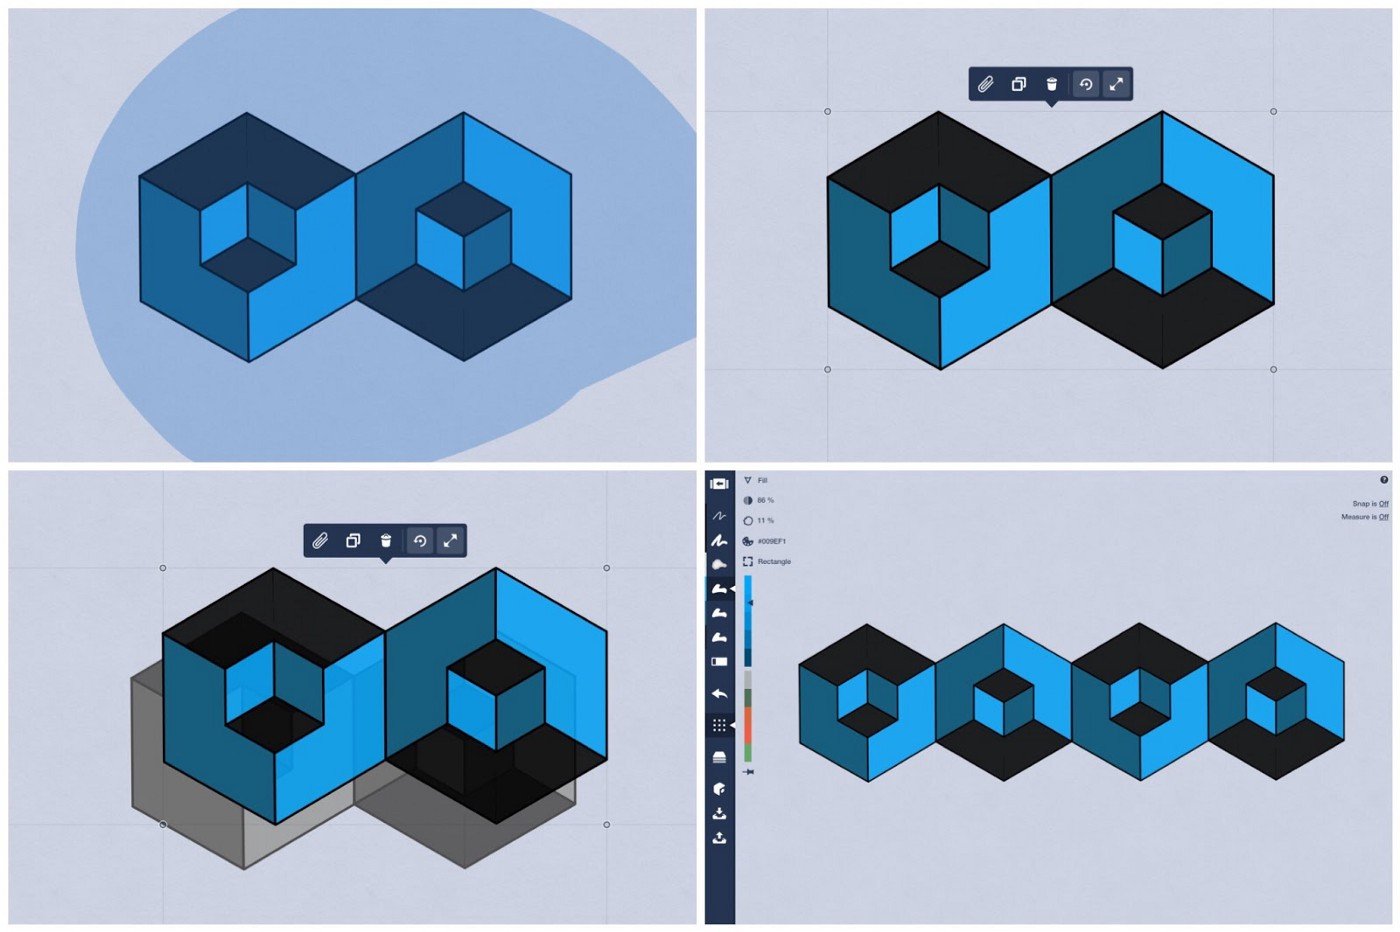
7. Now let’s add shading. Find where you’d like your light source to come from. Is it from the bottom? Top? Side? Or at an angle? I’m going with the top left for this demonstration. The lightest color will be nearest the light source, with the medium and darker colors on the opposite side.
8. Select the Fill tool with your light color. Activate the Rectangle shape guide, and fill in a square off to the side of your shape. Or you can choose a filled square from the Object Library.
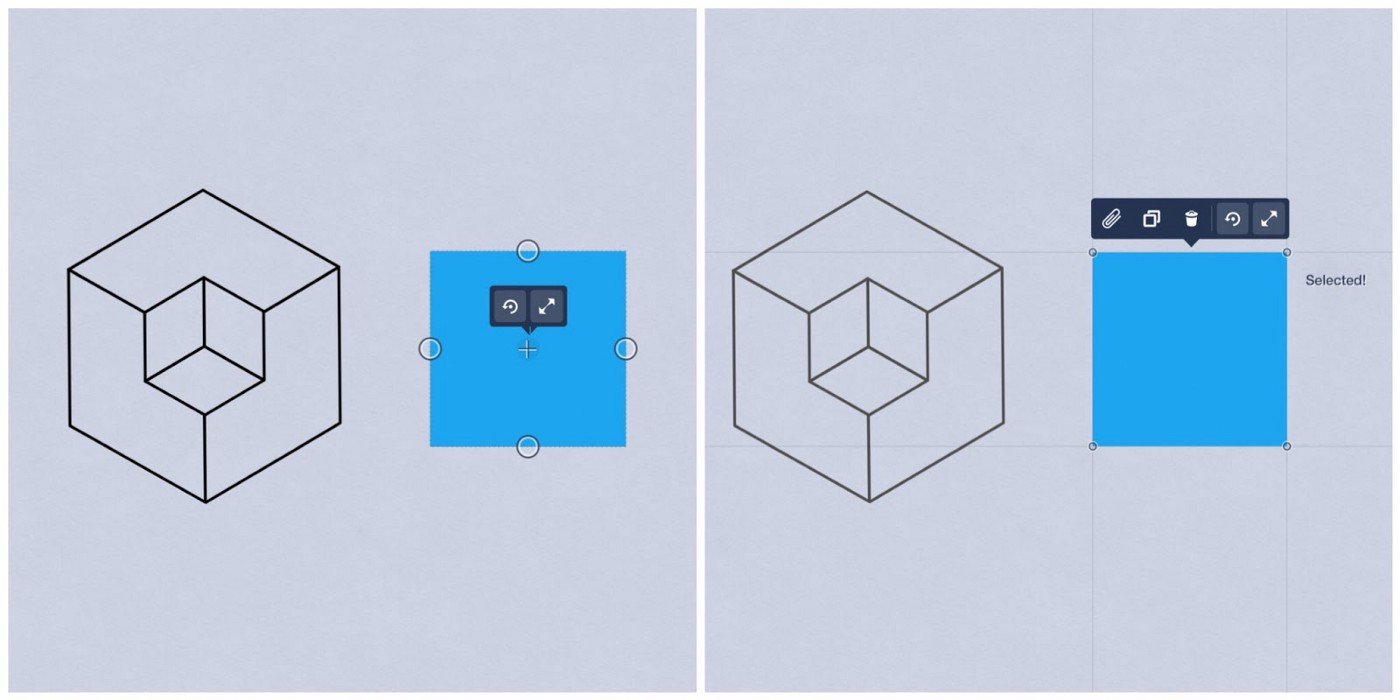
Turn the Rectangle guide off and select the light colored square.
Now tap one transform node at the corner of your selection (it’ll turn dark when selected) and drag the node to a corner of the small cube. Since Snap is on, it’ll snap right into place.
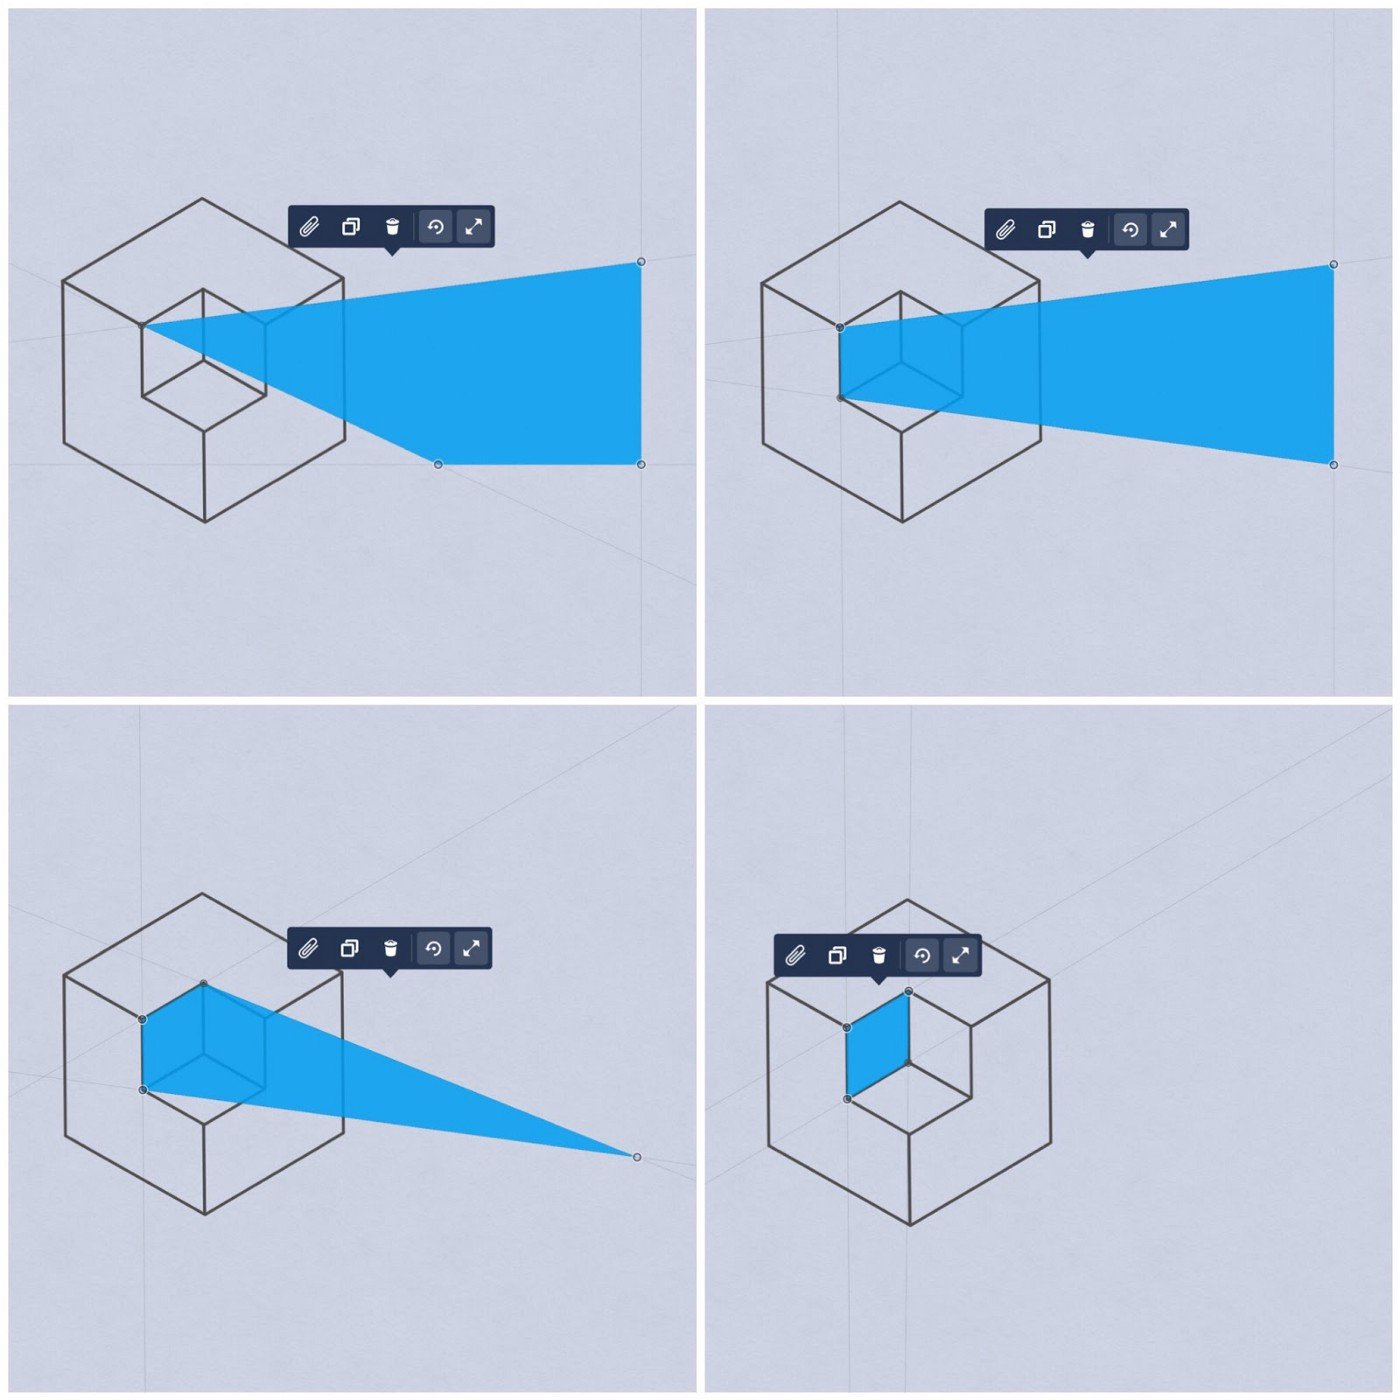
Tap the node again to deselect it, and tap on another node. Drag that one over to the next corner, and keep going until the cube is filled in.
Repeat the same process for the other sides of the smaller cube, using your medium and dark colors.
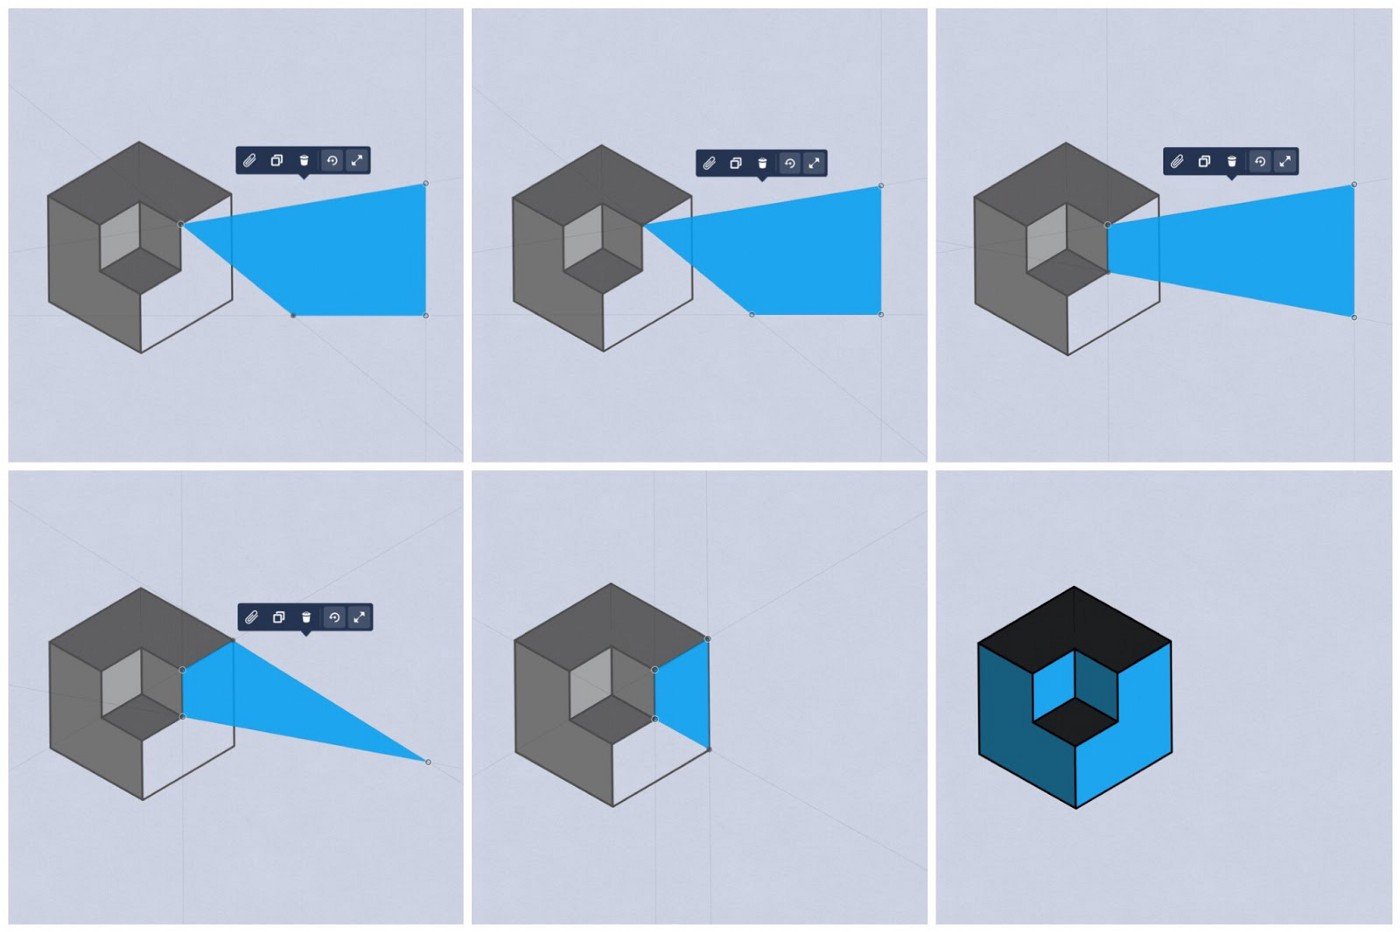
9. Our next step is to color the outer part of the shape using the same method. Think of the outer cube as an extension of the inner cube, as though it’s nesting inside a bigger surface. Add the light color to the area opposite the inner light edge, the medium color opposite the medium shape, and the dark color opposite the darkest shape.
Since there are more than four corners to each outer shape, let’s fill half the shape first, then fill the other half.
10. Now that we have our fully colored illusion cube, select and copy it, group it together, and flip it upside down.
Then snap it to the other cube.
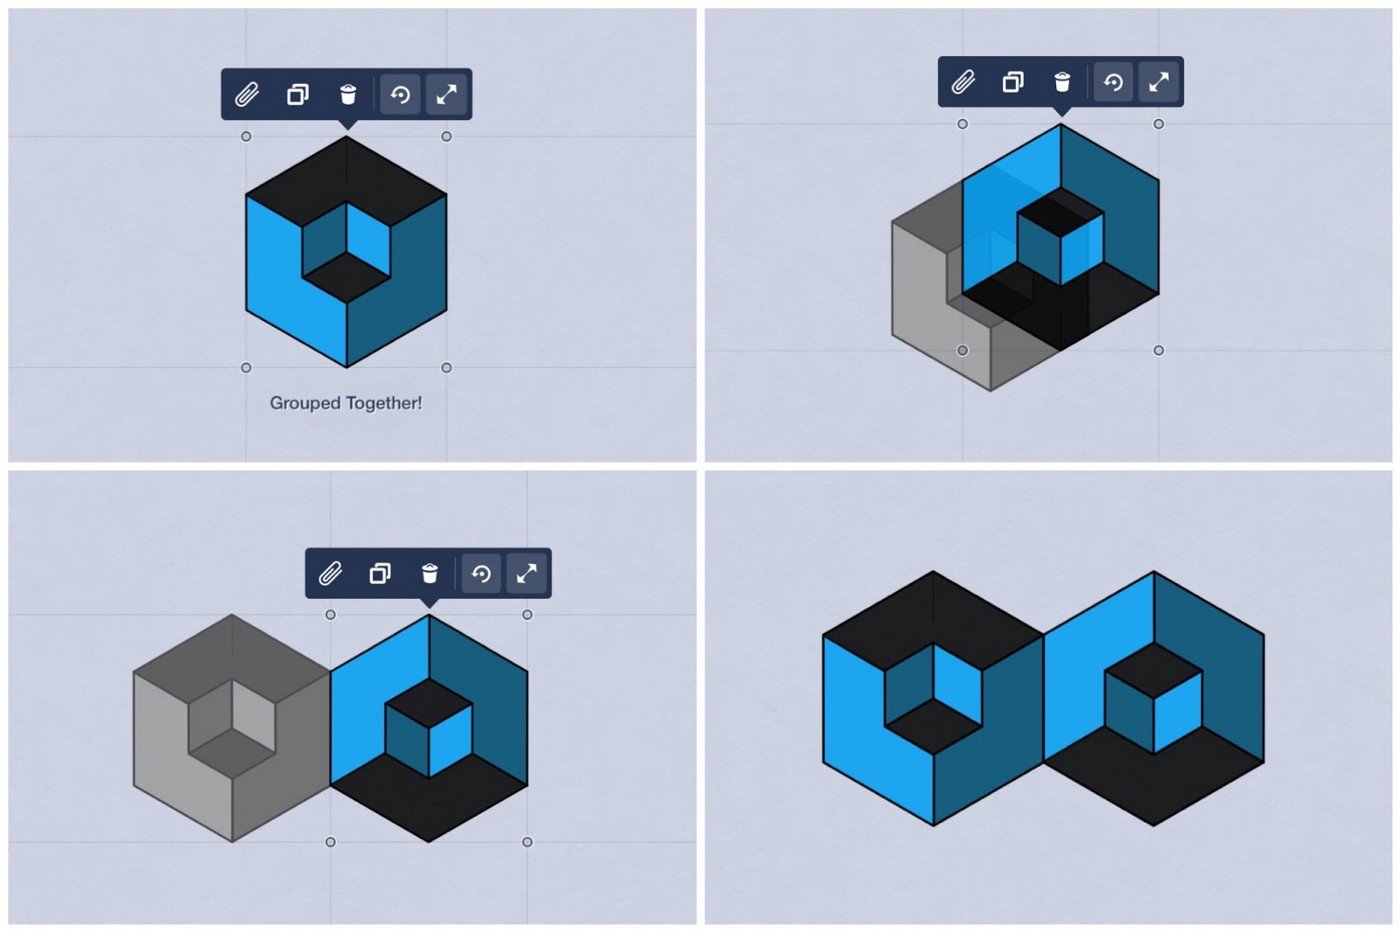
Now you can select both cubes at once, and copy and snap them together again, and so on!
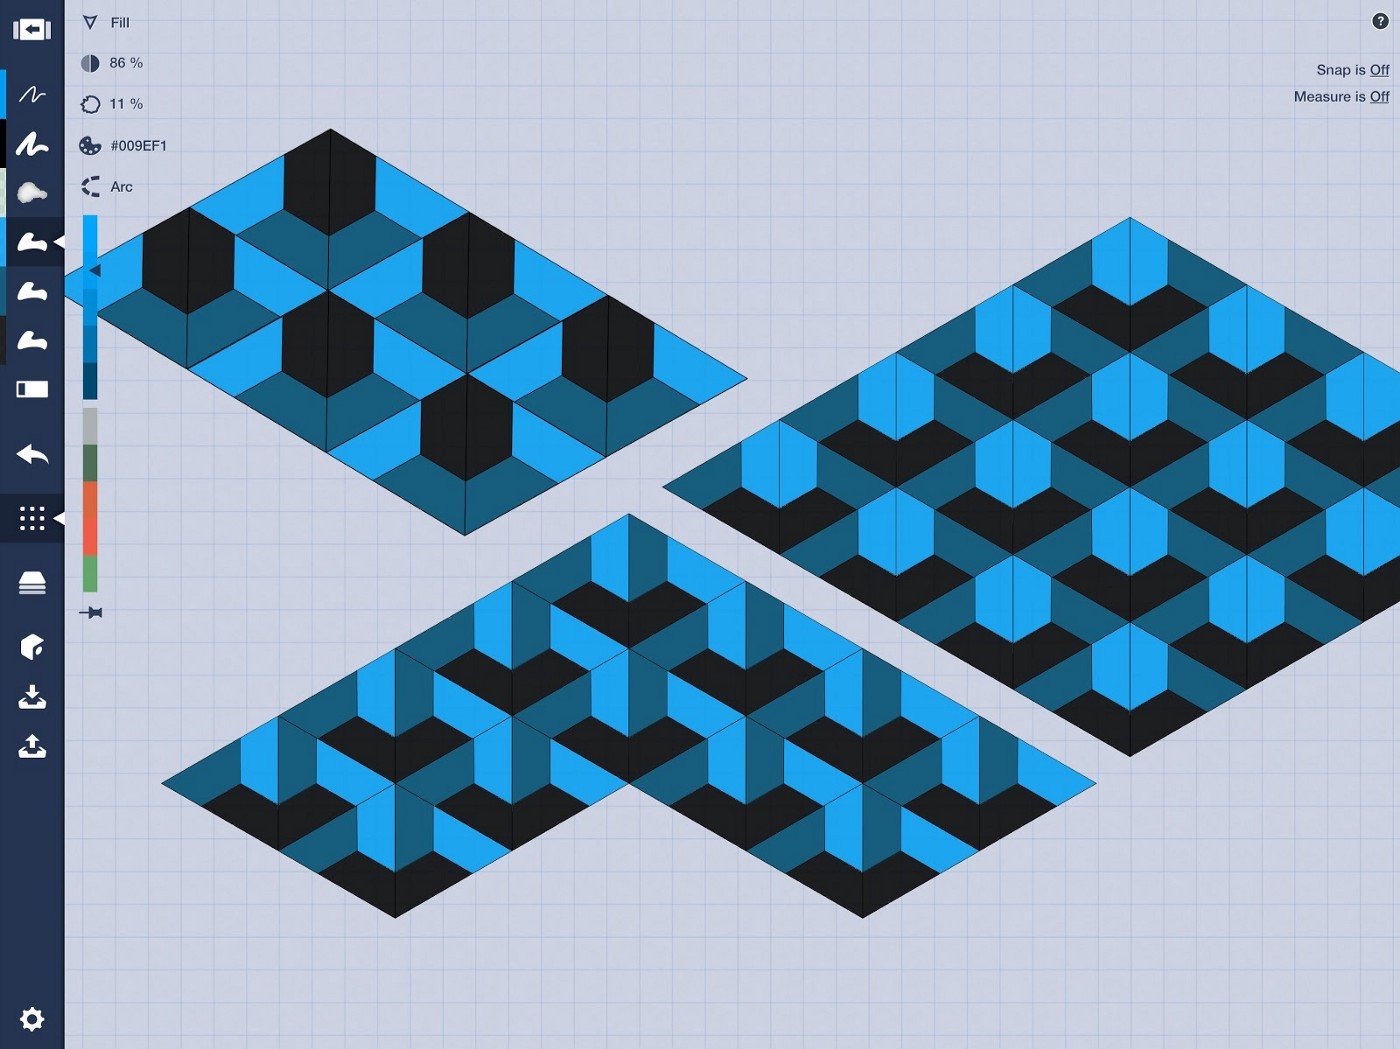
The rest is up to you to customize — color, size, orientation, etc. Play with it and have fun.
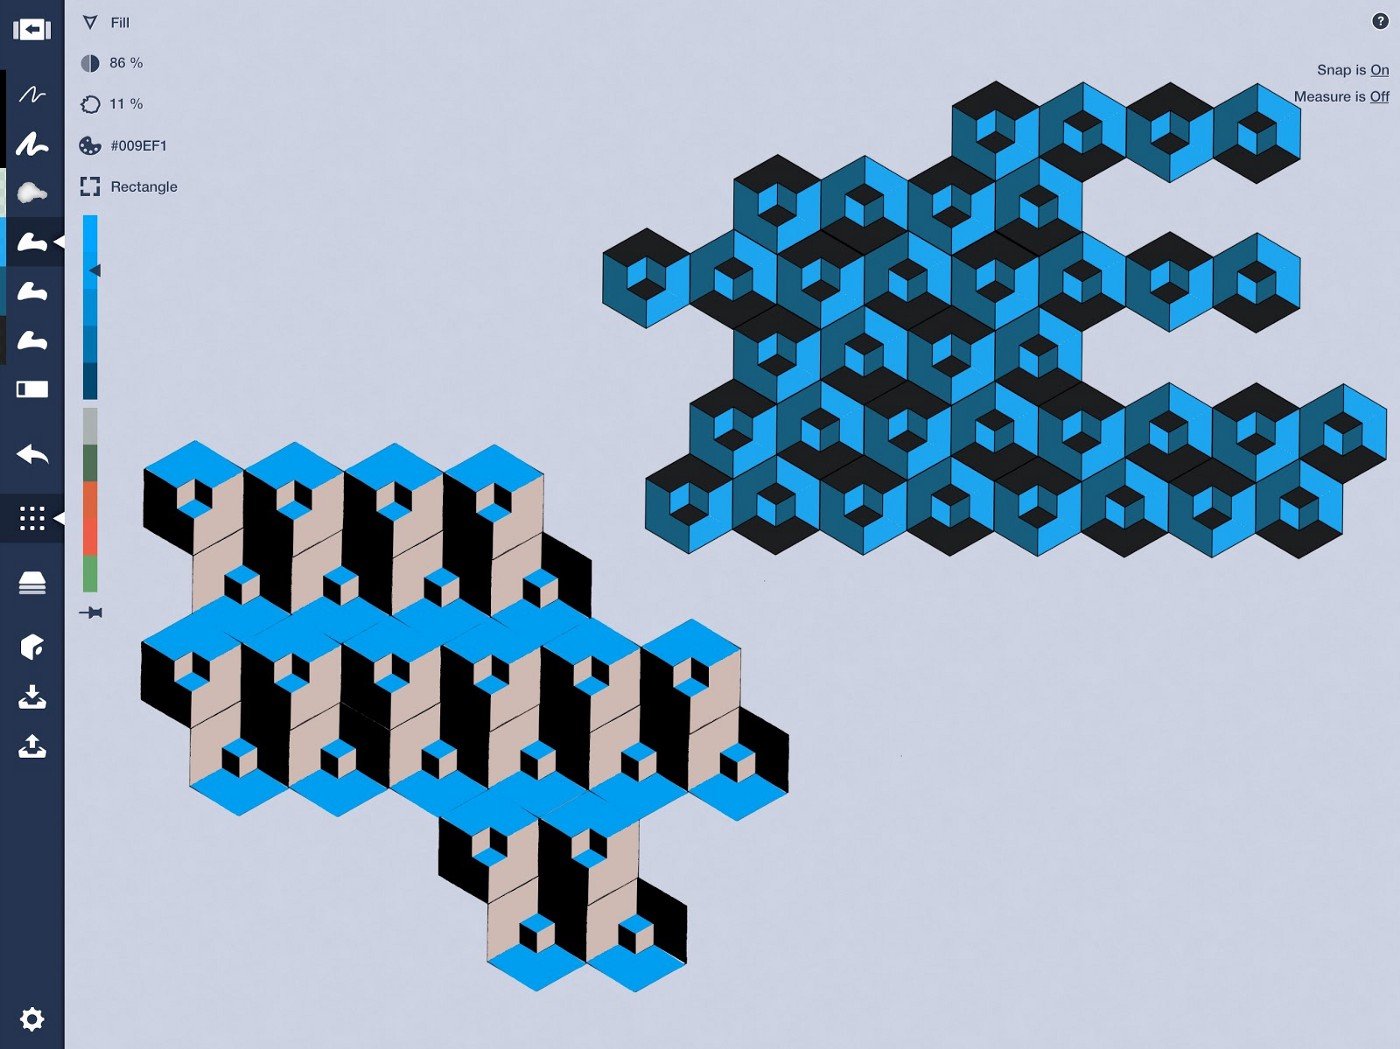
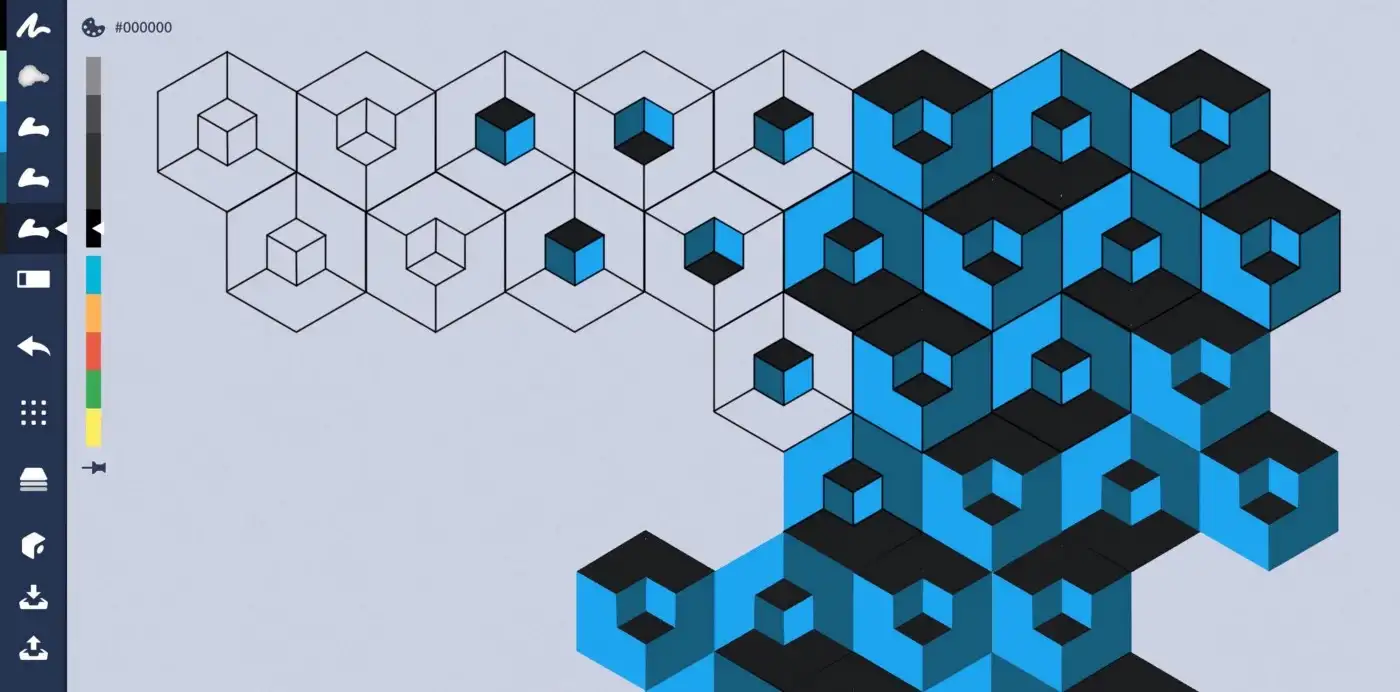
Here are different colors laid out in different patterns. Pretty cool what you can do with one shape.
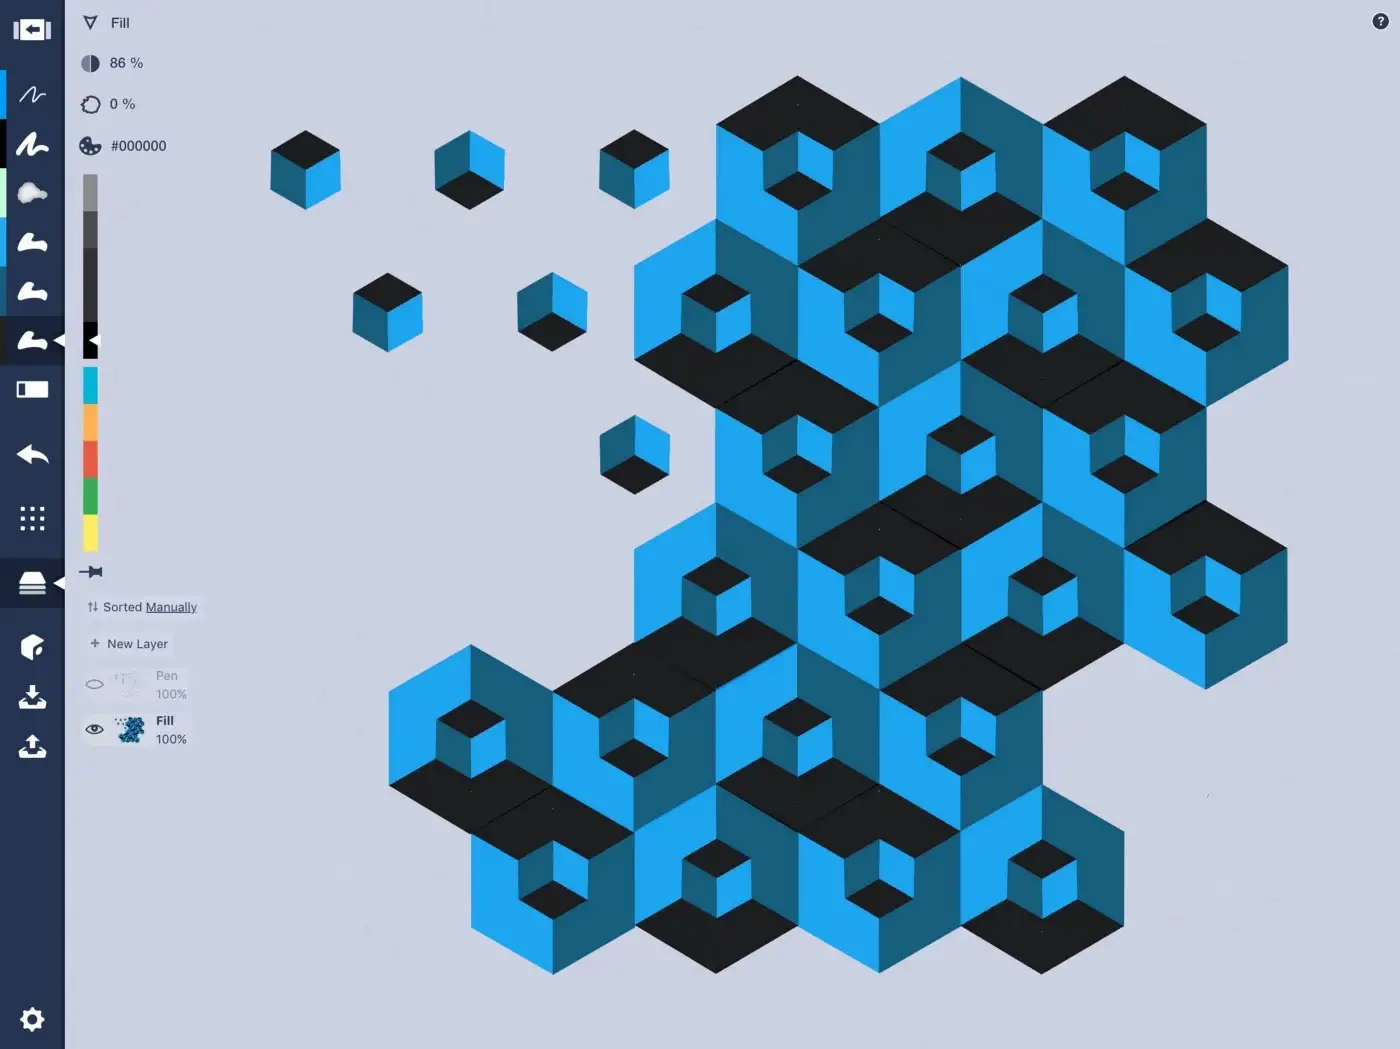
11. Finally, hide your line layer. Do you see how the illusion pops out? If you need to adjust your shapes a bit so they line up just right, it’s easy to select one and move it because they’re linked together. Pretty awesome!
Here is the process on video if you’d like to see it in real time.

Triangle Pattern
There are other shapes to explore as well. Let’s try an equilateral triangle.
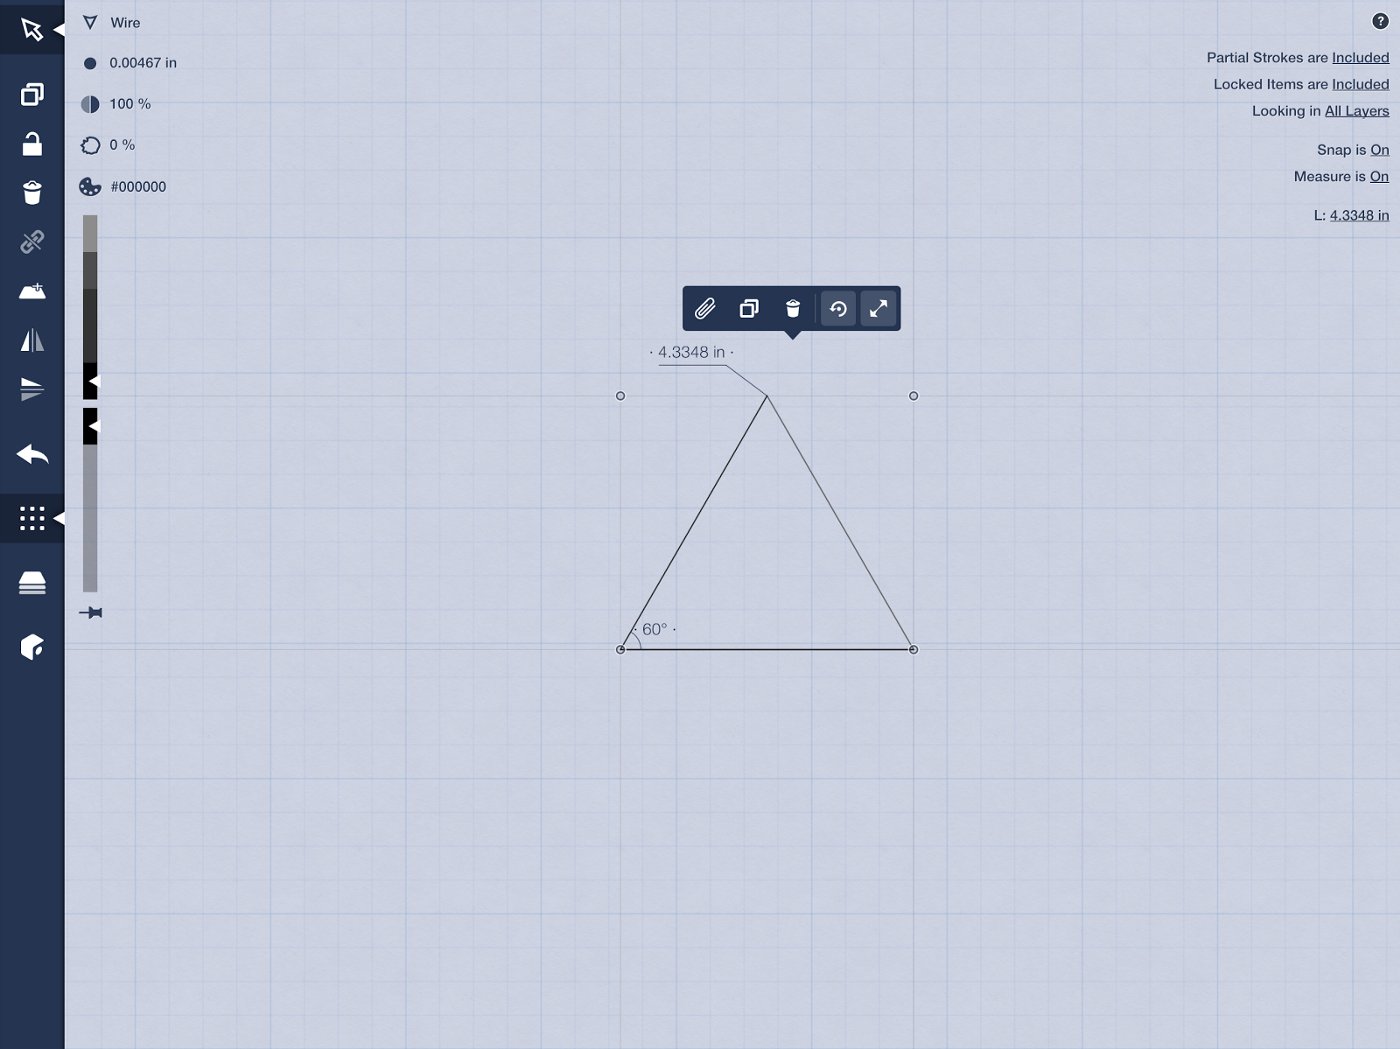
1. All sides are equal in this type of triangle, and each angle is 60 degrees. Select the Angle shape guide, and set the angle to 60 degrees by long-pressing on the measurement and entering in your number. (Don’t forget to turn Measure on in the HUD display.)
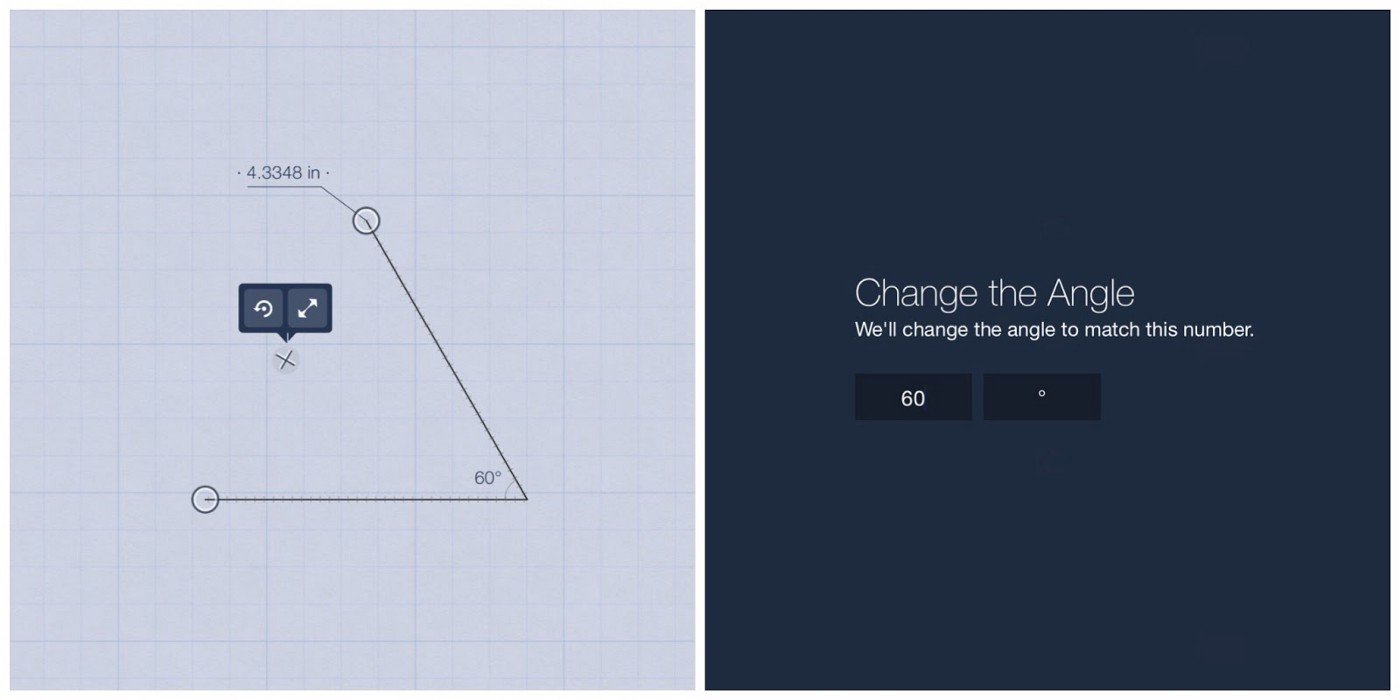
2. Now trace the guide.
Then turn the guide off, copy your line and flip it, and snap it to the first angle. Voila! You have your equilateral triangle.
3. Next, use the line tool to intersect the triangle in three places to find the middle.
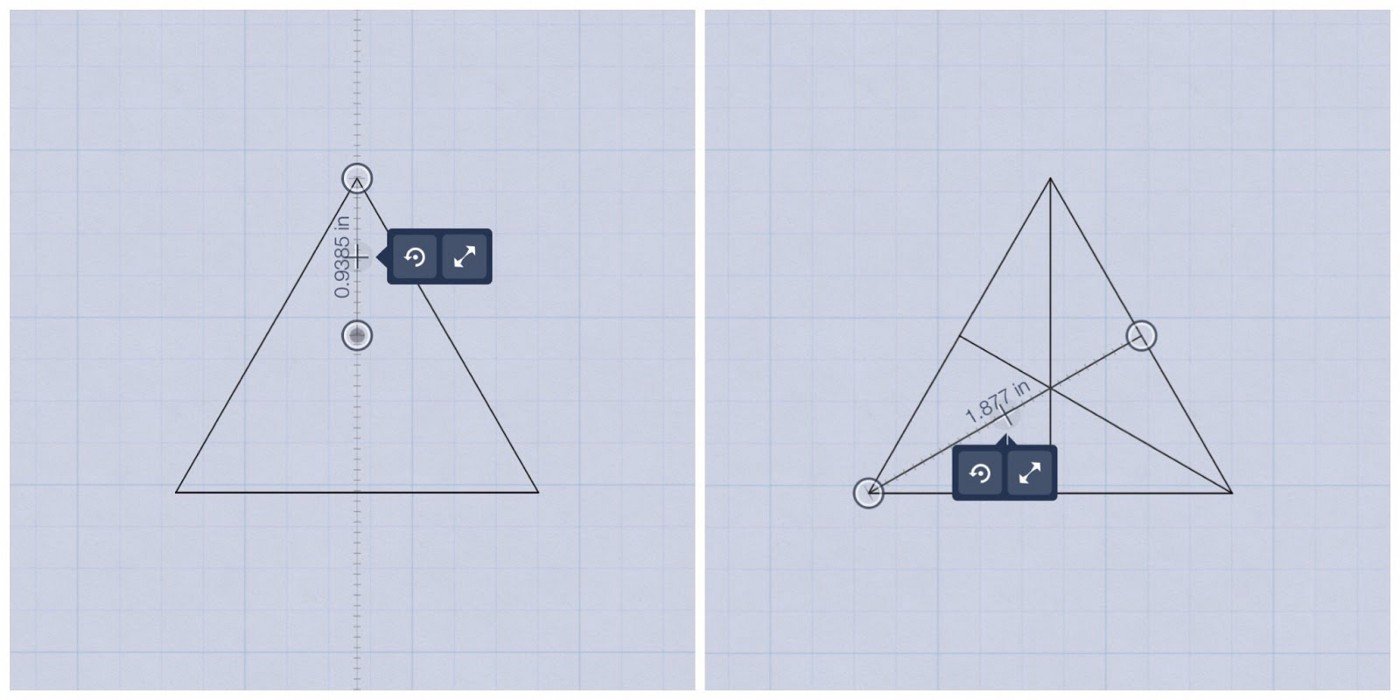
4. Set the Angle guide to 120 degrees and snap it to the corner, but just draw the portion of line that extends upward into the center of the triangle.
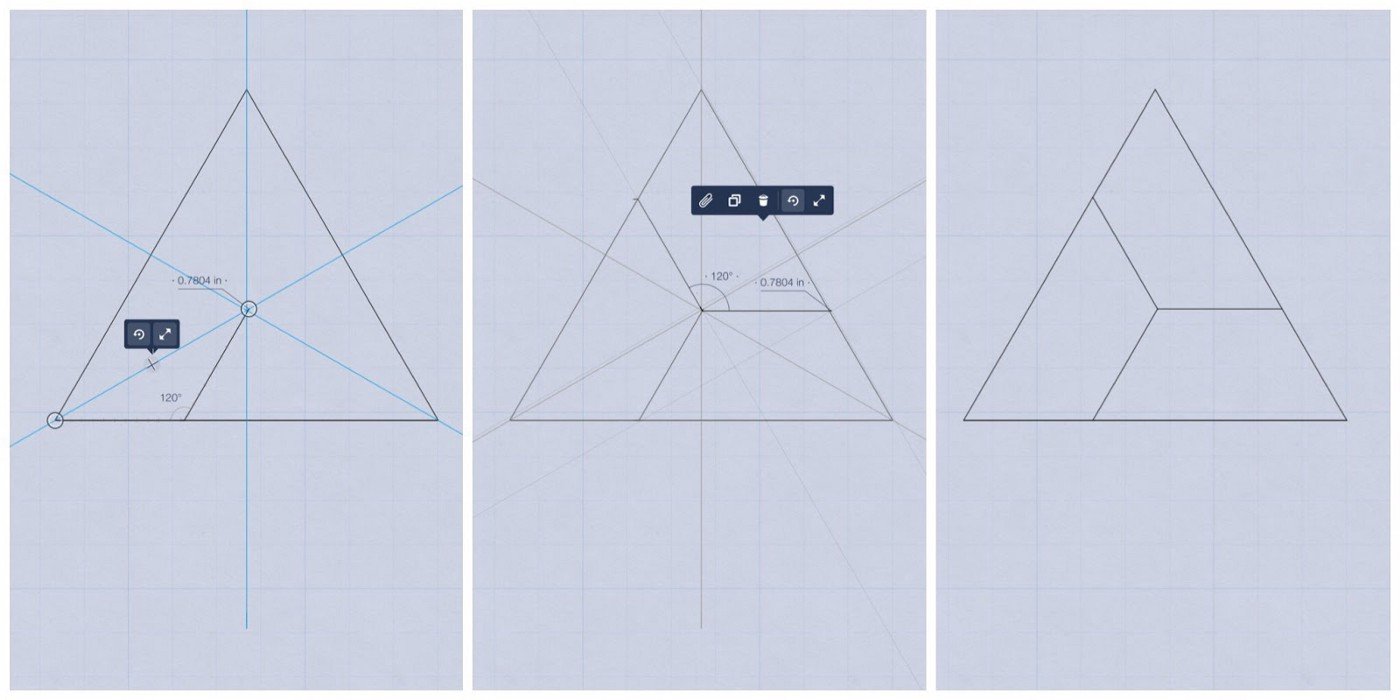
Then move the Angle guide so its corner rests at the tip of the line you just drew, right in the center of the triangle. The 120 degrees will bisect the other two sides of the triangle in just the right places, forming three equal quadrilaterals inside the triangle.
5. Using the same method we used to fill the cubes in our hexagonal shape, fill the insides of the triangle with light, medium and dark shades.
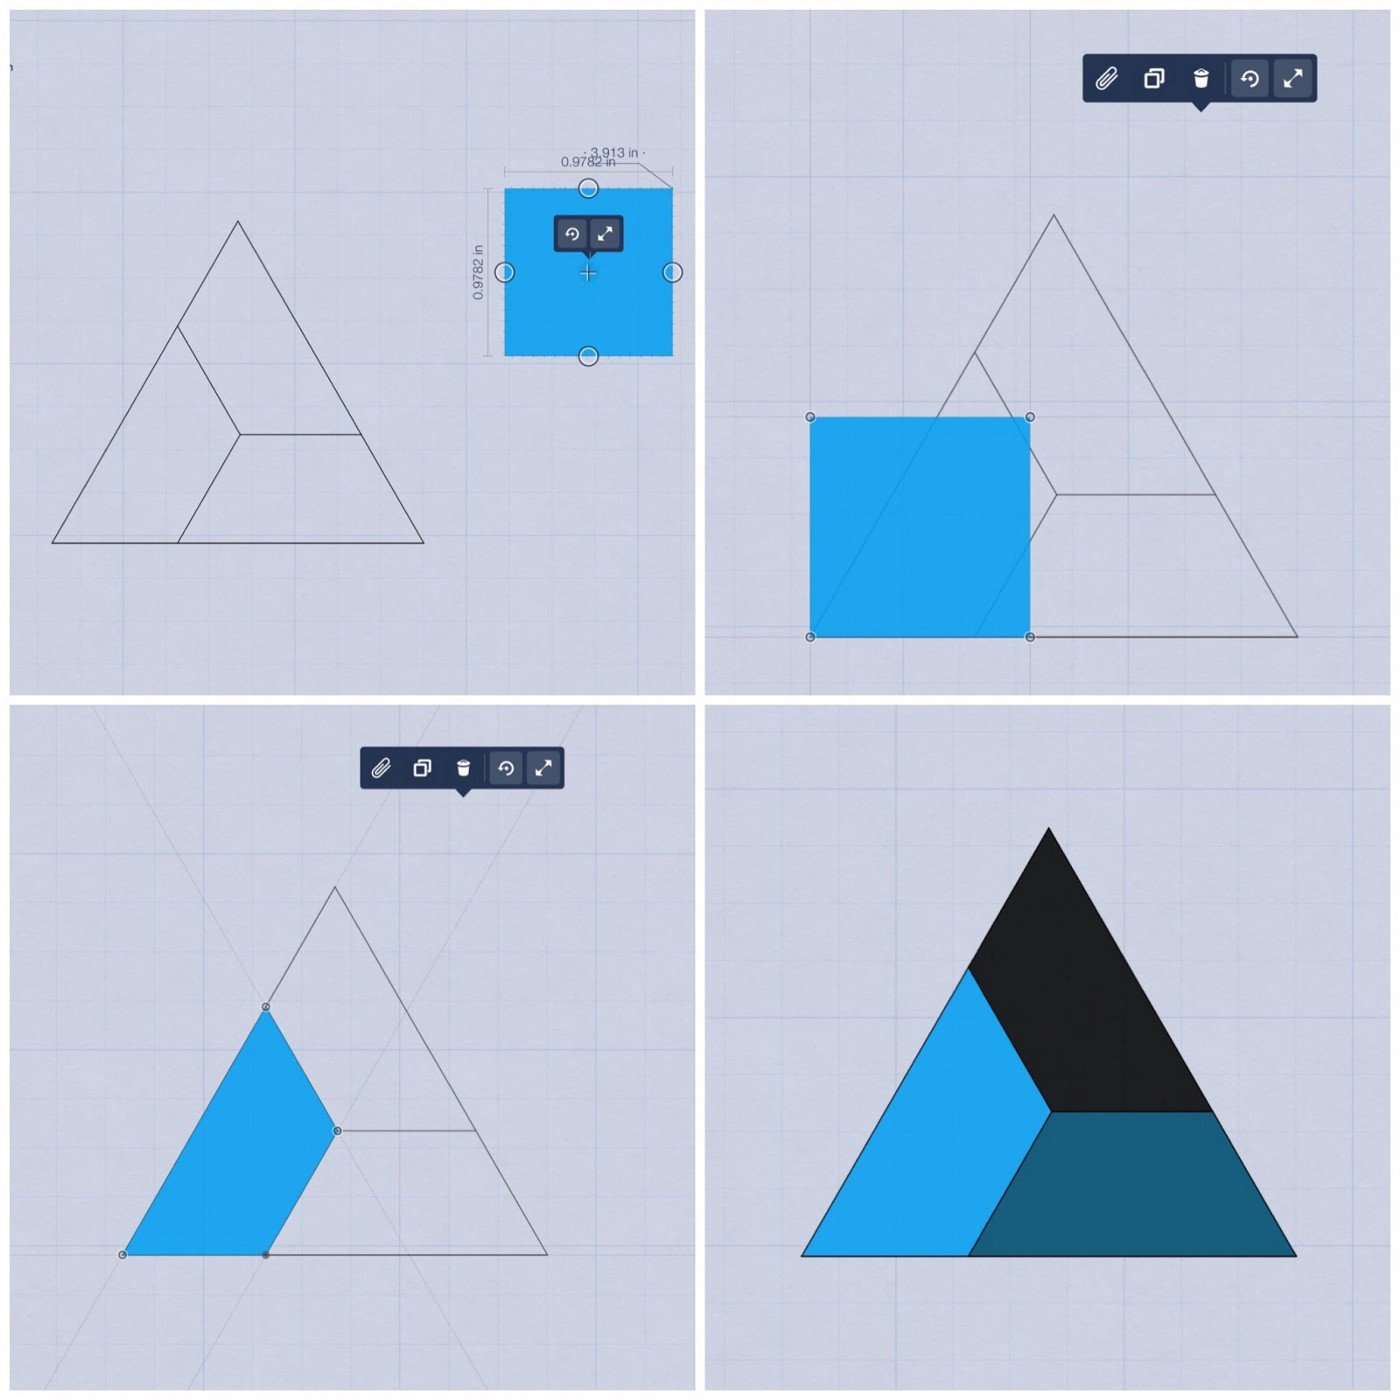
Remember the process? 1) Fill in a square with the Rectangle guide and Fill tool. 2) Snap the corner of the square to a corner of a polygon. 3) Use the transform points to distort and snap your rectangle to the corners of the shape.
6. Then group your shape together, copy it, flip it, and snap it to the first shape.

Keep going!
Flip the triangle this way or that way to get the look you like.
7. Now go ahead and hide the outline layer. You can see how the geometric illusion really stands out!
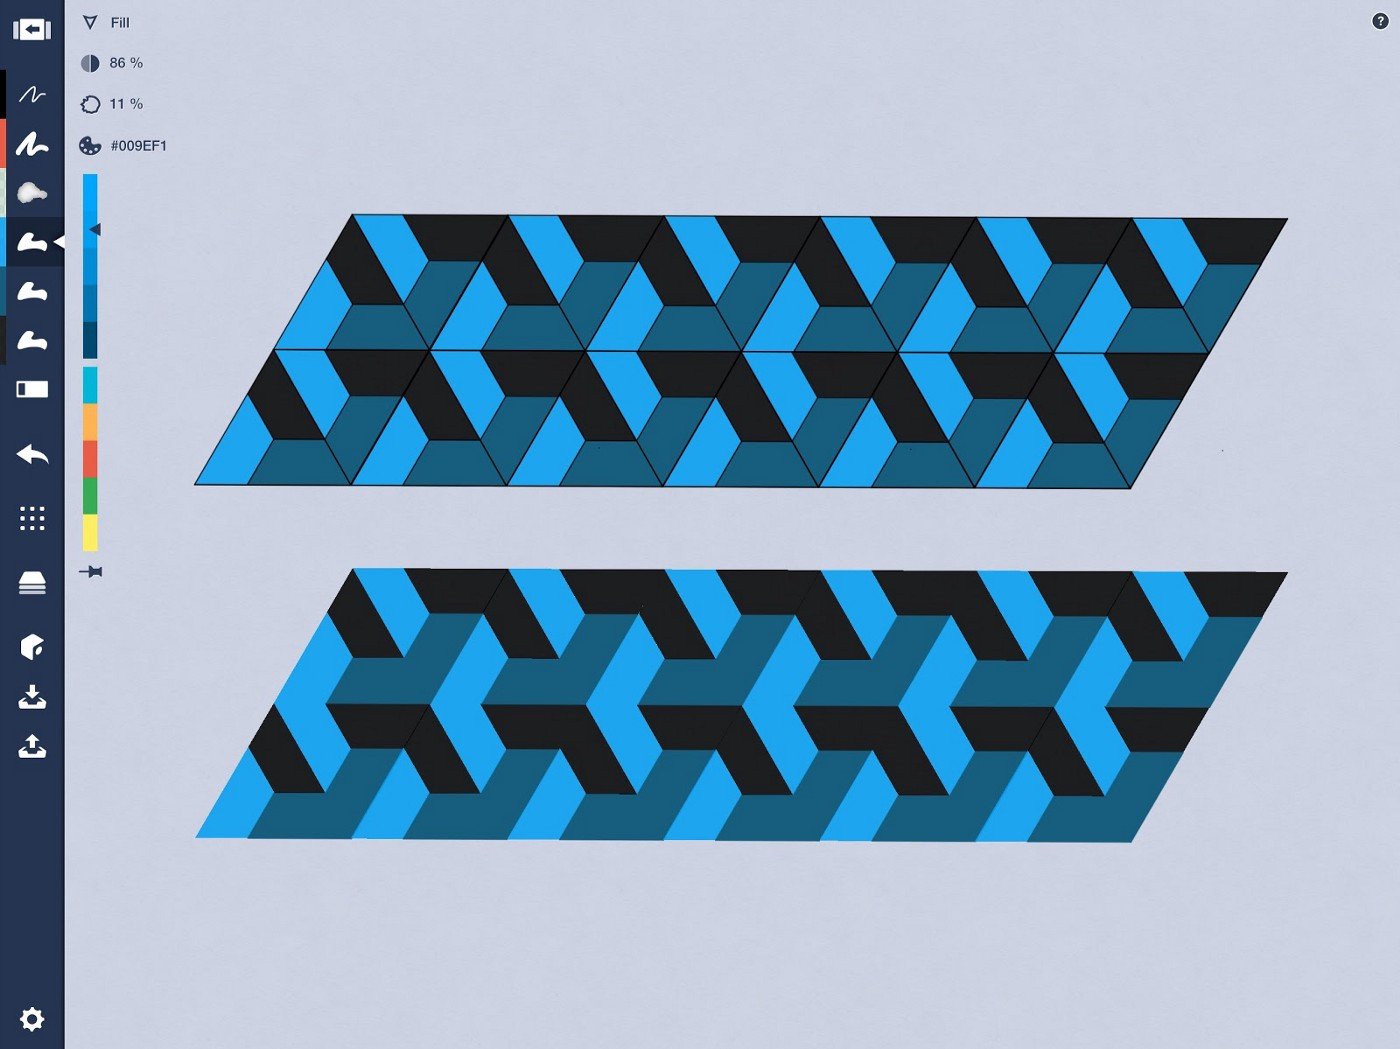
Can you still see the triangles you drew? Your eye is drawn to the inner relief.
Here is the process for the triangle pattern in video.

Your imagination is the limit with these patterns, you can create them in any combination of shape, pattern or texture you choose. I hope you enjoy making them as much as I have, good luck and have a great time!

With a strong background as a precision machinist and 20 years in a highly skilled field requiring much attention to detail, Michael Dearborn now uses his eye for design in the fast and furious, demanding, beautiful and ever mercurial Event Design industry. And, in his spare time, he rescues kittens.
Interview by Erica Christensen
Recommended
Scale and Measurement in Concepts - Learn how to apply accurate scale and measurements to your plans and drawings.
How to Draw a Mandala in Concepts - Learn how to create intricate mandalas in Concepts with this tutorial from artist Jill Buckley.
Using the Object Library and Make Your Own Objects - All about Concepts’ object libraries and how to make your own vector objects.