Architectural Design Series
Exterior Architectural Visualization
Learn how to create an exterior architectural rendering in Concepts based on a 3D SketchUp model.

Watch this tutorial on YouTube. Read below for additional insights by Osama Elfar along with tutorial details, tips and brush settings from the video.

Interview
What is your Architectural design process like? When do you use a 3D massing study versus a floor plan or Axonometric view?
In an architectural workflow, the Architect begins with a briefing with the client to understand needs related to the size, style, function and budget of the project. The Architect's mission is to translate these needs into lines and drawings. Usually this starts with a floor plan, which shares basic room configurations that create the bones of the building.
After reaching a satisfactory level with the floor plan, the Architect moves to the next step, which is building the overall shape of the building. There are a couple ways to do this - via a 2D elevation or a 3D massing.
My preferred way is to build a box out of the floor plan using SketchUp or Autodesk FormIt (on a tablet), and show the actual floors and height of the building. Then I generate an image from this app to use in Concepts. Sketching over the massing in Concepts gives me an idea of the shape of the building and allows me to remove, add or adjust masses, and to add details.
I also use this technique to communicate with the team involved in the building design. We discuss details back and forth in Concepts until we reach a consensus, then take the design to the computer to create a 3-dimensional CAD drawing and/or other renderings necessary to complete the project design.
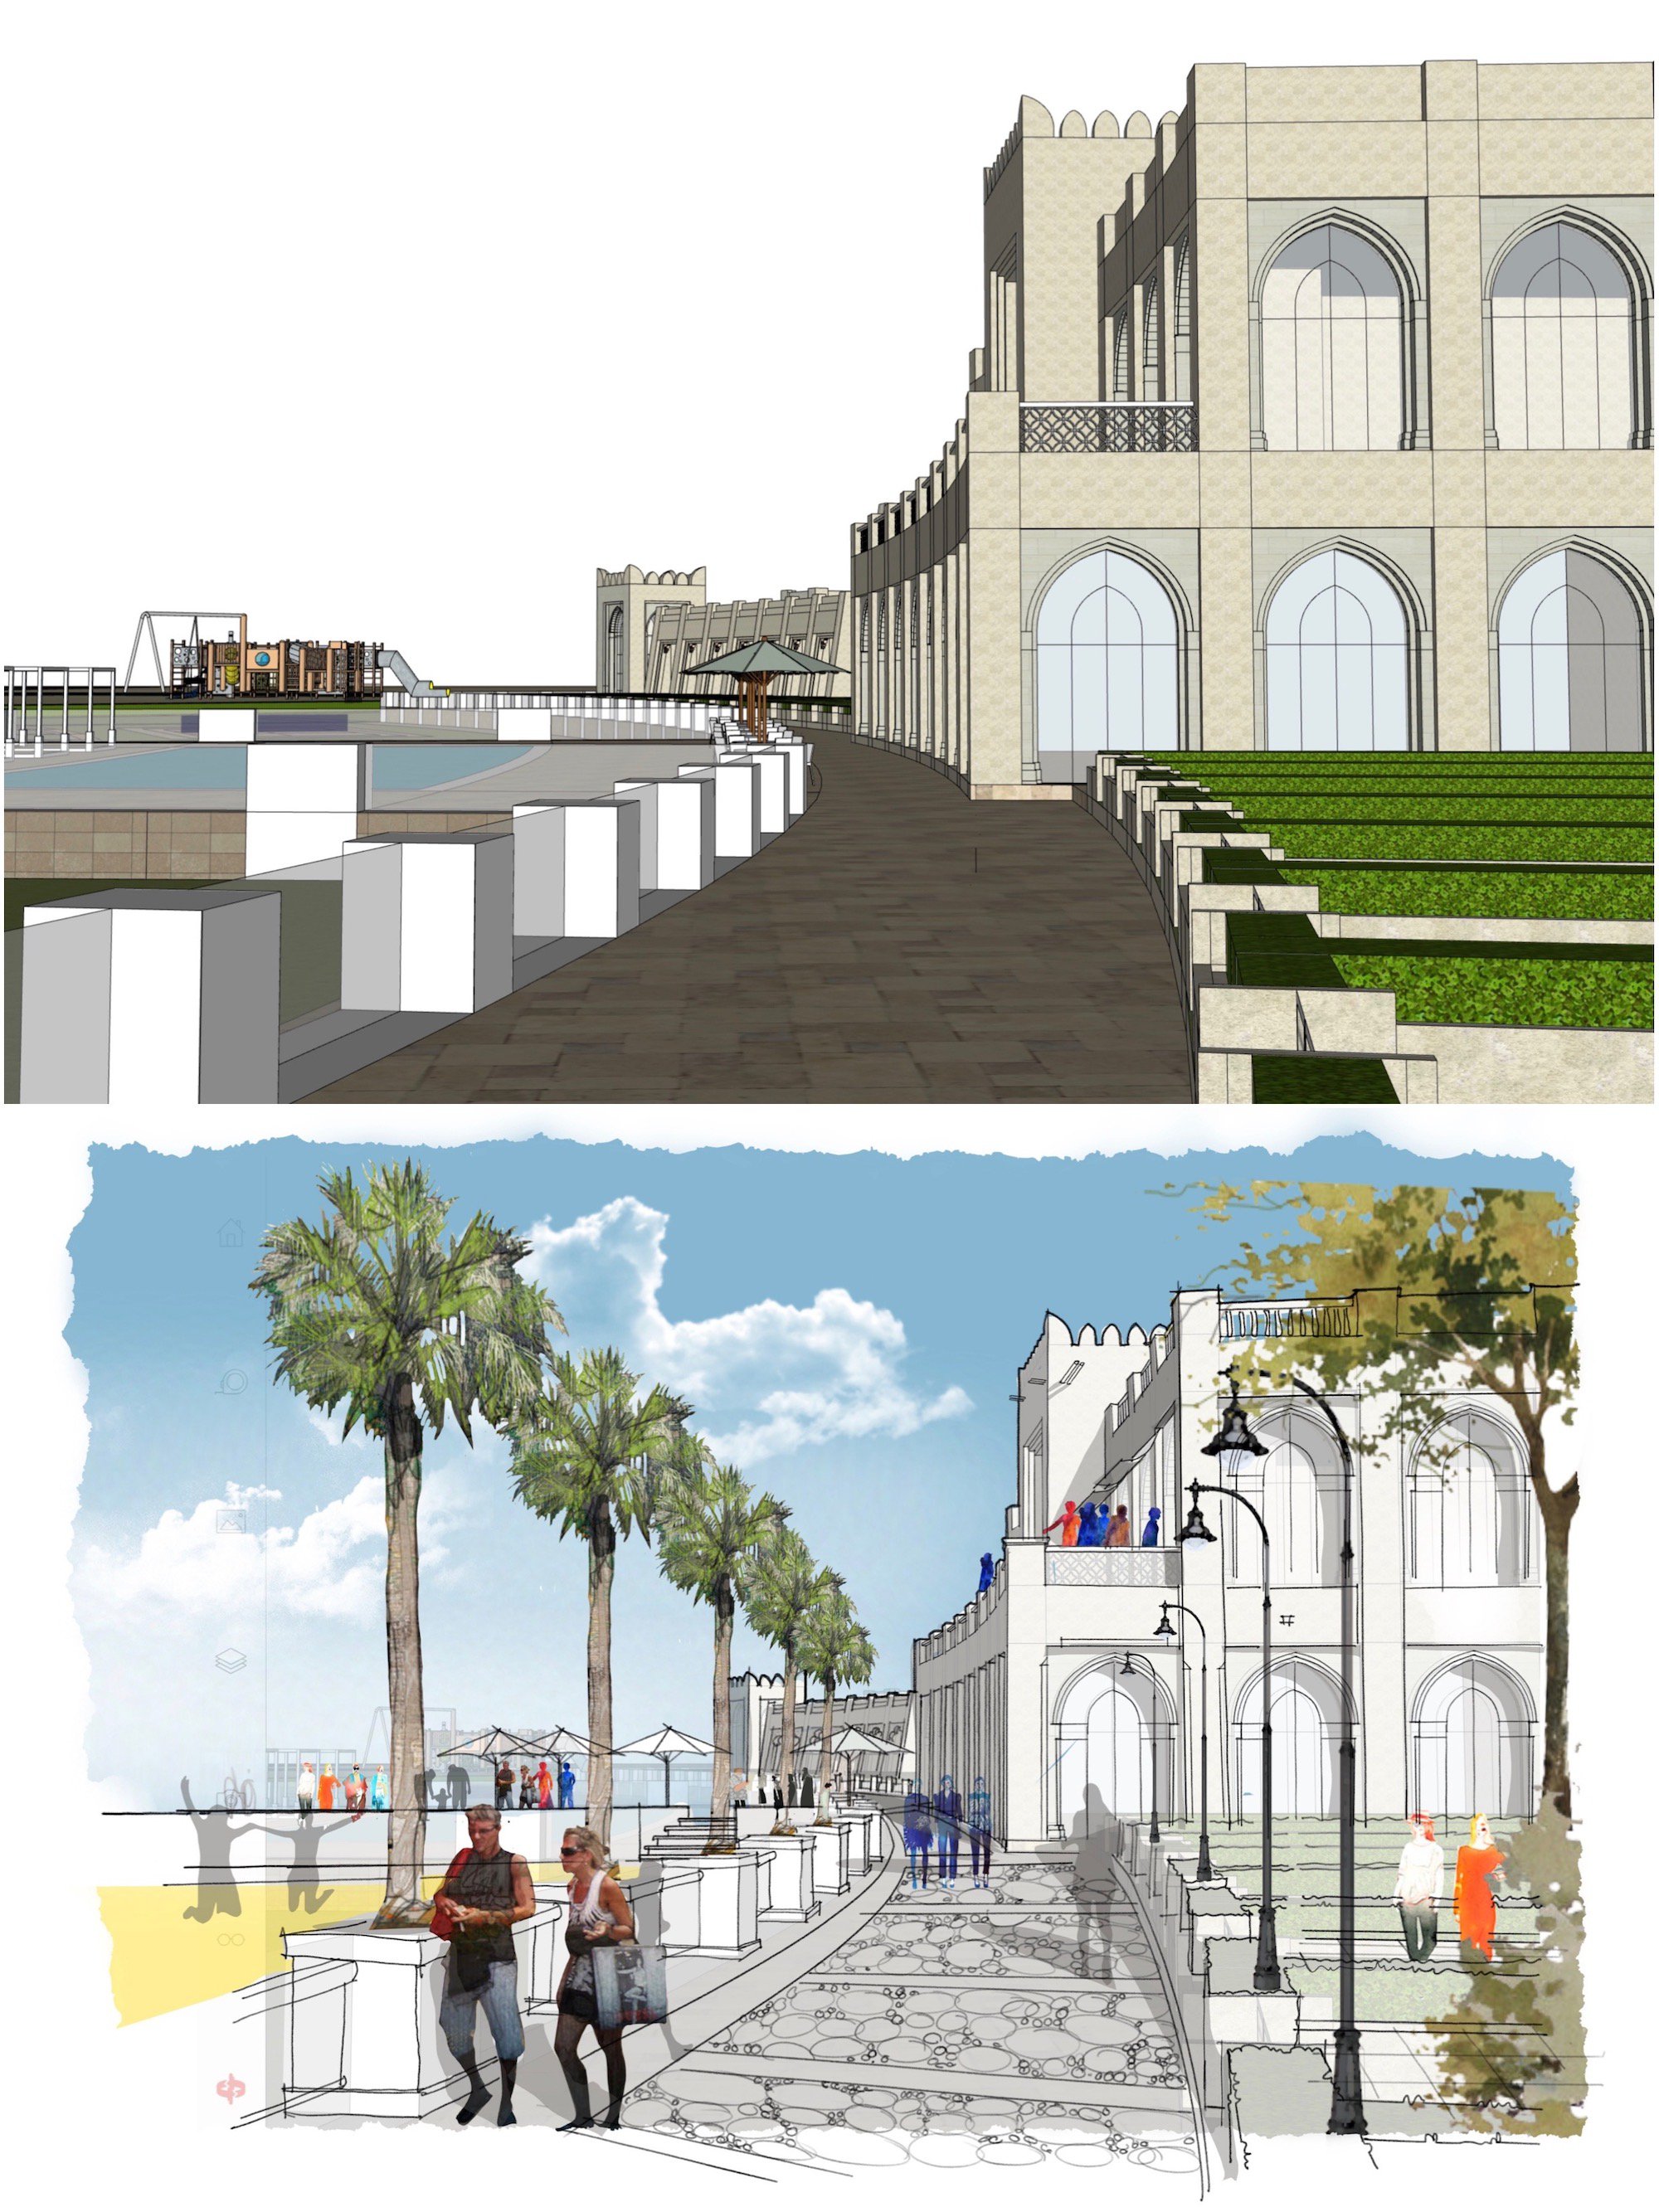
An example of a massing study imported into Concepts and rendered as in the video.
How is the Exterior presentation shown in the video helpful for your design projects?
In this project, our design team decided to present the project to the client using Concepts. The app made it simple and quick to render the drawing, and the vector-based tools gave us the flexibility to draw and edit each part of the drawing at any time during discussions.
Importing images, background, logos, plants and people from your library makes presentations super fast. Having Concepts ready with your material and background libraries on hand always impresses the client, even when drawing rough sketches during meetings with them. It is a quick way to add polish and color, and to capture their imagination over the final design.
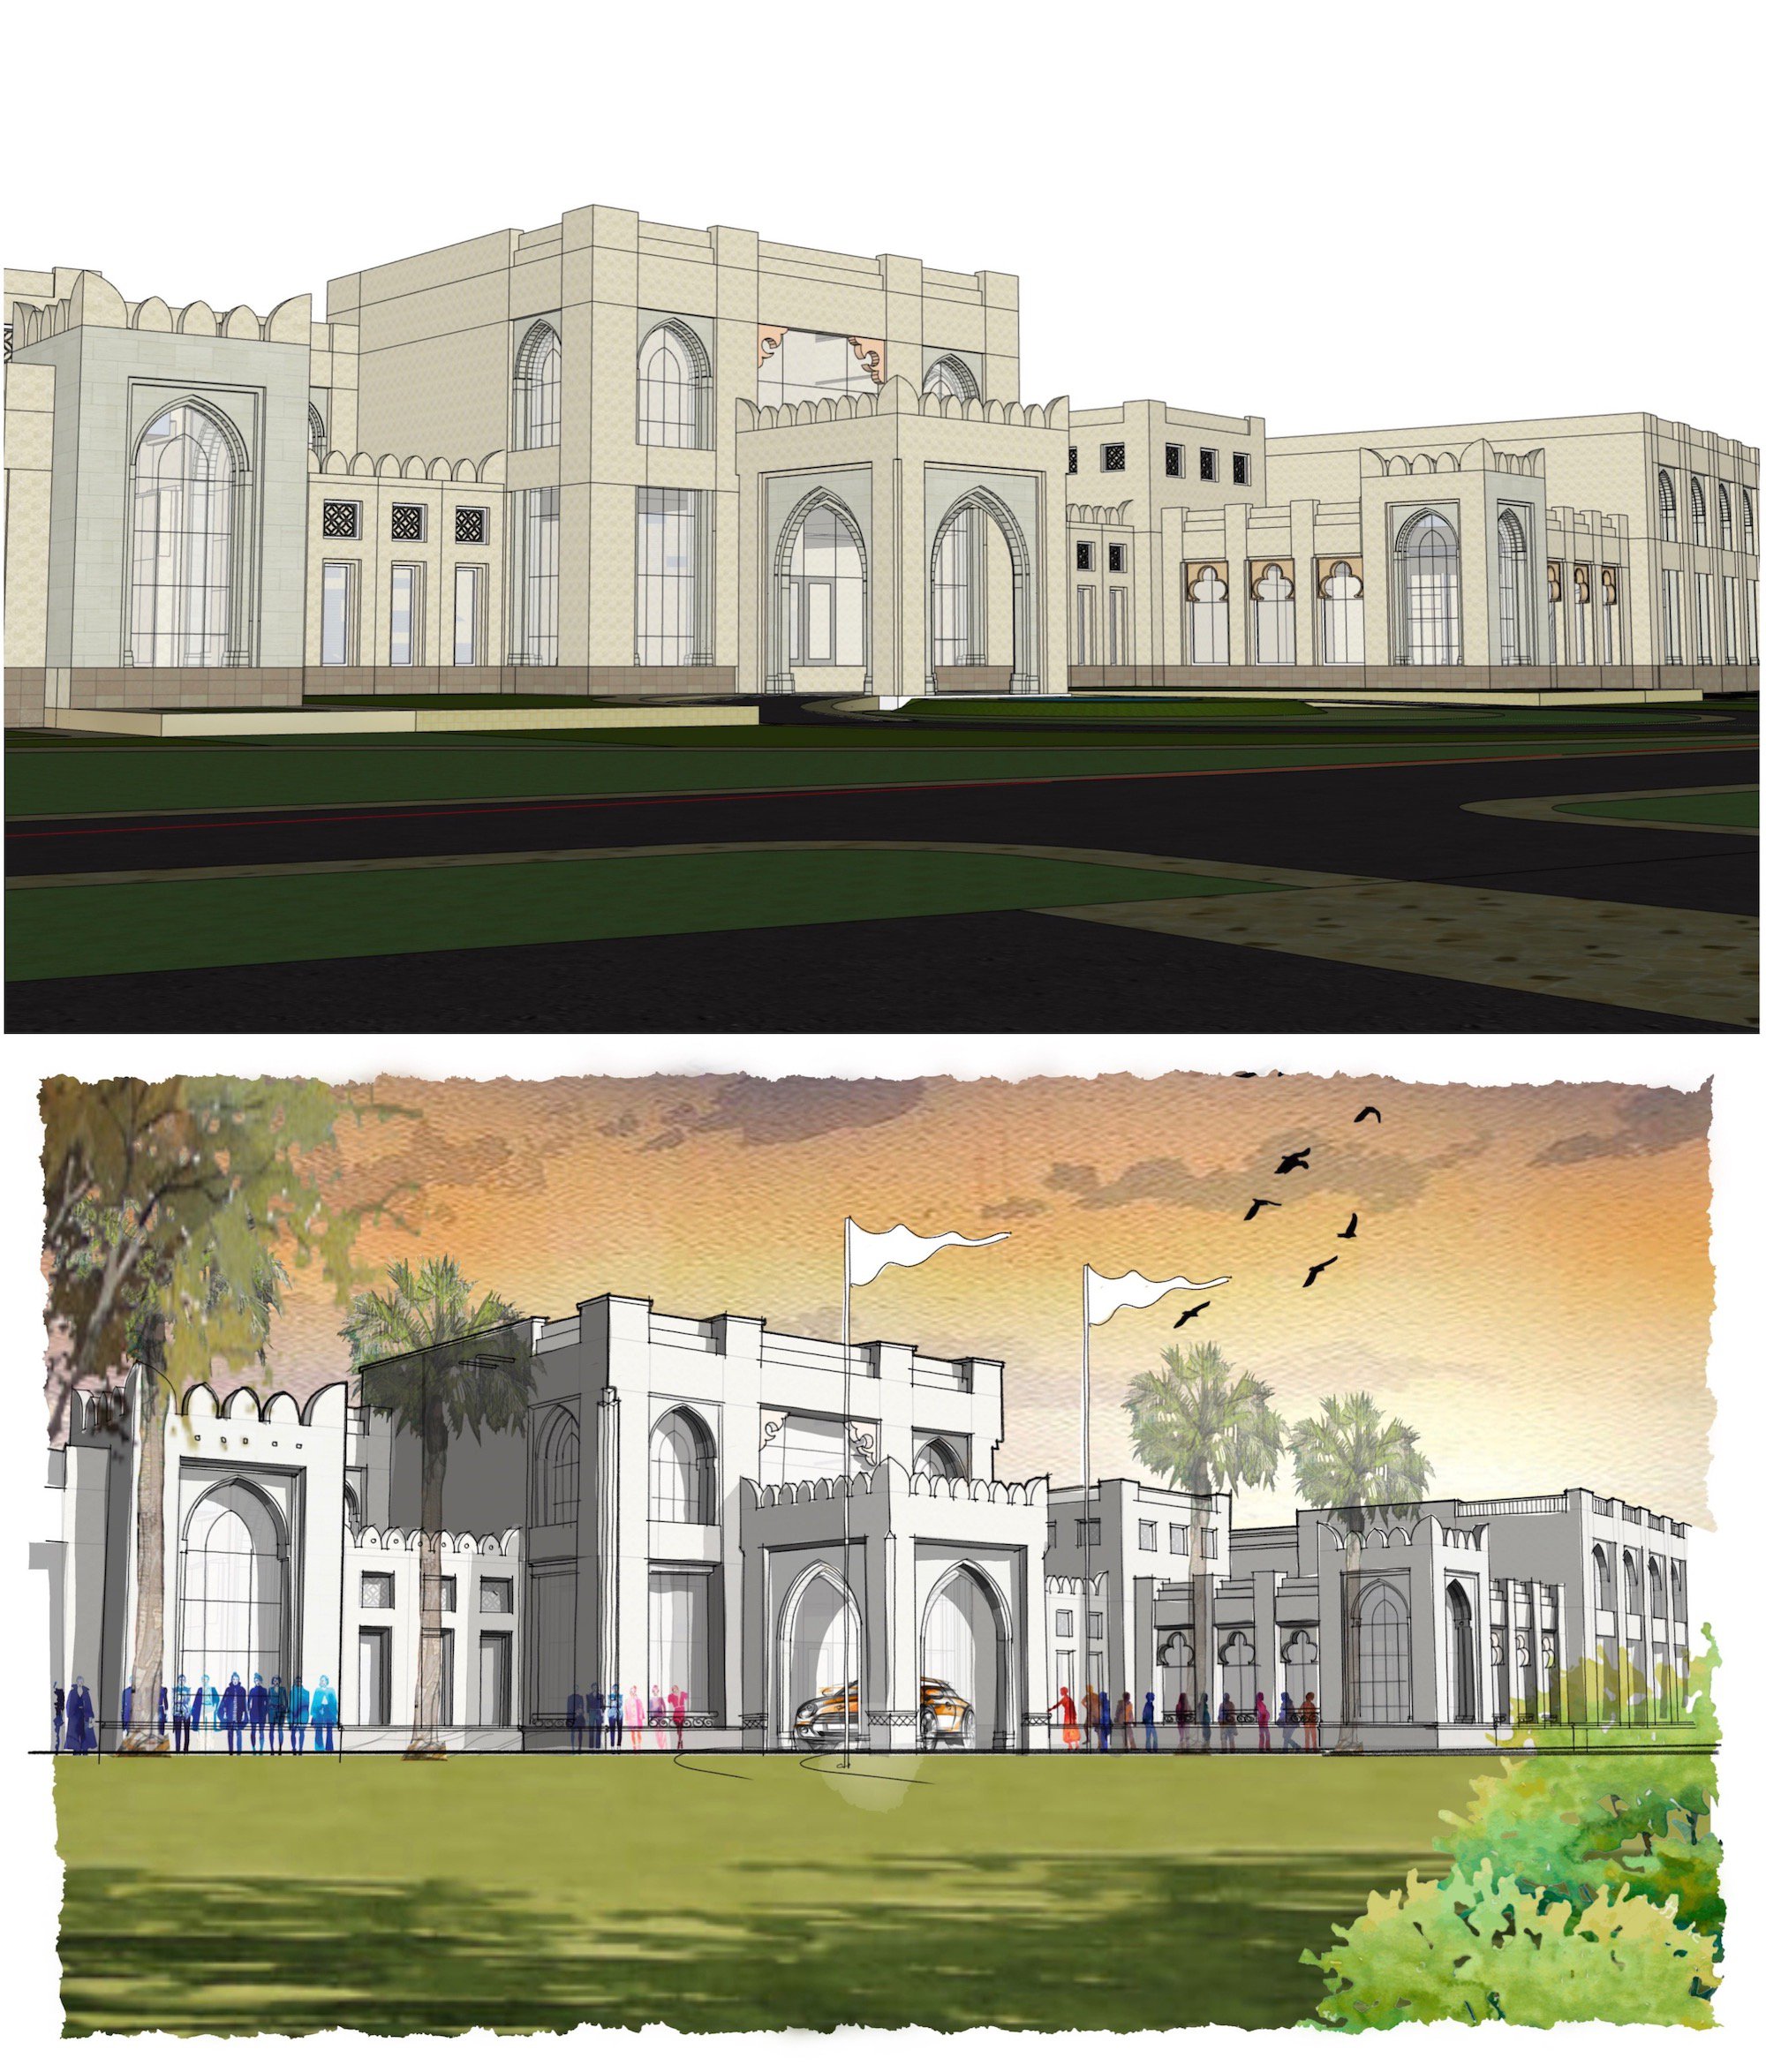
Another example of a massing study imported into Concepts and rendered.
Video Details
Taking a simple massing study to a fully presented perspective drawing is an easy task in Concepts. In this tutorial, we will import a basic 3D massing study from SketchUp based on the building's floor plan, and create a beautiful exterior study for the client using brushes, images and brand logos. (Learn how to create an Axonometric view in Concepts here. Learn how to draw a floor plan in Concepts here.)
Outlining the Design
1. After completing your simple 3D massing study in Sketchup, rotate your image to an attractive angle and export it as a JPG image (PDF is also fine).
2. Enter a new drawing in Concepts and tap the Import button. Select the photo from your images. While the photo is selected, lower the opacity to ~50%.
3. In a new layer, use the Soft Pencil at 100% smoothing and start outlining the details of your building.
4. Using the massing study as a general guide, add in additional details or alterations to your building. The more details you include, the better quality you will get. Apply a similar theme of details in each sketch to make the design cohesive.
5. You can use the massing study to envision multiple designs; drawing more than one version can help both you and your client to imagine the best alternative to the building design.
6. Once the main building is outlined, use a finer pencil width to apply detail work to the design, including visible inner window structures and any finer line work.
Rendering the Exterior
1. In a new layer below the pencil, use the Filled Stroke tool at ~20% opacity to apply shadows to your building sketch. Apply it more than once (or select and duplicate larger areas) for angles with deeper shading. The bottom areas of the building should be darkest, with fill applied up to three times.
2. Imagine where your lighting source comes from, highlighting the front of the building, wshadows moving toward the back. Apply a layer of fill as a secondary shadow to side angles. Then add drop shadows beneath windows and other structural details.
3. Remember to apply shadows to both sides of the wall. Use a single fill for the first overall shadow, then apply a shadow to the secondary wall again so it appears to diffuse.
4. Apply a blue fill to the glass to bring it out, then apply a low opacity black fill to darken the interior structures through the windows. This makes the glass appear more real and provides an additional sense of depth or relief to the structure.
5. To make your facade appear real, import an interior retail image and drop the opacity to ~50%. Apply the image to one section of the building, then just copy the image and apply it to multiple areas. Use the Hard Mask to hide any external areas outside the shops.
6. You can also import and apply brand logos for the shops to add a sense of atmosphere and realism. Use the control points to skew the logos to the angle of the drawing.
7. The multi-tasking feature of the iPad is the best way to import several assets at once and save some steps. Open your image file in one command center and continue to drag+drop images onto your canvas. You can also add several images to your selection and drag them onto the canvas at once.
8. Import a sky image into a background layer. Drop its opacity a little to see the lines behind, then place it. Use the Hard Mask tool to hide any extra areas behind the building. Hide any layers that get in the way of seeing the mask. Use 100% smoothing to outline the edges of the building, then remove the smoothing (set to 0%) and remove the inner parts quickly.
9. Use the Filled Stroke tool to apply a scenic curve to the outer landscape.
10. Next, populate the scene with crowds of people using transparent PNG objects or objects from the Concepts object library in-app. This helps to give context to the image and also adds a sense of scale to the building design. This is one of the funnest steps in the process and creates a polished presentation very quickly.
11. Adding some drop shadows to the people helps to blend them into the scene.
12. Add a watercolor-style tree to the corner of the image to tie the colors together and add some extra perspective. (For a tutorial on using the watercolor brush to create your own trees, read this tutorial.)
13. Finish the drawing by outlining the building with a thick black pen. This will add a sense of depth to the drawing and highlight the final product.
Brush Settings
0:43 - Overall Design Outline: Soft Pencil, .274 in, 100% Smoothing
3:53 - Curves: Soft Pencil, .274 in, 0 - 10% Smoothing
3:57 - Design Details: Soft Pencil, .274 in, 100% Smoothing
4:27 - Finer Design Details: Soft Pencil, .152 in, 100% Smoothing
5:11 - Shadows: Filled Stroke, Black, 20% Opacity
6:33 - Glass: Filled Stroke, Blue, 20% Opacity, Black, 20% Opacity
7:36 - Masking Background Image: Hard Mask, 2.45 in, 100% Opacity
10:20 - Hide Unnecessary Image Details: Filled Stroke, White, 100% Opacity
10:23 - Landscape Shadowing: Filled Stroke, Black, 17% Opacity
11:24 - Final Building Outline: Pen, Black, .326 in, 100% Opacity

Architect Osama Ahmad Elfar graduated from Alexandria University in 1992. He is a Partner at UNii Engineering Consultancy with offices in UAE, Qatar and Egypt. He has won several recognized design competitions. His work spans across many different building areas including high rise, mixed use, residential, commercial and hospitality. He has projects located in several countries including UAE, Qatar, Egypt, KSA, USA, Switzerland, Belgium, Oman, Libya and Japan. He also does design training, teaches courses and speaks at events.
Follow Osama on YouTube, Instagram and Facebook. Find more of his work at www.uniidesign.com and www.osamaelfar.com.
Content created by Osama Elfar
Edited by Lasse Pekkala
Text by Erica Christensen
Recommended
How to Clean Up a PDF or Image on Your iPad - 5 tricks to help you clean up your PDF or image on your iPad.
How to Create a Floor Plan - Everything you want to know about creating a floor plan in Concepts.
How to Use Objects and Make Your Own Objects - All about Concepts’ object libraries and how to make your own vector objects.